Apache Tomcat (earlier known as Jakarta Tomcat) is an open-source web server developed by Apache Foundation to provide a pure Java HTTP server, which will enable you to run Java files easily, which means that Tomcat is not a normal server like Apache or Nginx, because its main goal is to provide a good web environment to run Java applications only unlike other normal web servers.
This article will walk you throughout the installation of Apache Tomcat 9 on RHEL/CentOS 8/7/6.
For Ubuntu, follow How to Install Apache Tomcat in Ubuntu.
Step 1: Installing and Configuring Java
Before heading up for the Tomcat installation, make sure you must have JAVA installed on your Linux box to run Tomcat. If not, install the latest version of JAVA or use the following yum command to install available Java from the default repositories.
# yum install java-1.8.0-openjdk-devel  	#install JDK 8
OR
# yum install java-11-openjdk-devel		#install JDK 11
Once Java installed, you can verify the newly installed JAVA version running the following command on your system.
# java -version
Sample Output
openjdk version "11.0.4" 2019-07-16 LTS
OpenJDK Runtime Environment 18.9 (build 11.0.4+11-LTS)
OpenJDK 64-Bit Server VM 18.9 (build 11.0.4+11-LTS, mixed mode, sharing)
Step 2: Installing Apache Tomcat 9
After installing JAVA on the system, now it’s time to download the latest version of Apache Tomcat (i.e. 9.0.26) is the most recent stable version at the time of writing this article. If you want to make a cross-check, head over to following Apache download page and check if there is a newer version available.
Now download the latest version of Apache Tomcat 9, using following wget command and set up it as shown.
# cd /usr/local
# wget https://mirrors.estointernet.in/apache/tomcat/tomcat-9/v9.0.37/bin/apache-tomcat-9.0.37.tar.gz
# tar -xvf apache-tomcat-9.0.37.tar.gz
# mv apache-tomcat-9.0.37.tar.gz tomcat9
Note: Replace the version number above with the latest version available if it was different.
Before starting the Tomcat Service, configure a CATALINA_HOME environment variable in your system using the following command.
# echo "export CATALINA_HOME="/usr/local/tomcat9"" >> ~/.bashrc
# source ~/.bashrc
Now we all set to start the tomcat web server using the scripts provided by the tomcat package.
# cd /usr/local/tomcat9/bin
# ./startup.sh
Sample Output
Using CATALINA_BASE:   /usr/local/tomcat9
Using CATALINA_HOME:   /usr/local/tomcat9
Using CATALINA_TMPDIR: /usr/local/tomcat9/temp
Using JRE_HOME:        /usr
Using CLASSPATH:       /usr/local/tomcat9/bin/bootstrap.jar:/usr/local/tomcat9/bin/tomcat-juli.jar
Tomcat started.
Now to open Tomcat from your browser, go to your IP or domain with the 8080 port (because Tomcat will always run on the 8080 port) as an example: mydomain.com:8080, replace mydomain.com with your IP or domain.
http://Your-IP-Address:8080
OR
http://Your-Domain.com:8080
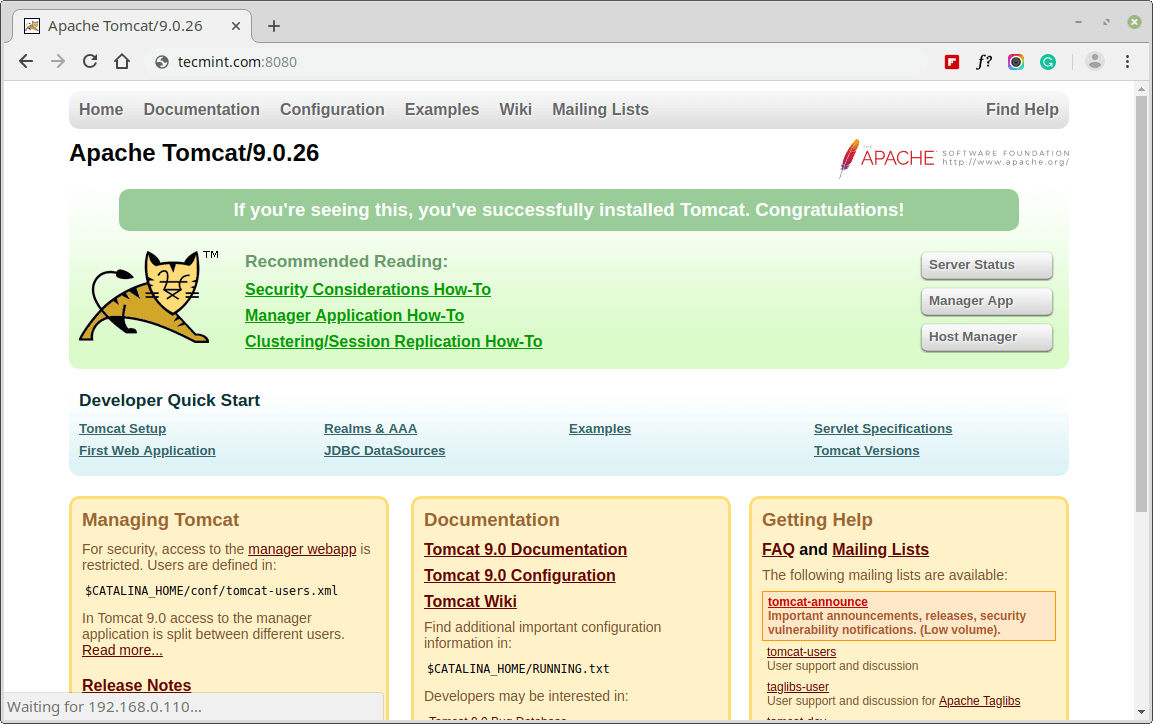
The default directory for Tomcat files will be in /usr/local/tomcat9, you can view the configuration files inside the conf folder, the main page that you have seen above, when you open your website on the 8080 port is in /usr/local/tomcat9/webapps/ROOT/.
Step 3: Configuring Apache Tomcat 9
By default you only able to access the default Tomcat page, to access admin and other sections like Server Status, Manager App and Host Manager. You need to configure user accounts for admins and managers.
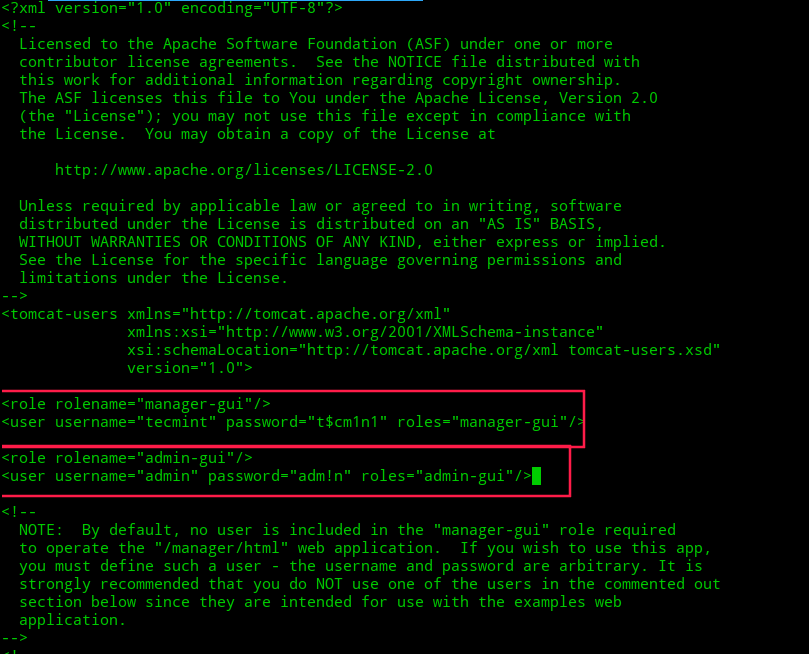
To do so, you need to edit the ‘tomcat-users.xml‘ file located under /usr/local/tomcat9/conf directory.
Setup Tomcat User Accounts
For example, to assign the manager-gui role to a user named ‘tecmint‘ with a password ‘t$cm1n1‘, add the following line of code to the config file inside the section.
# vi /usr/local/tomcat9/conf/tomcat-users.xml
<role rolename="manager-gui"/>
<user username="tecmint" password="t$cm1n1" roles="manager-gui"/>
Similarly, you can also add an ‘admin-gui‘ role to an admin user named ‘admin‘ with a password ‘adm!n‘ as shown below.
<role rolename="admin-gui"/>
<user username="admin" password="adm!n" roles="admin-gui"/>
Enable Remote Access to Tomcat
By default, access to the Manager and Host Manager section is restricted to the localhost only, to allow access to these pages, you need to mention IP address or network range in a configuration file.
# vi /usr/local/tomcat9/webapps/manager/META-INF/context.xml
Then look for the following line and change it to this to allow tomcat access from IP address 192.168.56.10.
allow="127\.\d+\.\d+\.\d+|::1|0:0:0:0:0:0:0:1 |192.168.56.10" />
You can also allow tomcat access from the local network 192.168.56.0.
allow="127\.\d+\.\d+\.\d+|::1|0:0:0:0:0:0:0:1 |192.168.56.*" /gt;
After setting up the admin and manager’s roles, restart the Tomcat and then try to access the admin section.
./shutdown.sh
./startup.sh
Now click on the ‘Server Status‘ tab, it will prompt you to enter user credentials, enter username and password that you’ve added above in the config file.
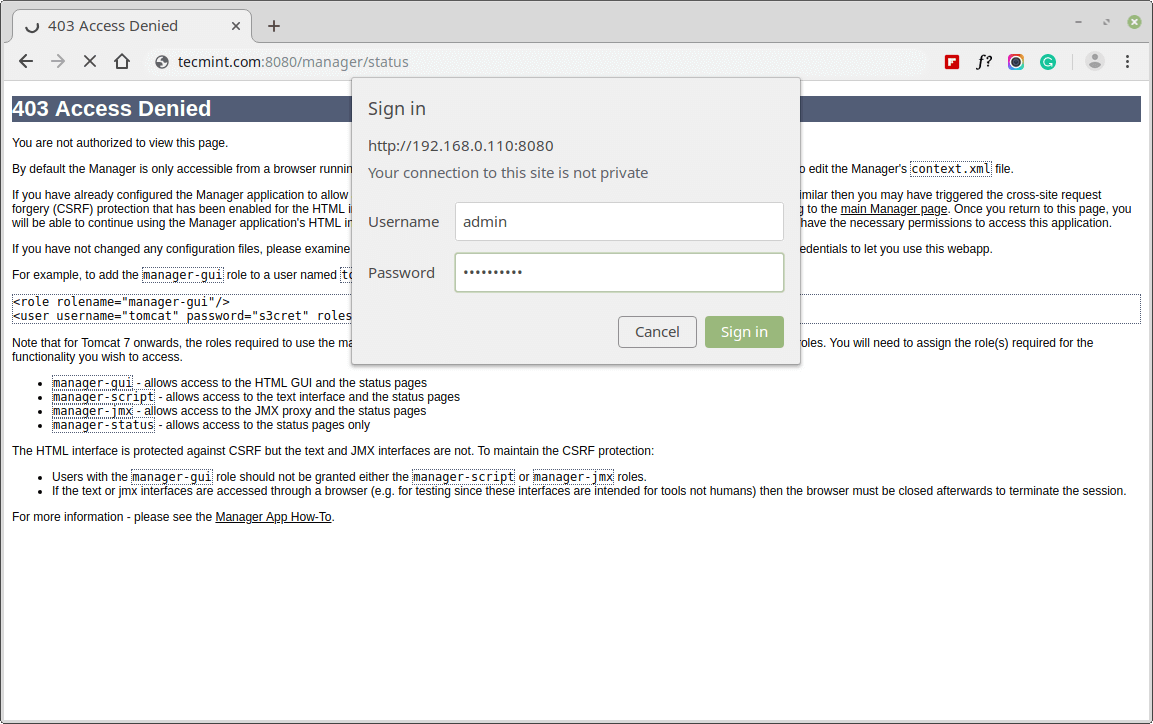
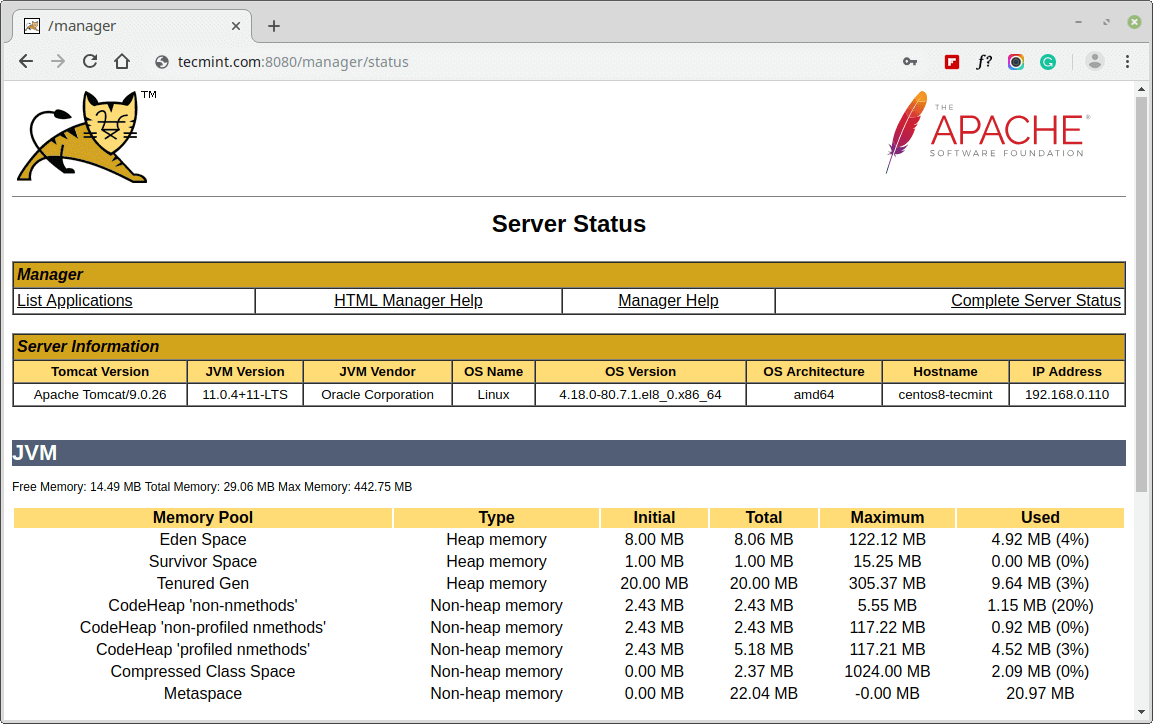
Once, you enter user credentials, you will find a page similar to below.
Changing Apache Tomcat Port
If you want to run Tomcat on different port say 80 port. You will have to edit the ‘server.xml‘ file in ‘/usr/local/tomcat9/conf/‘. Before changing, port, make sure to stop the Tomcat server using.
# /usr/local/tomcat9/bin/shutdown.sh
Now open the server.xml file using the Vi editor.
# vi /usr/local/tomcat9/conf/server.xml
Now search for “Connector port” and change its value from 8080 to 80 or any other port you want as it follows.

To save the file and restart the Apache Tomcat server again, using the below command.
# /usr/local/tomcat9/bin/startup.sh
That’s it, your Tomcat server will be running on the 80 port.
Of course, you have to run all the above commands as a root, if you don’t they won’t work because we are working on the ‘/usr/local‘ directory which is a folder owned by the root user only if you want you can run the server as a normal user but you will have to use your HOME folder as a working area to download, extract and run the Apache Tomcat server.
To get some information about your running Tomcat server and your computer, run.
/usr/local/tomcat9/bin/version.sh
Sample Output
Using CATALINA_BASE:   /usr/local/tomcat9
Using CATALINA_HOME:   /usr/local/tomcat9
Using CATALINA_TMPDIR: /usr/local/tomcat9/temp
Using JRE_HOME:        /usr
Using CLASSPATH:       /usr/local/tomcat9/bin/bootstrap.jar:/usr/local/tomcat9/bin/tomcat-juli.jar
NOTE: Picked up JDK_JAVA_OPTIONS:  --add-opens=java.base/java.lang=ALL-UNNAMED --add-opens=java.base/java.io=ALL-UNNAMED --add-opens=java.rmi/sun.rmi.transport=ALL-UNNAMED
Server version: Apache Tomcat/9.0.26
Server built:   Sep 16 2019 15:51:39 UTC
Server number:  9.0.26.0
OS Name:        Linux
OS Version:     4.18.0-80.7.1.el8_0.x86_64
Architecture:   amd64
JVM Version:    11.0.4+11-LTS
JVM Vendor:     Oracle Corporation
That’s it! Now you can start deploying JAVA based applications under Apache Tomcat 9. For more about how to deploy applications and create virtual hosts, check out the official Tomcat documentation.


How to enable port 8009 in apache tomcat 9?
Look in the server.xml file under the connector and update the “redirectPort=”8009“and make sure the 8009 port is enabled in the firewall deamon.
Hi, Guys,
How can I run tomcat from sub-domain, not domain.com:8080?
Regards
Use the below command after extracting the tar file.
NOTE: Don’t use the extension while moving the files to another directory
Correct @Lavanya!
Thanks, Tecmint for your support!
Hi,
I want to upgrade from Tomcat 8.5.34 to 8.5.51 on CentOS. Do I have to install the new Tomcat version manually for it or can this minor version be updated using yum?
@Saurabh,
You need to manually update Apache tomcat from sources, see this tomcat migration guide – http://tomcat.apache.org/migration-9.html
Above URL is not reachable .
@Sairam,
Thanks, corrected the Apache download link in the article to the latest version…
This was awesome, thanks a lot!!
Hi Id like to install SSL in tomcat any leads, please
@Shivanesh,
You can use Free Let’s Encrypt SSL for your Tomcat domain.
Hi Ravi
I have the certificates with my root, and intermediate.
I need to import them into jks format to install it in tomcat. However, I am unaware of the steps to cratering or the correct order to achieve this.
Hi Ravi,
Can you please provide any info on how to run tomcat9 as a service?
@Vinay,
To run Tomcat as service under CentOS, follow Step 3 under this article – https://www.tecmint.com/install-apache-tomcat-in-rhel-8/
I have installed httpd & tomcat 8 on centos7. My domain point to this at 80 port. How to map a subdomain to tomcat server through httpd or direct to tomcat alongside with httpd.
@Hein,
To map Tomcat Apps to sub-domain with apache.
First, add the following line to httpd.conf file.
ProxyRequests Off

<Proxy *>
  Order deny,allow
  Allow from all
</Proxy>
<VirtualHost *>
        ServerName somesystem.example.com
        RewriteEngine On
        ProxyPass / http://localhost:8080/myapp
        ProxyPassReverse / http://localhost:8080/myapp
</VirtualHost>
Restart apache.
Enable proxy support in Tomcat (conf/server.xml):
<Connector port="8080" protocol="HTTP/1.1"
               connectionTimeout="20000"
               redirectPort="8443" proxyPort="80" />
Finally, restart tomcat.
I am facing Service Unavailable error 503 with https
@Hein,
Create same Virtual Host configuration for your SSL vhost setup in the apache.
I have installed tomcat, can you explain how to configure the web servers?
Hi! I have made up to the point of opening tomcat with http://myipaddress:8080 and both the IP and domain options are not opening tomcat from putty.
@Sarah,
Please open the port 8080 of Tomcat on the firewall to access from the public network. Also let me know how you accessing the URL’s? and what error you getting?
Ravi,
I have tried in Microsoft Edge, which is telling me “Hmmm…can’t reach this page” and on Firefox which is telling me “the server is taking too long to respond”
I’m very new to this, can you briefly tell me how to open the port on the firewall?
Thank you.
@Sarah,
First try to access the Tomcat page from the server terminal itself at:
If it’s accessible from the localhost, you should open a port on firewall and allow Tomcat access from public IP.
Ravi,
That did not work for me. I opened up the firewall port 8080 and still nothing.
@Sarah,
Then you need to check your Tomcat installation and correct if you missed something..
I removed MC, but it wasn’t the reason.
It is really strange, that no errors where generated, only a zero byte length log file “catalina.out” was generated.
@Martin,
Thanks for your efforts, let’s give a final try by creating a systemd unit file, with this you can start, stop and enable the tomcat service..
Create and open the unit file by running this command:
Paste in the following script. Make sure to modify the memory allocation and path to tomcat installation settings that are specified in CATALINA_OPTS, CATALINA_HOME and CATALINA_PID:
Save and exit. This script tells the server to run the Tomcat service as the tomcat user, with the settings specified.
Now reload Systemd to load the Tomcat unit file and start & enable the service.
Hi Ravi
I’m familiary with this. Running Tomcat as a service will fail too with the same behaviour.
Thanks for this helpful tutorial. I used this article with other sources of information to get a clean installation.
In my case Tomcat does not start, if i execute “./startup.sh” which goes to “catalina.sh start“. Only an empty log file “catalina.out” was generated.
If i run “./catalina.sh run“, tomcat starts and works. In this case, Tomcat runs in the current window.
Now something weird: If the “Midnight Commander” is active and i run “./startup.sh“, it works!
Looks kind of a shell problem.
I’m really stuck, any idea where to look?
Cheers!
@Martin,
This is something really weird thing, I came across, have you tried on different terminal shell?
I have a standard CentOS 7 installation like others have. i’m not really sure, if it a good idea to change the shell systemwide. Keep in mind, that tomcat behaves the same, if i try to start the service instead on the command prompt.
I understand that’s not the perfect way, but could you remove MC and see?
I’m sorry, i didn’t not see your reply. I have removed MC, but it didn’t changed the situation.
Hi Ravi,
We are not able to install tomcat, getting the below error as follows.
[root@usa0300lv6529 local]# yum install http://www-us.apache.org/dist/tomcat/tomcat-9/v9.0.12/bin/apache-tomcat-9.0.12.tar.gz
Loaded plugins: product-id, search-disabled-repos
No package http://www-us.apache.org/dist/tomcat/tomcat-9/v9.0.12/bin/apache-tomcat-9.0.12.tar.gz available.
Error: Nothing to do
[root@usa0300lv6529 local]#
@Jaipalreddy,
Yeah the link to tomcat download as broken, use this new version tomcat link to download it.
Hi Ravi,
Thanks for your quick response.But we are unable to install tomcat. please find below status,
[root@usa0300lv6529 ~]# wget http://www-us.apache.org/dist/tomcat/tomcat-9/v9.0.14/bin/apache-tomcat-9.0.14.tar.gz
bash: wget: command not found
[root@usa0300lv6529 ~]#
Kindly reply.
@Jaipalreddy,
The error clearly saying that you need to have wget tool to have in the system to download files. You can install wget using yum command as shown.
403 Access Denied
You are not authorized to view this page.
Sir how to fix this problem? please help me….
While downloading the Tomcat 8 using the below url am getting error, i suggest you to change the new url and update it
wget http://ftp.itu.edu.tr/Mirror/Apache/tomcat/tomcat-8/v8.0.9/bin/apache-tomcat-8.0.9.tar.gz
–2018-09-23 12:45:51– http://ftp.itu.edu.tr/Mirror/Apache/tomcat/tomcat-8/v8.0.9/bin/apache-tomcat-8.0.9.tar.gz
Resolving http://ftp.itu.edu.tr... 160.75.25.15
Connecting to http://ftp.itu.edu.tr|160.75.25.15|:80… connected.
HTTP request sent, awaiting response… 404 Not Found
2018-09-23 12:45:51 ERROR 404: Not Found.
@Zaid,
I’ve udpated the article with the latest Apache Tomcat 9 installation instructions..
Issue while running shutdown.sh in tomcat
Using CATALINA_BASE: /opt/tomcat
Using CATALINA_HOME: /opt/tomcat
Using CATALINA_TMPDIR: /opt/tomcat/temp
Using JRE_HOME: /usr/
Using CLASSPATH: /opt/tomcat/bin/bootstrap.jar
Error: Could not find or load main class org.apache.catalina.startup.Bootstrap
Please help ..
Thanks
Kiran
bootstrap.jar is not present in tomcat/bin how to generate it ..
Sorry got it, it’s my mistake downloaded src file instead of bin file.
I need to install Apache 2.3.2 on Haswell processor which only support RHEL 6.xx. Whereas Apache being 32bit, I am not able to install it. Is there is any way out considering I cannot change any version of OS or Apache.
@Abhishek,
The only way is to compile it from source…
Hi Hanny Helal, i believe you are the best instructor, i dont have no problem like you are next to me. However i really want you to explain how can we install the weblogic and how to setting up. Thank you so much Hanny H.
I followed your instructions to the teeth. Zero problems. Worked like a charm. I have to say, this is the best instruction on installing apache-tomcat on the entire internet. I do not say this lightly. First time, I comment on any website when looking for information
I cannot open tomcat when i navigate to my server IP address.
Maybe there is some configuration error or i just didn’t follow good on the commands here.
I checked this tutorial: https://www.rosehosting.com/blog/installing-tomcat-8-on-a-centos-7-linux-vps/ and it is very similar to this, but somehow everything worked OK after completing the one article from Rosehosting.
Thanks…………….nice and simple tutorial………….it’s working on my centos 6.0
Hello there,
I’ve installed with no error. But its not working. When i visit my ip it can’t open.
root@localhost:/opt/apache-tomcat-8.0.9/bin# ./startup.sh
Using CATALINA_BASE: /opt/apache-tomcat-8.0.9
Using CATALINA_HOME: /opt/apache-tomcat-8.0.9
Using CATALINA_TMPDIR: /opt/apache-tomcat-8.0.9/temp
Using JRE_HOME: /usr
Using CLASSPATH: /opt/apache-tomcat-8.0.9/bin/bootstrap.jar:/opt/apache-tomcat-8.0.9/bin/tomcat-juli.jar
Tomcat started.
Please look above output, there was no error.
can you please tell whats going there?
Hello Aminul.
Yes, in the output there is no error as i can see, ./startup.sh is just telling you the CATALINA_BASE, CATALINA_HOME…etc paths which Tomcat will use to run other files, those variables are necessary to run Tomcat and ./startup.sh is setting them.
Thanks.