Stratis is one of the new features that ships with RHEL distribution. Stratis is a local storage management solution that focuses on simplicity and improved usability while at the same time providing access to advanced storage features. It uses the XFS file system and grants you access to advanced storage capabilities such as:
- Thin provisioning
- File system snapshots
- Tiering
- Pool-based management
- Monitoring
Basically, Stratis is a storage pool that is created from one or more local disks or disk partitions. Stratis helps a System administrator set up and manage complex storage configurations.
Before we proceed further, let us have a look at some of the technical terms you are bound to bump into as we go along:
- pool: A pool is made up of one or more block devices. The total size of the pool is equal to the sum total of the block devices.
- blockdev: As you might have guessed it this refers to block devices such as disk partitions.
- Filesystem: A filesystem is a thinly provisioned layer which does not come as a total fixed size. The filesystem’s actual size grows as data is added. Stratis automatically grows the size of the filesystem as data size nears the virtual size of the file system.
Block devices that you can use with Stratis include:
- LVM Logical Volumes
- LUKS
- SSDs (Solid State Drives)
- Device Mapper Multipath
- iSCSI
- HDDs (Hard Disk Drives)
- mdraid
- NVMe storage devices
Software Components of Stratis
Stratis provides 2 software utilities:
- Stratis-cli: This is the command-line tool that ships with Stratis.
- Stratisd daemon: This is a daemon that creates and manages block devices and plays a role in providing a DBUS API.
How to Install Stratis on RHEL 9/8
Having looked at what Stratis is and defined a few terminologies. Let’s now install and configure Stratis on RHEL 9/8 distribution (also works on CentOS 8).
Install Stratis on RHEL 9/8
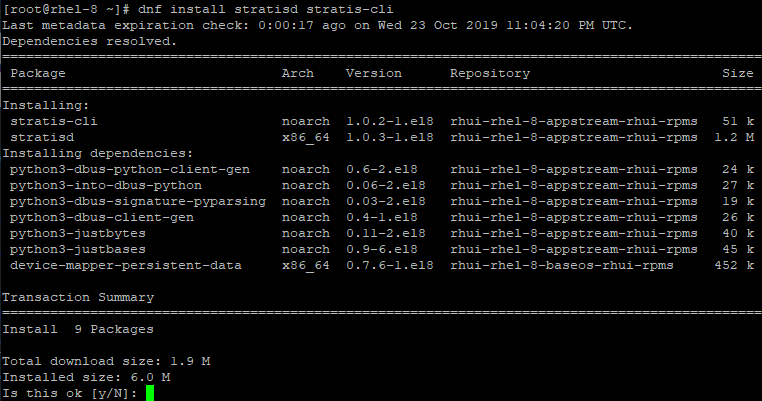
Let’s see how you can install Stratis on your RHEL 9/8 system, log in as root user and run the command.
# dnf install stratisd stratis-cli
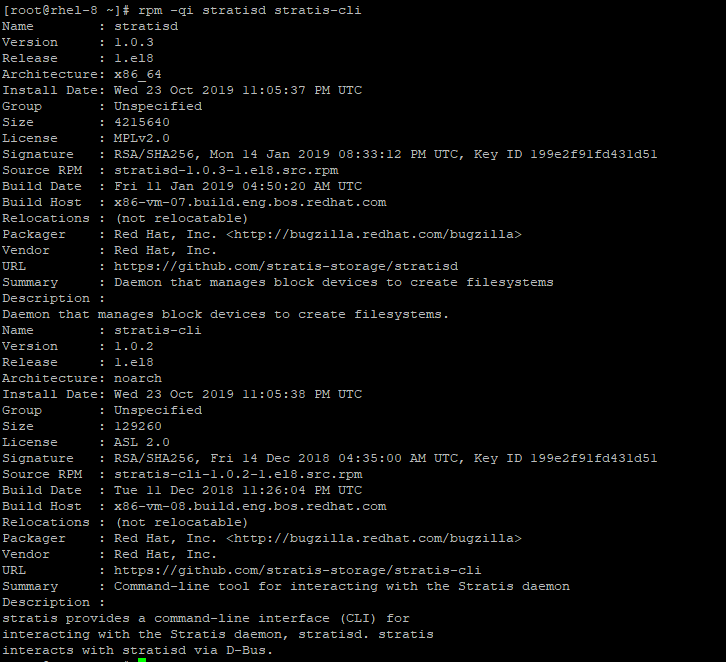
To find more information about the installed packages run the command.
# rpm -qi stratisd stratis-cli
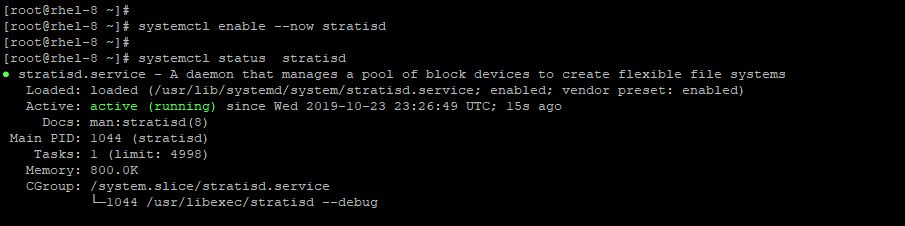
After the successful installation of Stratis, start the service by running the command.
# systemctl enable --now stratisd
To check the status of Stratis, run the command.
# systemctl status stratisd
Create a Stratis Pool
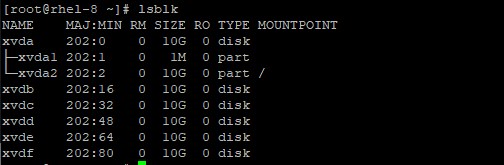
To create a Stratis pool you need block devices that are not in use or mounted. Also, it is assumed that Stratisd service is up and running. Additionally, the block devices that you are going to use need to be at least 1 GB in size.
On our RHEL 9/8 system, we have four additional block devices: /dev/xvdb, /dev/xvdc, /dev/xvdd, /dev/xvde. To display the block devices, run the lsblk command.
# lsblk
None of these block devices should have a partition table. You can confirm this using the command.
# blkid -p /dev/xvdb

If you get no output, then it means that your block devices do not have any partition table residing on them. However, in the event that a partition table exists, you can wipe it using the command:
# wipefs -a /<device-path>
Create a Stratis Pool from One Block Device
You can create a Stratis pool from a single block device using the syntax.
# stratis pool create <pool-name> <block-device>
For example to create a pool from /dev/xvdb run the command.
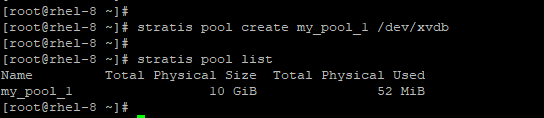
# stratis pool create my_pool_1 /dev/xvdb
To confirm the created pool run.
# stratis pool list
Create a Stratis Pool from Multiple Block Devices
To create a pool from multiple devices, use the syntax below listing all the devices on one line.
# stratis pool create <pool_name> device-1 device-2 device-n
To create a pool from /dev/xvdc, /dev/xvdd and /dev/xvde run the command.
# stratis pool create my_pool_2 /dev/xvdc /dev/xvdd/ /dev/xvde
Once again, list the pools available using the command.
# stratis pool list
At this point, you should have 2 pools: my_pool_1 and my_pool_2.

As you can see above, the hard disk space occupied by pool my_pool_2 is thrice that of the first pool which we created from only one block device with a memory of 10GB.
Create a Filesystem from a Pool
Having created your filesystem, you can create a filesystem from one of the pools using the syntax.
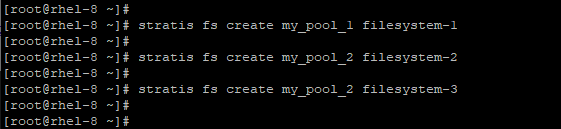
# stratis fs create <poolname> <filesystemname>
For instance, to create filesystem-1 and filesystem-2 from my_pool_1 and my_pool_2 respectively run commands:
# stratis fs create my_pool_1 filesystem-1
# stratis fs create my_pool_2 filesystem-2
To view the newly created filesystems, run the command.
# stratis fs list

To narrow down the results of a file system to one pool, run the command:
# stratis fs list <poolname>
For instance, to check the filesystem in my_pool_2 run the command.
# stratis fs list my_pool_2

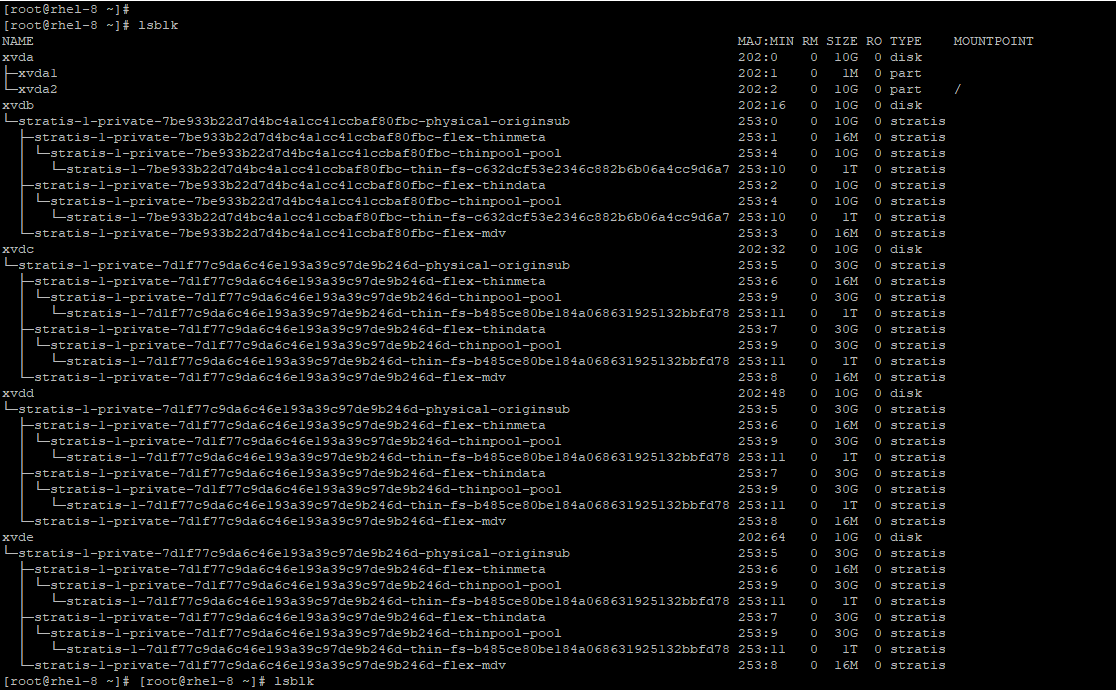
Now, if you run the lsblk command, the output should be somewhat similar to the sample output below.
# lsblk
Mounting a Stratis Filesystem
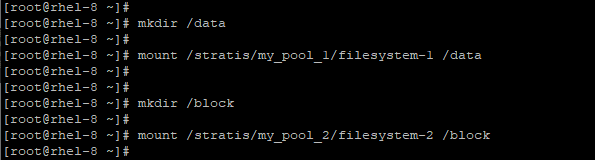
We are now going to mount the existing filesystems in order to access them. First, create the mount points.
For the filesystem in the first pool, run the command:
# mkdir /data
# mount /stratis/my_pool_1/filesystem-1 /data
For the second filesystem in the second pool, run the command.
# mkdir /block
# mount /stratis/my_pool_2/filesystem-2 /block
To verify the existence of the current mount points run df command:
# df -Th | grep stratis

Perfect! We can clearly see that our mount points are present.
Persistently Mount Stratis Filesystems
The mount points that we have just created cannot survive a reboot. To make them persistent, first obtain the UUID of each of the filesystems:
# blkid -p /stratis/my_pool_1/filesystem-1
# blkid -p /stratis/my_pool_2/filesystem-2

Now proceed and copy the UUID’s and mount point options to /etc/fstab as shown.
# echo "UUID=c632dcf5-3e23-46c8-82b6-b06a4cc9d6a7 /data xfs defaults 0 0" | sudo tee -a /etc/fstab
# echo "UUID=b485ce80-be18-4a06-8631-925132bbfd78 /block xfs defaults 0 0" | sudo tee -a /etc/fstab

For the system to register the new configuration run the command:
# systemctl daemon-reload
To verify the configuration works as expected, mount the filesystems.
# mount /data
# mount /block
Removing a Stratis Filesystem
To remove a filesystem, you need to, first of all, unmount the file system as shown.
# umount /mount-point
In this case, we shall have.
# umount /data
To destroy the filesystem, use the syntax:
# stratis filesystem destroy <poolname> <filesystem-name>
So, we shall have:
# stratis filesystem destroy my_pool_1 filesystem-1

To confirm the removal of the filesystem, issue the command.
# stratis filesystem list my_pool_1

From the output, we can clearly see that the filesystem associated with my_pool_1 has been deleted.
Adding a Disk to an Existing Stratis Pool
You can add a disk to an existing pool using the command:
# stratis pool add-data <poolname> /<devicepath>
For example, to add an additional disk /dev/xvdf, to my_pool_1, run the command:
# stratis pool add-data my_pool_1 /dev/xvdf
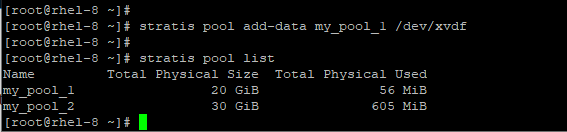
Notice that the size of my_pool_1 has double in size after adding the extra volume.
Create Stratis Snapshots
A snapshot is a thinly provisioned read and writes a copy of a filesystem at a given point in time.
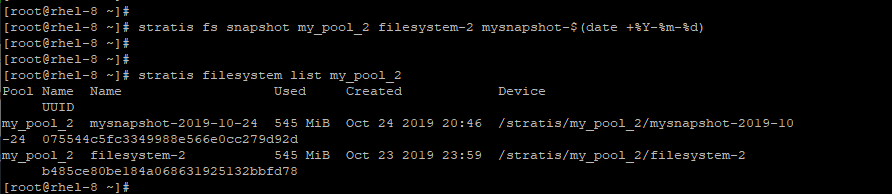
To create a snapshot, run the command:
# stratis fs snapshot <poolname> <fsname> <snapshotname>
In this case, the command will be:
# stratis fs snapshot my_pool_2 filesystem-2 mysnapshot
You can append the data attribute -$(date +%Y-%m-%d) to the snapshot add the date tag as shown in the screenshot below.
To verify the creation of the snapshot, run the command:
# stratis filesystem list <poolname>
In this case, the command will be:
# stratis filesystem list my_pool_2
Reverting to a Previous Snapshot Using a Filesystem
To revert a Stratis filesystem to a previously created snapshot, first, unmount and destroy the original filesystem.
# umount /stratis/<poolname>/filesystem
In our scenario, this will be.
# umount /stratis/my_pool_2/filesystem-2
Then create a copy of the snapshot using the original file system:
# stratis filesystem snapshot <poolname> filesystem-snapshot filesystem
The command will be:
# stratis filesystem snapshot my_pool_2 mysnapshot-2019-10-24 block
Finally, mount the snapshot.
# mount /stratis/my-pool/my-fs mount-point
Removing a Stratis Snapshot
To remove the snapshot, first, unmount the snapshot.
# unmount /stratis/my_pool_2/mysnapshot-2019-10-24

Next, proceed and destroy the snapshot:
# stratis filesystem destroy my_pool_2 mysnapshot-2019-10-24

Removing a Stratis Pool
To remove a Stratis pool, follow the simple steps below.
1. List the filesystems that exist in the pool.
# stratis filesystem list <poolname>
2. Next, unmount all the filesystems in the pool.
# umount /stratis//filesystem-1
# umount /stratis//filesystem-2
# umount /stratis//filesystem-3
3. Destroy the filesystems.
# stratis filesystem destroy <poolname> fs-1 fs-2
4. And then, get rid of the pool.
# stratis pool destroy poolname
In this case, the syntax will be.
# stratis pool destroy my_pool_2
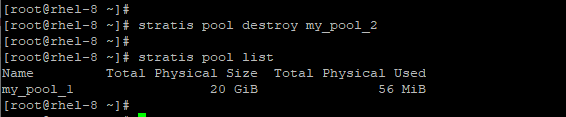
You can verify the pool list again.
# stratis pool list
Finally, remove the entries in the /etc/fstab for the filesystems.
We have come to the end of the guide. In this tutorial, we shed light on how you can install and use Stratis to manage layered local storage on RHEL. We do hope you found it useful. Give it a shot and let us know how it went.


Having created your filesystem,
should be
Having created your pools,