DHCP (Dynamic Host Configuration Protocol) is a network protocol that enables a server to automatically assign an IP address and provide other related network configuration parameters to a client on a network, from a pre-defined IP pool.
This means that each time a client (connected to the network) boots up, it gets a “dynamic” IP address, as opposed to “static” IP address that never changes. The IP address assigned by a DHCP server to DHCP client is on a “lease”, the lease time can vary depending on how long a client is likely to require the connection or DHCP configuration.
In this tutorial, we will cover how to install and configure a DHCP server in CentOS/RHEL and Fedora distributions.
Testing Environment Setup
We are going to use following testing environment for this setup.
DHCP Server - CentOS 7
DHCP Clients - Fedora 25 and Ubuntu 16.04
How Does DHCP Work?
Before we move any further, let’s briefly explain how DHCP works:
- When a client computer (configured to use DHCP) and connected to a network is powered on, it forwards a DHCPDISCOVER message to the DHCP server.
- And after the DHCP server receives the DHCPDISCOVER request message, it replies with a DHCPOFFER message.
- Then the client receives the DHCPOFFER message, and it sends a DHCPREQUEST message to the server indicating, it is prepared to get the network configuration offered in the DHCPOFFER message.
- Last but not least, the DHCP server receives the DHCPREQUEST message from the client, and sends the DHCPACK message showing that the client is now permitted to use the IP address assigned to it.
Step 1: Installing DHCP Server in CentOS
1. Installing DCHP is quite straight forward, simply run the command below.
# yum -y install dhcp
Important: Assuming there is more than one network interface attached to the system, but you want the DHCP server to only be started on one of the interfaces, set the DHCP server to start only on that interface as follows.
2. Open the file /etc/sysconfig/dhcpd, add the name of the specific interface to the list of DHCPDARGS, for example if the interface is eth0, then add:
DHCPDARGS=eth0
Save the file and exit.
Step 2: Configuring DHCP Server in CentOS
3. For starters, to setup a DHCP server, the first step is to create the dhcpd.conf configuration file, and the main DHCP configuration file is normally /etc/dhcp/dhcpd.conf (which is empty by default), it keeps all network information sent to clients.
However, there is a sample configuration file /usr/share/doc/dhcp*/dhcpd.conf.sample, which is a good starting point for configuring a DHCP server.
And, there are two types of statements defined in the DHCP configuration file, these are:
- parameters – state how to carry out a task, whether to perform a task, or what network configuration options to send to the DHCP client.
- declarations – specify the network topology, define the clients, offer addresses for the clients, or apply a group of parameters to a group of declarations.
Therefore, start by copying the sample configuration file as the main configuration file like so:
# cp /usr/share/doc/dhcp-4.2.5/dhcpd.conf.example /etc/dhcp/dhcpd.conf
4. Now, open the main configuration file and define your DHCP server options:
# vi /etc/dhcp/dhcpd.conf
Start by setting the following global parameters which will apply to all the subnetworks (do specify values that apply to your scenario) at the top of the file:
option domain-name "tecmint.lan";
option domain-name-servers ns1.tecmint.lan, ns2.tecmint.lan;
default-lease-time 3600;
max-lease-time 7200;
authoritative;
5. Now, define a subnetwork; in this example, we will configure DHCP for 192.168.56.0/24 LAN network (remember to use parameters that apply to your scenario):
subnet 192.168.56.0 netmask 255.255.255.0 {
        option routers                  192.168.56.1;
        option subnet-mask              255.255.255.0;
        option domain-search            "tecmint.lan";
        option domain-name-servers      192.168.56.1;
        range   192.168.56.10   192.168.56.100;
        range   192.168.56.120  192.168.56.200;
}
Step 3: Assign Static IP to DHCP Client
You can assign a static IP address to a specific client computer on the network, simply define the section below in /etc/dhcp/dhcpd.conf file, where you must explicitly specify it’s MAC addresses and the fixed IP to be assigned:
host ubuntu-node {
	 hardware  ethernet 00:f0:m4:6y:89:0g;
	 fixed-address 192.168.56.105;
 }

host fedora-node {
	 hardware  ethernet 00:4g:8h:13:8h:3a;
	 fixed-address 192.168.56.110;
 }
Save the file and close it.
Note: You can find out or display the Linux MAC address using following command.
# ifconfig -a eth0 | grep HWaddr
6. Now start the DHCP service for the mean time and enable it to start automatically from the next system boot, using following commands:
---------- On CentOS/RHEL 7 ----------
# systemctl start dhcpd
# systemctl enable dhcpd

---------- On CentOS/RHEL 6 ----------
# service dhcpd start
# chkconfig dhcpd on
7. Next, do not forget to permit DHCP service (DHCPD daemon listens on port 67/UDP) as below:
---------- On CentOS/RHEL 7 ----------
# firewall-cmd --add-service=dhcp --permanent
# firewall-cmd --reload

---------- On CentOS/RHEL 6 ----------
# iptables -A INPUT -p tcp -m state --state NEW --dport 67 -j ACCEPT
# service iptables save
Step 4: Configuring DHCP Clients
8. Now, you can configure your clients on the network to automatically receive IP addresses from the DHCP server. Login to the client machine and modify the Ethernet interface configuration file as follows (take not of the interface name/number):
# vi /etc/sysconfig/network-scripts/ifcfg-eth0
Add the options below:
DEVICE=eth0
BOOTPROTO=dhcp
TYPE=Ethernet
ONBOOT=yes
Save the file and exit.
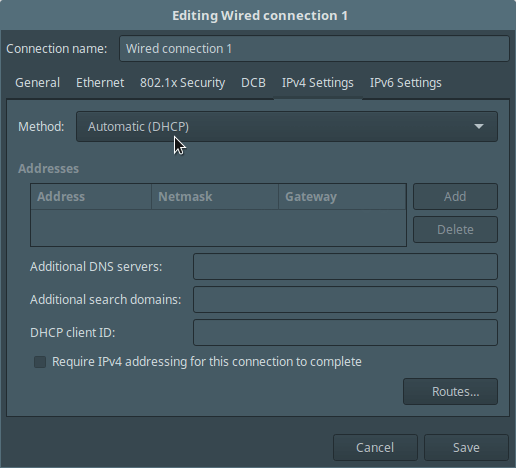
9. You can also perform the settings using the GUI on a desktop computer, set the Method to Automatic (DHCP) as shown in the screenshot below (Ubuntu 16.04 desktop).
10. Then restart network services as follows (you can possibly reboot the system):
---------- On CentOS/RHEL 7 ----------
# systemctl restart network

---------- On CentOS/RHEL 6 ----------
# service network restart
At this point, if all settings were correct, your clients should be receiving IP addresses automatically from the DHCP server.
You may also read:
- How to Install and Configure Multihomed ISC DHCP Server on Debian Linux
- 10 Useful “IP” Commands to Configure Network Interfaces
In this tutorial, we showed you how to setup a DHCP server in RHEL/CentOS. Use the comment form below to write back top us. In an upcoming article, we will show you how to setup a DHCP server in Debian/Ubuntu. Until then, always stay connected to TecMint.


Hi,
Thanks for the guide.
Just a quick question/comment:
In step 7 you mentioned (correctly) that DHCP Daemon is listening on 67/UDP but in the iptables config, you allowed 67/TCP. Is there a reason for that or is it just a typo?
@looseking
It is a typo, thanks for mentioning.
Thanks, Aaron,
In subnet configuration why 2 range are specified, skipped 101 till 119? Also, there are 2 domain-name-server, but in subnet config only 1 IP mentioned any specific reason?
Hi, it is great thank you so much. I would like to ask one question.
In syntax fixed ip address could we have script to add the syntax auto into dhcp configuration file.
For example: one client has mac address: AA:BB:CC:DD:EE and got ip address from dhcp server 192.168.56.10. Does have any script to add syntax automatic to dhcp configuration for fixed this ip address for client that has such mac address after client got IP address.
@Sarith
Sure, this is possible with a script. But you have to put in a little work to come up with such a script. We can’t tell if there is one out there, but we believe it is possible to write one.
hello Aaron,
Thanks for your kindly words. If you want to touch any of this topics, send me a mail, and I could show some triks. I would like to wrote such kind of tutorials, but my time is very limited and the most important, my English is very bad.
You know, nobody is perfect (my case only) ;)
@lulian
Welcome, i’ll definitely contact you for some ideas. Many thanks for always following us.
Hello to all
This tutorial it is good for a basic dhcp server. Maybe few ideas for your next post about dhcp:
dhcp is very complicated and has a lot of options, some of unusually dhcpd usage but very useful:
And because dhcp use udp, you need a decent network.
And not last, in some situations, dhcp-relay could be very useful.
@lulian
Sure, many thanks for the useful info, we’ll consider this in future articles.