Dynamic Host Control Protocol (DHCP) offers an expedited method for network administrators to provide network layer addressing to hosts on a constantly changing, or dynamic, network. One of the most common server utilities to offer DHCP functionality is ISC DHCP Server. The goal of this service is to provide hosts with the necessary network information to be able to communicate on the networks in which the host is connected. Information that is typically served by this service can include: DNS server information, network address (IP), subnet mask, default gateway information, hostname, and much more.
This tutorial will cover ISC-DHCP-Server version 4.2.4 on a Debian 7.7 server that will manage multiple virtual local area networks (VLAN) but can very easily be applied to a single network setup as well.
The test network that this server was setup on has traditionally relied on a Cisco router to manage the DHCP address leases. The network currently has 12 VLANs needing to be managed by one centralized server. By moving this responsibility to a dedicated server, the router can regain resources for more important tasks such as routing, access control lists, traffic inspection, and network address translation.
The other benefit to moving DHCP to a dedicated server will, in a later guide, involve setting up Dynamic Domain Name Service (DDNS) so that new host’s host-names will be added to the DNS system when the host requests a DHCP address from the server.
Step 1: Installing and Configuring ISC DHCP Server
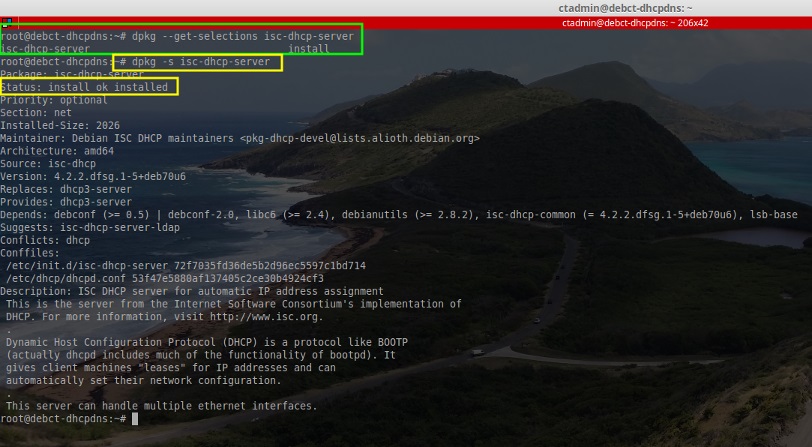
1. To start the process of creating this multi-homed server, the ISC software needs to be installed via the Debian repositories using the ‘apt‘ utility. As with all tutorials, root or sudo access is assumed. Please make the appropriate modifications to the following commands.
# apt-get install isc-dhcp-server 		[Installs the ISC DHCP Server software]
# dpkg --get-selections isc-dhcp-server		[Confirms successful installation]
# dpkg -s isc-dhcp-server 			[Alternative confirmation of installation]
2. Now that the server software is confirmed installed, it is now necessary to configure the server with the network information that it will need to hand out. At the bare minimum, the administrator needs to know the following information for a basic DHCP scope:
- The network addresses
- The subnet masks
- The range of addresses to be dynamically assigned
Other useful information to have the server dynamically assign includes:
- Default gateway
- DNS server IP addresses
- The Domain Name
- Host name
- Network Broadcast addresses
These are merely a few of the many options that the ISC DHCP server can handle. To get a complete list as well as a description of each option, enter the following command after installing the package:
# man dhcpd.conf
3. Once the administrator has concluded all the necessary information for this server to hand out it is time to configure the DHCP server as well as the necessary pools. Before creating any pools or server configurations though, the DHCP service must be configured to listen on one of the server’s interfaces.
On this particular server, a NIC team has been setup and DHCP will listen on the teamed interfaces which were given the name 'bond0'. Be sure to make the appropriate changes given the server and environment in which everything is being configured. The defaults in this file are okay for this tutorial.

This line will instruct the DHCP service to listen for DHCP traffic on the specified interface(s). At this point, it is time to modify the main configuration file to enable the DHCP pools on the necessary networks. The main configuration file is located at /etc/dhcp/dhcpd.conf. Open the file with a text editor to begin:
# nano /etc/dhcp/dhcpd.conf
This file is the configuration for the DHCP server specific options as well as all of the pools/hosts one wishes to configure. The top of the file starts of with a ‘ddns-update-style‘ clause and for this tutorial it will remain set to ‘none‘ however in a future article, Dynamic DNS will be covered and ISC-DHCP-Server will be integrated with BIND9 to enable host name to IP address updates.
4. The next section is typically the area where and administrator can configure global network settings such as the DNS domain name, default lease time for IP addresses, subnet-masks, and much more. Again to know more about all the options be sure to read the man page for the dhcpd.conf file.
# man dhcpd.conf
For this server install, there were a couple of global network options that were configured at the top of the configuration file so that they wouldn’t have to be implemented in every single pool created.
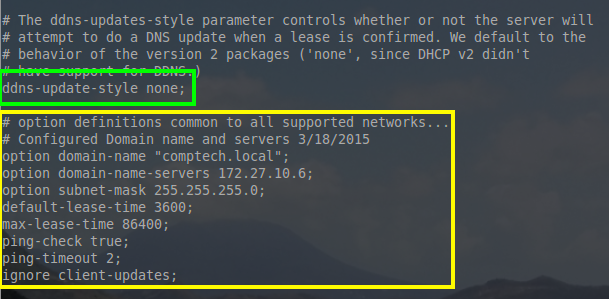
Lets take a moment to explain some of these options. While they are configured globally in this example, all of them can be configured on a per pool basis as well.
- option domain-name “comptech.local”; – All hosts that this DHCP server hosts, will be a member of the DNS domain name “comptech.local”
- option domain-name-servers 172.27.10.6; – DHCP will hand out DNS server IP of 172.27.10.6 to all of the hosts on all of the networks it is configured to host.
- option subnet-mask 255.255.255.0; – The subnet mask handed out to every network will be a 255.255.255.0 or a /24
- default-lease-time 3600; – This is the time in seconds that a lease will automatically be valid. The host can re-request the same lease if time runs out or if the host is done with the lease, they can hand the address back early.
- max-lease-time 86400; – This is the maximum amount of time in seconds a lease can be held by a host.
- ping-check true; – This is an extra test to ensure that the address the server wants to assign out isn’t in use by another host on the network already.
- ping-timeout; – This is how long in second the server will wait for a response to a ping before assuming the address isn’t in use.
- ignore client-updates; – For now this option is irrelevant since DDNS has been disabled earlier in the configuration file but when DDNS is operating, this option will ignore a hosts to request to update its host-name in DNS.
5. The next line in this file is the authoritative DHCP server line. This line means that if this server is to be the server that hands out addresses for the networks configured in this file, then uncomment the authoritative stanza.
This server will be the only authority on all the networks it manages so the global authoritative stanza was un-commented by removing the ‘#’ in front of the keyword authoritative.


Hello Guys,
I do remember my first dhcp server I ever set up was a Linux machine 12 years ago. Every time people say windows dhcp server for vlans and I smiled.
Any way keep in mind, Linux kernel which have support for 802.q will able to serve dhcp service also.
For example here:
Create virtual interfaces, you do no need more physical interfaces, in example to make 3 vlan 10.10.10.x, 10.10.20.x, and 10.10.30.x
This for fedora or rhel latest versions.
For Ubuntu and Debian, command is:
Then, configure the network settings for the VLAN interfaces:
Bring up the VLAN interface:
Do for all interfaces in Ubuntu and then check ip address and see virutal interfaces pinging..
Nex, open dhcpd.conf file and edit as follows.
# option definitions common to all supported networks...
option domain-name "example.org";
option domain-name-servers ns1.example.org, ns2.example.org;

default-lease-time 600;
max-lease-time 7200;

# Use this to enble / disable dynamic dns updates globally.
#ddns-update-style none;

# If this DHCP server is the official DHCP server for the local
# network, the authoritative directive should be uncommented.
#authoritative;

# Use this to send dhcp log messages to a different log file (you also
# have to hack syslog.conf to complete the redirection).
log-facility local7;

# No service will be given on this subnet, but declaring it helps the
# DHCP server to understand the network topology.

subnet 10.10.0.0 netmask 255.255.0.0 {
}

# This is a very basic subnet declaration.

subnet 10.10.10.0 netmask 255.255.255.0 {
  range 10.10.10.1 10.10.10.20;
  option routers 10.10.10.1;
}
subnet 10.10.20.0 netmask 255.255.255.0 {
  range 10.10.20.1 10.10.20.20;
  option routers 10.10.20.1;
}
  subnet 10.10.30.0 netmask 255.255.255.0 {
  range 10.10.30.1 10.10.30.20;
  option routers 10.10.30.1;
}
save the file and start the service and your good to go.
Connect to trunk port of switch and check it. Any doubts, do let me know.
my email :[email protected]
its not control protokoll ist configuration protokoll
How many NICs are attached to this server exactly? I’m not too keen on the NIC bonding in Linux yet. Can you elucidate?
D’jems,
This particular server only has one NIC. On the network that it was used in, the Cisco router was setup with an ip helper address for other vlans.