ImageMagick is a free open source simple software suite for any kind of image manipulation that is used for creating, editing, converting, displaying image files.
It can able to read and write over 200 image files such as JPEG, GIF, PNG, TIFF, and Photo CD image formats and it is also used for thumbnail or captcha generation. It also includes command-line options for creating transparent or animated gif image formats and many more features like resize, sharpen, rotate or add special effects to an image.
To use the ImageMagick tool with PHP or Perl programming language, you will need to install ImageMagick with the Imagick PHP extension for PHP and ImageMagick-Perl extension for Perl.
Imagick is a simple PHP extension for creating and modifying images using the ImageMagick API program. There is a confusion in name, as people think that ImageMagick and Imagick both are the same, but you can use ImageMagick without Imagick extension but you need both installed on your machine to use and run it.
Installing ImageMagick from Repository
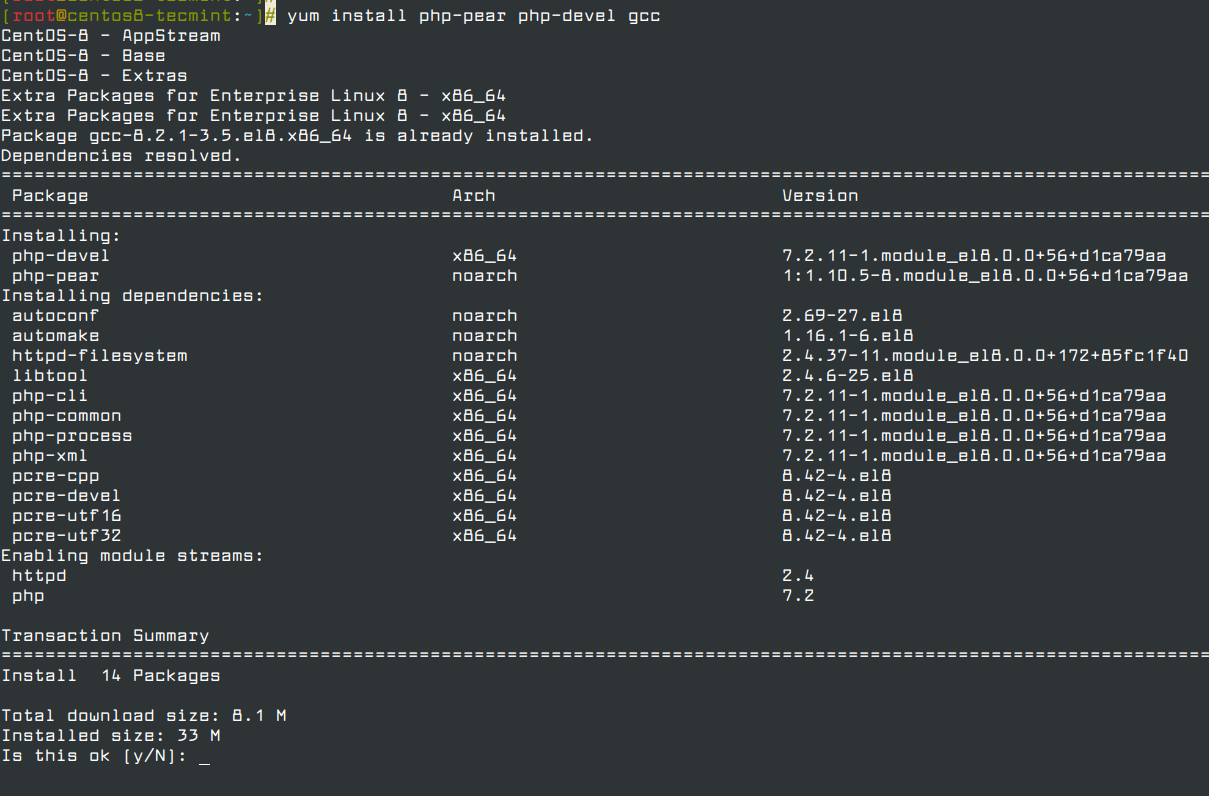
First, install following prerequisite php-pear, php-devel and gcc packages to compile the Imagick PHP extension.
# yum install php-pear php-devel gcc
Once you’ve installed php-pear, php-devel, and gcc packages, you may now install ImageMagick software for PHP and Perl support using yum command.
# yum install ImageMagick ImageMagick-devel ImageMagick-perl
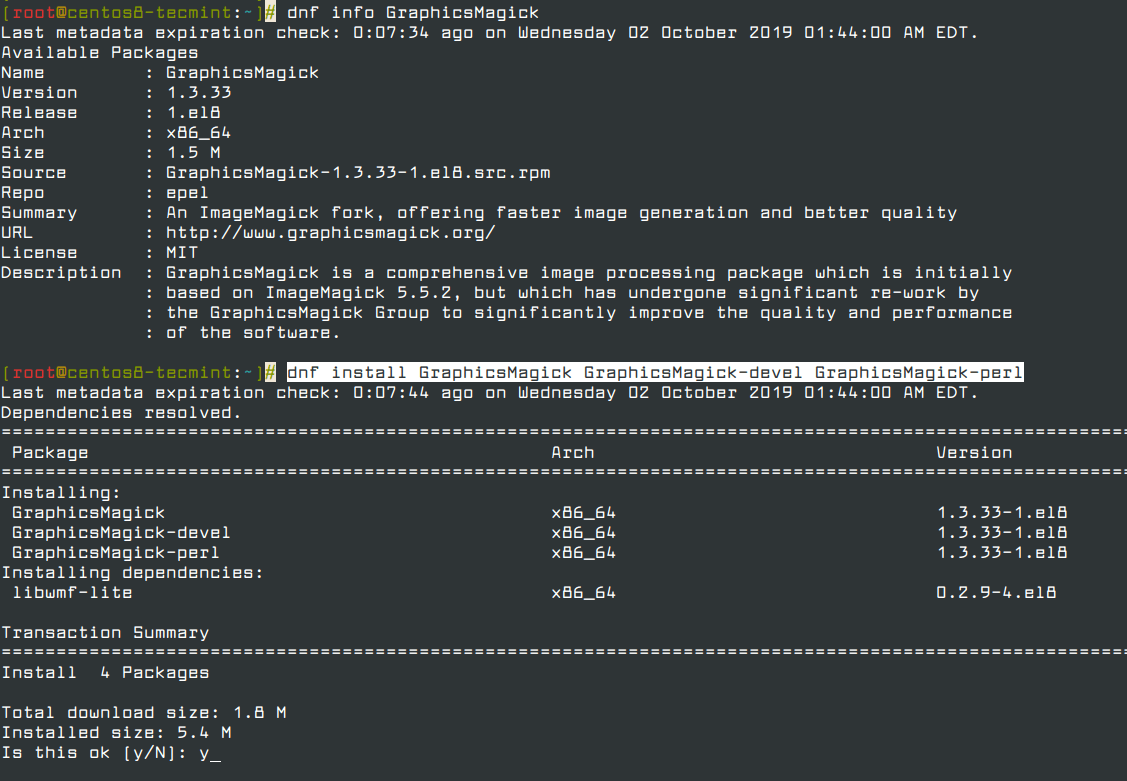
IMPORTANT: ImageMagick is not available in CentOS/RHEL 8, and it has been replaced with GraphicsMagick instead, which is a fork of ImageMagick.
To install GraphicsMagick on CentOS/RHEL 8, run the following command.
# dnf info GraphicsMagick
# dnf install GraphicsMagick GraphicsMagick-devel GraphicsMagick-perl
Next, verify that ImageMagick has been installed on your system by checking its version.
# convert --version

Version: ImageMagick 6.7.8-9 2019-02-01 Q16 http://www.imagemagick.org
Copyright: Copyright (C) 1999-2012 ImageMagick Studio LLC
Features: OpenMP
CentOS/RHEL 8 users, can run the following command to verify the version of GraphicsMagick installed on the system.
# gm version

GraphicsMagick 1.3.33 2019-07-20 Q16 http://www.GraphicsMagick.org/
Copyright (C) 2002-2019 GraphicsMagick Group.
Additional copyrights and licenses apply to this software.
See http://www.GraphicsMagick.org/www/Copyright.html for details.
Installing ImageMagick 7 from Source Code
To install ImageMagick from source, you need a proper development environment with a compiler and related development tools. If you don’t have the required packages on your system, install development tools as shown:
# yum groupinstall 'Development Tools'
# yum -y install bzip2-devel freetype-devel libjpeg-devel libpng-devel libtiff-devel giflib-devel zlib-devel ghostscript-devel djvulibre-devel libwmf-devel jasper-devel libtool-ltdl-devel libX11-devel libXext-devel libXt-devel lcms-devel libxml2-devel librsvg2-devel OpenEXR-devel php-devel
Now, download the latest version of the ImageMagick source code using the following wget command and extract it.
# wget https://www.imagemagick.org/download/ImageMagick.tar.gz
# tar xvzf ImageMagick.tar.gz
Configure and compile the ImageMagick source code. Depending on your server hardware specs, this may take some time to finish.
# cd ImageMagick*
# ./configure
# make
# make install
Verify that the ImageMagick compile and install were successful.
# magick -version

Version: ImageMagick 7.0.8-28 Q16 x86_64 2019-02-19 https://imagemagick.org
Copyright: © 1999-2019 ImageMagick Studio LLC
License: https://imagemagick.org/script/license.php
Features: Cipher DPC HDRI OpenMP
Delegates (built-in): bzlib djvu fontconfig freetype jng jpeg lzma openexr pangocairo png tiff wmf x xml zlib
Install Imagick PHP Extension
Next, compile the Imagick for PHP extension. To do, simply run the following ‘pecl‘ command. It will install ImageMagick and imagick PHP extension module ‘imagick.so‘ under /usr/lib/php/modules directory. If you are using a 64-bit system, the module directory path would be /usr/lib64/php/modules.
Note: It will ask you to provide Imagemagick installation prefix, simply hit enter to auto-detect.
# pecl install imagick

downloading imagick-3.4.3.tgz ...
Starting to download imagick-3.4.3.tgz (245,410 bytes)
...................................................done: 245,410 bytes
19 source files, building
running: phpize
Configuring for:
PHP Api Version:         20100412
Zend Module Api No:      20100525
Zend Extension Api No:   220100525
Please provide the prefix of Imagemagick installation [autodetect] :
Now, add the ‘imagick.so‘ extension to ‘/etc/php.ini‘ file.
echo extension=imagick.so >> /etc/php.ini
Next, restart Apache webserver.
# service httpd restart
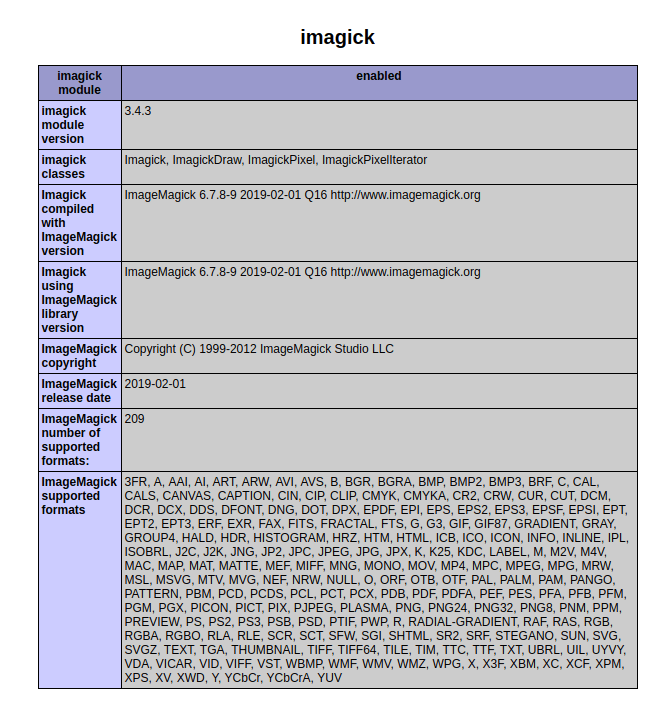
Verify the Imagick PHP extension by running the following command. You will see the Imagick extension similar to below.
# php -m | grep imagick

imagick
Install GMagick PHP Extension
Run the following commands to compile and install GMagick PHP Extension.
# cd /usr/local/src
# wget https://pecl.php.net/get/gmagick
# tar xfvz gmagick
# cd gmagick-*
# phpize
# ./configure
# make
# make install
Now, add the ‘gmagick.so‘ extension to ‘/etc/php.ini‘ file.
# echo extension=gmagick.so >> /etc/php.ini
Next, restart the Apache webserver.
# systemctl restart httpd
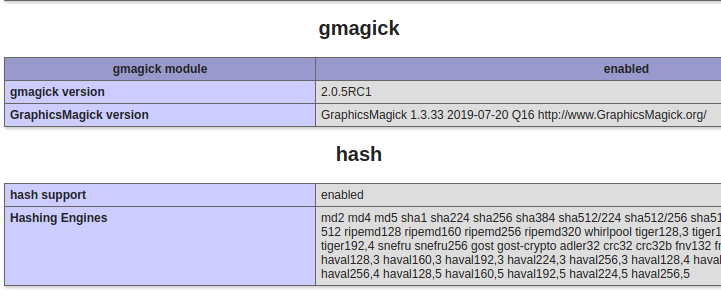
Verify gmagick PHP extension by running the following command.
# php -m | grep gmagick

gmagick
Alternatively, you can create a file called ‘phpinfo.php‘ under website root directory (ex: /var/www/html/).
# vi /var/www/html/phpinfo.php
Add the following code.
<?php

     phpinfo ();
?>
Open your favorite web browser and type ‘http://localhost/phpinfo.php‘ or ‘http://ip-addresss/phpinfo.php‘ and verify the extension.


I got stuck on:
GraphicsMagick configuration program… configure: error: not found. Please provide a path to the GraphicsMagick-config program.
Linux: Fedora
Hello Tecmint,
We have a requirement to install the PHP Modules Imagick, Redis, and WebP through Imagick on Suse Linux.
We have already installed PHP 8 Version.
So the above modules need to install in addition to the existing modules through configure compile and run method using make and make install.
Could you please check and help us with this?
Thank you.
Regards,
Veeramani M
I was able to install ImageMagick on CentOS 7. I ran
convert --versionand the following was returned:So I don’t think ImageMagick was discontinued for CentOS 7
I am running CentOS 7 and PHP. Following these instructions, I was able to install ImageMagick, but php failed to load the imagick.so.
I think it was a thread-safe vs non-thread-safe version issue with imagick.so. I uninstalled imagick, then I successfully reinstalled it using these instructions:
Credit to Ritter on serverfault.com, link: https://serverfault.com/questions/462892/how-to-install-imagemagick-for-php-on-centos
I am supposed to use ImageMagick in the Alfresco DMS solution. But since I am setting Alfresco in centos 8.1 and as mentioned by you, that ImageMagick in not supported in version 8, I installed GraphicsMagick. I did not build from source rather used command:
My questions are:
1. What is the root installation directory of GraphicsMagick?
2. I need to set the following parameters in my alfresco. What would be corresponding values for GraphicsMagick software
Property Description img.root On Windows, set this property to img.root=C:\\ImageMagick On Linux, set this property to img.root=/ImageMagick img.dyn On Windows, set this property to img.dyn=${img.root}\\lib On Linux, set this property to img.dyn=${img.root}/lib img.exe On Windows, set this property to img.exe=${img.root}\\convert.exe On Linux, set this property to img.exe=${img.root}/bin/convert img.coders On Windows, set this property to img.coders=${img.root}\\modules\\coders On Linux, set this property to img.coders=${img.root}/modules/coders img.config On Windows, set this property to img.config=${img.root}\\config On Linux, set this property to img.config=${img.root}/config img.url On Windows, set this property to img.url=${img.root}\\url On Linux, set this property to img.url=${img.root}/urlThis works for me on CentOS 7.7.1908, you replace rh-php71-php-XXXXXX which should install other similar libraries/modules.
I get to this step, “Install Imagick PHP Extension“, but get this error back from Terminal:
I am using this command: “pecl install imagick“.
Did I miss a step, or am I running the wrong command?
@Rick,
Please install the missing packages.
Does this work in RHEL 8
@Sri,
Yes, it should work on RHEL 8 as well..
Hi, After doing all that I’ve this error message “WriteBlob Failed `cs.png’ @ error/png.c/MagickPNGErrorHandler/1715”
I’m using CentOS 7 and PHP 5.2 and ImageMagick 7. I set permission to 777, but don’t know what I am missing 3 weeks in the problem with no solution !!!
Thanks, Nice Article. I tried same link (https://www.tecmint.com/install-imagemagick-in-linux/) 2015. I saved this link in my draft and tried in 2019 again. And it seems the article is also updated to latest instructions. Wow. Nice and Awesome this website. I love it.
@Jeyaram,
Thanks, keep showing love towards Tecmint.com :)
Hi,
I followed your guide and everything runs as you have shown, but when I try to use imagick i get:
Fatal error: Uncaught Error: Class ‘Imagick’ not found in /home/api/public_html/TestImagick.php:5
Last bit of output after running
pecl install imagick(I replaced the server ip address with …):Running phpinfo gives me:
I added extension=imagick.so to php.ini in /usr/local/php.
Further phpinfo output:
My test code:
setResolution(150, 150);
    // Reads image from PDF
    $imagick->readImage('test.pdf[0]');
    echo "image read";
And the output:
Fatal error: Uncaught Error: Class ‘Imagick’ not found in /home/api/public_html/TestImagick.php:5
Stack trace:
#0 {main}
thrown in /home/api/public_html/TestImagick.php on line 5
Please help!!!
I see you’ve added
echo extension=imagick.so >> /etc/php.inifile, but your actual PHP location is /usr/local/php/php.ini. Please check your configuration and add extension to correct php.ini file.As I said in my question, I did add imagick.so to /usr/local/php/php.ini as well as /etc/php.ini.
Still the same error.
Found the problem at last!
There was yet another
php.inifile in the website directory. I added “extension=imagick.so” to that one as well, and now the class is found.I was lazy and used the PHP info button from the CWP dashboard — it doesn’t give me the configuration file that is actually loaded when I run a PHP script on the website.
Best place to execute ImageMagick online for you. Supporting all ImageMagick feature with output file and console log, no need to install.
Good! this solved my problem, thanks a lot
Hi,
I am getting error like
/var/tmp/imagick/imagick.c:3299: error: ‘ZEND_MOD_END’ undeclared here (not in a function)
make: *** [imagick.lo] Error 1
ERROR: `make’ failed
Kindly help me to solve this issue
@Durai,
It seems that you’re installing ImageMagick on older version of PHP, consider upgrading to a more recent version that supports missing headers of ImageMagick, do:
THANKS!
I was trying to get jpeg / jpg file uploads working with mediawiki 1.23.6 on CentOS 7 with Apache/2.4.6 and php 5.4.16. I ran the command:
yum install php-pear ImageMagick ImageMagick-devel ImageMagick-perl
restarted httpd, and now everything works. Thanks!
Hello. All went well until # pecl install imagick then I received this series of errors on CentOS 6.5 PHP 5.5.12:
Warning: Invalid argument supplied for foreach() in Command.php on line 259
Warning: Invalid argument supplied for foreach() in /usr/share/pear/PEAR/Command.php on line 259
Warning: Invalid argument supplied for foreach() in Command.php on line 259
Warning: Invalid argument supplied for foreach() in /usr/share/pear/PEAR/Command.php on line 259
Notice: Undefined index: honorsbaseinstall in Role.php on line 180
Notice: Undefined index: installable in Role.php on line 145
Notice: Undefined index: phpfile in Role.php on line 212
Notice: Undefined index: config_vars in Role.php on line 49
Warning: Invalid argument supplied for foreach() in /usr/share/pear/PEAR/Command.php on line 259
XML Extension not found
What happened?
Then I erased pear and /usr/share/pear/ folder. Installed go-pear with same results. I’d appreciate any insight and / or solution. I thank you Ravi and appreciate your articles!
This error new to me, never seen such error, but I think PHP XML extension is missing, try to install php-xml via yum and then follow installation again.
Thanks a lot. I am able to setup Imagic in my server. Great and helpful article.
I get error after command
“sudo pecl install imagick”
downloading imagick-3.1.2.tgz …
Starting to download imagick-3.1.2.tgz (94,657 bytes)
…………………done: 94,657 bytes
15 source files, building
running: phpize
Can’t find PHP headers in /usr/include/php
The php-devel package is required for use of this command.
ERROR: `phpize’ failed
then just install php-devel and everythink works like a charm.
Thanks for this article :).
This worked perfectly. Excellent
I just found out that ghost script was already installed on the server
# which gs
Awesome Article. You solved my problem. thanks a lot.
I have a requirement where i need to convert a pdf to a jpeg thumbnail and i need to do this in php. I already installed imagick ( following ur article steps), do i need to install ghostscript too for converting the pdf to jpeg using a php script ? If I do can you breifly outline how to install ghostscript on centos
Fantastic explanation, fantastic article !!! Thanks !
How to install the latest version of imagemagick?
Already described in the article. follow correctly.
pecl install imagick fails with the following output (on CentOS 5.9 w/ PHP 5.4):
/var/tmp/imagick/imagick_class.c: In function ‘zim_imagick_setimageprogressmonitor’:
/var/tmp/imagick/imagick_class.c:9534: error: ‘struct _php_core_globals’ has no member named ‘safe_mode’
/var/tmp/imagick/imagick_class.c:9534: error: ‘CHECKUID_CHECK_FILE_AND_DIR’ undeclared (first use in this function)
/var/tmp/imagick/imagick_class.c:9534: error: (Each undeclared identifier is reported only once
/var/tmp/imagick/imagick_class.c:9534: error: for each function it appears in.)
/var/tmp/imagick/imagick_class.c:9534: error: ‘CHECKUID_NO_ERRORS’ undeclared (first use in this function)
make: *** [imagick_class.lo] Error 1
ERROR: `make’ failed
Any help would be appreciated.
Try this command hope it will install correctly.
while looking into the apache error logs it is giving this error
mod_fcgid: stderr: PHP Warning: Division by zero in /home/xxx/public_html/xxxx/logo.php on line 216,
Hi,
I have done everything accordingly but I am not able to see the imagick extension in phpinfo();
php -m | grep imagick — it shows that imagick is there but in phpinfo(); it is not shown anywhere….
nor I am able to run the functions getsize() etc; through my php script.
Please help
Thanks
Have you restarted Apache?
I have restarted several time !!
Thanks for your reply
Ok, no need to worry about, if it’s showing via command line, means it installed correctly..
But when trying to upload the image and resize my script is not working !! though my local script is working fine !!
Any help would be great ….
Thanks
I ran into a problem that sounds similar to Amit’s. I added extension=imagick.so to my ini file, but no love. A few thoughts: make sure you have it in the right .ini file (eg: on debian flavoured linux it needs to be in /etc/php5/apache2/…
also I found that pecl installed the module in /usr/lib/php/modules but my extension_dir was set to /usr/lib64/php/modules/ so i created a symlink and everything started working fine
Thanks so much!
Thanks for completing my request of tutorial on imagick extension…..Thanks again.