A LAMP stack is a collection of four different software (Linux, Apache, MySQL, and PHP) that programmers or web developers use to create and deploy websites or applications.
This tutorial will concentrate on how to install and configure the famous LAMP stack with PhpMyAdmin on the last release of RHEL and RHEL-based distributions such as CentOS, Oracle Linux, Rocky, and AlmaLinux.
[ez-toc]
Requirements
Depending on the used distribution, use the following links to perform a minimal system installation, using a static IP Address for network configuration.
- How to Download and Install RHEL 9 for Free
- How to Download and Install RHEL 8 for Free
- Installation of CentOS Stream 9 Linux
- Installation of CentOS 7 Linux
- How to Install Rocky Linux 9 Step by Step
- How to Install AlmaLinux 9 Step by Step
Step 1: Install Apache Web Server
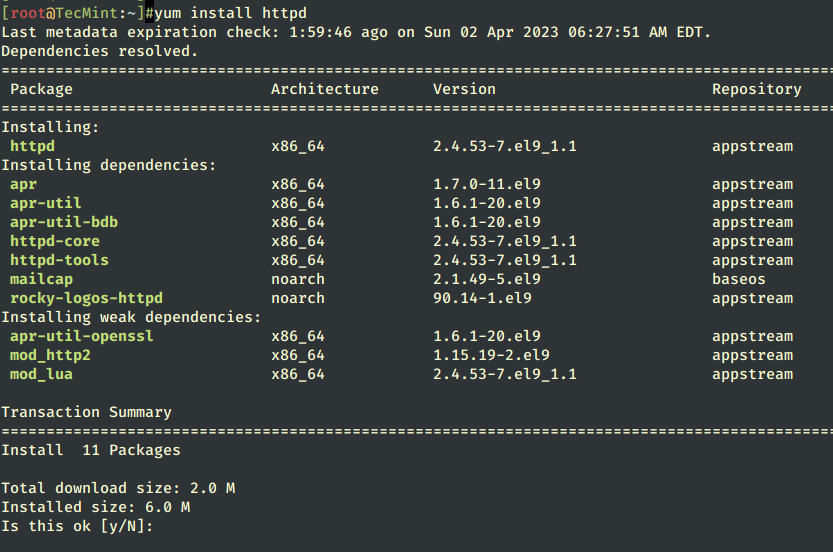
1. After performing a minimal system installation and configuring your server network interface with a Static IP Address, go ahead and install Apache (httpd) service binary package provided from official repositories using the following yum command.
# yum install httpd
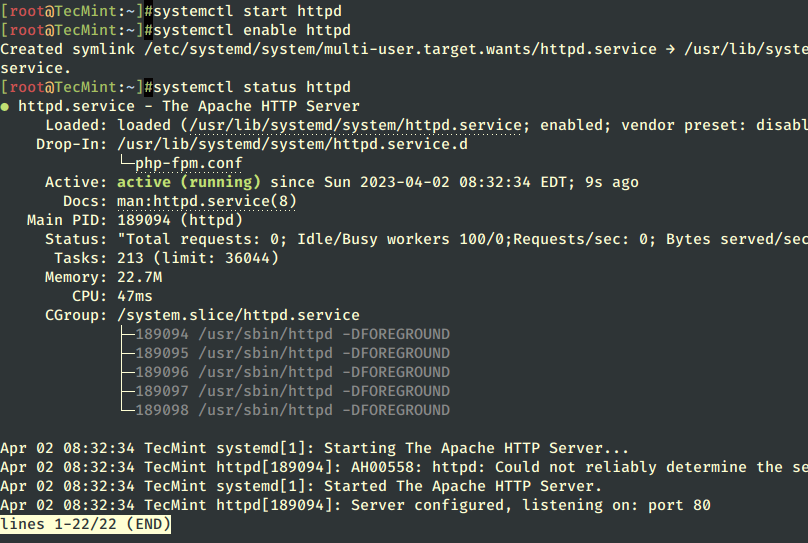
2. After finishing the Apache installation, use the following commands to manage Apache daemon since RHEL and CentOS both migrated their init scripts from SysV to Systemd – Why was init Replaced with Systemd in Linux?.
# systemctl start httpd
# systemctl enable httpd
# systemctl status httpd
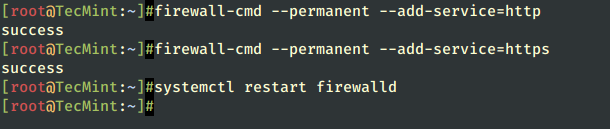
3. On the next step, make sure to allow access to Apache by opening ports 80 and 443 on Firewall using firewall-cmd, which is the default command to manage Firewalld through daemon.
# firewall-cmd --add-service=http
# firewall-cmd --add-service=https
# systemctl restart firewalld
To apply consistency iptables rules on the firewall using the --permanent option and restart the firewalld service to take effect.
# firewall-cmd --permanent --add-service=http
# firewall-cmd --permanent --add-service=https
# systemctl restart firewalld
Some important Firewalld commands to manage the firewall as presented below:
# firewall-cmd --state
# firewall-cmd --list-all
# firewall-cmd --list-interfaces
# firewall-cmd --get-service
# firewall-cmd --query-service service_name
# firewall-cmd --add-port=80/tcp
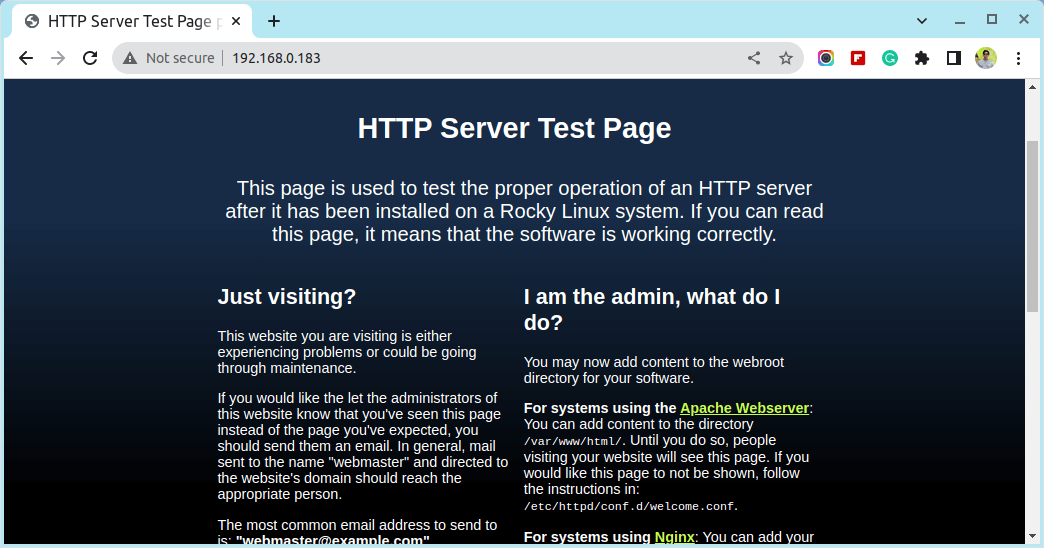
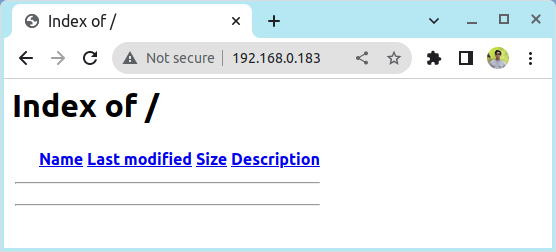
4. To verify Apache functionality open a remote browser and type your server IP Address using HTTP protocol on the URL, and a default page should appear like in the screenshot below.
http://server_IP
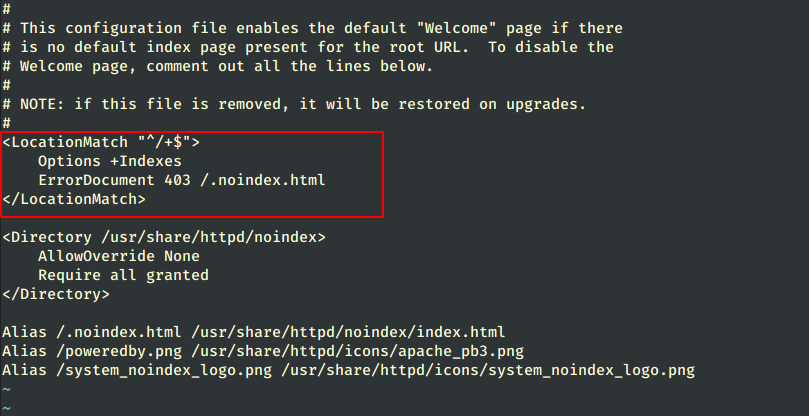
5. For now, the Apache DocumentRoot path it’s set to /var/www/html system path, which by default doesn’t provide any index file. If you want to see a directory list of your DocumentRoot path.
Open the Apache welcome configuration file and set the Indexes statement from – to + on LocationMatch directive, using the below screenshot as an example.
# vi /etc/httpd/conf.d/welcome.conf
6. After making changes, close the file, restart the Apache service to reflect changes, and reload your browser page to see the final result.
# systemctl restart httpd
Step 2: Install PHP Support for Apache
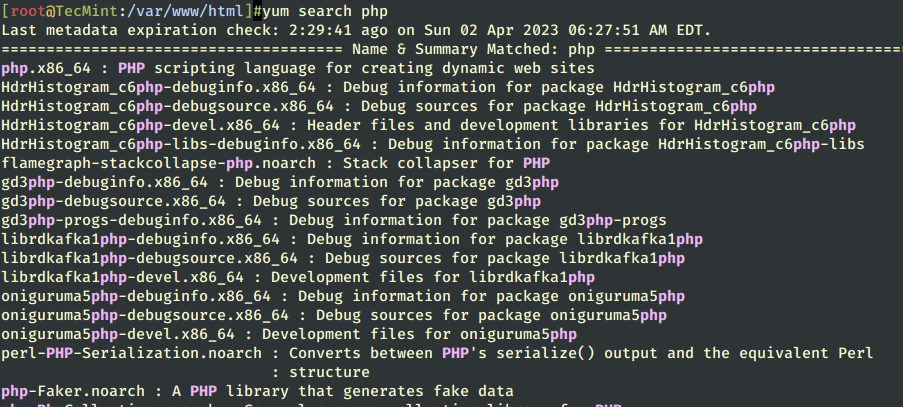
7. Before installing PHP dynamic language support for Apache, get a full list of available PHP modules and extensions using the following command.
# yum search php
8. Depending on what type of applications you want to use, install the required PHP modules from the above list, but for a basic MySQL/MariaDB support in PHP and PhpMyAdmin you need to install the following modules.
# yum install php php-mysql php-pdo php-gd php-mbstring

9. To get a full information list on PHP from your browser, create an info.php file on Apache Document Root using the following command, restart the httpd service, and direct your browser to the http://server_IP/info.php address.
# echo "<?php phpinfo(); ?>" > /var/www/html/info.php
# systemctl restart httpd

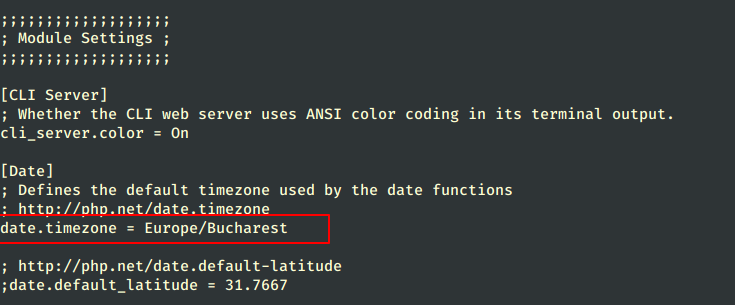
10. If you get an error on PHP Date and Timezone, open the php.ini configuration file, search, and uncomment date.timezone statement, append your physical location, and restart the Apache daemon.
# vi /etc/php.ini
Locate and change date.timezone line to look like this, using PHP Supported Timezones list.
date.timezone = Continent/City
Step 3: Install and Configure MariaDB Database
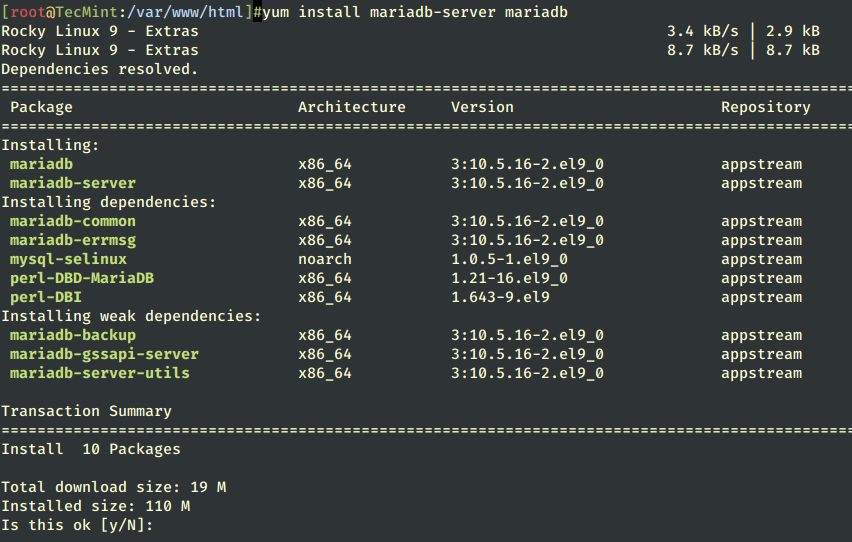
11. The RHEL distribution switched from MySQL to MariaDB for its default database management system. To install the MariaDB database use the following command.
# yum install mariadb-server mariadb
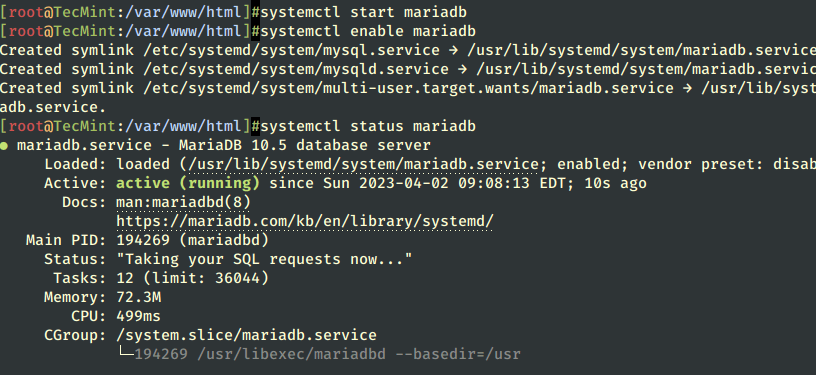
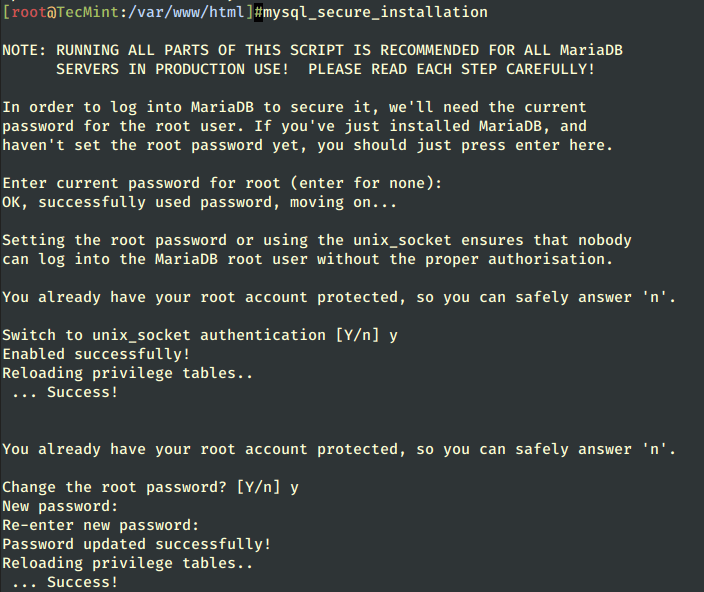
12. After the MariaDB package is installed, start the database daemon and use the mysql_secure_installation script to secure the database (set a root password, disable remote login from the root, remove the test database, and remove anonymous users).
# systemctl start mariadb
# systemctl enable mariadb
# systemctl status mariadb
# mysql_secure_installation
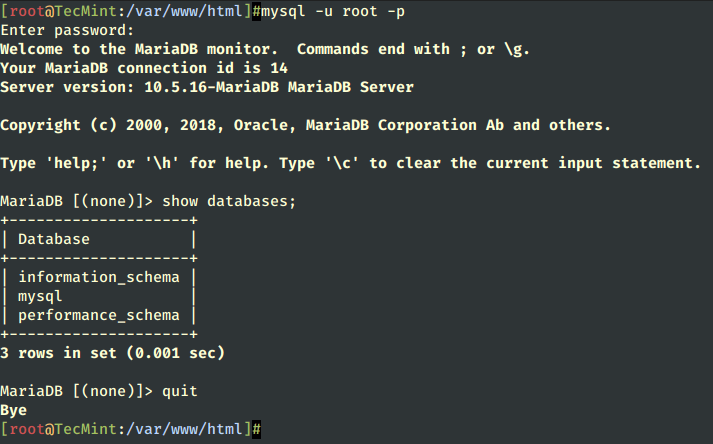
13. To test database functionality login to MariaDB using its root account and exit using a quit statement.
mysql -u root -p
MariaDB > show databases;
MariaDB > quit
Step 4: Install PhpMyAdmin to Manage MySQL
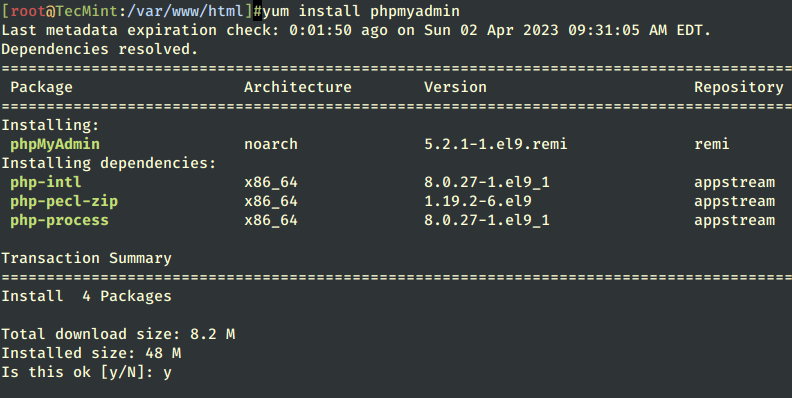
14. By default official repositories don’t provide any binary package for PhpMyAdmin Web Interface. If you are uncomfortable using the MySQL command line to manage your database you can install the PhpMyAdmin package by enabling the remi repository using the following command.
# yum install -y https://rpms.remirepo.net/enterprise/remi-release-9.rpm  [On CentOS/RHEL 8]
# yum install -y https://rpms.remirepo.net/enterprise/remi-release-8.rpm  [On CentOS/RHEL 8]
# yum install -y https://rpms.remirepo.net/enterprise/remi-release-7.rpm  [On CentOS/RHEL 7]
After enabling the remi repository, next install PhpMyAdmin.
# yum install phpmyadmin
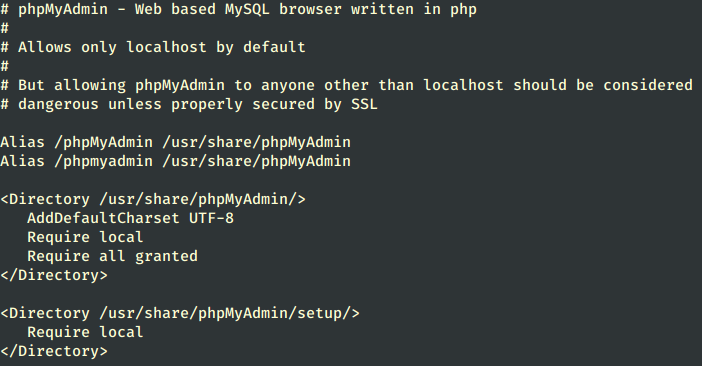
15. Next configure PhpMyAdmin to allow connections from remote hosts by editing phpmyadmin.conf file, located on the Apache conf.d directory, commenting on the following lines.
# vi /etc/httpd/conf.d/phpMyAdmin.conf
Add the “Require all granted” line under the “Require local” line as shown.
<Directory /usr/share/phpMyAdmin/>
   AddDefaultCharset UTF-8
   Require local
   Require all granted
</Directory>
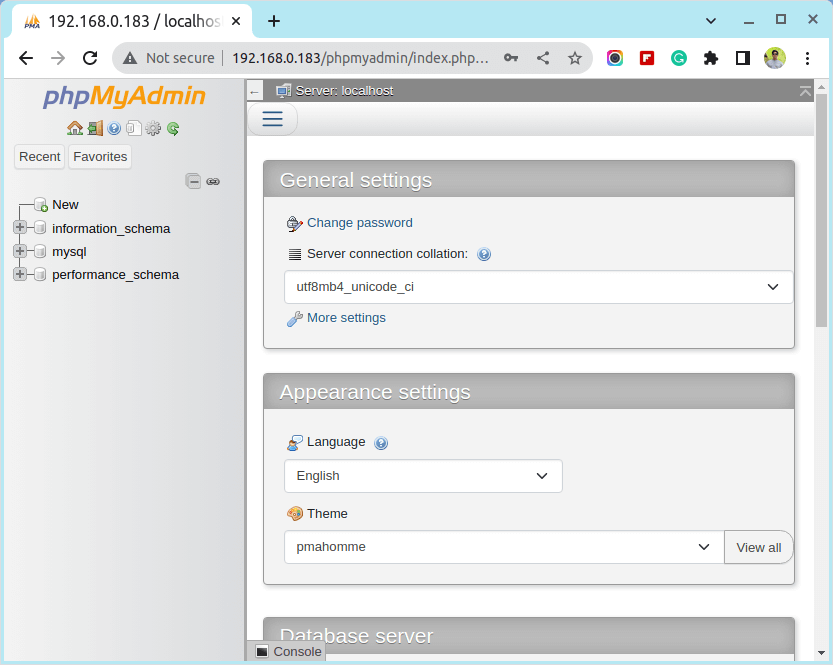
16. To be able to log in to the PhpMyAdmin Web interface, restart the Apache Web service and direct your browser to the URL address.
# systemctl restart httpd

http://server_IP/phpmyadmin/
Step 5: Enable LAMP System-Wide in Linux
17. If you need MariaDB and Apache services to be automatically started after reboot issue the following commands to enable them system-wide.
# systemctl enable mariadb
# systemctl enable httpd
That’s all it takes for a basic LAMP installation on RHEL-based distributions. The next series of articles related to the LAMP stack will discuss how to create Virtual Hosts, generate SSL Certificates and Keys, and add SSL transaction support for Apache HTTP Server.


Thank you very much for your informative article on LAMP setup..
Hi
One more thing to note:
rpmforge-release-0.5.3-1.el7.rf.x86_64.rpm
[root@centos yum-root-bB6l9i]# pwd
/var/tmp/yum-root-bB6l9i
//marsk
Dear friend, I have installed CentOS 7.0 as I can know until version of php supports. felix
Typo ‘LocationMach’ please change ‘LocationMatch’
and ‘nano /etc/httpd/conf.d/phpmyadmin.conf’ change to ‘nano /etc/httpd/conf.d/phpMyAdmin.conf’
New Version
you can add phpmyadmin for Centos 7:
sudo yum install epel-release
sudo yum install phpmyadmin
Can not install phpmyadmin on OEL 7.2 x64….
wget http://pkgs.repoforge.org/rpmforge-release/rpmforge-release-0.5.3-1.el7.rf.x86_64.rpm
rpm -Uvh rpmforge-release-0.5.3-1.el7.rf.x86_64.rpm
=>package rpmforge-release-0.5.3-1.el7.rf.x86_64 is already installed
Error: Package: phpmyadmin-2.11.11.3-2.el6.rf.noarch (rpmforge)
Requires: php-mbstring >= 4.1.0
Dont work! bad howto
Your instructions throws erros at:
# yum install http://pkgs.repoforge.org/rpmforge-release/rpmforge-release-0.5.3-1.el7.rf.x86_64.rpm
and your image associated with that command also shows the error. Can’t get past this part.
@Lester,
Do this way…
It’s really late to answer this but I think I would let you know.
# yum install http://ftp.tu-chemnitz.de/pub/linux/dag/redhat/el7/en/x86_64/rpmforge/RPMS/rpmforge-release-0.5.3-1.el7.rf.x86_64.rpm
You can get past right this way.
Thanks!!!
@sahadev: Check /etc/httpd/conf.d/phpmyadmin.conf file and verify your IP/netmask
##############
Order Deny,Allow
Deny from all
Allow from 10.0.0.0/24 ## Use your IP/Network CDIR
Require all granted
I tried to restrict phpmyadmin access to a particular ip address in httpd-2.4 but still it is not working
@Israrul,
How to configure PhpMyAdmin to allow access to specific IP address.
Open /etc/httpd/conf.d/phpMyAdmin.conf file and edit
Require ip& Allow fromlines as shown in the following example.Here is what phpMyAdmin.conf will look like with the added access rules.
hi,
plz guide me how to configure phpmyadmin bcause i am not accessing that and i m receving this nessages
Forbidden
You don’t have permission to access /phpmyadmin on this server.
Apache/2.2.15 (CentOS) Server at 10.0.0.80 Port 80
plz helppppppppp
To resolve the problem of phpmyadmin,
do :
rpm -ivh http://dl.fedoraproject.org/pub/epel/7/x86_64/e/epel-release-7-1.noarch.rpm
yum install phpmyadmin
Enjoy ;-)
still its not working
rpm -ivh http://dl.fedoraproject.org/pub/epel/7/x86_64/e/epel-release-7-1.noarch.rpm
error is :-
Retrieving http://dl.fedoraproject.org/pub/epel/7/x86_64/e/epel-release-7-1.noarch.rpm
curl: (22) The requested URL returned error: 404 Not Found
error: skipping http://dl.fedoraproject.org/pub/epel/7/x86_64/e/epel-release-7-1.noarch.rpm – transfer failed
What to do ?
Dear Ananda,
Please use the following correct and updated epel repository to install the package as shown.
Nice howto. FWIW, step #14 is missing the `install’ command on the yum command line:
yum install http://pkgs.repoforge.org/
Not sure why the URL got trimmed short in that last post. Try #2:
yum install http://pkgs.repoforge.org/rpmforge-release/rpmforge-release-0.5.3-1.el7.rf.x86_64.rpm
Thanks Jim, corrected now in write up…
About phpmyadmin
rpm -Uvh http://fedora.mirrors.romtelecom.ro/pub/epel/beta/7/x86_64/epel-release-7-0.2.noarch.rpm
yum install -y phpmyadmin
vi /etc/httpd/conf.d/phpMyAdmin.conf
#
# # Apache 2.4
#
# Require ip 127.0.0.1
# Require ip ::1
#
#
#
# # Apache 2.2
# Order Deny,Allow
# Deny from All
# Allow from 127.0.0.1
# Allow from ::1
#
Require all granted
I found many ways online and I successed by this way.
FYI
Binary PhpMyAdmin package can be installed now from EPEL 7 Repo:
rpm -Uvh http://fedora.mirrors.romtelecom.ro/pub/epel/beta/7/x86_64/epel-release-7-0.2.noarch.rpm
Apache config file for PhpMyAdmin:
nano /etc/httpd/conf.d/phpMyAdmin.conf
Your installation instructions are great! But I am having issues accessing phpMyAdmin from a remote computer, even adding in the internal IP address of the client machine.
Hi.
Thanks a lot!
Add your network between
/etc/httpd/conf.d/phpMyAdmin.conf
15 Require ip 127.0.0.1
16 Require ip 192.168.0.
17 Require ip ::1
18
From an install today (2014/07/24) the phpmyadmin.conf file name has been re-cased to:
phpMyAdmin.conf
So the location is:
/etc/httpd/conf.d/phpMyAdmin.conf
Yes …you are right…I think they have removed phpmyadmin from rpmforge repositories. A few days ago the packages was there and working. Remove rpmforge from your system and install phpMyAdmin from sources:
yum remove rpmforge-release
wget http://downloads.sourceforge.net/project/phpmyadmin/phpMyAdmin/4.2.6/phpMyAdmin-4.2.6-english.tar.gz
tar xfz phpMyAdmin-4.2.6-english.tar.gz
mv phpMyAdmin-4.2.6-english/ phpmyadmin
cp -r phpmyadmin/ /usr/share/
nano /etc/httpd/conf.d/phpmyadmin.conf
Here add this lines:
##############
Order Deny,Allow
Deny from all
Allow from 192.168.1.0/24 ## Use your IP/Network CDIR
Require all granted
Alias /phpmyadmin /usr/share/phpmyadmin
Alias /phpMyAdmin /usr/share/phpmyadmin
Alias /mysqladmin /usr/share/phpmyadmin
###############
systemctl restart httpd.service
cp /usr/share/phpmyadmin/config.sample.inc.php /usr/share/phpmyadmin/config.inc.php
nano /usr/share/phpmyadmin/config.inc.php
Add blowfish pass as explained above (http://www.question-defense.com/tools/phpmyadmin-blowfish-secret-generator) and you’re ready!
Thank you for your help
So the installation of phpMyAdmin doesn’t work…its not even in the repo