LibreNMS is an open source, powerful and feature-rich auto-discovering PHP based network monitoring system which uses the SNMP protocol. It supports a broad range of operating systems including Linux, FreeBSD, as well as network devices including Cisco, Juniper, Brocade, Foundry, HP and many more.
LibreNMS Features:
- It auto-discovers a whole network using these protocols: CDP, FDP, LLDP, OSPF, BGP, SNMP and ARP.
- It has a mobile friendly Web UI, with customizable dashboards.
- Supports a Unix agent.
- Supports horizontal scaling to expand with your network.
- Supports a highly flexible and customizable alerting system; sends notifications through email, irc, slack and more.
- Supports an API for managing, graphing and retrieving data from your system.
- Offers a traffic billing system.
- Also supports an Android and iOS apps which offer core functionalities.
- Supports integration with NfSen, collectd, SmokePing, RANCID and Oxidized.
- Supports multiple authentication methods such as MySQL, HTTP, LDAP, Radius and Active Directory.
- Allows for auto updating and many other features.
An online demo is available for you to try before installing LibreNMS on Linux systems.
Demo URL: https://demo.librenms.org/
Username: demo
Password: demo
Test Environment:
In this tutorial we will learn how to install LibreNMS Network Monitoring Tool on a freshly installed Ubuntu or CentOS Linux (same instructions also works on Debian and RHEL based distributions).
NOTE: All these instructions in this article should be run as the root user, if you are not, use the sudo command to gain root user privileges.
Step 1: Install Required Packages
1. First start by installing all the required packages using the default package manager as shown.
On Ubuntu/Debian
$ sudo apt install composer fping git graphviz imagemagick mariadb-client mariadb-server mtr-tiny nginx-full nmap php7.0-cli php7.0-curl php7.0-fpm php7.0-gd php7.0-mcrypt php7.0-mysql php7.0-snmp php7.0-xml php7.0-zip python-memcache python-mysqldb rrdtool snmp snmpd whois
On CentOS/RHEL
# yum install epel-release
# rpm -Uvh https://mirror.webtatic.com/yum/el7/webtatic-release.rpm
# yum install composer cronie fping git ImageMagick jwhois mariadb mariadb-server mtr MySQL-python net-snmp net-snmp-utils nginx nmap php72w php72w-cli php72w-common php72w-curl php72w-fpm php72w-gd php72w-mysql php72w-process php72w-snmp php72w-xml php72w-zip python-memcached rrdtool
2. Once all the packages are installed, nginx, php-fpm, mariadb and snmp services will be started and enabled to auto-start at boot time (this is normally the case with Ubuntu), otherwise, you can run the commands below to start and enable them.
------------ On Debian/Ubuntu ------------
$ sudo systemctl nginx start php7.0-fpm mysql snmp
$ sudo systemctl enable nginx php7.0-fpm mysql snmp

------------ On CentOS/RHEL ------------
# systemctl nginx start php-fpm mariadb snmpd
# systemctl enable nginx php-fpm mariadb snmpd
Step 2: Install LibreNMS Monitoring Tool
3. Next, create a system user called librenms, with the useradd command; where the -M flag disables creation of user’s home directory, and -r enables creating of a system account. Then add the librenms user to the group www-data (on Ubuntu) or nginx (on CentOS) as follows.
------------ On Debian/Ubuntu ------------
$ sudo useradd librenms -d /opt/librenms -M -r
$ sudo usermod -a -G librenms www-data

------------ On CentOS/RHEL ------------
# useradd librenms -d /opt/librenms -M -r
# usermod -a -G librenms nginx
4. Then install LibreNMS via composer command as shown.
------------ On Debian/Ubuntu ------------
$ cd /opt
$ sudo composer create-project --no-dev --keep-vcs librenms/librenms librenms dev-master

------------ On CentOS/RHEL ------------
# cd /opt
# composer create-project --no-dev --keep-vcs librenms/librenms librenms dev-master
Step 3: Create LibreNMS Database
5. Before you can start using the MariaDB server, you need to secure your installation, run the security script provided in the binary package. It will ask you set a root password, remove anonymous users, disable root login remotely and remove test database.
You can launch the script by issuing the below command and answer all questions with yes/y.
$ sudo mysql_secure_installation   [On Debian/Ubuntu]
# mysql_secure_installation        [On CentOS/RHEL]
6. Then login to MariaDB database to create a database for LibreNMS (remember to use a strong/secure password in a production environment).
$ sudo mysql -u root -p
MariaDB [(none)]> CREATE DATABASE librenms CHARACTER SET utf8 COLLATE utf8_unicode_ci;
MariaDB [(none)]> CREATE USER 'librenms'@'localhost' IDENTIFIED BY '=@!#@%$libre';
MariaDB [(none)]> GRANT ALL PRIVILEGES ON librenms.* TO 'librenms'@'localhost';
MariaDB [(none)]> FLUSH PRIVILEGES;
MariaDB [(none)]> exit
7. Afterwards, disable MySQL strict mode for now (compatibility with MySQL strict mode is yet to be added).
$ sudo vim /etc/mysql/mariadb.conf.d/50-server.cnf    [On Debian/Ubuntu]
# vi /etc/my.cnf        [On CentOS/RHEL]
Within the [mysqld] section please add.
innodb_file_per_table=1
sql-mode=""
lower_case_table_names=0
Then restart the database server to effect the changes.
$ sudo systemctl restart mysql     [On Debian/Ubuntu]
# systemctl restart mariadb        [On CentOS/RHEL]
Step 4: Configure and Start PHP-FPM
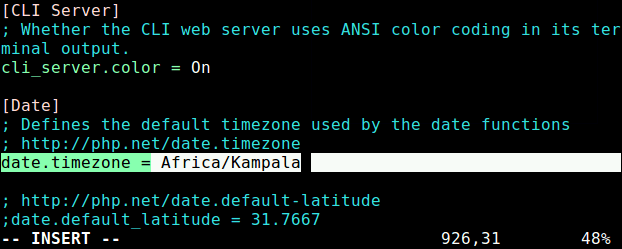
8. Next, set your date.timezone in the php.ini to your current time zone, for example “Africa/Kampala”, as shown in the following screenshot.
------------ On Debian/Ubuntu ------------
$ sudo vim /etc/php/7.0/fpm/php.ini
$ sudo vim /etc/php/7.0/cli/php.ini

------------ On CentOS/RHEL ------------
# vi /etc/php.ini
9. Next enable the mcrypt PHP module in Ubuntu and restart php-fpm as shown.
------------ On Debian/Ubuntu ------------
$ sudo phpenmod mcrypt
$ sudo systemctl restart php7.0-fpm
10. On CentOS/RHEL you need to make following changes in php-fpm configuration file.
# vi /etc/php-fpm.d/www.conf
Make following changes.
;user = apache
user = nginx

group = apache   ; keep group as apache

;listen = 127.0.0.1:9000
listen = /var/run/php-fpm/php7.2-fpm.sock

listen.owner = nginx
listen.group = nginx
listen.mode = 0660
11. Restart php-fpm service as shown.
# systemctl restart php-fpm
Step 5: Configure Nginx for LibreNMS
12. In this step, you need to configure a Nginx server block for librenms in order to access the web UI. Create a .conf file for it as shown.
$ sudo vim /etc/nginx/conf.d/librenms.conf     [On Debian/Ubuntu]
# vi /etc/nginx/conf.d/librenms.conf           [On CentOS/RHEL]
Add the following config, edit server_name as required.
server {
 listen      80;
 server_name librenms.example.com;
 root        /opt/librenms/html;
 index       index.php;

 charset utf-8;
 gzip on;
 gzip_types text/css application/javascript text/javascript application/x-javascript image/svg+xml text/plain text/xsd text/xsl text/xml image/x-icon;
 location / {
  try_files $uri $uri/ /index.php?$query_string;
 }
 location /api/v0 {
  try_files $uri $uri/ /api_v0.php?$query_string;
 }
 location ~ \.php {
  include fastcgi.conf;
  fastcgi_split_path_info ^(.+\.php)(/.+)$;
  fastcgi_pass unix:/var/run/php/php7.0-fpm.sock;
 }
 location ~ /\.ht {
  deny all;
 }
}
13. Then save and exit the file. Also remove the default server block configuration and restart the Nginx server.
------------ On Debian/Ubuntu ------------
$ sudo rm /etc/nginx/sites-enabled/default
$ sudo systemctl restart nginx

------------ On CentOS/RHEL ------------
# systemctl restart nginx
NOTE: On CentOS/RHEL, you will need to disable the default site section, if this is the only site you are hosting. Delete the server section from /etc/nginx/nginx.conf file.
14. Also on CentOS/RHEL, you need to install the policy tool for SELinux and Configure the contexts needed by LibreNMS using following commands.
------------ On CentOS/RHEL ------------
# yum install policycoreutils-python
# semanage fcontext -a -t httpd_sys_content_t '/opt/librenms/logs(/.*)?'
# semanage fcontext -a -t httpd_sys_rw_content_t '/opt/librenms/logs(/.*)?'
# restorecon -RFvv /opt/librenms/logs/
# semanage fcontext -a -t httpd_sys_content_t '/opt/librenms/rrd(/.*)?'
# semanage fcontext -a -t httpd_sys_rw_content_t '/opt/librenms/rrd(/.*)?'
# restorecon -RFvv /opt/librenms/rrd/
# setsebool -P httpd_can_sendmail=1
# setsebool -P httpd_execmem 1
15. Allow fping by creating the file http_fping.tt with the following contents.
module http_fping 1.0;

require {
type httpd_t;
class capability net_raw;
class rawip_socket { getopt create setopt write read };
}

#============= httpd_t ==============
allow httpd_t self:capability net_raw;
allow httpd_t self:rawip_socket { getopt create setopt write read };
16. Then run these commands.
------------ On CentOS/RHEL ------------
# checkmodule -M -m -o http_fping.mod http_fping.tt
# semodule_package -o http_fping.pp -m http_fping.mod
# semodule -i http_fping.pp
17. If you are using Firewall on CentOS/RHEL, enable HTTP/HTTPS access through firewall.
------------ On CentOS/RHEL ------------
# firewall-cmd --zone public --add-service http
# firewall-cmd --permanent --zone public --add-service http
# firewall-cmd --zone public --add-service https
# firewall-cmd --permanent --zone public --add-service https
Step 6: Configure SNMPD for LibreNMS
18. Now use the sample snmp configuration to create your configuration file and open it for editing, as follows.
------------ On Debian/Ubuntu ------------
$ sudo cp /opt/librenms/snmpd.conf.example /etc/snmp/snmpd.conf
$ sudo vim /etc/snmp/snmpd.conf

------------ On CentOS/RHEL ------------
# cp /opt/librenms/snmpd.conf.example /etc/snmp/snmpd.conf
# vi /etc/snmp/snmpd.conf
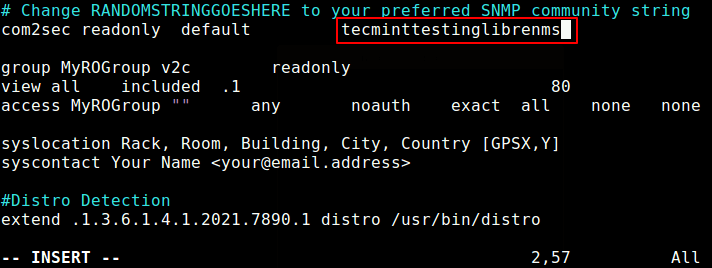
Find the string RANDOMSTRINGGOESHERE and change it to your own community string as shown in screenshot.
19. Next, download a shell script on your system, which helps to detect which OS and if it is Linux then it will detect which Linux distribution, you are using:
------------ On Debian/Ubuntu ------------
$ sudo curl -o /usr/bin/distro https://raw.githubusercontent.com/librenms/librenms-agent/master/snmp/distro
$ sudo chmod +x /usr/bin/distro
$ sudo systemctl restart snmpd

------------ On CentOS/RHEL ------------
# curl -o /usr/bin/distro https://raw.githubusercontent.com/librenms/librenms-agent/master/snmp/distro
# chmod +x /usr/bin/distro
# systemctl restart snmpd
Step 7: Create Cron and Configure Logrotate
20. Now run the command below to setup a cron job for LibreNMS.
# cp /opt/librenms/librenms.nonroot.cron /etc/cron.d/librenms
21. Next, all LibreNMS logs are recorded in /opt/librenms/logs, you can need to configure these logs to be auto-rotated, using the logrotate config file provided, like this.
# cp /opt/librenms/misc/librenms.logrotate /etc/logrotate.d/librenms
Then set the appropriate permissions on the LibreNMS installation root directory and log files.
------------ On Debian/Ubuntu ------------
$ sudo chown -R librenms:librenms  /opt/librenms
$ sudo setfacl -d -m g::rwx /opt/librenms/rrd /opt/librenms/logs
$ sudo setfacl -R -m g::rwx /opt/librenms/rrd /opt/librenms/logs

------------ On CentOS/RHEL ------------
# chown -R librenms:librenms /opt/librenms
# setfacl -d -m g::rwx /opt/librenms/rrd /opt/librenms/logs
# setfacl -R -m g::rwx /opt/librenms/rrd /opt/librenms/logs
Step 8: Access LibreNMS Web Installer
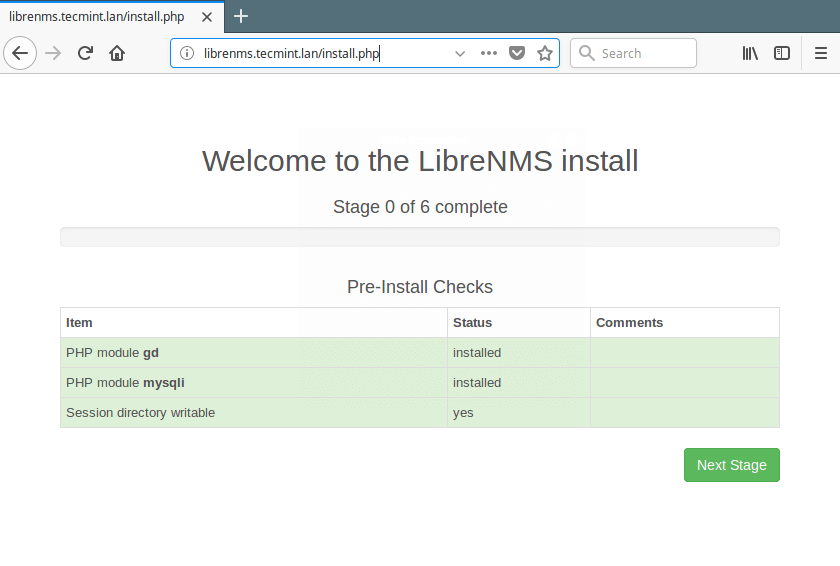
22. Next, use the following URL to access the web installer and follow the on-screen instructions.
http://librenms.tecmint.lan/install.php
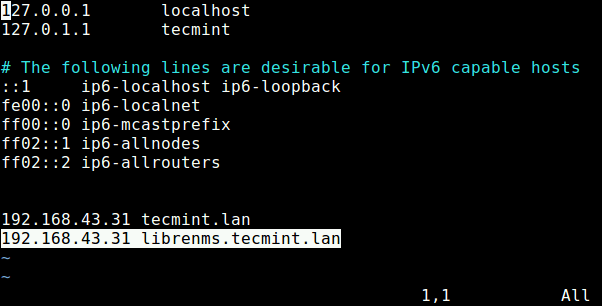
For this address to work on a local machine, you need to setup a local DNS using the hosts file (/etc/hosts), for local domain resolution or testing purposes before going live.
192.168.43.31 tecmint.lan
192.168.43.31 librenms.tecmint.lan
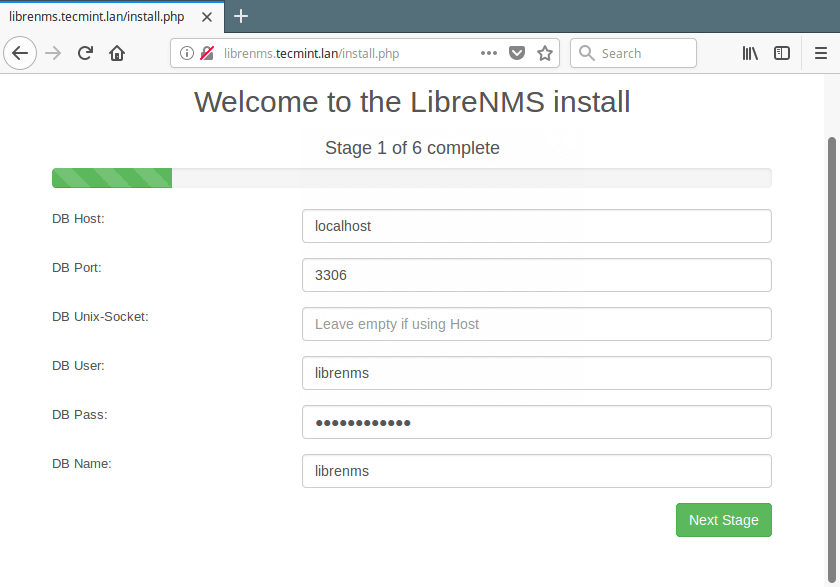
23. You will see the installation welcome page as shown in the following screenshot, click Next Stage to continue.
24. Then enter the settings (database host, port, username and user password) for the LibreNMS database and click Next Stage to proceed.
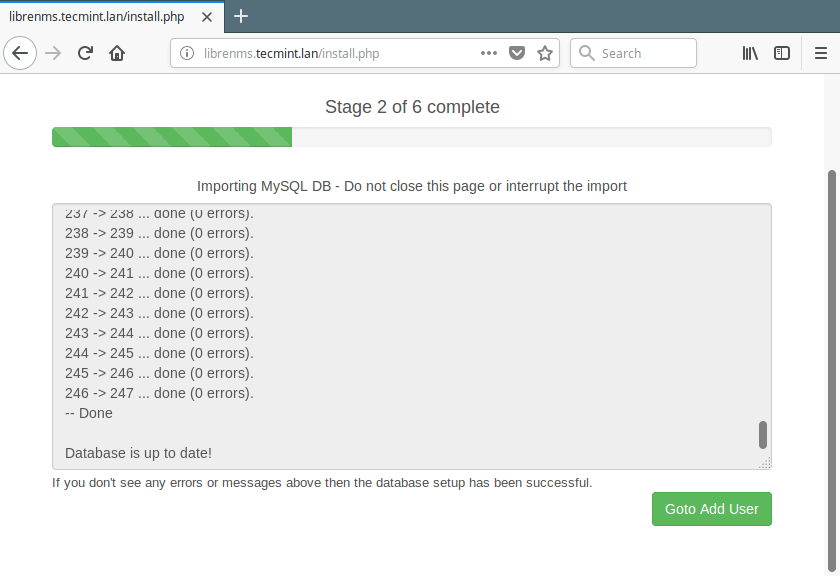
25. The web installer will now start importing the MySQL database, this will take some time. Note that the process will try to pause at certain points, simple click on Retry to continue with the importation process.

26. Once the database importation is complete, you should see the message “Database is up to date!”, as shown in the screenshot below. Then click on Goto Add User to proceed.
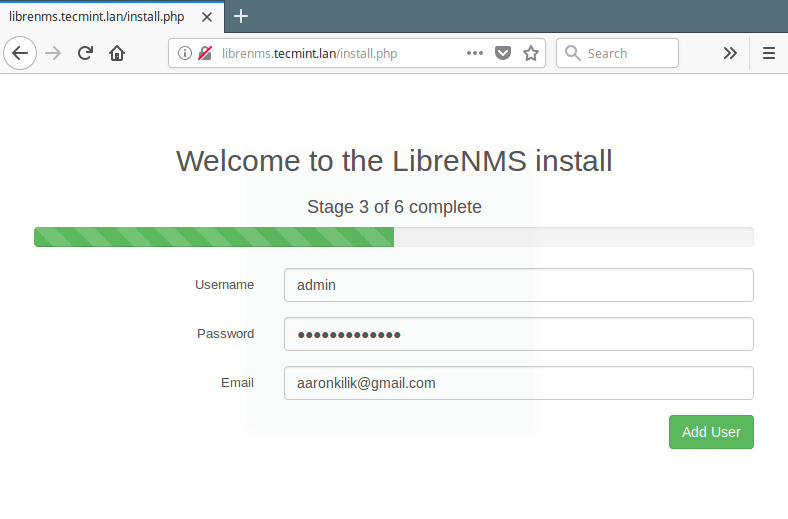
27. Next, add a LibreNMS user, specify username, password and email, then click on Add User to effect the changes.
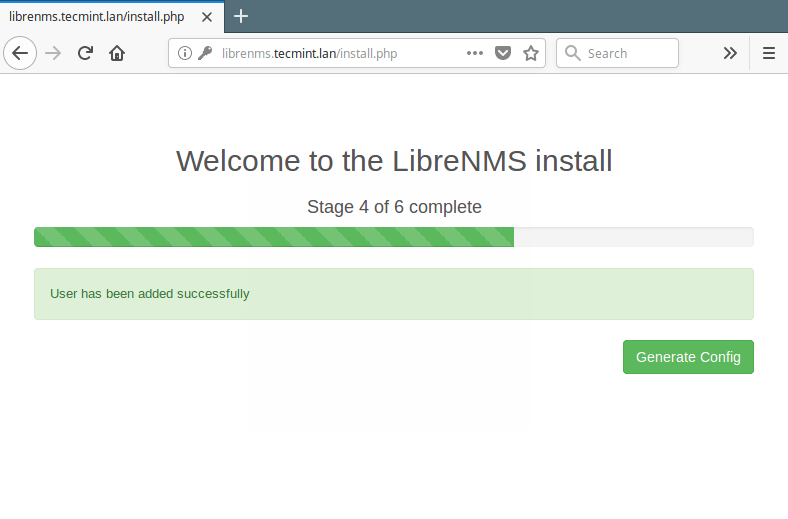
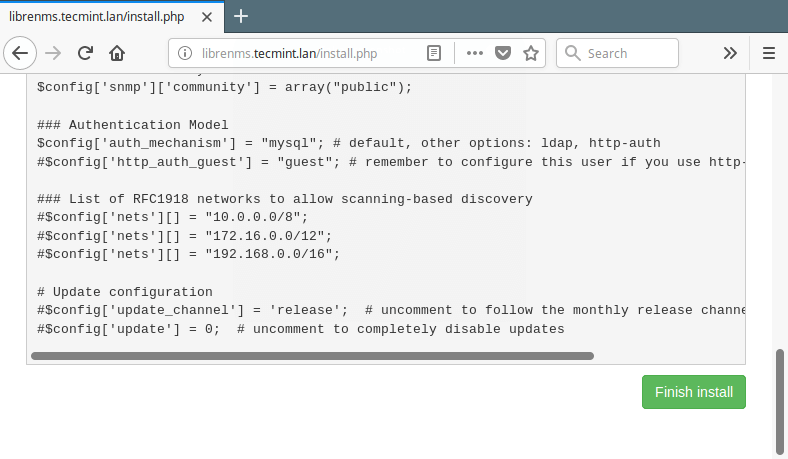
28. Now click on create the LibreNMS configuration for your system, by clicking Generate Config.
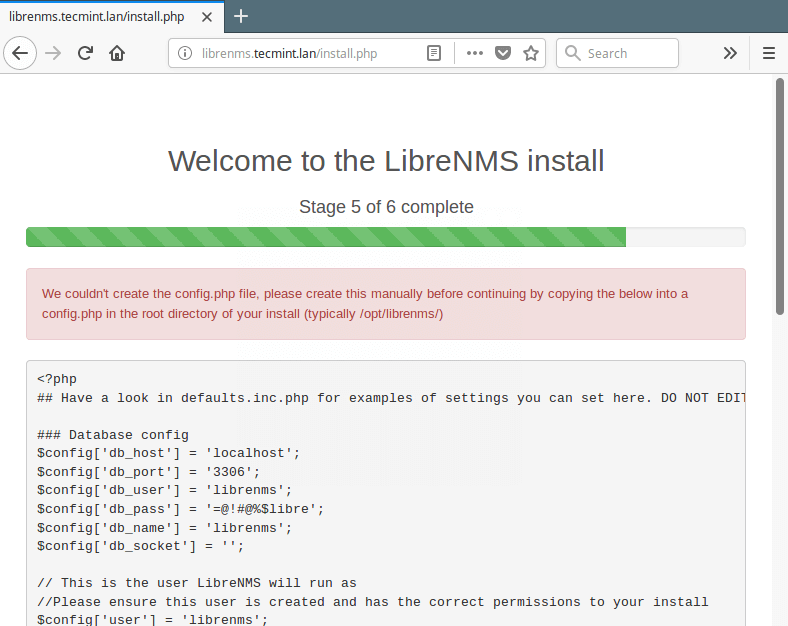
29. Once the config is generated, as shown in the previous screenhot, copy it and save it in the root directory of your installation, in a file called /opt/librenms/config.php.
# vi /opt/librenms/config.php
<?php
## Have a look in defaults.inc.php for examples of settings you can set here. DO NOT EDIT defaults.inc.php!

### Database config
$config['db_host'] = 'localhost';
$config['db_port'] = '3306';
$config['db_user'] = 'librenms';
$config['db_pass'] = '=@!#@%$libre';
$config['db_name'] = 'librenms';
$config['db_socket'] = '';

// This is the user LibreNMS will run as
//Please ensure this user is created and has the correct permissions to your install
$config['user'] = 'librenms';

### Locations - it is recommended to keep the default
#$config['install_dir']  = "/opt/librenms";

### This should *only* be set if you want to *force* a particular hostname/port
### It will prevent the web interface being usable form any other hostname
#$config['base_url']        = "http://librenms.company.com";

### Enable this to use rrdcached. Be sure rrd_dir is within the rrdcached dir
### and that your web server has permission to talk to rrdcached.
#$config['rrdcached']    = "unix:/var/run/rrdcached.sock";

### Default community
$config['snmp']['community'] = array("public");

### Authentication Model
$config['auth_mechanism'] = "mysql"; # default, other options: ldap, http-auth
#$config['http_auth_guest'] = "guest"; # remember to configure this user if you use http-auth

### List of RFC1918 networks to allow scanning-based discovery
#$config['nets'][] = "10.0.0.0/8";
#$config['nets'][] = "172.16.0.0/12";
#$config['nets'][] = "192.168.0.0/16";

# Update configuration
#$config['update_channel'] = 'release';  # uncomment to follow the monthly release channel
#$config['update'] = 0;  # uncomment to completely disable updates
30. Save and close the file. Then return to the web installer to continue with the installation process, by clicking Finish Install.
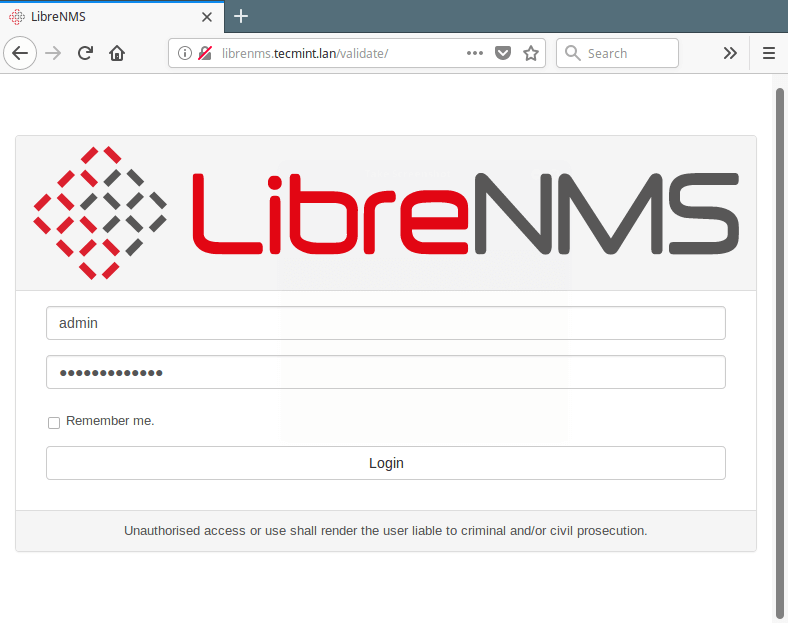
31. Now your LibreNMS installation is complete, you can click on “validate your install and fix any issues”, the login page should appear.

32. Next, enter your user credentials to access the validation page.
33. From the installation validation process, LibreNMS has discovered two issues, one is that devices have not been added (this is a warning for now), and secondly, we have not set the appropriate permission on the config file (/opt/librenms/config.php) which was manually added, as shown in the screen shot below.
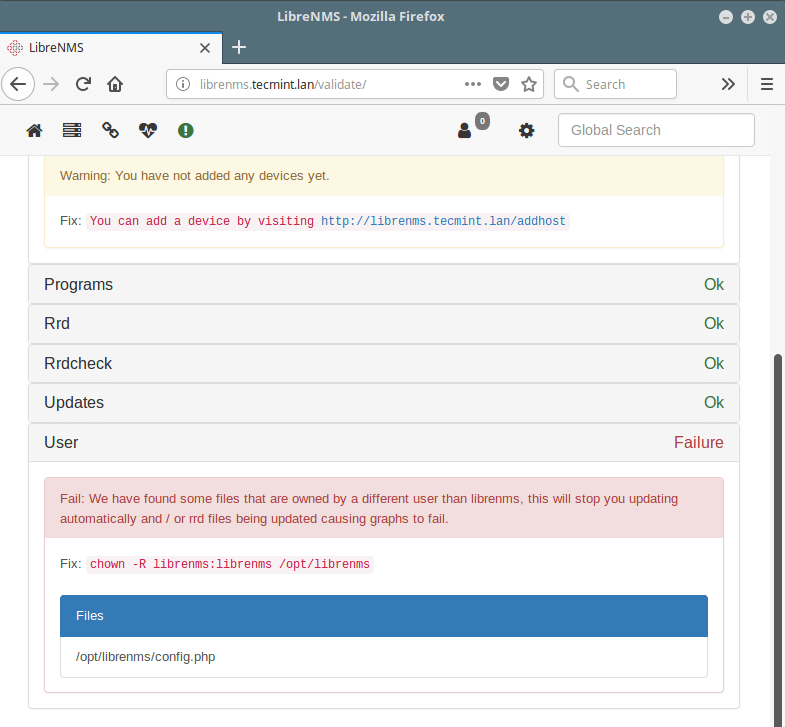
Now run the following command to set the correct permission on the config file.
$ sudo chown -R librenms:librenms /opt/librenms/config.php
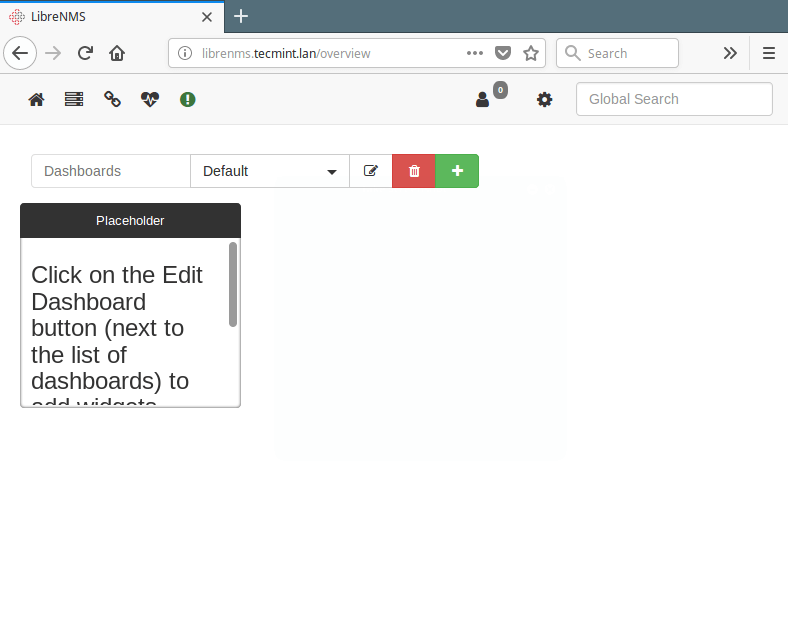
34. To add devices, go to: http://librenms.tecmint.lan/addhost. After adding devices, you can go to the home page and add various dashboards.
That’s It! You can find more information, including installation and setup on the LibreNMS Documentation at https://docs.librenms.org/.
LibreNMS is a fully featured network monitoring system that supports a variety of network hardware. We hope that this was a lucid installation guide, if you have any questions, reach us via the feedback form below.


Could you provide the syntax or Linux commands to restart LibreNMS and clear its cache?
@Jean,
To restart LibreNMS, you need to restart the web server and the services it relies on.
There is a bad gateway error due to mistake in /etc/nginx/conf.d/librenms.conf file. There should be fastcgi_pass unix:/var/run/php-fpm/php7.2-fpm.sock;
@jj
Correct, this depends on your PHP version. If you have PHP 7.2, then use fastcgi_pass unix:/var/run/php-fpm/php7.2-fpm.sock; or if you have PHP 7.0, use fastcgi_pass unix:/var/run/php-fpm/php7.0-fpm.sock; and so on. Many thanks for sharing this.
Hi Aaron,
Another info about librenms:
It is a very good tool, in my case with more then 20 snmp devices (10 are 24 ports switches) during almost one year I do not have any problem (and I make updates very often)
@lulian
Many thanks for the useful addition.
@Aaron Kili
There is another typo for CentOS 7 because there is no service named snmp. It is named snmpd not snmp.
It should be:-
Also the part where you make changes to the nginx configuration files does not refer to the default files installed on CentOS 7 after installing nginx.
Everything is now in /etc/nginx/conf.d/ the file default.conf is there.
nginx.conf contains only the following:-
user  nginx;
worker_processes  1;

error_log  /var/log/nginx/error.log warn;
pid        /var/run/nginx.pid;


events {
    worker_connections  1024;
}


http {
    include       /etc/nginx/mime.types;
    default_type  application/octet-stream;

    log_format  main  '$remote_addr - $remote_user [$time_local] "$request" '
                      '$status $body_bytes_sent "$http_referer" '
                      '"$http_user_agent" "$http_x_forwarded_for"';

    access_log  /var/log/nginx/access.log  main;

    sendfile        on;
    #tcp_nopush     on;

    keepalive_timeout  65;

    #gzip  on;

    include /etc/nginx/conf.d/*.conf;
}
Please revisit the nginx configuration area while looking at the files in a current version of CentOS 7 as so much in your how-to is different to current files in CentOS 7 that I cannot work out what to do.
Thanks,
Michael K.
@ Michael
We will update the article as you have suggested. Many thanks for the heads up.
Stuck on Step 1 on RHEL 7.4, please somebody review for me:
[root@rhel-74 student]# systemctl nginx start php7.0-fpm mariadb snmp
Unknown operation ‘nginx’.
[root@rhel-74 student]# systemctl start nginx php7.0-fpm mariadb snmp
Failed to start php7.0-fpm.service: Unit not found.
Failed to start snmp.service: Unit not found.
@David,
Have you enabled EPEL repository on the system? epel must be enabled on the system to install nginx as shown.
Also to install PHP 7, you need to enable Remi repository on RHEL 7, please follow this guide – https://www.tecmint.com/install-php-7-in-centos-7/
@David
Sorry, there is a typo in the article. From the output of the second command, you do not have PHP7.0-FPM and SNMP services installed on your system. Ensure that you install all required packages like this:
# yum install epel-release

# rpm -Uvh https://mirror.webtatic.com/yum/el7/webtatic-release.rpm

# yum install composer cronie fping git ImageMagick jwhois mariadb mariadb-server mtr MySQL-python net-snmp net-snmp-utils nginx nmap php72w php72w-cli php72w-common php72w-curl php72w-fpm php72w-gd php72w-mysqlnd php72w-process php72w-snmp php72w-xml php72w-zip python-memcached rrdtool
Then start the services like this, the correct commands are here:
Love LibreNMS. It’s one of my favorite tools.
@Tim
We find it remarkable. Thanks for sharing your experience with us.