Squid is a most popular caching and forwarding HTTP web proxy server used my wide range of companies to cache web pages from a web server to improve web server speed, reduce response times and reduce network bandwidth usage.
Read Also: How to Create an HTTP Proxy Using Squid on CentOS 7
In this article, we will explain how to install a squid proxy server on Ubuntu and Debian distributions and use it as an HTTP proxy server.
How to Install Squid on Ubuntu
Before we begin, you should know that Squid server doesn’t have any requirements, but the amount of RAM utilization may differ based on the clients browsing the internet via the proxy server.
Squid package is available to install from the base Ubuntu repository, but before that make sure to update your packages by running.
$ sudo apt update
Once your packages are up to date, you can proceed further to install squid and start and enable it on system startup using following commands.
$ sudo apt -y install squid
$ sudo systemctl start squid
$ sudo systemctl enable squid
At this point your Squid web proxy should already be running and you can verify the status of the service with.
$ sudo systemctl status squid
Sample Output
● squid.service - LSB: Squid HTTP Proxy version 3.x
   Loaded: loaded (/etc/init.d/squid; generated)
   Active: active (running) since Tue 2018-12-04 06:42:43 UTC; 14min ago
     Docs: man:systemd-sysv-generator(8)
    Tasks: 4 (limit: 1717)
   CGroup: /system.slice/squid.service
           ├─2761 /usr/sbin/squid -YC -f /etc/squid/squid.conf
           ├─2766 (squid-1) -YC -f /etc/squid/squid.conf
           ├─2768 (logfile-daemon) /var/log/squid/access.log
           └─2772 (pinger)

Dec 04 06:42:43 tecmint systemd[1]: Starting LSB: Squid HTTP Proxy version 3.x...
Dec 04 06:42:43 tecmint squid[2708]:  * Starting Squid HTTP Proxy squid
Dec 04 06:42:43 tecmint squid[2708]:    ...done.
Dec 04 06:42:43 tecmint systemd[1]: Started LSB: Squid HTTP Proxy version 3.x.
Dec 04 06:42:43 tecmint squid[2761]: Squid Parent: will start 1 kids
Dec 04 06:42:43 tecmint squid[2761]: Squid Parent: (squid-1) process 2766 started
Following are the some important squid file locations you should be aware of:
- Squid configuration file: /etc/squid/squid.conf
- Squid Access log: /var/log/squid/access.log
- Squid Cache log: /var/log/squid/cache.log
The default configuration file contains some configuration directives that needs to be configured to affect the behavior of the Squid.
Now open this file for editing using Vi editor and make changes as shown below.
$ sudo vim /etc/squid/squid.conf
Now, you may search about the following lines and change them as requested, in the Vi editor, you may search about those lines by hitting the ‘ESC’ and typing “/” key to writing the specific lines to look for.
- http_port : This is the default port for the HTTP proxy server, by default it is 3128, you may change it to any other port that you want, you may also add the “transparent” tag to the end of the line like http_port 8888 transparent to make Squid proxy act like a transparent proxy if you want.
- http_access deny all : This line won’t let anybody to access the HTTP proxy server, that’s why you need to change it to http_access allow all to start using your Squid proxy server.
- visible_hostname : This directive is used to set the specific hostname to a squid server. You can give any hostname to squid.
After making above changes, you may restart the Squid proxy server using the command.
$ sudo systemctl restart squid
Configuring Squid as an HTTP Proxy on Ubuntu
In this squid configuration section, we will explain you how to configure squid as an HTTP proxy using only the client IP address for authentication.
Add Squid ACLs
If you wish to allow only one IP address to access the internet through your new proxy server, you will need to define new acl (access control list) in the configuration file.
$ sudo vim /etc/squid/squid.conf
The acl rule you should add is:
acl localnet src XX.XX.XX.XX
Where XX.XX.XX.XX is the IP address of client machine. This acl should be added in the beginning of the ACL’s section as shown in the following screenshot.
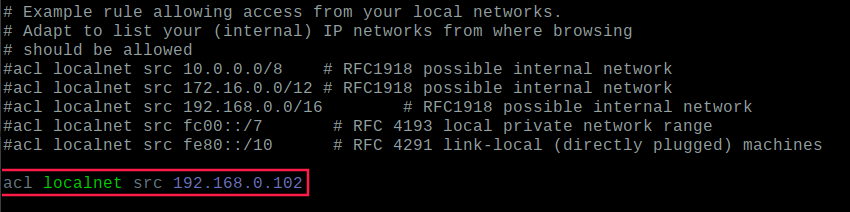
It is always a good practice to define a comment next to ACL which will describe who uses this IP address, for example.
acl localnet src 192.168.0.102 # Boss IP address
You will need to restart Squid service to take the new changes into effect.
$ sudo systemctl restart squid
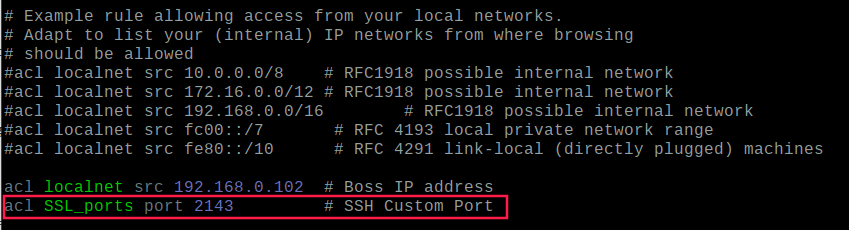
Open Ports in Squid Proxy
By default, only certain ports are allowed in the squid configuration, if you wish to add more just define them in the configuration file as shown.
acl Safe_ports port XXX
Where XXX is the port number that you wish to allow. Again it is a good practive to define a comment next to acl that will describe what the port is going to be used for.
For the changes to take effect, you will need to restart squid once more.
$ sudo systemctl restart squid
Squid Proxy Client Authentication
To allow users to authenticate before using the proxy, you need to enable basic http authentication in the configuration file, but before that you need to install apache2-utils package using following command.
$ sudo apt install apache2-utils
Now create a file called “passwd” that will later store the username for the authentication. Squid runs with user “proxy” so the file should be owned by that user.
$ sudo touch /etc/squid/passwd
$ sudo chown proxy: /etc/squid/passwd
$ ls -l /etc/squid/passwd
Now we will create a new user called “tecmint” and setup its password.
$ sudo htpasswd /etc/squid/passwd tecmint

New password:
Re-type new password:
Adding password for user tecmint
Now to enable basic http authentication open the configuration file.
$ sudo vim /etc/squid/squid.conf
After the ports ACLs add the following lines:
auth_param basic program /usr/lib64/squid/basic_ncsa_auth /etc/squid/passwd
auth_param basic children 5
auth_param basic realm Squid Basic Authentication
auth_param basic credentialsttl 2 hours
acl auth_users proxy_auth REQUIRED
http_access allow auth_users

Save the file and restart squid so that the new changes can take effect:
$ sudo systemctl restart squid
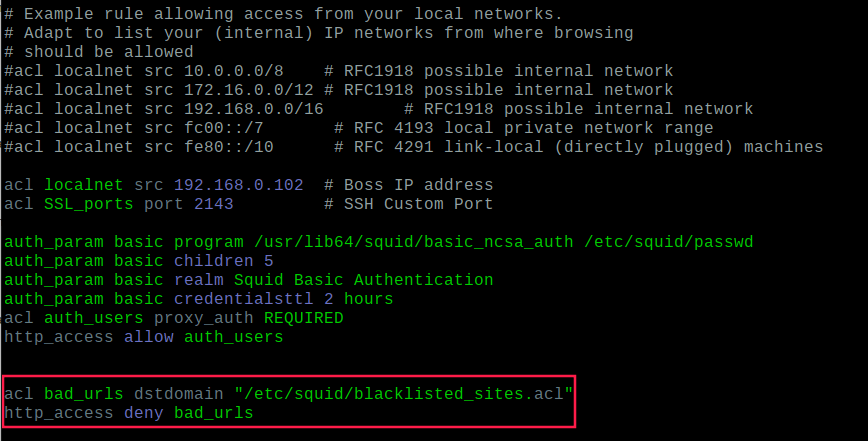
Block Websites on Squid Proxy
To block access to unwanted websites, first create a file called “blacklisted_sites.acl” that will store the blacklisted sites in it.
$ sudo touch /etc/squid/blacklisted_sites.acl
Now add the websites that you wish to block access, for example.
.badsite1.com
.badsite2.com
The proceeding dot informs squid to block all references to that sites including www.badsite1, subsite.badsite1.com etc.
Now open Squid’s configuration file.
$ sudo vim /etc/squid/squid.conf
Just after the above ACLs add the following two lines:
acl bad_urls dstdomain "/etc/squid/blacklisted_sites.acl"
http_access deny bad_urls
Now save the file and restart squid:
$ sudo systemctl restart squid
Block Specific Keyword with Squid
To block a list of keywords, first create a file called “blockkeywords.lst” that will store the blacklisted keywords in it.
$ sudo touch /etc/squid/blockkeywords.lst
Now add the keywords that you wish to block access, for example.
facebook
instagram
gmail
Now open Squid’s configuration file and add the following rule.
acl blockkeywordlist url_regex "/etc/squid/blockkeywords.lst"
http_access deny blockkeywordlist
Now save the file and restart squid:
$ sudo systemctl restart squid
Once everything configured accurately, you can now configure your local client web browser or operating system’s network settings to use your newly configured squid HTTP proxy.
Configure Client to Use Squid Proxy
Now to test that your proxy server is working or not, you may open Firefox and go to Edit –> Preferences –> Advanced –> Network –> Settings and select “Manual proxy configuration” and enter your proxy server IP address and Port to be used for all connection as it follows.

Once you fill all the required proxy details, you will be able to surf the Web using your Squid proxy server, you may do the same thing in any other browser or program you want.
To make sure that you are surfing the web using your proxy server, you may visit http://www.ipaddresslocation.org/, in the right top corner you must see the same IP address as your server IP address.
For more additional configuration settings, you may check official squid documentation. If you have any questions or comments, please add them in the comment section below.


Hi,
I have an error after rebooting the device when I force to restart the service works. I tried with the default template squid.conf and at booting works well.
When I use my squid.conf I’m getting an error at reboot, I reviewed the configuration using
sudo squid -kparse and I did not find errors.Could you please provide me with advice?
Take a look at the error.
● squid.service – Squid Web Proxy Server
Loaded: loaded (/lib/systemd/system/squid.service; enabled; vendor preset: enabled)
Active: failed (Result: exit-code) since Fri 2022-01-14 18:11:55 CST; 3min 19s ago
Docs: man:squid(8)
Process: 2300 ExecStartPre=/usr/sbin/squid –foreground -z (code=exited, status=0/SUCCESS)
Process: 2315 ExecStart=/usr/sbin/squid –foreground -sYC (code=exited, status=1/FAILURE)
Main PID: 2315 (code=exited, status=1/FAILURE)
Jan 14 18:11:54 raspib4bcm squid[2315]: Removing PID file (/run/squid.pid)
Jan 14 18:11:55 raspib4bcm systemd[1]: squid.service: Main process exited, code=exited, status=1/FAILURE
Jan 14 18:11:55 raspib4bcm systemd[1]: squid.service: Killing process 2346 (squid) with signal SIGKILL.
Jan 14 18:11:55 raspib4bcm systemd[1]: squid.service: Killing process 2347 (squid) with signal SIGKILL.
Jan 14 18:11:55 raspib4bcm systemd[1]: squid.service: Killing process 2346 (squid) with signal SIGKILL.
Jan 14 18:11:55 raspib4bcm systemd[1]: squid.service: Killing process 2347 (squid) with signal SIGKILL.
Jan 14 18:11:55 raspib4bcm systemd[1]: squid.service: Failed with result ‘exit-code’.
Jan 14 18:11:55 raspib4bcm systemd[1]: squid.service: Unit process 2346 (squid) remains running after unit stopped.
Jan 14 18:11:55 raspib4bcm systemd[1]: squid.service: Unit process 2347 (squid) remains running after unit stopped.
Jan 14 18:11:55 raspib4bcm systemd[1]: Failed to start Squid Web Proxy Server.
Hi, I am wondering if this “great” guide could be updated to include transparent proxy setup/configuration. I don’t want to set up individual clients and guests and simply force them all to use the proxy to access the internet.
I read somewhere about using IP tables but can’t seem to get my head around it.
Thanks in advance.
Ubuntu 20.04 on a Pi4 with webmin, UFW & squid 4.10.
but to create a whitelist the procedure is the same as the blacklist?
thank you so much.
Could you tell me, WHY to use a proxy if I don’t need user authentication for using the internet?
Just because it can’t cache, filter, etc. SSL/tls content…
A little thing left out: I’m using squid to log which domains were accessed by the clients. But it is incomplete because android devices can bypass the proxy. And I can’t stop them on the router, because if I forbid all traffic, except the proxy’s own, then many features get unusable on the mobiles. :(
I agree that nowadays it is complicated to use a proxy, in the past without too many mobile phones connected and with more HTTP sites to cache, it was more usable.
Today what I use a proxy for is just to deny websites for specific users and define download pools.
For mobile phones, the best usage is to implement freeradius and some sort of captive portal.
Hello, 2020 reader here! When I try to make the server require authentication, I get an error saying “/usr/lib64/squid/basic_ncsa_auth. No such file or directory” Could it be the fact that it is a newer version of ubuntu, Or is it that I’m using a newer version of squid?
P.S. May I know which version of ubuntu you were using? Also what version of Squid you were using at the time.
Dear Ravi,
Thanks for the great guide.
I have set up the Squid proxy server on my server. I can now browse the Internet on my desktop through the proxy server after setting up the Network proxy in the network settings GUI.
However, if I try to access the Internet from the terminal, there is “502 Bad Gateway” showing up.
I have only set up squid and configured it to allow the IP address of my desktop by adding one line “acl localnet src 172.xx.xx.xx” near the top while leaving other settings untouched, I have not set up authentications, etc.
Could you please tell me where I could be wrong?
Thanks a lot!
@Hongchengi,
The error 502 Bad Gateway is related to your HTTP web server, and the error means the server on the internet received an invalid response from another server. It is nothing related to proxy..
Thanks for your reply. When I log in to the server, I actually have access to the Internet, both from firefox and from, say, wget and w3m. When I use firefox on the desktop I can also browse. However, when I use tools from the terminal (wget and w3m etc.) on the desktop, there is error 502. That is really strange I would say. Do you have any clue what could be wrong? Thanks again!
@Hongchengi,
Try to change your DNS servers in the system, maybe Bad Gateway errors are caused by temporary issues with DNS servers.
Squid proxy asking Authentication Required when i open the browser, i want to restrict only few sites not the whole browser
Please help me to solve it..
thanks and regards
naveen chowdary
Thanks for your how to guide.
ACL Concept works from head to tail line for line, so i would change the line http_access allow with the http_access deny to block the unwanted sites.
Correct me if I’m wrong!
@Alex
Yes, you are correct, to block websites it should be http_access deny.
I am pulling my hair out. Every time I check my IP (web running thru squid proxy) from a site like whatsmyip.org, I get a different IP address each time. I only want the public IP address of the squid proxy server to show.
@Chris,
Have you configured your client browser to use your Squid Proxy Server IP as proxy?
Yes, it is a PHP CURL program actually. It seems from my end that it is working properly. The only thing that was alarming was in testing I would go to whatsmyip.org and that site would say that my IP is not what it should be – and every time I would test it there, it would give a different IP address.
I checked logs of web servers and PHP headers, etc. Everything seems fine and I think it is working properly – just the weird issue with whatsmyip.org got me concerned.
@ChrisL,
Try different IP Address Locator to find out IP address..
Hello,
i’m implement squid in my office but i faced lots of problem user end.
1) Outlook send and recive problem.
I have to DMZ setup on squid server for accessing my another network.
3 lan lan port on my squid server, static ip set on eth0, internal network set on eth1.
how i configure DMZ on eth2
how can you do so much stuff?
@Alas,
For readers like you, we’ve to go through such painful stuff..:) I hope you understand..
thank you, this is very nice very helpful
Is any way to include password for this set up? Let’s say I want to share this proxy with some people, but I want to control access in case I don’t want to share access any more. Thank you in advance.
@Adam,
I think this proxy authentication guide will help you out in setting password for your squid server.
http://wiki.squid-cache.org/Features/Authentication
Hey tecmint, what is your Linux distribution that you use in this tutorial.? thanks before.
@Bagus,
Linux Mint 17.1 distribution.
There is a GUI tool for managing squid and many other applications called WEBMIN
hey after installing squid you told to go to firefox and enter in connection settings at HTTP my proxy server ip address.where can i find that?
On client machine, open firefox and add proxy settings..
I am a linux newbie running ubuntu latest version. Is there a GUI to use after installing Squid? I don’t see how I can see it working without a GUI (remember I am not a Linux guy) – I’d consider installing in Windows if I can get a graphical interface to use afterwards.
I am after stats as to what websites are the most visited etc. Can you help?
@Rod,
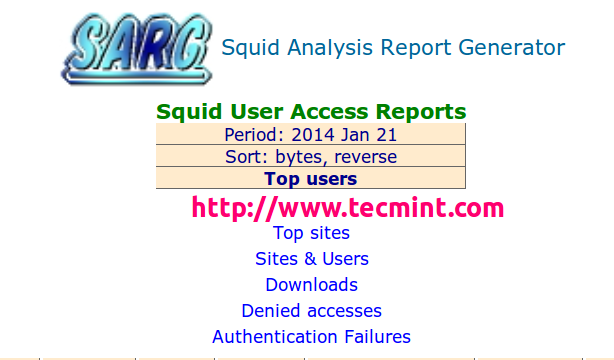
You talking about a GUI tool to manage squid? If yes, unfortunately there isn’t any gui..but you can monitor your squid behavior using sarg tool as explained in the below article.
https://www.tecmint.com/sarg-squid-analysis-report-generator-and-internet-bandwidth-monitoring-tool/
gui tool is called webmin
What version of Ubuntu is that, I will create cache server on our network.
@Prabhat,
We’ve used latest Ubuntu version to setup squid proxy server, you can use any Ubuntu version, the instructions will work 100%.
What version of Ubuntu is that, I will create proxy server on our company. Thanks in advance man..
Hello.
It will work on both Ubuntu 14.04/14.10.
Hi,
May I know how to configure caching in squid?
Also what is the ideal system hardware requirements if Im going to build a transparent proxy with caching?
Thanks
for he success of cache lines you uncomment :
cache_mem
cache_dir ufs
can you share tutorial of transparent squid proxy in same network ,, like squid server is of ip 192.168.10.1 and network is 192.168.10/24 ?