Technology today relies heavily on networking equipment and proper configuration of that networking equipment. Administrators are tasked with ensuring that configuration changes are not only tested thoroughly before implementation but also that any configuration changes are done by individuals who are authorized to be making changes as well as making sure that the changes are logged.

This security principle is known as AAA (Triple-A) or Authentication, Authorization, and Accounting. There are two very prominent systems that offer AAA functionality for administrators to secure access to devices and the networks those devices serve.
RADIUS (Remote Access Dial-In User Service) and TACACS+ (Terminal Access Controller Access-Control System Plus).
Radius is traditionally used to authenticate users to access the network which contrasts to TACACS in that TACACS is traditionally used for device administration. One of the large differences between these two protocols is the ability for TACACS to separate the AAA functions into independent functions.
The benefit of TACACS separation of the AAA functions is that a user’s ability to execute certain commands can be controlled. This is very advantageous to organizations who wish to provide networking staff or other IT administrator’s with differing command privileges at a very granular level.
This article will walk through setting up a Debian system to act as a TACACS+ system.
Environment Setup
- Debian 8 installed and configure with network connectivity. Please read this article on how to install Debian 8
- Cisco network switch 2940 (Most other Cisco devices will work as well but commands on the switch/router may vary).
Installation of the TACACS+ Software on Debian 8
The first step in setting up this new TACACS server will be to acquire the software from the repositories. This is easily accomplished with the use of the ‘apt’ command.
# apt-get install tacacs+
The above command will install and start the server service on port 49. This can be confirmed with several utilities.
# lsof -i :49
# netstat -ltp | grep tac
These two commands should return a line that indicates TACACS is listening on port 49 on this system.

At this point TACACS is listening for connections on this machine. Now it is time to configure the TACACS service and users.
Configuring TACACS Service and Users
It is generally a good idea to bind services to specific IP addresses if the server happens to have multiple addresses. To accomplish this task, the default daemon options can be modified to specify an IP address.
# nano /etc/default/tacacs+
This file specifies all of the daemon settings the TACACS system should start. The default installation will only specify the configuration file. By adding a ‘-B’ argument to this file, a specific IP address can be used for TACACS to listen.
DAEMON_OPTS="-C /etc/tacacs+/tac_plus.conf " - Original Line
DAEMON_OPTS="-C /etc/tacacs+/tac_plus.conf -B X.X.X.X " - New line, where X.X.X.X is the IP address to listen on
Special note in Debian: For some reason attempting to restart the TACACS+ service to read the new daemon options is unsuccessful (via service tacacs_plus restart).
The issue here seems to be when TACACS is started via the init script, the PID is statically set to “PIDFILE=/var/run/tac_plus.pid” however when the “-B X.X.X.X” is specified as a daemon option, the name of the pid file is changed to “/var/run/tac_plus.pid.X.X.X.X”.
I’m not totally sure if this is a bug or not but to combat the situation temporarily, one can manually set the PIDFILE in the init script by changing the line to “PIDFILE=/var/run/tac_plus.pid.X.X.X.X” where X.X.X.X is the IP address TACACS should listen on and then start the service with:
# service tacacs_plus start
Upon restarting the service, the lsof command can be used again to confirm that the TACACS service is listening on the correct IP address.
# lsof -i :49

As seen above, TACACS is listening on an IP address on a specific IP address as set in the TACACS defaults file above. At this point users and specific command sets need to be created.
This information is managed by another file: ‘/etc/tacacs+/tac_plus.conf‘. Open this file with a text editor to make the appropriate modifications.
# nano /etc/tacacs+/tac_plus.conf
This file is where all the TACACS specifications should reside (user permissions, access control lists, host keys, etc). The first thing that needs to be created is a key for the network devices.
There is a lot of flexibility in this step. A single key can be configured for all network devices or multiple keys can be configured per device. The option is up to the user but this guide will use a single key for simplicity’s sake.
key = "super_secret_TACACS+_key"

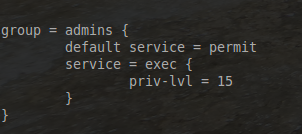
Once a key has been configured, groups should be built that determine the permissions that users will be assigned later. Creating groups makes the delegation of permissions much easier. Below is an example of assigning full administrator rights.
group = admins {
        default service = permit
        service = exec {
                priv-lvl = 15
        }
}

- The group name is determined by the line “group = admins” with admins being the group name.
- The “default service = permit” line indicates that if a command is not explicitly denied, then allow it implicitly.
- The “service = exec { priv-lvl = 15 }” allows privilege level 15 in exec mode on a Cisco device (privilege level 15 is the highest on Cisco equipment).
Now a user needs to be assigned to the admin group.
user = rob {
       member = admins
       login = des mjth124WPZapY
}

- The “user = rob” stanza allows a user-name of rob to access some resource.
- The “member = admins” tells TACACS+ to refer to the previous group called admins for a listing of what this user is authorized to do.
- The final line, “login = des mjth124WPZapY” is a des encrypted password for this user to authenticate ( feel free to use a cracker to figure out this super “complex” password example)!
Important: It is generally a best practice to place encrypted passwords into this file rather than plain-text as it adds a slight amount of security in the event that someone should read this file and shouldn’t necessarily have access.
A good preventative measure for this is to at least remove world read access on the configuration file as well. This can be accomplished via the following command:
# chmod o-r /etc/tacacs+/tac_plus.conf
# service tacacs_plus reload
At this point the server side is ready for connections from network devices. Let’s head over to the Cisco switch now and configure it to communicate with this Debian TACACS+ server.


Hi, there,
I found an interesting project – tacacsGUI- a self-hosted front-end UI for tac_plus configuration. My installation was easy, try it. Plus it has some advantages like Backup Maker for auto backup, Subnet Searcher for subnet collection, etc.
Good luck!
Alexey,
This tool appears to be very useful. I’ll have to experiment with it and amend this article! Thanks for the heads up on this tool.
Perfect all information you need for both router and server. Thanks ! I tested it with GNS3 environment with a Router c3640 Version 12.4(12), it only works with cleartext password setup on TACACS+ server. When you generate the RSA Key on the router don’t forget to define the size to 1024, otherwise the key is not validated (it’s hidden on the script block).
Alain,
Thank you for that piece of information. I hadn’t had any issues with the setup yet but I’m sure your testing will help someone else in the future as well!