TrueNAS CORE (formerly FreeNAS) is a popular storage system that helps you build your own high-quality storage setup without paying for software. You can install it on your computer hardware or a virtual machine (VM) to get the benefits of open-source storage.
You can use TrueNAS CORE at home, in an office, or in a data center for storing and managing large amounts of data. It’s useful for IT professionals, photographers, designers, audio/video producers, developers, and anyone who needs to store and protect lots of data. You can also use it with backup software to save large amounts of rarely used data and even sync it with the cloud.
TrueNAS CORE uses the OpenZFS filesystem, which is known for its reliability and was once only found in high-end storage systems. OpenZFS includes features like built-in RAID, powerful data management tools, and the ability to automatically fix data errors.
System Requirements
Before installing TrueNAS CORE, ensure that your hardware meets the following requirements:
- TrueNAS CORE requires a 64-bit CPU.
- A minimum of 8 GB of RAM is recommended; more is preferable for better performance.
- At least 16 GB for the installation.
- Additional drives for storing data, with capacity based on your needs.
- At least one Ethernet port (no wireless support).
In this TrueNAS CORE 4-article series, we will cover the installation and configuration of TrueNAS with storage, and in later articles will cover setting up a video streaming & torrent server.
My Server Setup
Hardware		:	Virtual Machine 64-bit
Operating System        :	TrueNAS-13.0-U6.2.iso
IP Address	      	:	192.168.122.103
8GB RAM		        :	Minimum RAM
1 Disk (20GB)	      	:	Used for OS Installation
2 Disks (20GB)		:	Used for Storage
Step 1: Create TrueNAS Bootable Media
To set up a TrueNAS operating system, you will need to download the latest stable installation ISO Image (i.e. version 13.0-U6.2) from the TrueNAS download page, or you can use the following wget command to download directly in the terminal.
wget https://download-core.sys.truenas.net/13.0/STABLE/U6.2/x64/TrueNAS-13.0-U6.2.iso
Next, insert your USB stick into your computer and create a bootable image using the USB creation tool or use a tool like the dd command as shown.
sudo dd if=TrueNAS-13.0-U6.2.iso of=/dev/sdX bs=4M status=progress && sync
Step 2: Install TrueNAS Distribution
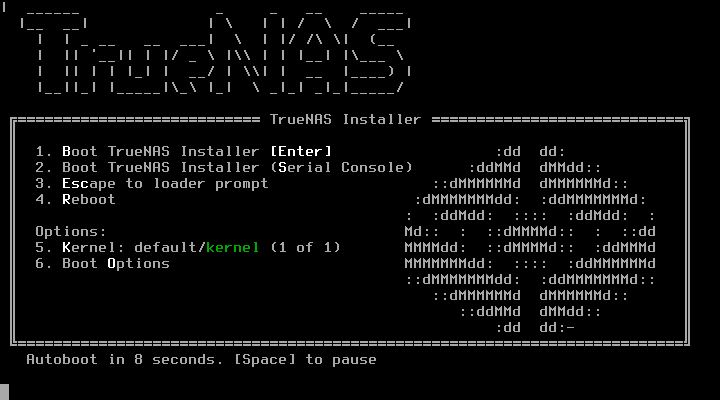
Now that you have created a bootable USB drive, you need to boot from it by selecting the system’s boot options (usually by pressing F2, F12, or the Del key) and select the USB Drive as the boot device.
Once you have booted from the USB drive, you can start the installation process by choosing the “Boot TrueNAS Installer” option.
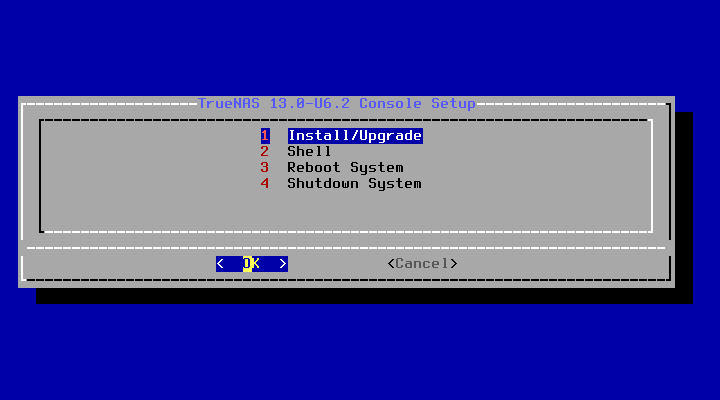
Select the Install/Upgrade option.
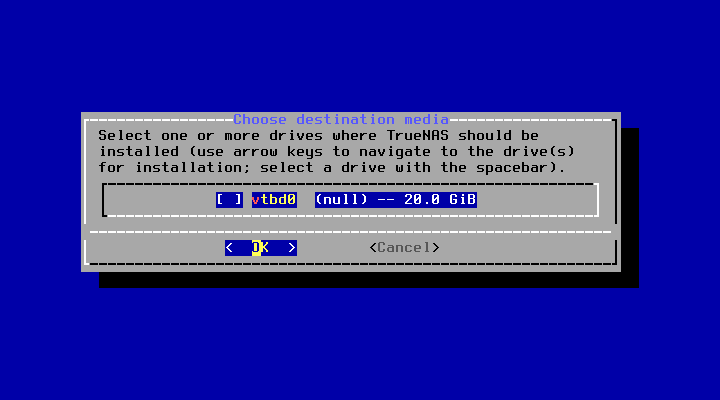
Next, you need to choose the desired install drive from the listed drives.
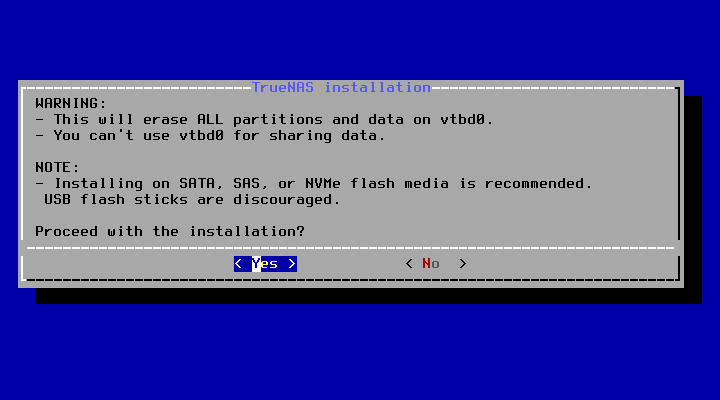
After selecting the drive, on the next screen, you will warned of data loss, if you have any important data in that selected drive, please take a backup before installing TrueNAS on the drive.
After pressing ‘Yes‘ all the data in that drive will be destroyed during installation.
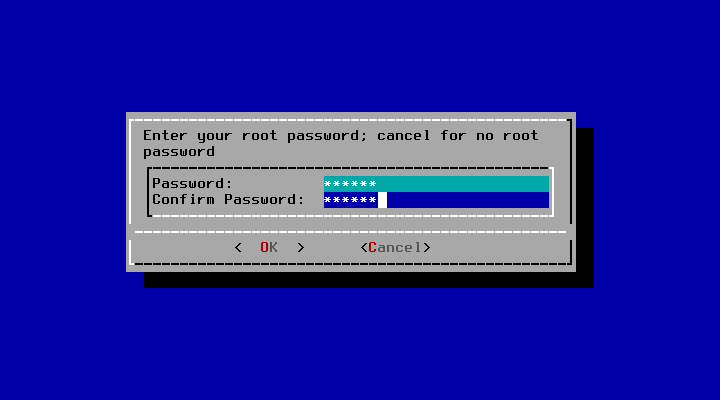
Next, set a password for the TrueNAS administrative account, named root by default.
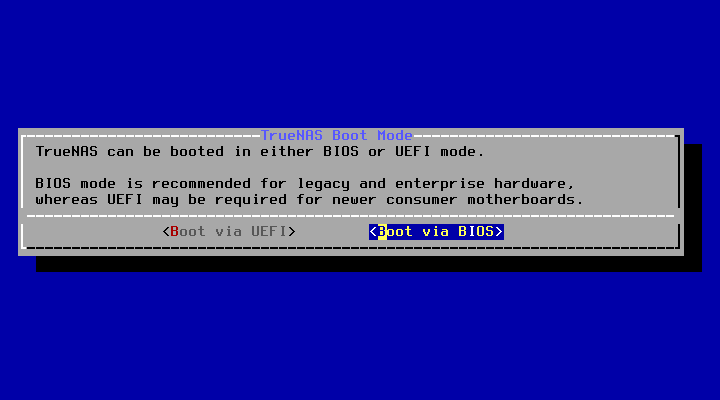
You can choose between UEFI or Legacy BIOS mode. Select the mode that matches your hardware configuration (Legacy BIOS is commonly used).
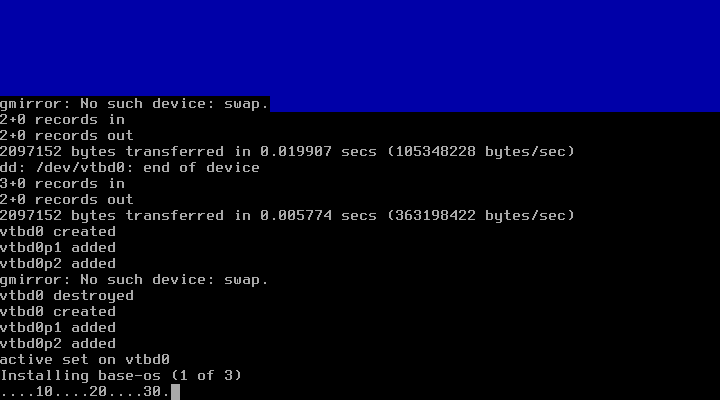
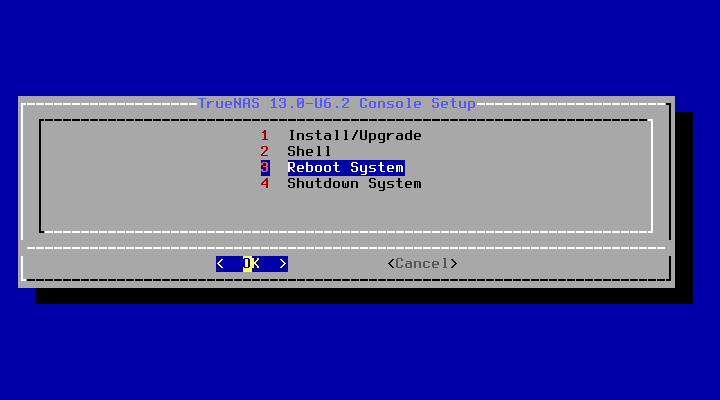
The installation will proceed, and once completed, you will be prompted to remove the installation media.
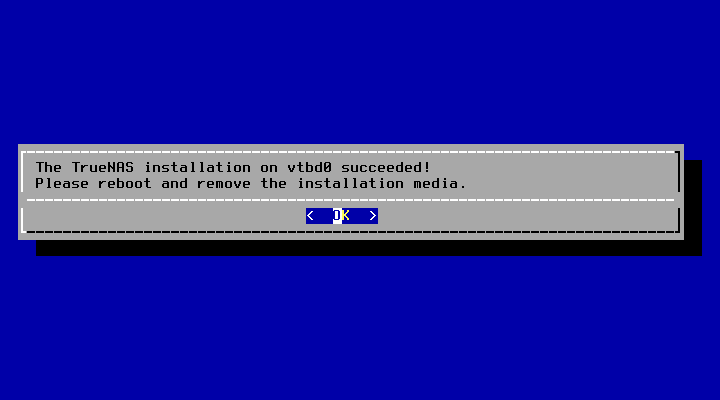
On the next screen, choose the 3rd option to reboot the machine and remove the setup disk.
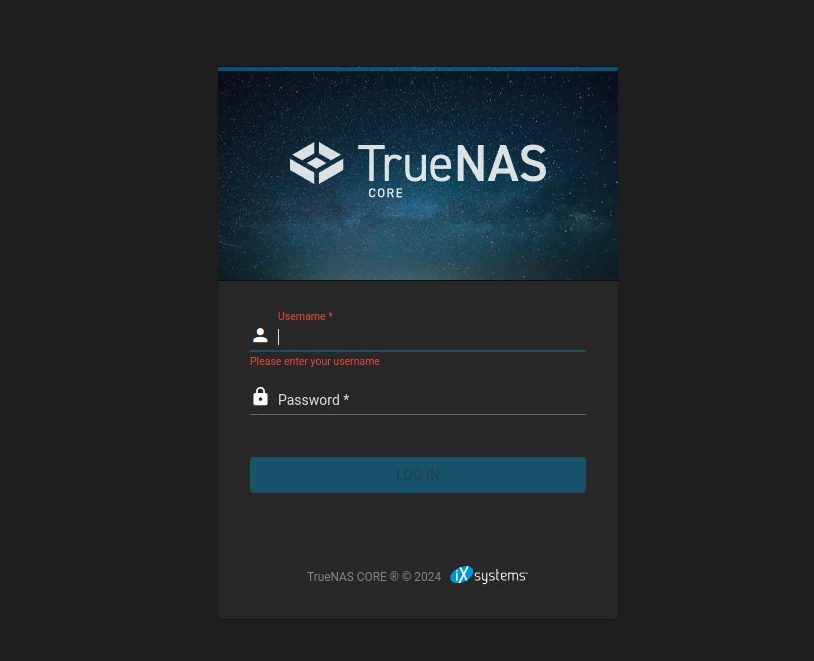
After the TrueNAS setup is completed, we can get the console setup menu to add the DNS IP Address to access the TrueNAS web dashboard.
http://192.168.122.143
https://192.168.122.143
The next step is to log in to the web interface using the administrative account credentials and begin configuring the system.
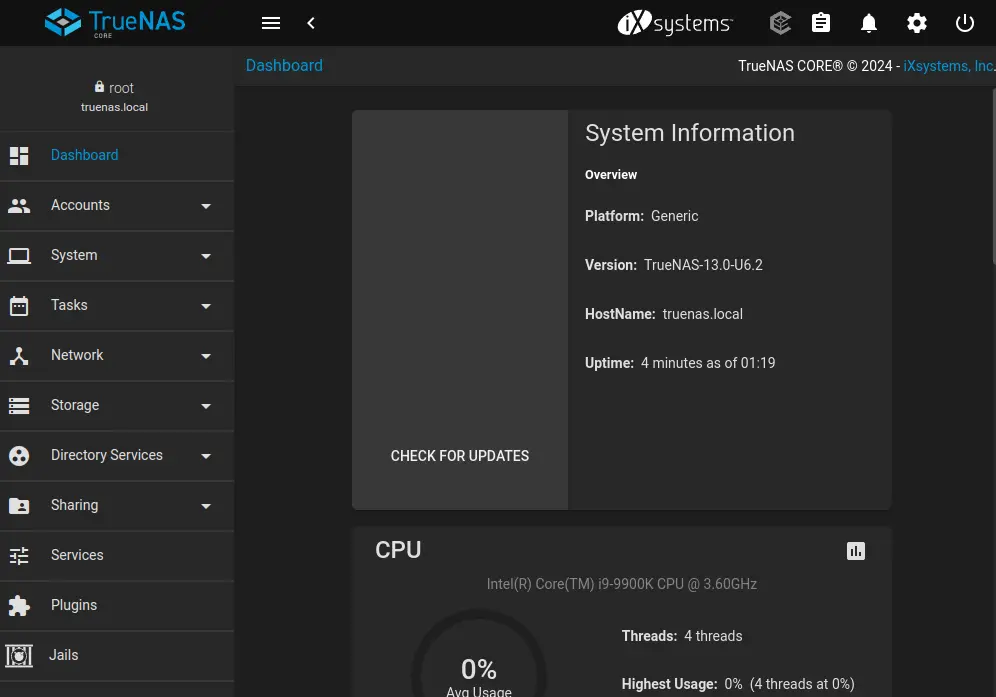
After login, you will see information about the TrueNAS server such as domain name, version, total memory available, system time, uptime, system load, etc.
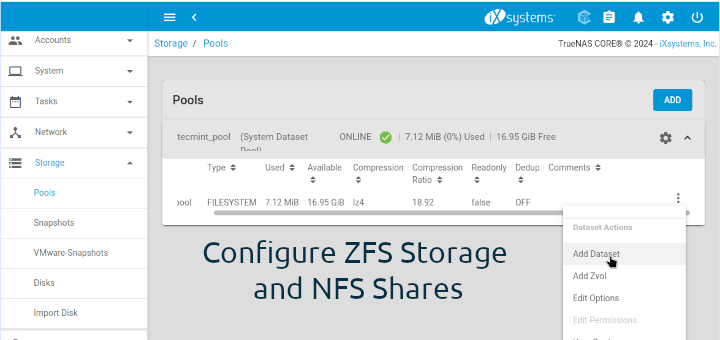
That’s it! In this article, we’ve installed and configured the TrueNAS server. In the next article, we will discuss how to configure TrueNAS settings step by step and how to define storage in TrueNAS.
Dear Sir,
After reading your excellent article about installing TrueNAS, which is part 1, I am looking for part 2. Could you please tell me where to find it?
With regards,
Gerard Zwiers
@Gerard,
Thank you for your interest in our TrueNAS installation series. Part 2 is currently in progress and will be published soon. Please stay tuned!
Have tried over several days to install FreeNas to a Lenovo IdeaPad 300-151SK but I get as far as selecting a 15GB Toshiba USB as request and nothing happens when I press the OK button once or many times. What am I doing wrong?
Hi Guys,
I am trying to build a machine to install FreeNas on it. Do you know if this should be an exclusive OS installed? or can I share the machine with another OS as UBUNTU?? is it interesting to upgrade the CPU?? as I5 for instance?
Looking forward to your advice.
thanks
Fabien
I select the HD I want it to be installed but minutes later It returns an error that prevent me go ahead.
Cant go beyond step 10.
IP V4 address and netmask could not be found on 11th step.
After step 8, do I have to connect the NAS machine to my internet modem via Ethernet cable? will a wifi connection work?
Not working for me. I downloaded “FreeNAS-9.2.1.8-RELEASE-x64.img.xz – (143MB)” usb image. Copied it into
16GB Sandisk pendrive. But my mobo Asus H81M-CS is not booting from this pendrive. System loads windows (which I intend to delete after formatting the hdd later) from HDD in the syst
Am I missing something??
@Mahipal,
You need to use some USB boot creator to make the FreeNAS image bootable in any USB devices.
When I type freenas ip address in my browser it only give me login page as attached screenshot in the following link:
https://drive.google.com/file/d/0B4AaV7HNky5uSmJ6N2VlejM4RnM/view?usp=sharing
After this, what to do please help me…
I didn’t get the console setup menu,freenas 10
Hello Mr. Lanston,
Ignore if it’s a dumb question but I am new to NAS and home networking. In step 13, where I am supposed to open the NAS GUI by entering the new IP address 192.169.0.225, am I supposed to do it on a sperate machine attached to NAS machine via ethernet cable?
I am sorry Mr. Lanston. I apologise that I didn’t write your name correctly.
@Mahipal,
Yes you need to access from separate machine in same network.
great tutorial,thanks ^^
Tx for your tutorial, it’s great.
@Alex,
Thanks for your positive feedback. Stay tune with us.
Hi!
Thanks for the great Tutorial. I must be doing something wrong. When I use the volume manager everything goes smooth but when I click “Add Volume” nothing happens. It just blinks then there is no volume saved. It doesn’t matter what I seem to do I get the same result. I’ve tried to to do it every which way to no avail.
I’m using four identical 160gig HD’s. They are visible. I’ve tried to do it with the MB set to RAID in the bios, ACHI, IDE. Nothing seems to get me the result I need which is a saved volume. I’ve tried just one disk. I’ve tried unplugging all the HD’s except one.
Any suggestions?
Thanks,
Terie
Good article, part 1 done, trying part 2
@Herve
Thanks for your feedback let us know how it went through part 2 :)
Nice one mate.
Thanks buddy for your valuable feedback.
Good One
Please send me the Complete link of FreeNas setup to my mail id [email protected]
@Ashok,
We’ve already covered all articles about FreeNAS setup, still some articles are in progress they will published soon..and it’s not possible us to send guides to each individual. I hope you understand…:)
These walkthroughs are great. You list the ability to setup an OwnCloud server, would you be able to create a walkthrough for that plugin?
Sure let me come with own cloud, Thanks for your feedback
Nice tutorial. When is part two coming out??
Regards
nice tutorial
nice tutorial. waiting for rest parts
@Robin,
Thanks, we are in process to publish remain parts soon of this FreeNAS series.
Freenas requires to much resources.
Better if you can provide tutorial on Nas4free
Thank you very much..keep it up ..
@Nick Els Yes i have coverd plugins in upcoming articles.
I have 320GB Hard Disk /dev/sda, Other 1 TB /dev/sdb for Storage. Below is my Partition layout as shown in the images.
http://i.imgur.com/S48FYmY.png
Here you can see /dev/sda16 and /dev/sda17 was under libvirt-qemu user usage, cos in those two partition currently my apt-cache server VM and DNS VM are running.
42GB defined for /
186GB defined for /home
4 GB for swap.
http://i.imgur.com/L23zbaf.png
From /dev/sda5 to /dev/sda17 defined as unused Partitions each with 5GB in size. If i need to install centos virtual machine in /dev/sda8, I used to select the Physcial Disk as VM’s Hard disk as show below
http://i.imgur.com/Gbv3LUi.png
Hope you got it now.
For FreeNAS installation i have choosed from /dev/sda5 to /dev/sda14.
Got it ?…
i love you guys Thank you very much. for your lessons
Thank you for this, very helpful. I sincerely hope that you will discuss jail plugins and how to setup jail plugins and a webserver plugin. Did you actually partitioned one drive into 5gig partitions?
I don’t used to install VM’s using virtual disks, cos it will save under /var/lib/libvirt/images and occur the / space a lot and make the system damm slow. If i need to destroy any VM’s after deleting the VM from Virtual manager i used to shred my particular partition to reuse.
Warning:> Without knowing shred command please never use it, you will loose every data’s in your system, you can recover it.
eg: sudo shred -v -z /dev/sda8
This will make my paritition once again fresh like a new drive for a new vm installation.