Kali Linux is arguably one of the best out-of-the-box Linux distributions available for security testing. While many of the tools in Kali can be installed in most Linux distributions, the Offensive Security team developing Kali has put countless hours into perfecting their ready-to-boot security distribution.
Kali Linux is a secure Debian-based Linux distribution that comes pre-loaded with hundreds of well-known security tools and has gained quite a name for itself.
Kali even has an industry-respected certification available called “Penetration Testing with Kali Linux”. The certification is a rigorous 24-hour challenge in which applicants must successfully compromise a number of computers with another 24 hours to write up a professional penetration test report that is sent to and graded by the personnel at Offensive Security. Successfully passing this exam will allow the test taker to obtain the OSCP credential.
The focus of this guide and future articles is to help individuals become more familiar with Kali Linux and several of the tools available within the distribution.
Please be sure to use extreme caution with the tools included with Kali as many of them can accidentally be used in a manner that will break computer systems. The information contained within all of these Kali articles is intended for legal usage.
Kali Linux System Requirements
Kali has some minimum suggested specifications for hardware. Depending upon the intended use, more may be desired. This guide assumes that the reader will want to install Kali as the only operating system on the computer.
- At least 20GB of disk space; strongly encouraged to have more.
- At least 2GBMB of RAM; more is encouraged especially for graphical environments.
- USB or CD/DVD boot support
- ISO is available from the Kali Linux download page.
Create a Bootable Kali Linux USB Drive
This guide will assume that a USB drive is available to use as the installation media. Take note that the USB drive should be as close to 4/8GB as possible and ALL DATA WILL BE REMOVED!
The author has had issues with larger USB drives but some may still work. Regardless, following the next few steps WILL RESULT IN DATA LOSS ON THE USB DRIVE.
Please be sure to back up all data before proceeding. This bootable Kali Linux USB drive is going to be created from another Linux machine.
Download Kali Linux
The first step is to obtain the Kali Linux ISO image, as this guide is going to use the current newest version of Kali with the XFCE Linux desktop environment.
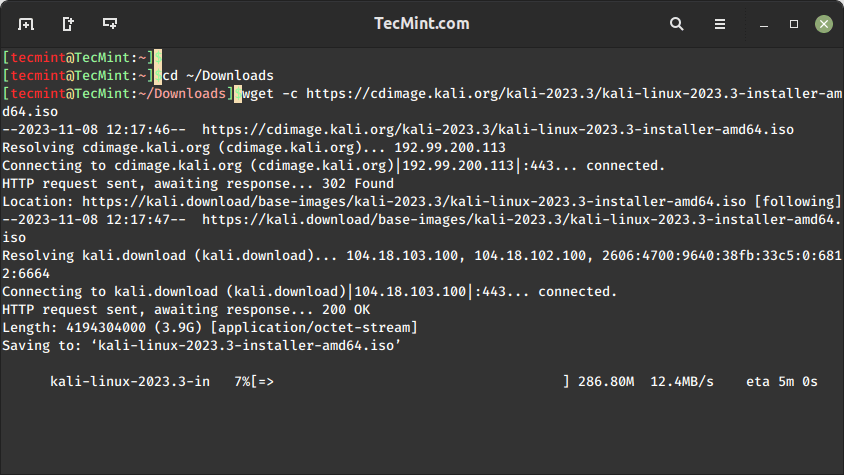
To download the Kali Linux 2023.3 version, type the following wget command into a terminal.
cd ~/Downloads
wget -c https://cdimage.kali.org/kali-2023.3/kali-linux-2023.3-installer-amd64.iso
The two commands above will download the Kali Linux ISO into the current user’s ‘Downloads’ folder.
Create Kali Linux Bootable USB
The next process is to write the ISO to a USB drive to boot the installer. To accomplish this we can use the dd command within Linux. First, the disk name needs to be located with the lsblk command though.
lsblk
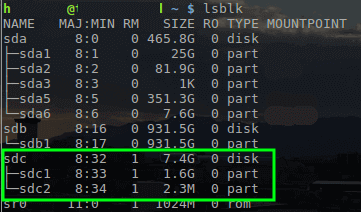
With the name of the USB drive determined as /dev/sdc, the Kali ISO can be written to the drive with the ‘dd’ tool.
sudo dd if=~/Downloads/kali-linux-2023.3-installer-amd64.iso of=/dev/sdc
Once the ISO is copied over to the USB drive, proceed further to install Kali Linux.
Install Kali Linux 2023.3
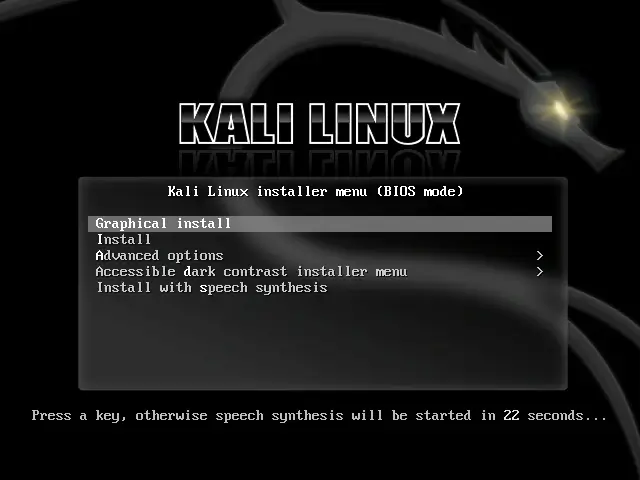
1. First, plug the USB drive into the respective computer that Kali should be installed upon and proceed to boot to the USB drive. Upon successful booting to the USB drive, the user will be presented with the following screen and should proceed with the ‘Install’ or ‘Graphical Install’ options.
This guide will be using the ‘Graphical Install’ method.
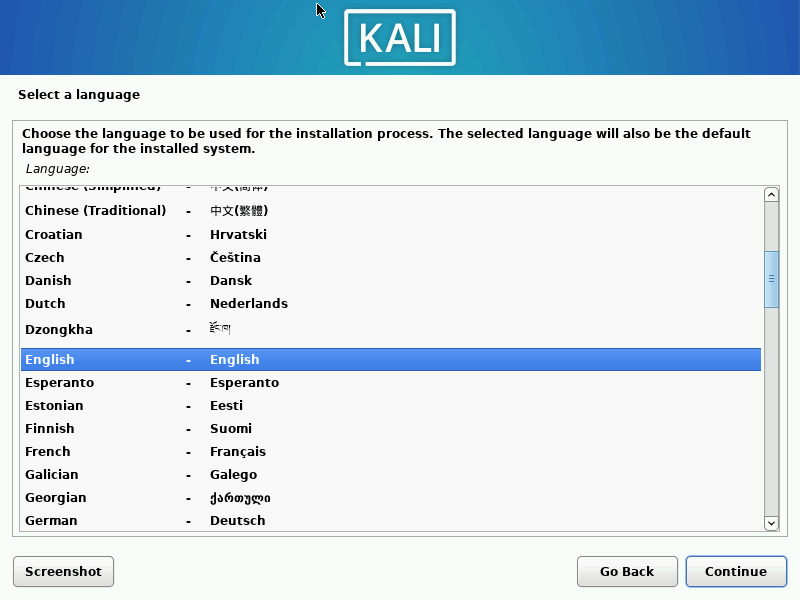
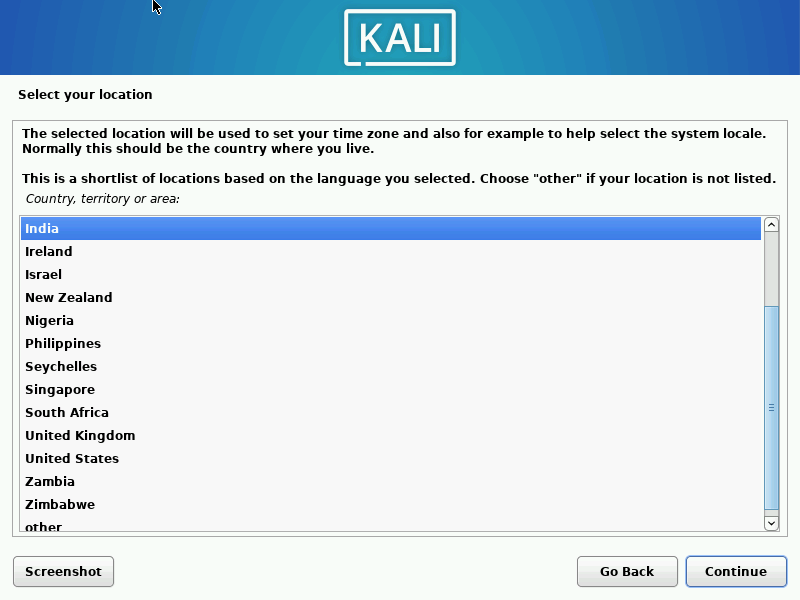
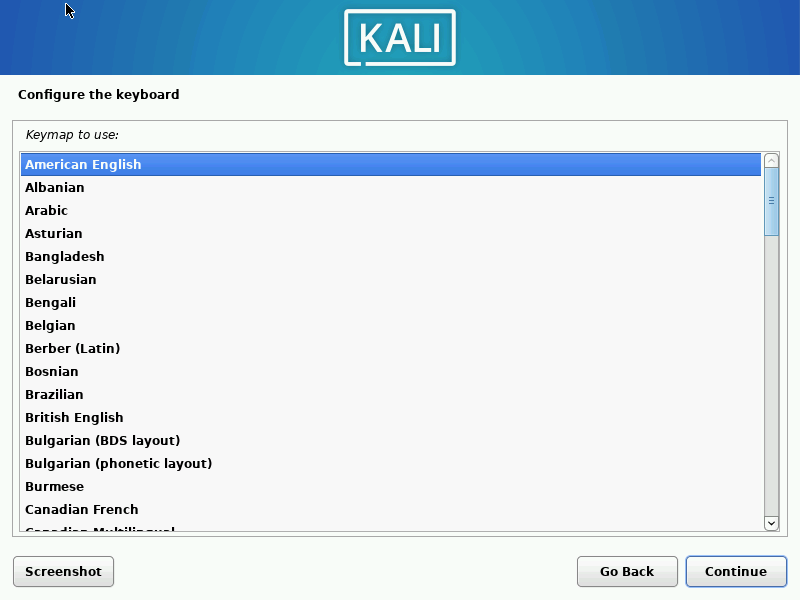
2. The next couple of screens will ask the user to select locale information such as language, country, and keyboard layout.
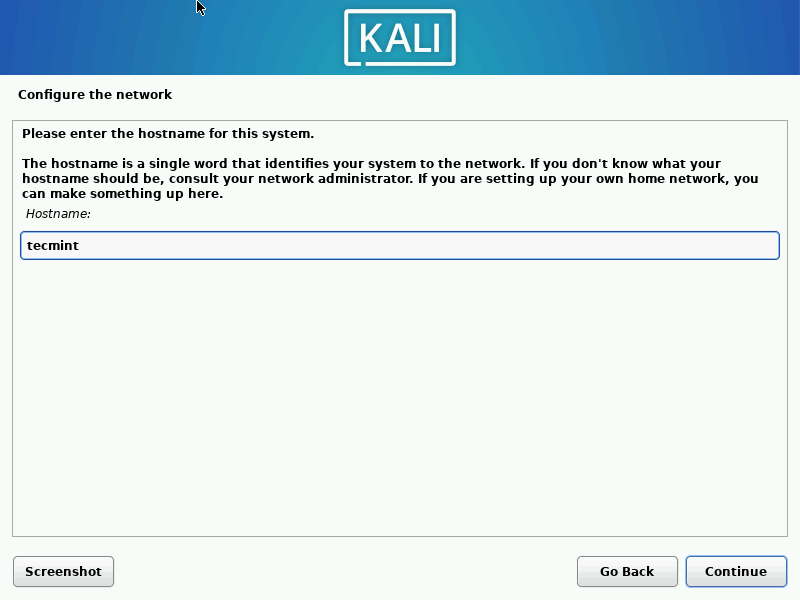
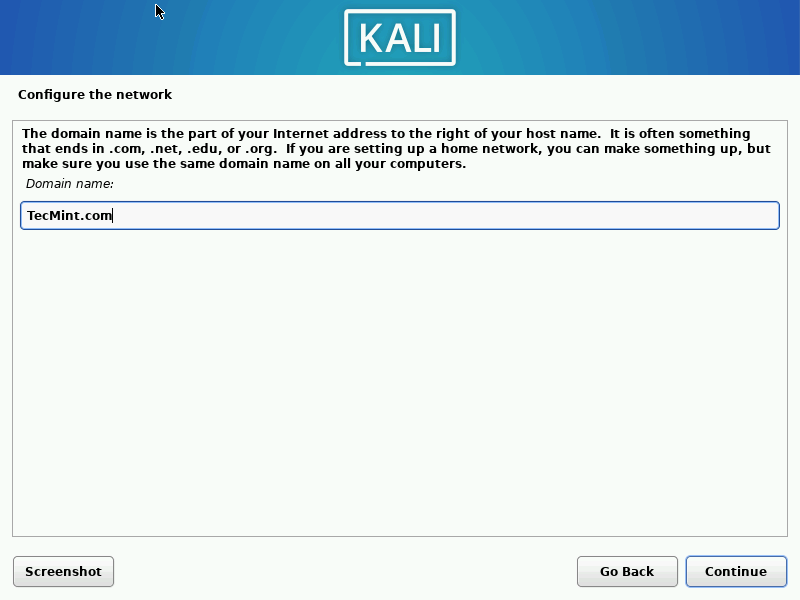
Once through the locale information, the installer will prompt for a hostname and domain for this install. Provide the appropriate information for the environment and continue installing it.
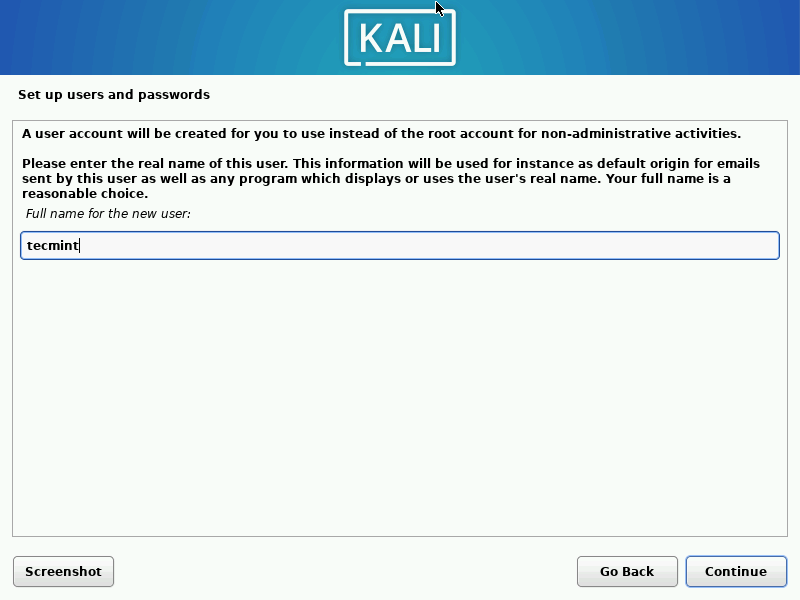
3. After setting up the hostname and domain name, you need to create a new user account to use instead of a root account for non-administrative activities.
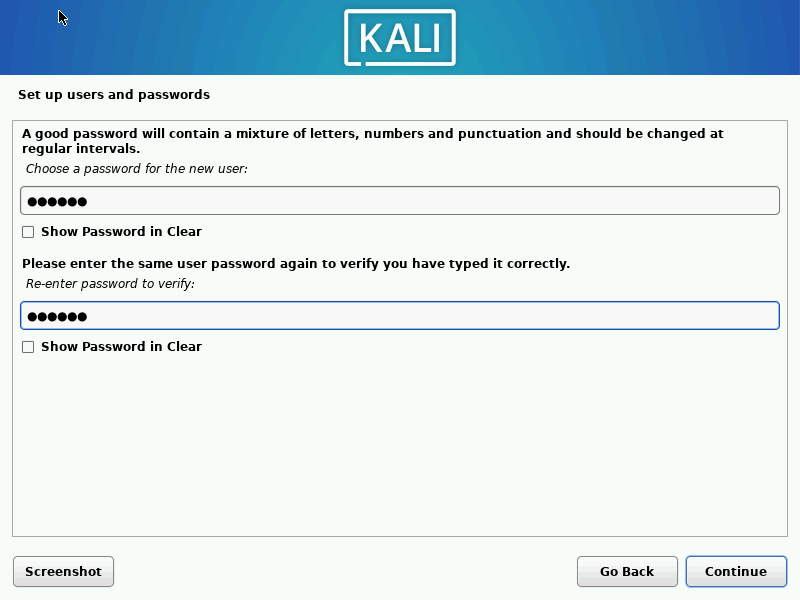
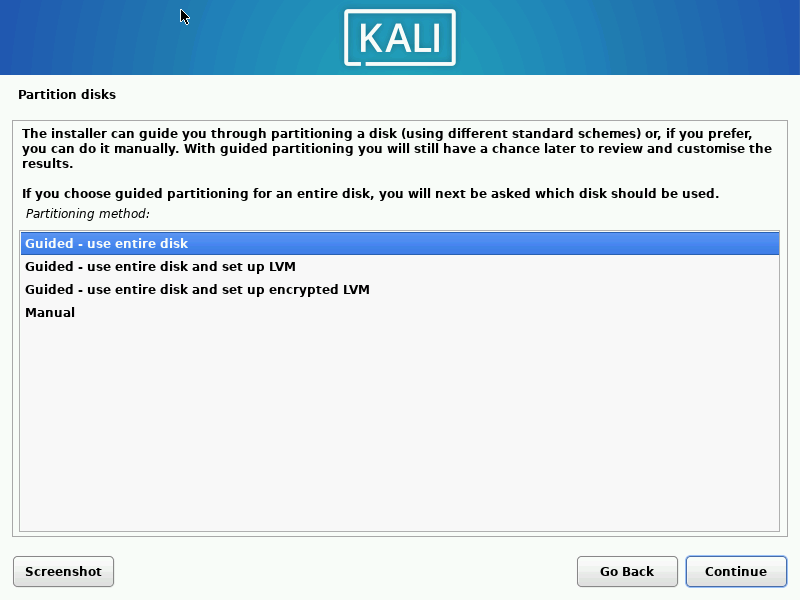
4. After setting the password, the installer will prompt for time zone data and then pause at the disk partitioning.
If Kali will be the only one operating on the machine, the easiest option is to use ‘Guided – Use Entire Disk’ and then select the storage device you wish to install Kali.
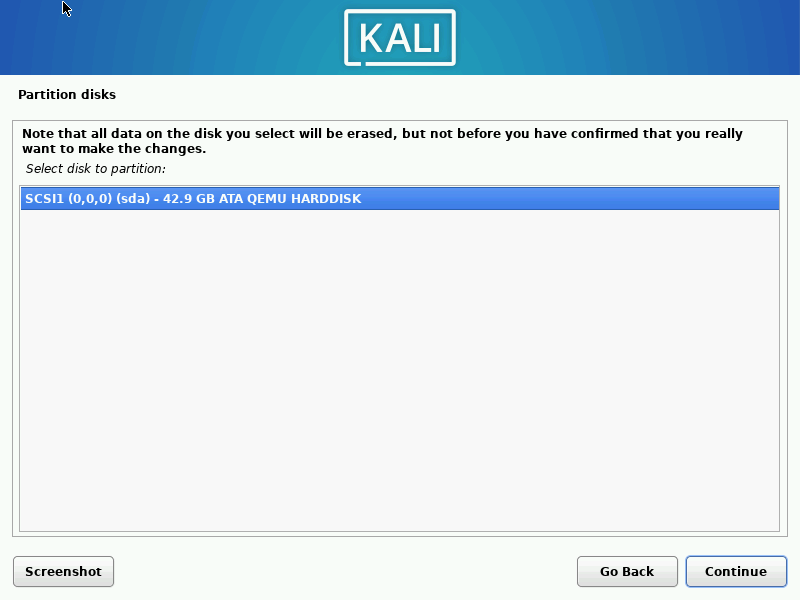
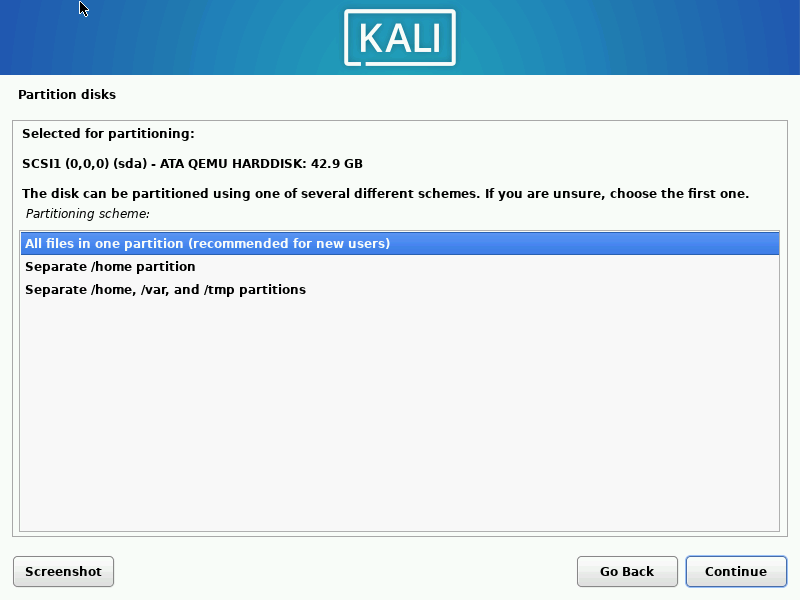
5. The next question will prompt the user to determine the partitioning on the storage device. Most installs can simply put all data on one partition though.
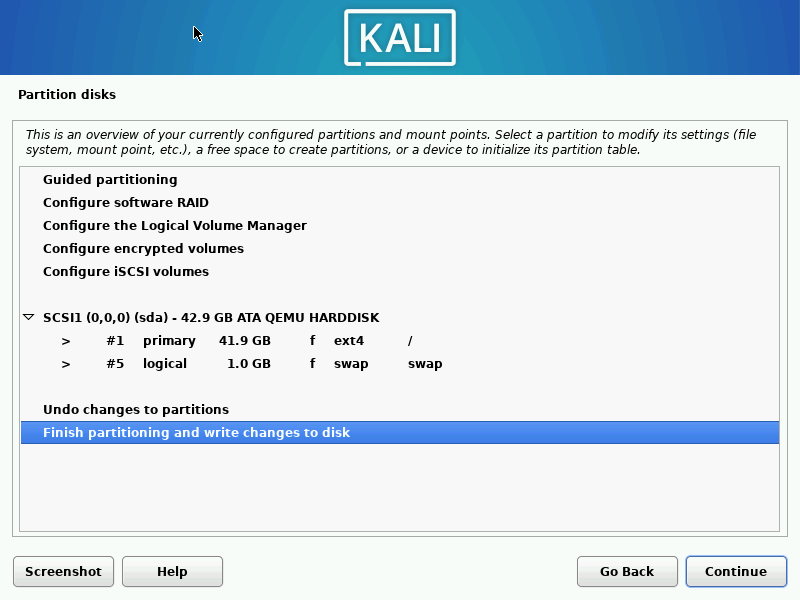
6. The final step asks the user to confirm all changes to be made to the disk on the host machine. Be aware that continuing will ERASE DATA ON THE DISK.
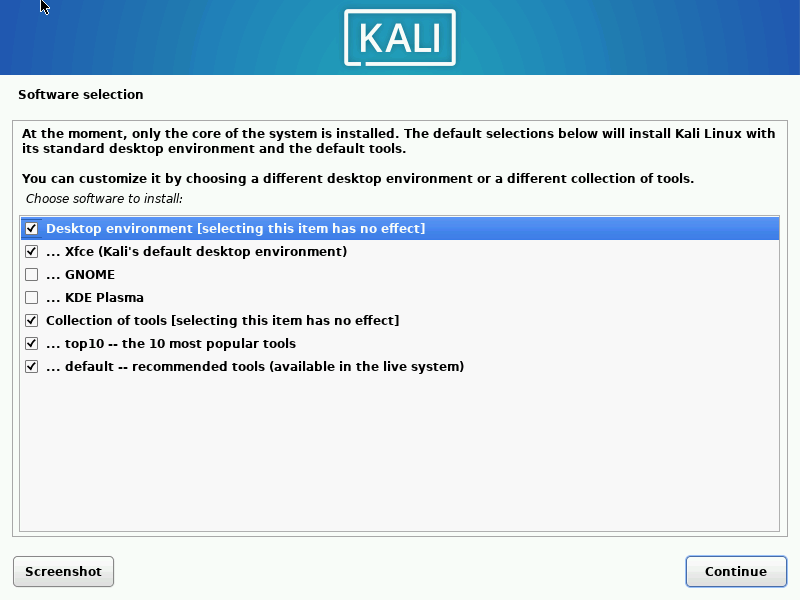
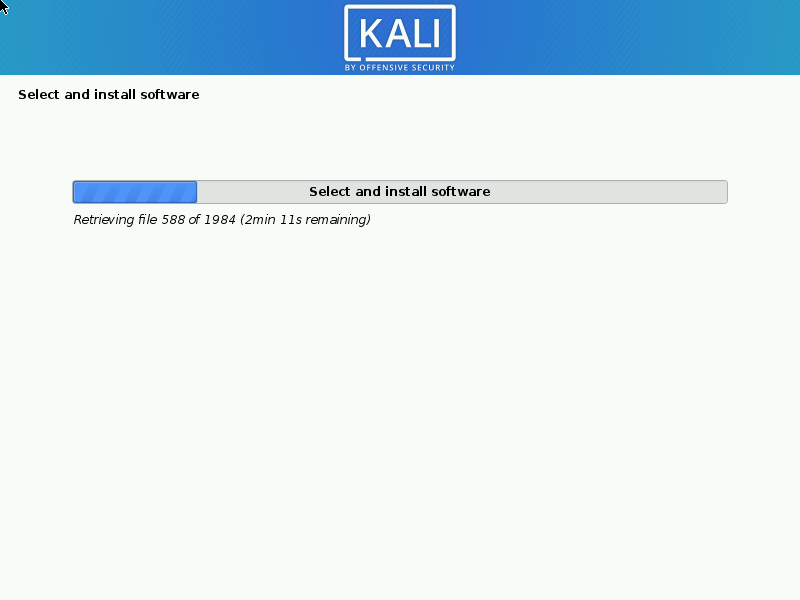
7. Once the partition changes, the installer will run through the process of installing the files. Once it is completed, the system will prompt you to select software that will install a standard desktop environment with the needed tools.
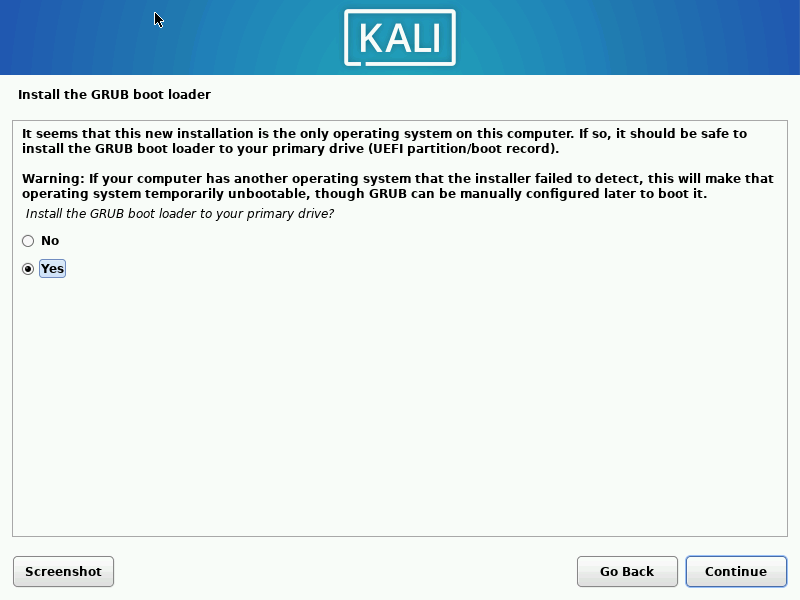
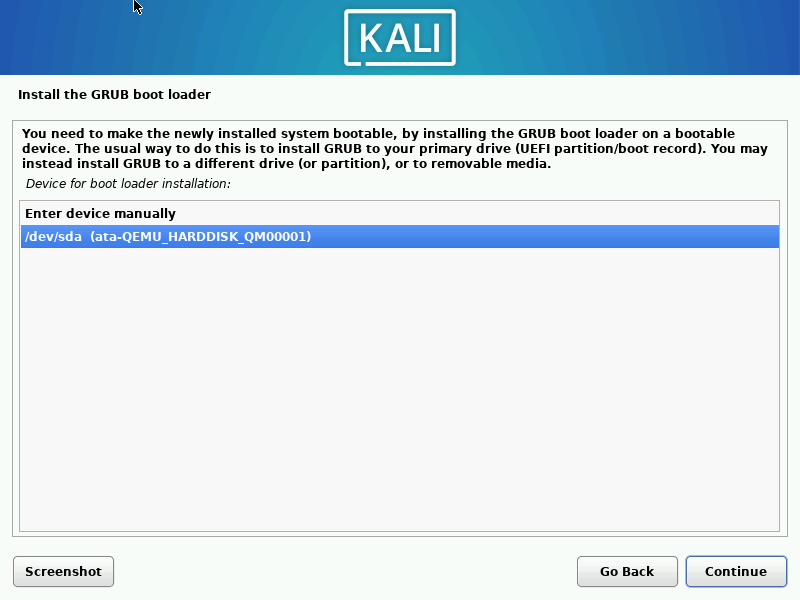
8. After the software installation is complete, the system will ask to install grub. Again this guide assumes that Kali is to be the only operating system on this computer.
Selecting ‘Yes’ on this screen will allow the user to pick the device to write the necessary boot loader information to the hard drive to boot Kali.
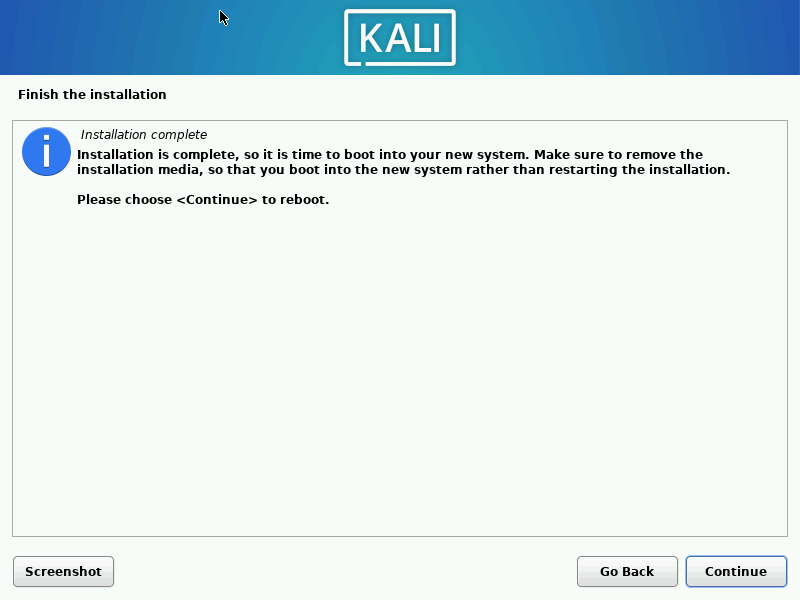
9. Once the installer finishes installing GRUB to the disk, it will alert the user to reboot the machine to boot into the newly installed Kali machine.
10. Since this guide installed the XFCE Desktop environment, it will likely default boot into it.
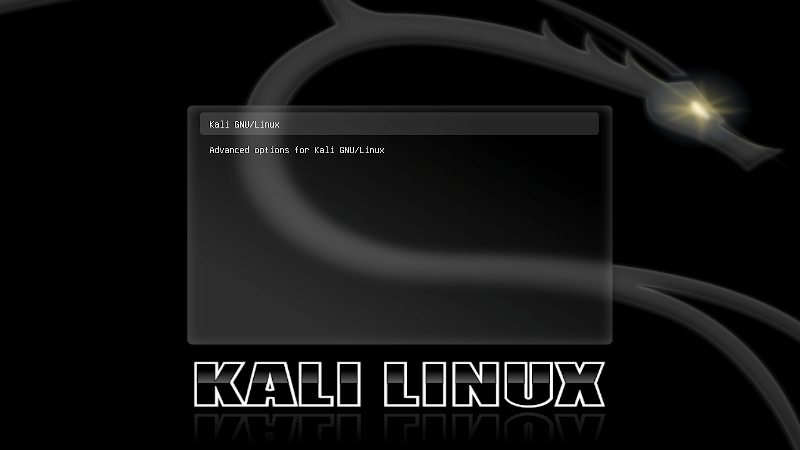
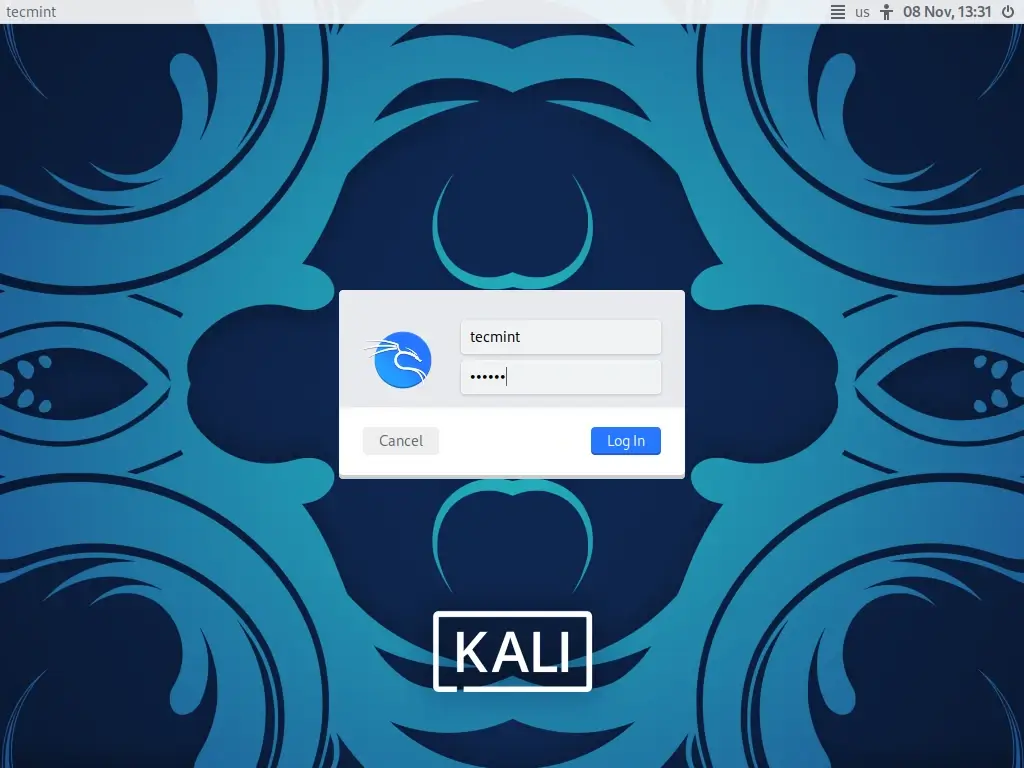
11. Once it is booted, log in as the user ‘tecmint‘ with the password created earlier in the installation process.
At this point, Kali Linux is successfully installed and ready to be used! Upcoming articles will walk through the tools available within Kali and how they can be utilized to test the security posture of hosts and networks. Please feel free to post any comments or questions below.


Does the iso on the usb drive format the target disk as part of the installation? I want to convert a Windows system to Kali, and I had to format the host drive from Unix to Windows: Now I am going back.
An ISO on a USB drive is exactly the same as one on a DVD. As one of the first steps the installer will ask you if you want to:
“Use the Entire Disk” – in which case it will partition and format automatically
or
“Use Existing Partitions” – in which case it will ask you for desired mount points and let you format them to any of a dozen filesystem formats
or
“Do a Custom or Manual Partitioning” – in which case you will have to create the partitions you want (/, /home, swap, etc.) and then format them.
The bottom line is that the installer will format the partitions BUT only if you tell it to do so.
For my installs, I first run a stand-alone GParted to partition and format my discs. Then I do the actual install using the “Use the Existing Partitions” option. It may be a little extra work but I can safely keep partitioning/formatting until I get the configuration I am satisfied with. Also, I use a partition tool I am familiar with. Distro installers use different partitioners.
This guide is going to use the current newest version of Kali with the Enlightenment Linux desktop environment.”
Step 7 shows you chose to install XFCE as the Desktop Environment.
Step 10 shows 3 screenshots of XFCE DE.
Does anybody edit the articles for accuracy and consistency?
@Dragonmouth,
Sorry for the errors, I have updated the article as suggested by you…
How can I log in as root?
@Matheus,
To enable root login in Kali Linux, do:
The Kali bit “LIVE” Version is a version that I can run with vmware or virtual box right.
I have an error with grub. I am trying to install kali Linux permanently.
I have tried to install this program from a disc supplied with the Linux magazine to no avail. I AM WONDERING IF MICROSOFT HAS TAKEN OVER MY COMPUTER BECAUSE WHEN I tried to make Google the default Microsoft has interfered and won’t let me.
How I can give root permission on Kali Linux 2020.3 or the latest version of Kali Linux. Please help me, I can’t find any solutions in this new version of Kali Linux…
@Shuvo,
Do you mean how to log in as root in Kali Linux?
Hey can I cancel installation after starting the installation and can I resume to windows as it was firstly.
Please reply…
@Varun,
Yes, you stop the installation or delete the partition where you have installed Kali…
Tecmint, I really love this site, Lots of Linux related content got there, Thanks for doing a great job keep it up
I installed Kali Linux 2020.2 from a DVD. After the installation was completed system rebooted and there were 2 options to choose from:
If I choose either of those options system rebooting and going to the same screen.
@Thejas,
Please remove the installation media, and then try to reboot the machine…
I’ve tried but still facing the same issue.
Hello
Today I try to install Kali Linux 2020.2 on Lenovo ThinkBook laptop, and after install, I have a problem with the Wifi network, Touchpad, and Numpad. The Kali os has not recognized that component. If anyone knows what is the problem can repeat me on a comment or contact me on e-mail
My e-mail is [email protected]
Hi, I am getting problem, please tell me what to do for installing kali Linux is there not a practical video for downloading Kali Linux? Please tell me I shall be very grateful to you..
there are a lot of videos on youtube.
So you need to be running Linux to install linux?
What do you do if you only have Windows?
Thanks for this in-depth article. But i prefer virtual box for kali Linux.
Keep sharing. .
unable to ssh to my newly installed kali Linux box. Have installed and enabled ssh service, disabled ufw
Its a very helpful article but why do i get a problem after the keyboard selection? it says mounting Cd rom failed even-though i am using bootable usb drive?
Omg thanks man this helped me so much this article is so underrated this should be on top of google. Thanks
I have installed Kali Linux, but it rejected my password what might be the problem? because I used my name as password how would I forget my name?
Mogorosi,
Did you actually install Kali? The live version and some older versions of Kali will have a root password or ‘toor’ without the quotes. If you have forgotten your root password, there is still a way to recover it by booting into single user mode.
Very nice article Rob Turner, I love the article , you made this very easy and clear instructions to install Kali. By the way I created a infographic about Kali Linux, I thought it will be a nice addition to article, if you are interested check my infographic.
Keep up the good job Rob!
Micael,
You are quite welcome and I’m glad you found the article useful!
We need a follow up tutorial on the how to of carving out a big persistence partition. Penetration Testers need a lot of free space to store their dictionary / wordlists.
OKCarl,
This guide goes through a persistent install of Kali on a hard drive not an install on a USB drive. Anything done after Kali is installed using this method, will be saved as a result.
Kali is great and it should be essential in the repertoire of any serious system administrator….
UPP,
Agreed but many of the tools included in Kali can be installed in almost any other Linux distro!
Hi, very nice article
Kumar,
Thank you! Hope you found it useful.