Last August, the Linux Foundation started the LFCS certification (Linux Foundation Certified Sysadmin), a brand new program whose purpose is to allow individuals everywhere and anywhere take an exam in order to get certified in basic to intermediate operational support for Linux systems, which includes supporting running systems and services, along with overall monitoring and analysis, plus intelligent decision-making to be able to decide when it’s necessary to escalate issues to higher level support teams.
Please have a quick look at the following video that describes an introduction to the Linux Foundation Certification Program.
This article is Part 8 of a 10-tutorial long series, here in this section, we will guide you on how to manage users and groups permissions in Linux system, that are required for the LFCS certification exam.
Since Linux is a multi-user operating system (in that it allows multiple users on different computers or terminals to access a single system), you will need to know how to perform effective user management: how to add, edit, suspend, or delete user accounts, along with granting them the necessary permissions to do their assigned tasks.
Adding User Accounts
To add a new user account, you can run either of the following two commands as root.
# adduser [new_account]
# useradd [new_account]
When a new user account is added to the system, the following operations are performed.
1. His/her home directory is created (/home/username by default).
2. The following hidden files are copied into the user’s home directory, and will be used to provide environment variables for his/her user session.
.bash_logout
.bash_profile
.bashrc
3. A mail spool is created for the user at /var/spool/mail/username.
4. A group is created and given the same name as the new user account.
Understanding /etc/passwd
The full account information is stored in the /etc/passwd file. This file contains a record per system user account and has the following format (fields are delimited by a colon).
[username]:[x]:[UID]:[GID]:[Comment]:[Home directory]:[Default shell]
- Fields [username] and [Comment] are self explanatory.
- The x in the second field indicates that the account is protected by a shadowed password (in /etc/shadow), which is needed to logon as [username].
- The [UID] and [GID] fields are integers that represent the User IDentification and the primary Group IDentification to which [username] belongs, respectively.
- The [Home directory] indicates the absolute path to [username]’s home directory, and
- The [Default shell] is the shell that will be made available to this user when he or she logins the system.
Understanding /etc/group
Group information is stored in the /etc/group file. Each record has the following format.
[Group name]:[Group password]:[GID]:[Group members]
- [Group name] is the name of group.
- An x in [Group password] indicates group passwords are not being used.
- [GID]: same as in /etc/passwd.
- [Group members]: a comma separated list of users who are members of [Group name].

After adding an account, you can edit the following information (to name a few fields) using the usermod command, whose basic syntax of usermod is as follows.
# usermod [options] [username]
Setting the expiry date for an account
Use the –expiredate flag followed by a date in YYYY-MM-DD format.
# usermod --expiredate 2014-10-30 tecmint
Adding the user to supplementary groups
Use the combined -aG, or –append –groups options, followed by a comma separated list of groups.
# usermod --append --groups root,users tecmint
Changing the default location of the user’s home directory
Use the -d, or –home options, followed by the absolute path to the new home directory.
# usermod --home /tmp tecmint
Changing the shell the user will use by default
Use –shell, followed by the path to the new shell.
# usermod --shell /bin/sh tecmint
Displaying the groups an user is a member of
# groups tecmint
# id tecmint
Now let’s execute all the above commands in one go.
# usermod --expiredate 2014-10-30 --append --groups root,users --home /tmp --shell /bin/sh tecmint
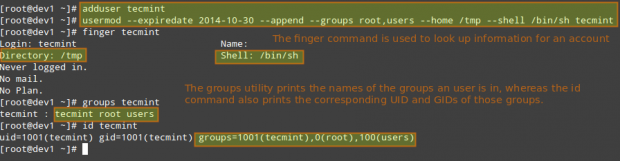
In the example above, we will set the expiry date of the tecmint user account to October 30th, 2014. We will also add the account to the root and users group. Finally, we will set sh as its default shell and change the location of the home directory to /tmp:
Read Also:
For existing accounts, we can also do the following.
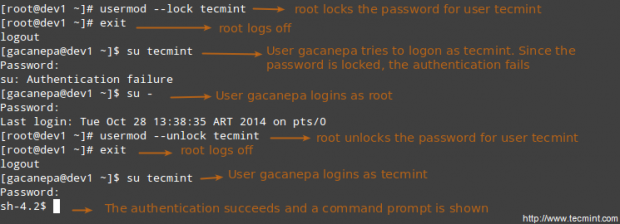
Disabling account by locking password
Use the -L (uppercase L) or the –lock option to lock a user’s password.
# usermod --lock tecmint
Unlocking user password
Use the –u or the –unlock option to unlock a user’s password that was previously blocked.
# usermod --unlock tecmint
Creating a new group for read and write access to files that need to be accessed by several users
Run the following series of commands to achieve the goal.
# groupadd common_group # Add a new group
# chown :common_group common.txt # Change the group owner of common.txt to common_group
# usermod -aG common_group user1 # Add user1 to common_group
# usermod -aG common_group user2 # Add user2 to common_group
# usermod -aG common_group user3 # Add user3 to common_group
Deleting a group
You can delete a group with the following command.
# groupdel [group_name]
If there are files owned by group_name, they will not be deleted, but the group owner will be set to the GID of the group that was deleted.
Linux File Permissions
Besides the basic read, write, and execute permissions that we discussed in Archiving Tools and Setting File Attributes – Part 3 of this series, there are other less used (but not less important) permission settings, sometimes referred to as “special permissions”.
Like the basic permissions discussed earlier, they are set using an octal file or through a letter (symbolic notation) that indicates the type of permission.
Deleting user accounts
You can delete an account (along with its home directory, if it’s owned by the user, and all the files residing therein, and also the mail spool) using the userdel command with the –remove option.
# userdel --remove [username]
Group Management
Every time a new user account is added to the system, a group with the same name is created with the username as its only member. Other users can be added to the group later. One of the purposes of groups is to implement a simple access control to files and other system resources by setting the right permissions on those resources.
For example, suppose you have the following users.
- user1 (primary group: user1)
- user2 (primary group: user2)
- user3 (primary group: user3)
All of them need read and write access to a file called common.txt located somewhere on your local system, or maybe on a network share that user1 has created. You may be tempted to do something like,
# chmod 660 common.txt
OR
# chmod u=rw,g=rw,o= common.txt [notice the space between the last equal sign and the file name]
However, this will only provide read and write access to the owner of the file and to those users who are members of the group owner of the file (user1 in this case). Again, you may be tempted to add user2 and user3 to group user1, but that will also give them access to the rest of the files owned by user user1 and group user1.
This is where groups come in handy, and here’s what you should do in a case like this.
Understanding Setuid
When the setuid permission is applied to an executable file, an user running the program inherits the effective privileges of the program’s owner. Since this approach can reasonably raise security concerns, the number of files with setuid permission must be kept to a minimum. You will likely find programs with this permission set when a system user needs to access a file owned by root.
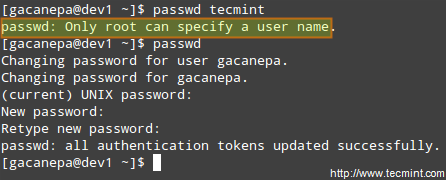
Summing up, it isn’t just that the user can execute the binary file, but also that he can do so with root’s privileges. For example, let’s check the permissions of /bin/passwd. This binary is used to change the password of an account, and modifies the /etc/shadow file. The superuser can change anyone’s password, but all other users should only be able to change their own.

Thus, any user should have permission to run /bin/passwd, but only root will be able to specify an account. Other users can only change their corresponding passwords.
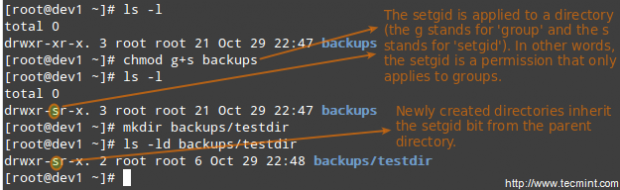
Understanding Setgid
When the setgid bit is set, the effective GID of the real user becomes that of the group owner. Thus, any user can access a file under the privileges granted to the group owner of such file. In addition, when the setgid bit is set on a directory, newly created files inherit the same group as the directory, and newly created subdirectories will also inherit the setgid bit of the parent directory. You will most likely use this approach whenever members of a certain group need access to all the files in a directory, regardless of the file owner’s primary group.
# chmod g+s [filename]
To set the setgid in octal form, prepend the number 2 to the current (or desired) basic permissions.
# chmod 2755 [directory]
Setting the SETGID in a directory
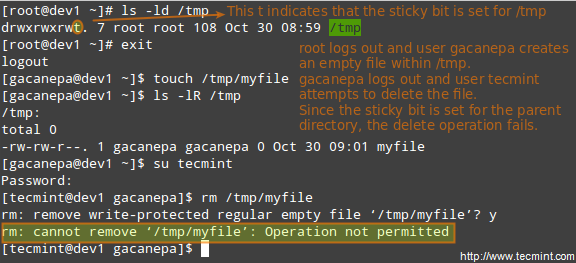
Understanding Sticky Bit
When the “sticky bit” is set on files, Linux just ignores it, whereas for directories it has the effect of preventing users from deleting or even renaming the files it contains unless the user owns the directory, the file, or is root.
# chmod o+t [directory]
To set the sticky bit in octal form, prepend the number 1 to the current (or desired) basic permissions.
# chmod 1755 [directory]
Without the sticky bit, anyone able to write to the directory can delete or rename files. For that reason, the sticky bit is commonly found on directories, such as /tmp, that are world-writable.
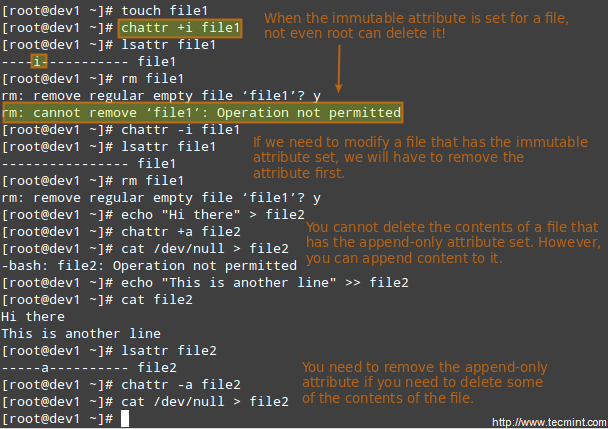
Special Linux File Attributes
There are other attributes that enable further limits on the operations that are allowed on files. For example, prevent the file from being renamed, moved, deleted, or even modified. They are set with the chattr command and can be viewed using the lsattr tool, as follows.
# chattr +i file1
# chattr +a file2
After executing those two commands, file1 will be immutable (which means it cannot be moved, renamed, modified or deleted) whereas file2 will enter append-only mode (can only be open in append mode for writing).
Accessing the root Account and Using sudo
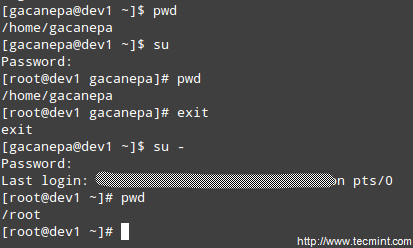
One of the ways users can gain access to the root account is by typing.
$ su
and then entering root’s password.
If authentication succeeds, you will be logged on as root with the current working directory as the same as you were before. If you want to be placed in root’s home directory instead, run.
$ su -
and then enter root’s password.
The above procedure requires that a normal user knows root’s password, which poses a serious security risk. For that reason, the sysadmin can configure the sudo command to allow an ordinary user to execute commands as a different user (usually the superuser) in a very controlled and limited way. Thus, restrictions can be set on a user so as to enable him to run one or more specific privileged commands and no others.
Read Also: Difference Between su and sudo User
To authenticate using sudo, the user uses his/her own password. After entering the command, we will be prompted for our password (not the superuser’s) and if the authentication succeeds (and if the user has been granted privileges to run the command), the specified command is carried out.
To grant access to sudo, the system administrator must edit the /etc/sudoers file. It is recommended that this file is edited using the visudo command instead of opening it directly with a text editor.
# visudo
This opens the /etc/sudoers file using vim (you can follow the instructions given in Install and Use vim as Editor – Part 2 of this series to edit the file).
These are the most relevant lines.
Defaults    secure_path="/usr/sbin:/usr/bin:/sbin"
root        ALL=(ALL) ALL
tecmint     ALL=/bin/yum update
gacanepa    ALL=NOPASSWD:/bin/updatedb
%admin      ALL=(ALL) ALL
Let’s take a closer look at them.
Defaults secure_path="/usr/sbin:/usr/bin:/sbin:/usr/local/bin"
This line lets you specify the directories that will be used for sudo, and is used to prevent using user-specific directories, which can harm the system.
The next lines are used to specify permissions.
root ALL=(ALL) ALL
- The first ALL keyword indicates that this rule applies to all hosts.
- The second ALL indicates that the user in the first column can run commands with the privileges of any user.
- The third ALL means any command can be run.
tecmint ALL=/bin/yum update
If no user is specified after the = sign, sudo assumes the root user. In this case, user tecmint will be able to run yum update as root.
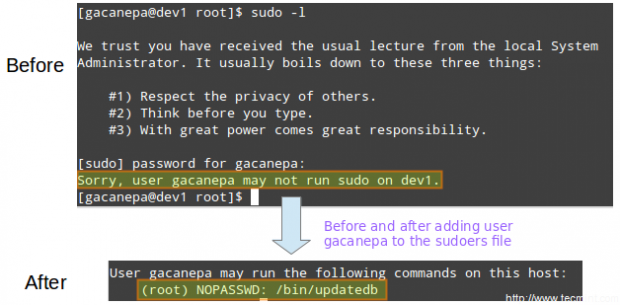
gacanepa ALL=NOPASSWD:/bin/updatedb
The NOPASSWD directive allows user gacanepa to run /bin/updatedb without needing to enter his password.
%admin ALL=(ALL) ALL
The % sign indicates that this line applies to a group called “admin”. The meaning of the rest of the line is identical to that of an regular user. This means that members of the group “admin” can run all commands as any user on all hosts.
To see what privileges are granted to you by sudo, use the “-l” option to list them.
PAM (Pluggable Authentication Modules)
Pluggable Authentication Modules (PAM) offer the flexibility of setting a specific authentication scheme on a per-application and / or per-service basis using modules. This tool present on all modern Linux distributions overcame the problem often faced by developers in the early days of Linux, when each program that required authentication had to be compiled specially to know how to get the necessary information.
For example, with PAM, it doesn’t matter whether your password is stored in /etc/shadow or on a separate server inside your network.
For example, when the login program needs to authenticate a user, PAM provides dynamically the library that contains the functions for the right authentication scheme. Thus, changing the authentication scheme for the login application (or any other program using PAM) is easy since it only involves editing a configuration file (most likely, a file named after the application, located inside /etc/pam.d, and less likely in /etc/pam.conf).
Files inside /etc/pam.d indicate which applications are using PAM natively. In addition, we can tell whether a certain application uses PAM by checking if it the PAM library (libpam) has been linked to it:
# ldd $(which login) | grep libpam # login uses PAM
# ldd $(which top) | grep libpam # top does not use PAM

In the above image we can see that the libpam has been linked with the login application. This makes sense since this application is involved in the operation of system user authentication, whereas top does not.
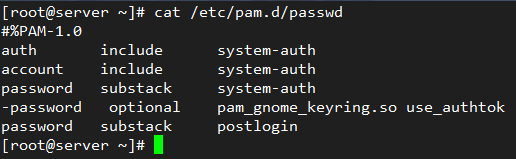
Let’s examine the PAM configuration file for passwd – yes, the well-known utility to change user’s passwords. It is located at /etc/pam.d/passwd:
# cat /etc/passwd
The first column indicates the type of authentication to be used with the module-path (third column). When a hyphen appears before the type, PAM will not record to the system log if the module cannot be loaded because it could not be found in the system.
The following authentication types are available:
account: this module type checks if the user or service has supplied valid credentials to authenticate.auth: this module type verifies that the user is who he / she claims to be and grants any needed privileges.password: this module type allows the user or service to update their password.session: this module type indicates what should be done before and/or after the authentication succeeds.
The second column (called control) indicates what should happen if the authentication with this module fails:
requisite: if the authentication via this module fails, overall authentication will be denied immediately.requiredis similar to requisite, although all other listed modules for this service will be called before denying authentication.sufficient: if the authentication via this module fails, PAM will still grant authentication even if a previous marked as required failed.optional: if the authentication via this module fails or succeeds, nothing happens unless this is the only module of its type defined for this service.includemeans that the lines of the given type should be read from another file.substackis similar to includes but authentication failures or successes do not cause the exit of the complete module, but only of the substack.
The fourth column, if it exists, shows the arguments to be passed to the module.
The first three lines in /etc/pam.d/passwd (shown above), load the system-auth module to check that the user has supplied valid credentials (account). If so, it allows him / her to change the authentication token (password) by giving permission to use passwd (auth).
For example, if you append
remember=2
to the following line
password sufficient pam_unix.so sha512 shadow nullok try_first_pass use_authtok
in /etc/pam.d/system-auth:
password sufficient pam_unix.so sha512 shadow nullok try_first_pass use_authtok remember=2
the last two hashed passwords of each user are saved in /etc/security/opasswd so that they cannot be reused:

Summary
Effective user and file management skills are essential tools for any system administrator. In this article we have covered the basics and hope you can use it as a good starting to point to build upon. Feel free to leave your comments or questions below, and we’ll respond quickly.


Hi Gabriel, nice tutorial, enjoyed it. Can you clarify and state best practices, please. I have 2 directories, ACCOUNTS, and OFFICE, both set to 2770 and ACCOUNTS is owned by group “department1″, and OFFICE is owned by group ” department 2″ both groups users can only use and see their own directories.
This all works fine but a new user “JOHN” wants to be able to access and modify BOTH directories, can you tell me how to make this happen, whats best practice?
How to delete multiple users at a time?
@Kiran,
To delete multiple users at a time in Linux, use the following command.
Alternatively, use the following command to delete multiple system users in Linux.
explanation of the above command.
Nice article appreciate your work. But make one correction here for unlocking a user you have to use “usermod -U username” instead of using small “u“, use capital U. Because with small u we can assign new UID for the user. its not for Unlocking a user.
Create a bash script to perform user management tasks like creating a new group. The script must check to ensure that no duplicate group names exist on the system. If a duplicate is found, an error needs to be reported, and the administrator must try another group name.
I Have a Samba Shared Folder and 2 or 3 folders inside that, how can I prevent copying file attributes (Like created /modified time stamps) when I copy for move files between these folders.
For the example you’ve just mentioned, what is the desired modification time stamp (or other file attributes) after you’ve copied the file(s)?
great tutorial
Thanks! Please help us spread the word by sharing this and our other posts through your social network profiles!
hi my name is mahi and i am from India learning red-hat 7 course but looking for red-hat book for more practices but in sequence or chapter-wise so i can learn Linux commands and concept in brief and deeply i often follow your site to learn Linux
i saw your red-hat certification study guide which is in red color and price of 34$ but bit surprise after saw the pages just 164, how you will cover all the topics in 164 pages may be i can be wrong but please suggest me one best book to learn red-hat Linux 7 , i want a book like the same way you write on your website
Great tutorial !! thank you
@BENALIF,
Thank you for taking the time to comment on this post. Please help us spread the word by sharing it through your social networks!
Wow this is such a comprehensive tutorial. Thanks for the good work.
Hi Gabriel,
For the past few days, I’ve been reading this tutorial series and making the exercises as a complement to do the LFCS exam. Until now (from part1 to 8) I’ve only had detected minor errors/typos but in this section you have some content from user and group management inside file permissions section :)
Since this exchange can lead to some confusion while reading, I’m here just to make you aware of this so you can correct.
Thank you for all the great info that you posted in these articles.
Best,
Nuno
@Nuno,
Thank you for pointing this out. You’re right, there are a couple of paragraphs in the File permissions section that should be moved to User management.
On a side note, would you be as kind as to let us know what are the errors / typos you’ve found in the previous guides?
Hi Gabriel,
No problem :)
Regarding the other errors/typos I’ve pointed out, as I said, they’re just minor things that I’ve noticed while reading and following your tutorials. As an example, the only one I can remember right now is on part 6 (RAID), in the section “Check the array creation status” where you show the status of a RAID5 after create a RAID0 but as I said, not a big deal :)
Again, big thanks for this tutorial series.
Best regards,
Nuno
@Nuno,
I just checked the RAID article and you’re right :). I am adding a comment in that article to ask the owner of the site to clarify. Thanks again!
In “Overview of Domains and Competencies” block on a page with LFCS info (https://training.linuxfoundation.org/certification/lfcs) we have two interesting competencies:
“Managing local users accounts”
“Managing user accounts”
Can you describe the difference? As I have found in the web, “Managing user accounts” means something related to network accounts (e.g. LDAP) and I don’t see anything related to it in this article.
@Paul,
The way I see it, that is a repeated topic. In the context of the LFCS exam, they mean the same. You will only be asked to perform local user management as described in this article.
ifconfig … output is
eth0 error fetching interface information device not found
lspci output
05:00.0 Ethernet controller: Realtek Semiconductor Co., Ltd. RTL8101E/RTL8102E PCI Express Fast Ethernet controller (rev 05)
please guide me about this issue…
@Tanveer,
Based on the error message, and without knowing what your distribution and environment is, I am assuming you are getting this error in a virtual machine. You have configured a NIC (network interface card) but have not added the virtual resource to the virtual machine. If my assumption is correct, my best guess is that you’re using VMWare. If so, please confirm and we’ll guide you through the steps to solve this issue. Without further information I am afraid we can’t do much.
Draga Gabriel,
Am o nelamurire legata de output-ul generat de crearea unui nou user. Centos7 nou user intr-o forma cat mai simpla: useradd dragos. Se creaza automat un UID si GID default si un grup default cu nume identic. Cand verific cu cat /etc/group output-ul este pt. userul nou creat in forma: dragos:x:1001: deci fara a aparea in mod explicit ce user are grupul “dragos”. La alt user apare forma: apolo:x:1000:apolo.
Inrebarea mea de ce o inregistrare cuprinde explicit userul default generat si cealalta inregistrare nu. Este vreo diferenta???
PS: cu id user totul apare corect.
Multumesc mult!!!!
English Version
Dear Gabriel ,
I have a misunderstanding related to the output generated by creating a new user . Centos7 new user in a form as simple : useradd nice. It automatically creates a UID and GID default and a default group with the same name . When you check with cat / etc / group is for output . The newly created user in the form : Dragos : x : 1001 : so without appearing explicitly that user group has ” pretty.” At another user appears as: Apollo : x : 1000: Apollo.
Asked what my record contains explicit default user generated and no other listing . Is there any difference ???
PS : everything seems right with user id .
Thank you very much!!!!
Hey, Thanks Gabriel
I would like to know how to manually add users to my Linux system, i mean not using either adduser or useradd.
first thank you for this nice series
there is a little mistake in lock user account part it should be -L (uppercase) not -l (lowercase)
hey just a note – unlock and lock actually user uppercase letters
Hello,
Perhaps there is a typo here?
# usermod –expiredata 2014-10-30 tecmint
Is it should be
# usermod –expiredate 2014-10-30 tecmint
@Nick,
Thanks for pointing out that typo, corrected in the writeup….
Great articles, I just wanted to point out a possible typo. The “man” pages show that “usermod -L” will lock a user account and “-U” will unlock. Thanks again for this valuable documentation.
Hi,
Thanks very much for the great series covering LFCS.
Perhaps there is a typo here?
# chmod :common_group common.txt # Change the group owner of common.txt to common_group
Is it should be chown (to change the user/group ownership of a file)?
@Jason,
I can’t find the typo you’re pointing out (maybe it was fixed by the editor already). But yes, you’re right. You change the owner of the file with chown, not chmod.
Do we have an LFCS series from start to end here? Would love to see the content and topics covered being an RHCE.
@Prasad, thank you for sharing that link and for taking the time to comment!.
Actually, I thought about saying a word or two about the skel file, but I ended up trying to stick with the intent of the LFCS certification (strictly performance-based).
Hi,
Great document. Also need to add skel file importance.
http://www.linfo.org/etc_skel.html