This tutorial represents a practical excerpt on how to migrate (also known as cloning) a Windows 10 Operating System from a large HDD with multiple partitions, such as C:, D:, to a smaller SSD using a Linux distribution which includes Clonezilla utility.
Clonezilla utility can run from PartedMagic Linux distribution CD ISO image or directly from Clonezilla Linux distribution CD ISO image.
This guide assumes that both disks (old HDD and SSD) are physically plugged-in into your machine simultaneously and Windows OS is installed on a disk with MBR partition scheme table. Fdisk command line utility should display the disklabel type as DOS.
Read Also: 8 Open Source Disk Cloning and Backup Solutions for Linux
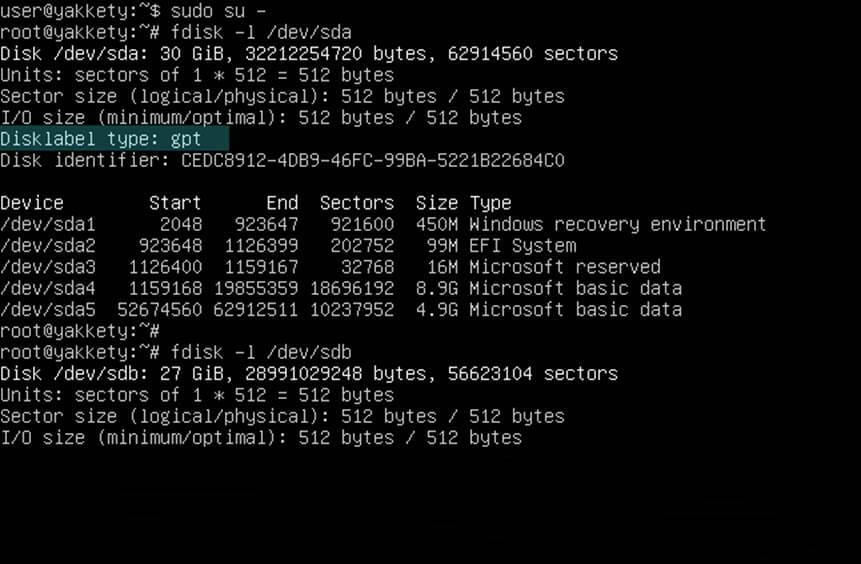
If disk in partitioned in MBR layout from UEFI, you should clone all partitions, such as Windows RE partition, EFI System partition, Microsoft Reserved partition and Microsoft basic data partition which holds the Windows OS partition, typically the C: drive. In this case Fdisk command line utility should report the disklabel type as GPT.
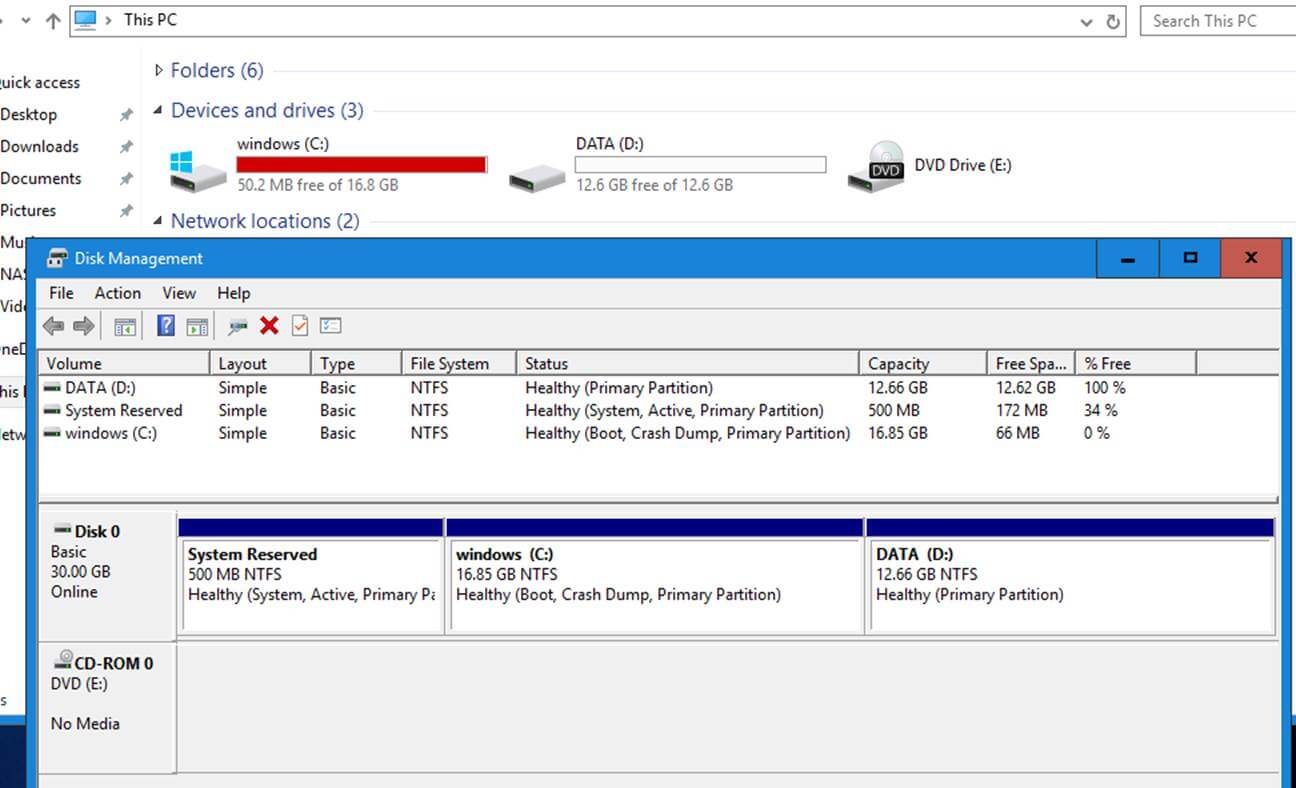
On the below screenshots you can review the initial Windows partitioning scheme in case of a MBR layout style and GPT partition layout performed from UEFI.
MBR Partition Layout from Disk Management
GPT Partition Layout from Disk Management

Step 1: Shrink C: Partition of Windows System
Be aware that in the case your windows C: partition from the HDD is larger than the total size of your SSD you will need reduce its size to fit on the SSD.
The calculations for this step are simple:
System Reserved + Recovery + EFI partition + Windows C: partitions must be smaller or equal than the total size of the SSD reported by a utility such as fdisk.
1. To shrink C: partition from Windows, first open a Command Prompt window and execute the diskmgmt.msc to open Windows Disk Management utility which will be used to Shrink the volume (assuming that windows is installed at the beginning of the disk on the second partition, after the System Reserved partition and has C: letter assigned) in order to reduce its size to minimal.
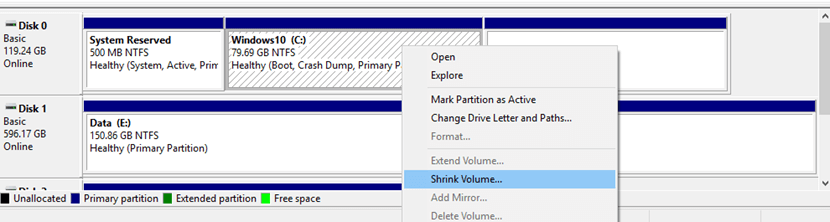
Feel free to use other partitioning tools for this step, such as Gparted run from a live Linux ISO, to reduce C: drive size to minimal.
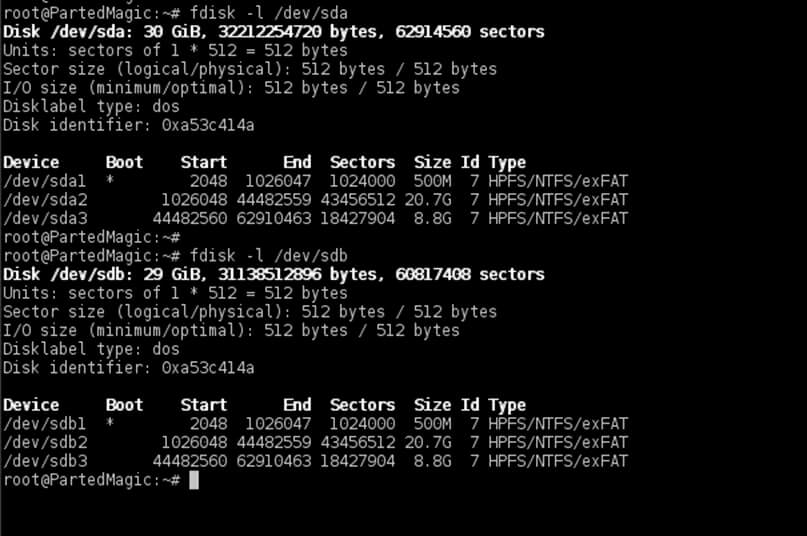
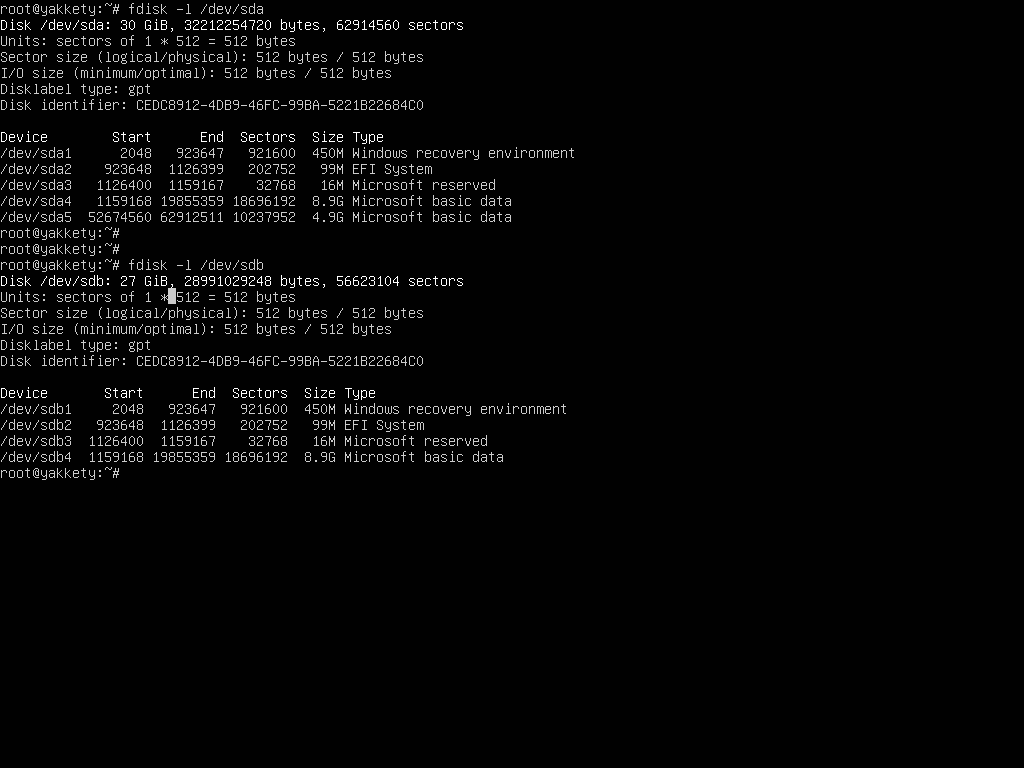
2. After you’ve reduced the size of C: partition, plug the SSD drive to your machine motherboard and reboot the machine into Clonezilla utility (use Clonezilla ISO image or <arel=”nofollow” href=”https://partedmagic.com/downloads/” target=”_blank”>Parted Magic ISO), enter to Bash shell interface and check both disks partition table and size using the below commands.
# fdisk -l /dev/sda
# fdisk -l /dev/sdb
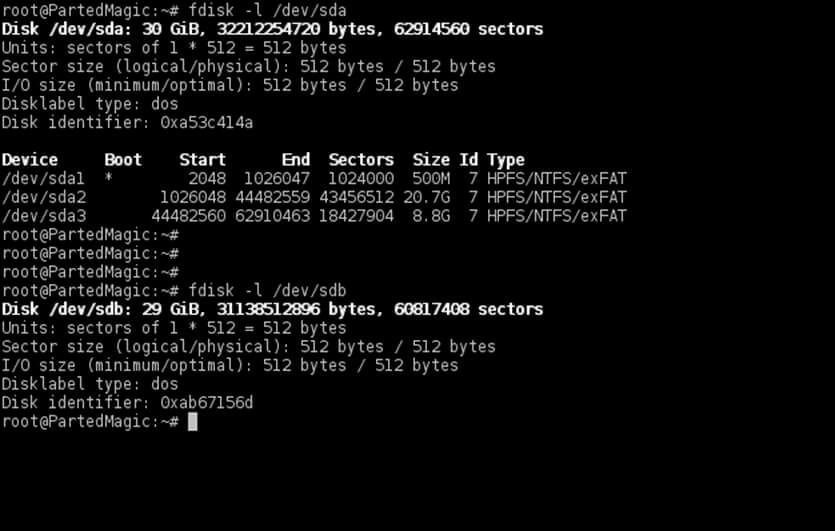
Be aware that your drives names would be sda for the first disk, sdb for the second and so on. Choose the disk with maximum attention so you won’t end-up cloning the wrong device and destroy all data.
To match the correct disk source (HDD in this case) and disk destination target (SSD) use the size and the partition table reported by fdisk command. Fdisk output will show that the SSD should be smaller in size than your HDD disk and should have no partition table created by default.
In case of a GPT disk, the HDD partition table should look as illustrated on the below screenshot.
$ su -
# fdisk -l /dev/sda
# fdisk -l /dev/sdb
Step 2: Clone Disks Using Clonezilla
3. Next , clone only the MBR (stage one bootloader + partition table) from the HDD to the SSD target disk using one of the below commands (assuming that sda represents the drive where Windows OS is installed and sdb the SSD disk).
# dd if=/dev/sda of=/dev/sdb bs=512 count=1
or
# sfdisk -d /dev/sda | sfdisk -f /dev/sdb

In case of a GPT partition style you should clone the first 2048 bytes:
# dd if=/dev/sda of=/dev/sdb bs=2048 count=1
Or use sgdisk utility. Be aware that if you copy partition table from sda to sdb you should inverse the order of disks when using sgdisk.
# sgdisk -R /dev/sdb /dev/sda
After cloning the MBR/GPT, run fdisk command again with the -l flag to verify if the partition table matches on both disks.
# fdisk -l /dev/sda
# fdisk -l /dev/sdb
4. By now both drives should have the exact partition table. On the target disk now delete all the partitions that follow after the Windows partition in order to start with a clean partition table with the entries necessaries only for system reserved and windows.
You won’t clone data from D: (or other partitions that follow Windows) from the old drive. You’re basically cloning only the first two partitions from the old HDD. Later you will use this unallocated space left behind to extend the C: partition by incorporating all the unused space from SSD.
Use fdisk utility as described below to delete partitions. First run the command against your SSD target drive (/dev/sdb this case), print partition table with p key, press d key to start delete partitions and choose the last partition number from the prompt (in this case the third partition) as illustrated in the below screenshots.
# fdisk /dev/sdb
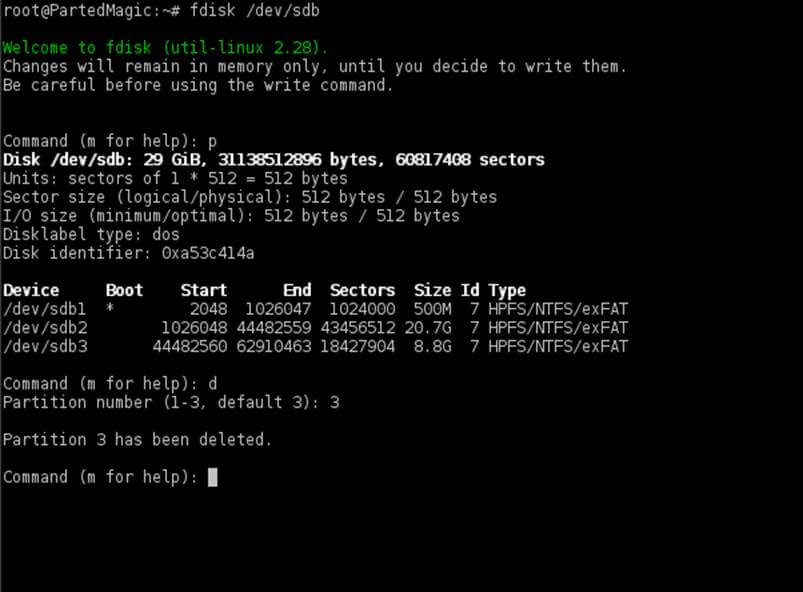
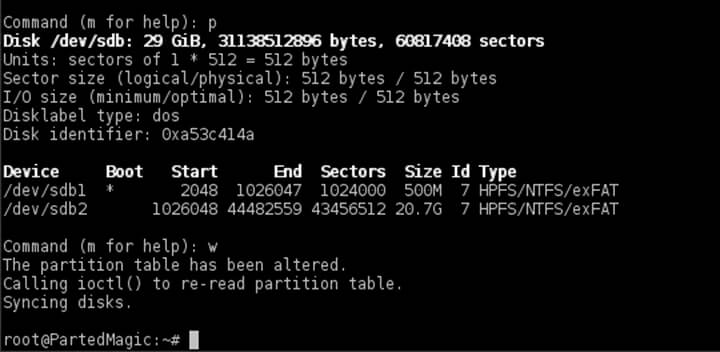
In case your drive has more than one partition following after the Windows partition, make sure you delete all of them. After you’ve finished removing all unneeded partitions, press p key again to print partition table and if, by now, only the two required Windows partitions are listed, you are safe to hit on w key in order to apply all changes.
The same procedure for deleting last partitions applies for GPT disks also, with the mention that you should use cgdisk utility which is intuitive to work with in manipulation a disk layout.
Don’t worry about destroying backed-up partition table at the end of the GPT disk, cgdisk will make the appropriate changes on both partition tables and will save the new disk layout table at the end of the disk automatically.
# cgdisk /dev/sdb
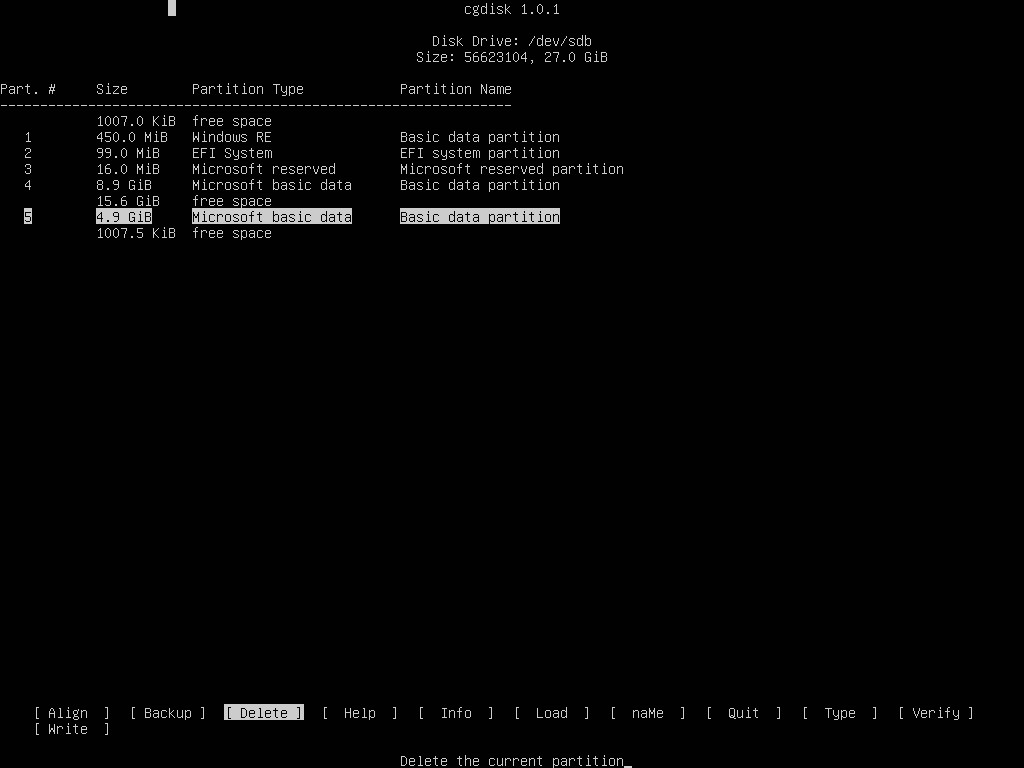
And the final GPT disk report with the last 4,9 GB partition deleted.
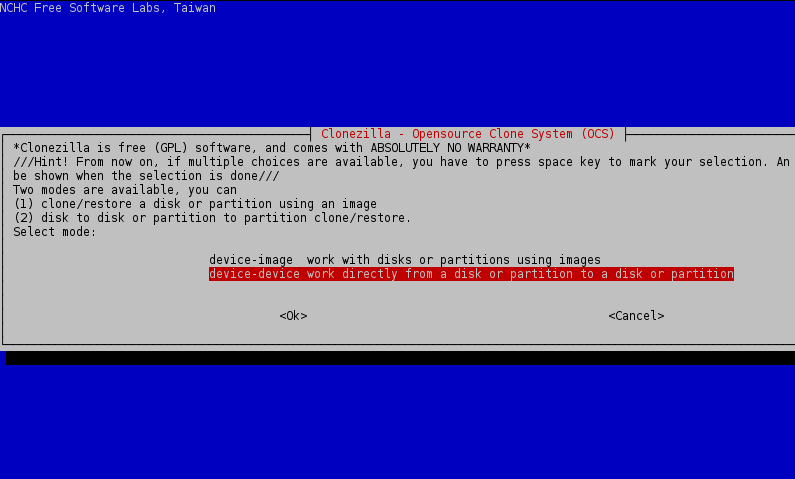
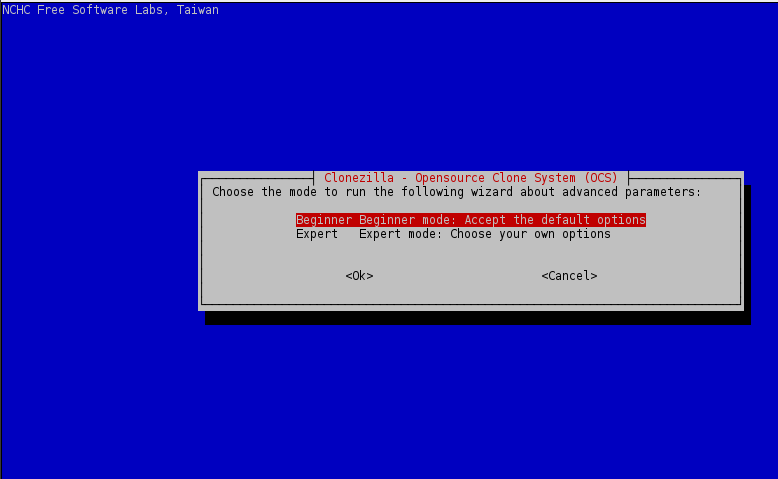
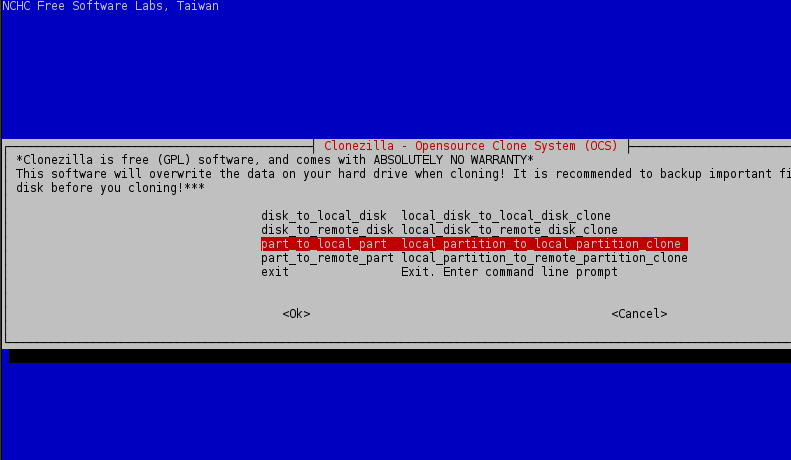
5. Now, if everything is in place, start Clonezilla utility, select device-device mode, run from beginner wizard and select part-to-local_part cloning option.
Use the below screenshots for guide.
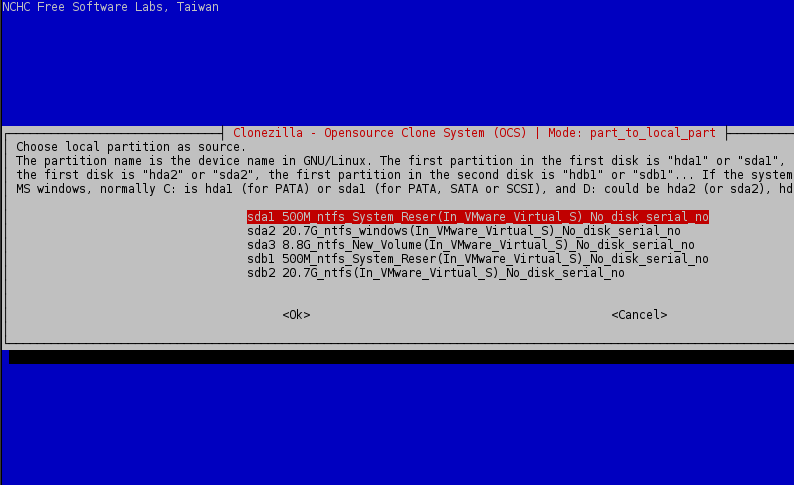
6. Choose the first local partition from the list (sda1 – System Reserved ) as source and press Enter key to continue.
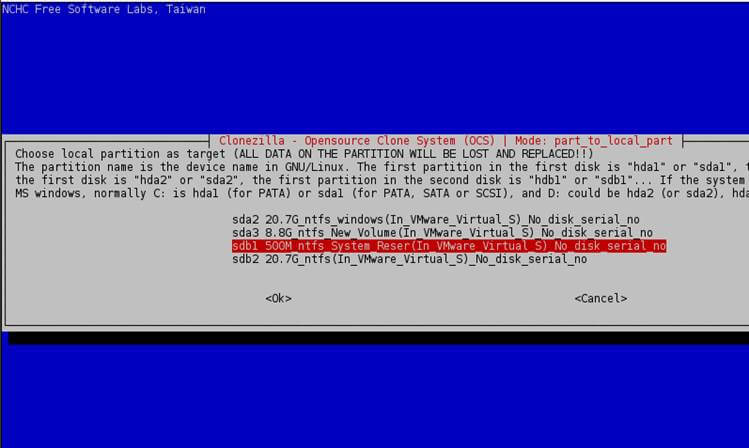
7. Next, choose the local target partition, which will be the first partition from the second disk, (/dev/sdb1) and press Enter key to continue.
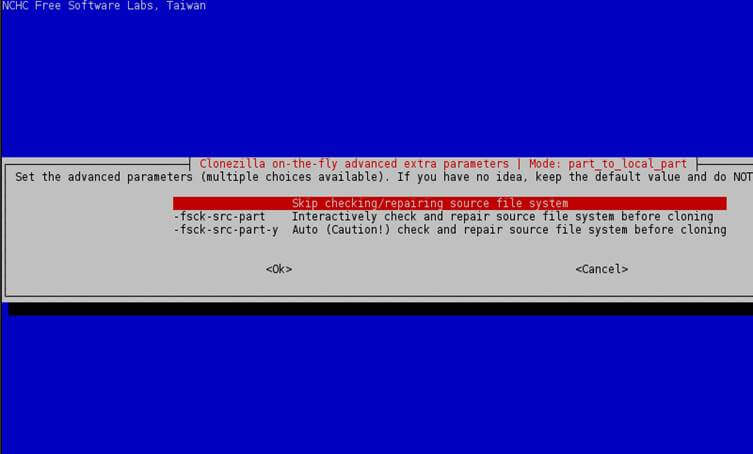
8. On the next screen choose to Skip check/repair file system and press Enter key again to continue.
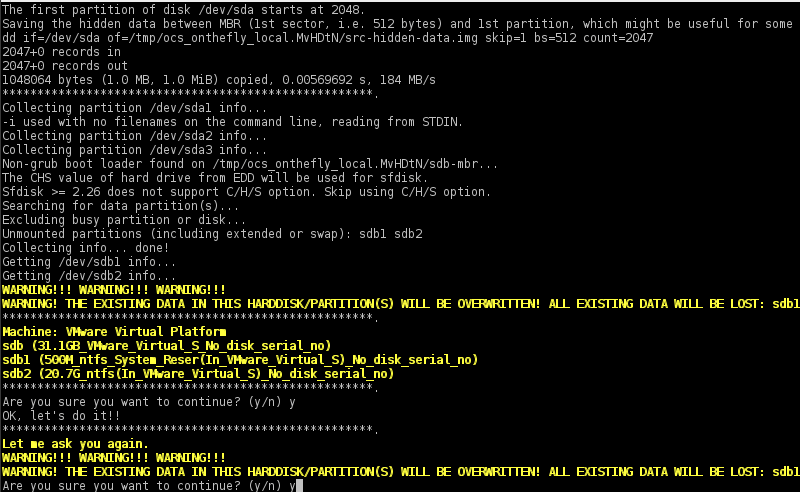
9. Finally, press Enter key again to Continue and answer with yes (y) twice to accept the warnings and start the cloning process.
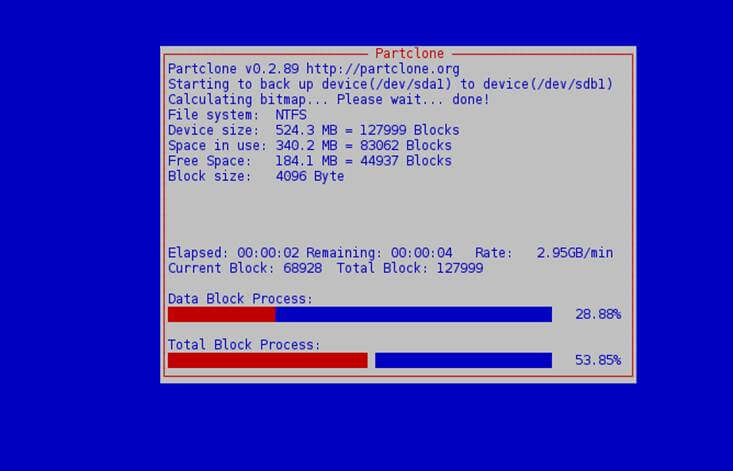
10. After the cloning process of the first partition finishes select to enter command line prompt, run clonezilla and repeat the same steps for next partitions (source sda2 – target sdb2, etc).

11. After all windows partitions are cloned, reboot the system and physically unplug the HDD drive or, better, tamper BIOS settings in order to set SSD as primary boot drive instead of old HDD.
Step 3: Resize Windows Partition
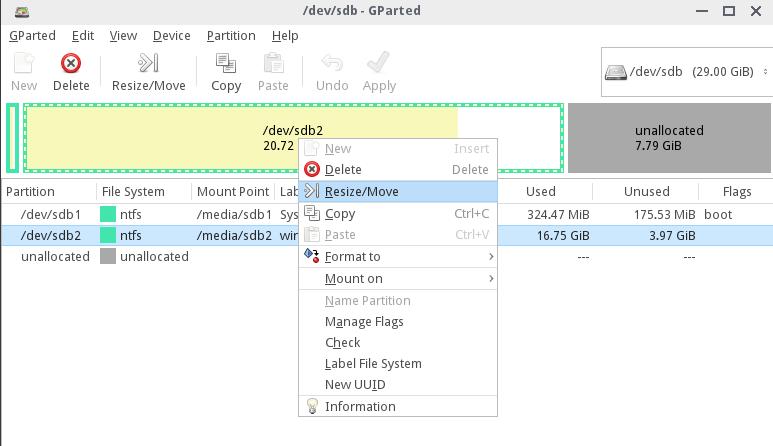
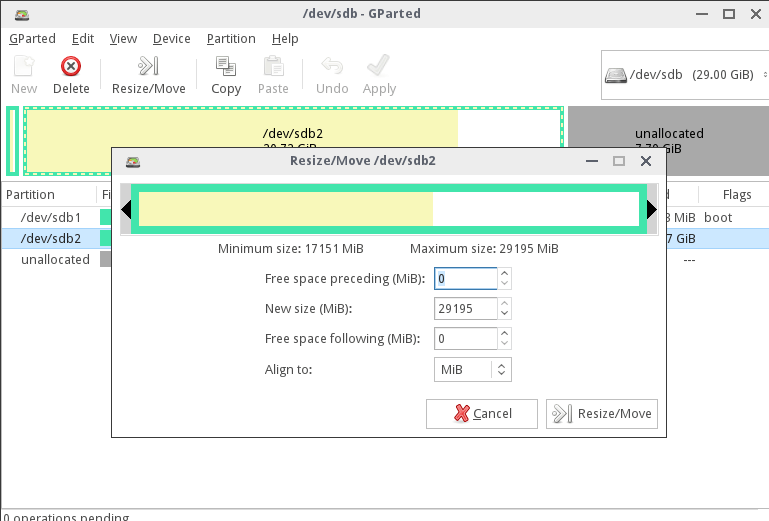
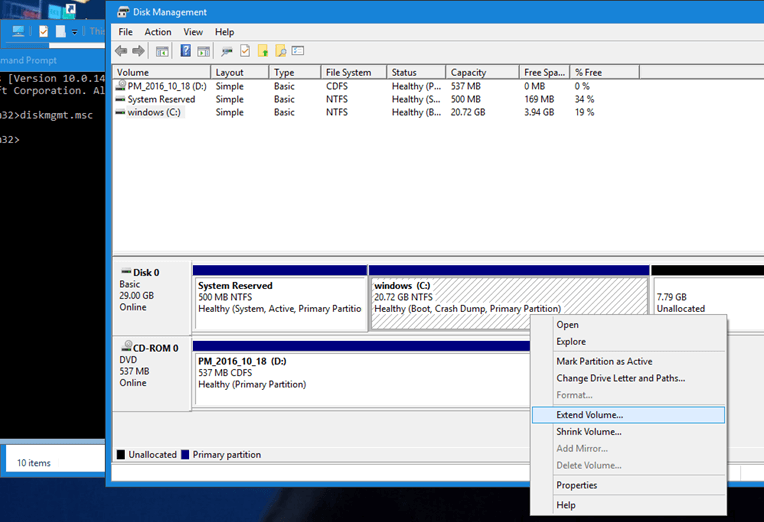
12. You can run Gparted utility to check partitions sanity and extend windows partition from Linux or you can just boot into Windows and use Disk Management utility to do this job. The below screenshots illustrate how to use both utilities.
Extend Partition using Gparted Live CD
Extend Partition using Windows Disk Management utility directly from Windows.
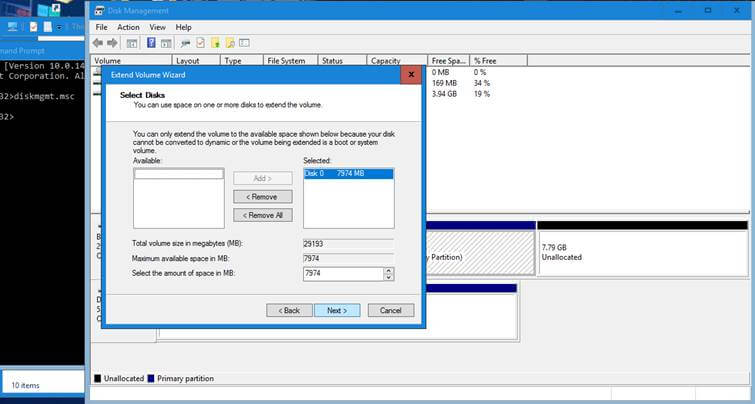
That’s all! The C: partition is now expanded to the maximum size of your SSD and Windows can now run at its maximum speed on a brand new SSD. The old HDD has all data intact.
Connect the hard-disk again in order to use it in case you’ve physically removed it from the motherboard. You can delete system reserved partition and windows partition from the old HDD and create a new partition instead of these two. The other old partitions (D:, E: etc) will remain intact.
Conclusion
With Clonezilla you can also choose to image the partitions and save them to an external HDD or a network location. In this case you must also backup HDD MBR/GPT with one of the following commands and save the MBR image to the same directory where your clonezilla images are kept.
MBR backup to file:
# dd if=/dev/sda of=/path/to/MBR.img bs=512 count=1
or
# sfdisk -d /dev/sda > =/path/to/sda.MBR.txt
GPT Backup to file:
# dd if=/dev/sda of=/path/to/GPT.img bs=2048 count=1
or
# sgdisk --backup=/path/to/sda.MBR.txt /dev/sda
For a future restoration of your Windows system from a network location, first restore the MBR sector from the saved imaged above using one of the below commands, then proceed with restoring each clonezilla partition image one by one.
MBR image restore from file:
# dd if=/path/to/MBR.img of=/dev/sda bs=512 count=1
or
# sfdisk /dev/sda < =/path/to/sda.MBR.txt
GPT image restore from file:
# dd if=/path/to/GPT.img of=/dev/sda bs=2048 count=1
# sgdisk - -load-backup=/path/to/sda.MBR.txt /dev/sda
Read Also: How to Clone or Backup Linux Disk Using Clonezilla
This method has been used multiple times on BIOS motherboards and on UEFI machines with Windows installed from Legacy Mode (CSM) or directly from UEFI without any error or data loss.


Many many thanks for this. I followed the tutorial religiously and not also managed to make it work, choosing only the partitions that I needed, but also I learned a lot in the process.
A couple of extra steps I needed to do in order to make it all work on my end:
The cloning process failed on the
C:drive because of bad sectors on the source. I saw this exact message:I was able to solve this by:
It detected bad sectors on the source but kept going till the end.
The SSD wasn’t able to boot after. So I run:
I guess I don’t understand why one would go through all of this when all that is needed to migrate make exact clones of disks are native Linux tools – sfdisk to duplicate partitions and gpartd to copy from one drive to the other.
Such can be done on the subject host by booting a Linux “live” disk after attaching the new drive alongside the original, or by a “third party” Linux machine with the drives attached.
We can also draw support from other professional system migration software. Steps of the migrating systems with such software could be easier. Besides, when we transfer the system from HDD to SSD, we should pay attention to whether the new disk has been 4K aligned. If it is not 4K aligned, the performance of the SSD will be poor. I have ever used this software to transfer the system from SSD to HDD and it helped me make the 4K alignment in SSD automatically. And the whole operation is only 4 simple steps. The software here has helped me many times to migrate systems with simple steps.
Thank you so much for this lovely guide!
It makes clear sense!
One thing though – fdisk complained about a corrupt GPT table right after copying the GPT table from my 1TB HDD to my 120GB SSD; I think it’s worth mentioning that in case fdisk complains, you can still remove the offending partitions in sgdisk (I didn’t use cgdisk as you recommended; although it looks like it should work).
You reminded me of how much fun Linux was! I’ve been using Windows almost exclusively because of stylus/touch input and Office and good HiDPI support. Thank you for taking out the time to write this detailed guide!
Excellent documentary!
Hi, this is fantastic article, it helped me to save about 50$. I had to migrate HDD to SSD with Win8.1 with UEFI boot, used clonezilla for cloning partitions, but didn’t know how to copy boot records.
I almost gave up and I was considering buying one of these commercial magic tools to do the job for me, but then I found this article. I used sysrescuecd Linux and followed first steps, now everything here works like a charm on new SSD. Thank you.
I found that Clonezilla was disrupting the partition table on a nvme drive with windows 10 bitlocker encrypted drive. I was able to get this to work with 2 changes. Disable bitlocker before shutting down (but did not decrypt), and then using dd instead of Clonezilla to copy each partition. I suspect the block by block option in Clonezilla would work too.
Congratulations Matei for this good tutorial.
Maybe an extra step . Before start cloning, make a fstrim on the SSD in case of a old/used SSD.
And what’s the procedure in case the Windows partition has 500GB, for example, and your SSD only 60 or 120 GB? How do you transfer the OS to a SSD in this case. You can do it in expert mode and skip checking the destination disk, but if the size of the Windows partition, in case of a production machine, exceeds the SSD size, then data corruption will surly occur! Yes, you can disable page file, hibernation and delete all system restore points to free some space, but this is just a Windows trick to save space. What if the machine was put into hibernation.
You don’t want to delete hiverfile.sys. The point of cloning is to do exactly what it implies: clone, bit by bit, sector by sector, block by block, all data from one drive to other. If Windows diskmgmt tool does an execrable job in shrinking space, then you can use an Open Source Linux distro to shrink a Windows OS partition to it’s minimal data limit.
Unnecessary complicated procedure and not even complete, as many times you are not able to shrink windows system partition without previously (and temporarily) removing virtual memory and disabling system protection.
I would prefer moving any data partition to an exterrnal disk, then remove the data partition, leave all other partitions adding up to the size of the ssd disk, and run the clonezilla in expert mode and select not checking the size of the destination disk, leaving all remaining options as default.
What if the you have a 4 TB HDD, with the Windows system installed on a 200 GB partition and the rest of the space forms the
D:partition with 3 GB occupied space. What’s the easy way? Wait a day to transfer 3GB of data from one HDD to other and then crate one big partition to transfer with clonezilla (no check the size of the destination disk) or shrink the windows partition to the size of the SSD and transfer only the Windows partition (with all required pre-partitions, such as Reserved space, certainly).Then, on the old HDD you just delete the windows partition and create a new partition. The rest of the partitions on old HDD, the old D: partition will remain intact with with no data touched. The time you gain using this method is way shorter. With disk to disk clone, migrating a 100 GB Windows partition from a HDD to a SSD will not take longer than a couple of ten minutes or roughly one or two hours tops.
I would prefer moving any data partition to an external disk, then remove the data partition, leave all other partitions adding up to the size of the SSD disk, and run the Clonezilla in expert mode and select not checking the size of the destination disk, leaving all remaining options as default.
That sounds like a good idea.
Fortunately, I seem to have already succeeded in shrinking my OS partition so that it will fit. All I want to do now is copy the old HDD onto my SSD. Your suggested method sounds easier than all the commands in the tutorial above.
However, my recovery partition is at the other end of my 1TB HDD which will not get moved to the SDD. Perhaps I can use Gparted to move it first.
Yes! Thank you. Martins Almeida
I used Clonezilla advanced removing disk size check and it seems to have worked.
To clone a large HDD to a smaller SDD:
Remove your hard drive and boot with your new SSD Os drive!
Timothy, not sure if you’ll respond after 3 years but here goes: It looks like your procedure greatly simplified the process by eliminating the command lines. Can you please confirm if this worked for you? Can you elaborate on step 5 as to why you need to move your recovery partition to the left? A link to a video or screenshots would help. Thanks
Hi Matt,
I am sorry I don’t remember! I guess it was because the system recovery disk may be created at the top end of your drive, but if you want to put it in the smallest space possible then (where M is your windows related files and R is your recovery drive)
is preferable to
where there is some unused disk space between the windows files and the recovery partition.
The above did work for me, and all of the steps may not have been necessary, but I don’t know why or how now! I have 3 PCs with SSDs that have been going for ages.