For those of you in the hosting business, or if you’re hosting your own servers and exposing them to the Internet, securing your systems against attackers must be a high priority.
mod_security (open-source intrusion detection and prevention engine for web applications that integrates seamlessly with the webserver) and mod_evasive are two very important tools that can be used to protect a web server against brute force or (D)DoS attacks.
mod_evasive, as its name suggests, provides evasive capabilities while under attack, acting as an umbrella that shields web servers from such threats.
In this article, we will discuss how to install, configure, and put them into play along with Apache on RHEL/CentOS 8 and 7 as well as Fedora. In addition, we will simulate attacks in order to verify that the server reacts accordingly.
This assumes that you have a LAMP server installed on your system. If not, please check this article before proceeding further.
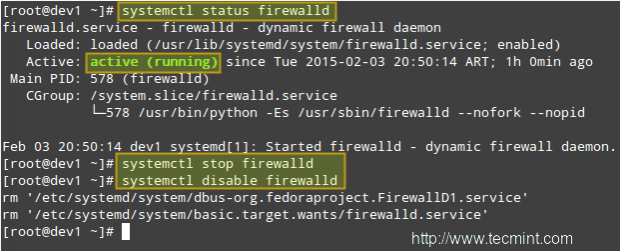
You will also need to set up iptables as the default firewall front-end instead of firewalld if you’re running RHEL/CentOS 8/7 or Fedora. We do this in order to use the same tool in both RHEL/CentOS 8/7 and Fedora.
Step 1: Installing the Iptables Firewall on RHEL/CentOS 8/7 and Fedora
To begin, stop and disable firewalld:
# systemctl stop firewalld
# systemctl disable firewalld
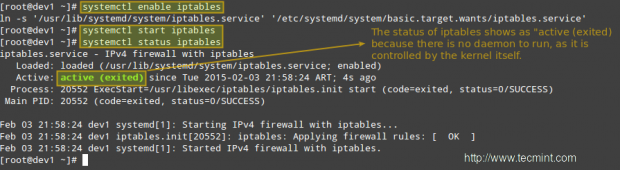
Then install the iptables-services package before enabling iptables:
# yum update && yum install iptables-services
# systemctl enable iptables
# systemctl start iptables
# systemctl status iptables
Step 2: Installing Mod_Security and Mod_evasive
In addition to having a LAMP setup already in place, you will also have to enable the EPEL repository in RHEL/CentOS 8/7 in order to install both packages. Fedora users don’t need to enable any repo, because epel is already part of the Fedora Project.
# yum update && yum install mod_security mod_evasive

--------------- CentOS/RHEL 8 ---------------
# dnf install https://pkgs.dyn.su/el8/base/x86_64/raven-release-1.0-1.el8.noarch.rpm
# dnf --enablerepo=raven-extras install mod_evasive
When the installation is complete, you will find the configuration files for both tools in /etc/httpd/conf.d.
# ls -l /etc/httpd/conf.d

Now, in order to integrate these two modules with Apache and have it load them when it starts, make sure the following lines appear in the top-level section of mod_evasive.conf and mod_security.conf, respectively:
LoadModule evasive20_module modules/mod_evasive24.so
LoadModule security2_module modules/mod_security2.so
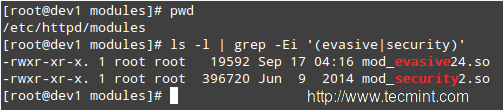
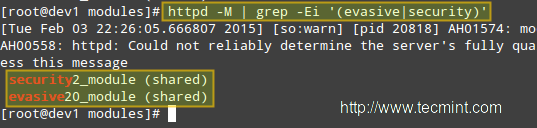
Note that modules/mod_security2.so and modules/mod_evasive24.so are the relative paths, from the /etc/httpd directory to the source file of the module. You can verify this (and change it, if needed) by listing the contents of the /etc/httpd/modules directory:
# cd /etc/httpd/modules
# pwd
# ls -l | grep -Ei '(evasive|security)'
Then restart Apache and verify that it loads mod_evasive and mod_security:
# systemctl restart httpd
Dump a list of loaded Static and Shared Modules.
# httpd -M | grep -Ei '(evasive|security)'
Step 3: Installing A Core Rule Set and Configuring Mod_Security
In a few words, a Core Rule Set (aka CRS) provides the web server with instructions on how to behave under certain conditions. The developer firm of mod_security provides a free CRS called OWASP (Open Web Application Security Project) ModSecurity CRS that can be downloaded and installed as follows.
1. Download the OWASP CRS to a directory created for that purpose.
# mkdir /etc/httpd/crs-tecmint
# cd /etc/httpd/crs-tecmint
# wget -c https://github.com/SpiderLabs/owasp-modsecurity-crs/archive/v3.2.0.tar.gz -O master

2. Untar the CRS file and change the name of the directory for one of our convenience.
# tar xzf master
# mv owasp-modsecurity-crs-3.2.0 owasp-modsecurity-crs
3. Now it’s time to configure mod_security. Copy the sample file with rules (owasp-modsecurity-crs/modsecurity_crs_10_setup.conf.example) into another file without the .example extension:
# cd owasp-modsecurity-crs/
# cp crs-setup.conf.example crs-setup.conf
and tell Apache to use this file along with the module by inserting the following lines in the web server’s main configuration file /etc/httpd/conf/httpd.conf file. If you chose to unpack the tarball in another directory you will need to edit the paths following the Include directives:
<IfModule security2_module>
        Include crs-tecmint/owasp-modsecurity-crs/crs-setup.conf
        Include crs-tecmint/owasp-modsecurity-crs/rules/*.conf
</IfModule>
Finally, it is recommended that we create our own configuration file within the /etc/httpd/modsecurity.d directory where we will place our customized directives (we will name it tecmint.conf in the following example) instead of modifying the CRS files directly. Doing so will allow for easier upgrading of the CRSs as new versions are released.
<IfModule mod_security2.c>
	SecRuleEngine On
	SecRequestBodyAccess On
	SecResponseBodyAccess On
	SecResponseBodyMimeType text/plain text/html text/xml application/octet-stream
	SecDataDir /tmp
</IfModule>
You can refer to the SpiderLabs’ ModSecurity GitHub repository for a complete explanatory guide of mod_security configuration directives.
Step 4: Configuring Mod_Evasive
mod_evasive is configured using directives in /etc/httpd/conf.d/mod_evasive.conf. Since there are no rules to update during a package upgrade, we don’t need a separate file to add customized directives, as opposed to mod_security.
The default mod_evasive.conf file has the following directives enabled (note that this file is heavily commented, so we have stripped out the comments to highlight the configuration directives below):
<IfModule mod_evasive24.c>
    DOSHashTableSize    3097
    DOSPageCount        2
    DOSSiteCount        50
    DOSPageInterval     1
    DOSSiteInterval     1
    DOSBlockingPeriod   10
</IfModule>
Explanation of the directives:
- DOSHashTableSize: This directive specifies the size of the hash table that is used to keep track of activity on a per-IP address basis. Increasing this number will provide a faster lookup of the sites that the client has visited in the past, but may impact overall performance if it is set too high.
- DOSPageCount: Legitimate number of identical requests to a specific URI (for example, any file that is being served by Apache) that can be made by a visitor over the DOSPageInterval interval.
- DOSSiteCount: Similar to DOSPageCount, but refers to how many overall requests can be made to the entire site over the DOSSiteInterval interval.
- DOSBlockingPeriod: If a visitor exceeds the limits set by DOSSPageCount or DOSSiteCount, his source IP address will be blacklisted during the DOSBlockingPeriod amount of time. During DOSBlockingPeriod, any requests coming from that IP address will encounter a 403 Forbidden error.
Feel free to experiment with these values so that your web server will be able to handle the required amount and type of traffic.
Only a small caveat: if these values are not set properly, you run the risk of ending up blocking legitimate visitors.
You may also want to consider other useful directives:
DOSEmailNotify
If you have a mail server up and running, you can send out warning messages via Apache. Note that you will need to grant the apache user SELinux permission to send emails if SELinux is set to enforcing. You can do so by running
# setsebool -P httpd_can_sendmail 1
Next, add this directive in the mod_evasive.conf file with the rest of the other directives:
DOSEmailNotify [email protected]
If this value is set and your mail server is working properly, an email will be sent to the address specified whenever an IP address becomes blacklisted.
DOSSystemCommand
This needs a valid system command as an argument,
DOSSystemCommand </command>
This directive specifies a command to be executed whenever an IP address becomes blacklisted. It is often used in conjunction with a shell script that adds a firewall rule to block further connections coming from that IP address.
Write a shell script that handles IP blacklisting at the firewall level
When an IP address becomes blacklisted, we need to block future connections coming from it. We will use the following shell script that performs this job. Create a directory named scripts-tecmint (or whatever name of your choice) in /usr/local/bin and a file called ban_ip.sh in that directory.
#!/bin/sh
# IP that will be blocked, as detected by mod_evasive
IP=$1
# Full path to iptables
IPTABLES="/sbin/iptables"
# mod_evasive lock directory
MOD_EVASIVE_LOGDIR=/var/log/mod_evasive
# Add the following firewall rule (block all traffic coming from $IP)
$IPTABLES -I INPUT -s $IP -j DROP
# Remove lock file for future checks
rm -f "$MOD_EVASIVE_LOGDIR"/dos-"$IP"
Our DOSSystemCommand directive should read as follows:
DOSSystemCommand "sudo /usr/local/bin/scripts-tecmint/ban_ip.sh %s"
In the line above, %s represents the offending IP as detected by mod_evasive.
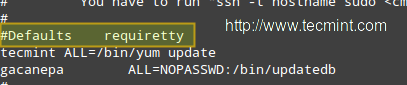
Add the apache user to the sudoers file
Note that all of this just won’t work unless you give permissions to user apache to run our script (and that script only!) without a terminal and password. As usual, you can just type visudo as root to access the /etc/sudoers file and then add the following 2 lines as shown in the image below:
apache ALL=NOPASSWD: /usr/local/bin/scripts-tecmint/ban_ip.sh
Defaults:apache !requiretty

IMPORTANT: As a default security policy, you can only run sudo in a terminal. Since in this case, we need to use sudo without a tty, we have to comment out the line that is highlighted in the following image:
#Defaults requiretty
Finally, restart the webserver:
# systemctl restart httpd
Step 4: Simulating a DDoS Attacks on Apache
There are several tools that you can use to simulate an external attack on your server. You can just google for “tools for simulating ddos attacks” to find several of them.
Note that you, and only you, will be held responsible for the results of your simulation. Do not even think of launching a simulated attack on a server that you’re not hosting within your own network.
Should you want to do the same with a VPS that is hosted by someone else, you need to appropriately warn your hosting provider or ask permission for such a traffic flood to go through their networks. Tecmint.com is not, by any means, responsible for your acts!
In addition, launching a simulated DoS attack from only one host does not represent a real-life attack. To simulate such, you would need to target your server from several clients at the same time.
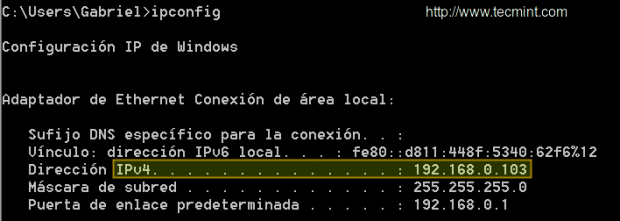
Our test environment is composed of a CentOS 7 server [IP 192.168.0.17] and a Windows host from which we will launch the attack [IP 192.168.0.103]:
Please play the video below and follow the steps outlined in the indicated order to simulate a simple DoS attack:
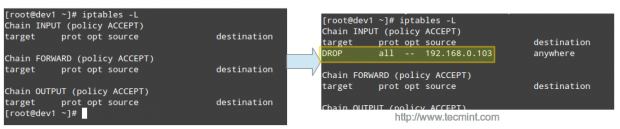
Then the offending IP is blocked by iptables:
Conclusion
With mod_security and mod_evasive enabled, the simulated attack causes the CPU and RAM to experiment with a temporary usage peak for only a couple of seconds before the source IPs are blacklisted and blocked by the firewall. Without these tools, the simulation will surely knock down the server very fast and render it unusable during the duration of the attack.
We would love to hear if you’re planning on using (or have used in the past) these tools. We always look forward to hearing from you, so don’t hesitate to leave your comments and questions, if any, using the form below.


Is there a later version of mod_evasive that’s happy to use firewalld? It’s the new default and I don’t really want to have to revert back to iptables as the world moves to firewalld.
Can you help me, sir?
I try to install it at my centos web panel (webserver using varinish + nginx and apache (using centos 7).
After I install. my apache failed to start. what I need to sir. Can you help me?
This most likely wouldn’t work on an AWS EC2 instance as typically you use the AWS Security Groups to restrict ports instead of the host-based firewall.
Hello,
I followed the article and mod_evasive works perfectly if my site configured at 80 port with 443 port the mod_evasive does not work.
Any Idea?
I am running CentOS 7
Thank you
No longer works on Fedora as Fedora uses firewalld and eventually nftables see https://fedoraproject.org/wiki/Changes/firewalld_default_to_nftables
@Robert,
I think it should work if you remove firewalld and nftables and install iptables as shown in the article.
Gabriel,
Thanks the mod_evasive stuff is really interesting – I might have a play with it…
A true DDOS is pretty hard to handle but every little helps.
We’ve noticed a big rise in brute force login attacks recently and made a blog about using ModSecurity to stop them: loadbalancer.org/blog/brute-force-login-modsecurity-waf
this tutorial for old version and you will found error if you use this version of tutorial.
Thank you for a perfect article.
I did all the steps in tutorial but when I restart apache got the below error,
AH00526: Syntax error on line 25 of /etc/httpd/crs/owasp-modsecurity-crs/base_rules/modsecurity_crs_40_generic_attacks.conf:
Error creating rule: Unknown variable: pk_ref)/
so, what can i do!
I have the same problem. How do you fix it?
you can update to latest version of crs 3
Hi,
I have a CentOS 7 / Plesk Onyx server with multiple PHP versions. How can I install these extensions on each PHP version (5.4, 5.6, 7.0, 7.1)?
Thanks.
@John,
Install these extensions from source to respective PHP version location..
I can’t do that. I can’t run below command, may be owsap update or upgrade. So can you fix some thing. Please!
I think it doesn’t work well with CloudFlare. Have you try install vDDoS Protection Reverse Proxy from https://sourceforge.net/p/vddos-protection Layer 7 Filter Mitigate DOS, DDOS, SYN Floods, or HTTP Floods attack?
Please help me. I was setup mod_security and mod_evasive. I used WordPress, its working good, but when I login, I type account and password. It notify is “You don’t have permission to access /wp-login.php on this server.”.
@Nguyen,
Try to add these following lines to .htaccess file and see..
Hi, thanks for the article it was great, only I faced a problem with google recaptcha values that contains suspicious values, I had to override a rule with
SecRuleUpdateTargetById 981319 !ARGS:’g-recaptcha-response’
but when I add it to tecmint.conf file httpd wont restart…. is there somewhere else that I have to add this custom rule?
@Ehphan,
What errors are you getting while trying to restart Apache? What distribution / version are you using? Assuming CentOS 7, what is the output of systemctl -l status httpd and journalctl -xe immediately after failing to restart httpd?
is it possible to use firewalld instead of iptables as on my server i am using firewalld.
@tashfeen,
It’s perfectly possible, but you will have to dig around a little. We may consider this as a topic for a future article.
Nathan,
I also had an issue with “modsecurity_crs_41_sql_injection_attacks.conf” when using WordPress. My issue was that the wp-admin panel would fail to load. I checked my error log and my issue was due to line 159. It has something to do with the number of special characters in a single parameter. In my case, changing the number at the end of the regex from “{5,}” to “{6,}” fixed the issue for me.
@Tom,
Thanks for contributing to Nathan’s question!
Thanks! I went back and re-enabled the module and am working on making it wordpress friendly.
Extra note: I also had to disable “modsecurity_crs_20_protocol_violations.conf”. With it enabled non of the streaming audio on sites work under WordPress.
It was line 431
Thanks for the great writeup! This helped drastically with constant brute force attacks. I however had to disable “modsecurity_crs_41_sql_injection_attacks.conf”. When it was enabled it always took me to the welcome page when trying to access any of the WordPress pages on my server. This might be what Christian was running into a few months ago. I’m thinking it’s just an incompatibility between the two but I’m subscribing in case anyone smarter than me takes a look at it. Either way with all other modules enabled I’m far better off than before.
why are you using a script to write iptables rules.
why not just use an ipset table thats set up with a time out and just add the ip to that.
you then only need a single iptables rule saving massive amounts of ram?
@Damien,
Please enlighten us. How exactly would you go about to do that? Feel free to let us know and we’ll be more than happy to update the article and give you credit for it.
I really thanks to tecmint.com..
Hello,
when I’m trying to install I got this error
–> Running transaction check
—> Package mod_security.x86_64 0:2.7.3-5.el7 will be installed
–> Processing Dependency: httpd-mmn = 20120211×8664 for package: mod_security-2.7.3-5.el7.x86_64
–> Processing Dependency: httpd for package: mod_security-2.7.3-5.el7.x86_64
–> Processing Dependency: libaprutil-1.so.0()(64bit) for package: mod_security-2.7.3-5.el7.x86_64
–> Running transaction check
—> Package apr-util.x86_64 0:1.5.2-6.el7 will be installed
—> Package mod_security.x86_64 0:2.7.3-5.el7 will be installed
–> Processing Dependency: httpd-mmn = 20120211×8664 for package: mod_security-2.7.3-5.el7.x86_64
–> Processing Dependency: httpd for package: mod_security-2.7.3-5.el7.x86_64
–> Finished Dependency Resolution
Error: Package: mod_security-2.7.3-5.el7.x86_64 (base)
Requires: httpd
Error: Package: mod_security-2.7.3-5.el7.x86_64 (base)
Requires: httpd-mmn = 20120211×8664
You could try using –skip-broken to work around the problem
You could try running: rpm -Va –nofiles –nodigest
i run centos 7 with cpanel
As the error message states, you need to install the httpd (Apache) and htppd-mmn packages as well.
Is there a way to whitelist an IP address with Mod_Security? I’m trying “SecRule REMOTE_ADDR “@ipMatch 10.0.0.101″ phase:1,nolog,allow,id:’1234′,ctl:ruleEngine=Off,ctl:auditEngine=Off” in the /etc/httpd/conf.d/mod_security.conf file without success. I also tried phase:2 and putting this in my own custom file, nothing seems to work for me. :(
Never mind my post… let’s just say I was running low on sleep and had a typo in the IP address… ;)
Hi Gabriel – great post!!
I’m getting these in fail2ban.log:
[Thu Jan 21 07:20:59 2016] [error] [client 1.2.3.4] ModSecurity: Rule 7f651554d428 [id “981242”][file “/etc/httpd/crs-tecmint/owasp-modsecurity-crs/base_rules
/modsecurity_crs_41_sql_injection_attacks.conf”][line “237”] – Execution error – PCRE limits exceeded (-8): (null). [hostname “xyz.com”] [uri “/xmlrpc.php”] [
unique_id “VqDNKX8AAAEAAAiIPZwAAAAF”]
also get a lot of these:
[Thu Jan 21 07:19:26 2016] [warn] PassEnv variable MODSEC_ENABLE was undefined
@Steve,
Step 1: Go to /etc/httpd/conf.d and create a file named pcre_exceeded_limits.conf and insert the following contents in it:
SecPcreMatchLimit 200000
SecPcreMatchLimitRecursion 200000
Step 2: Edit /etc/httpd/modsecurity.d/tecmint.conf and include the last two lines inside the IfModule tags:
SecRuleEngine On
SecRequestBodyAccess On
SecResponseBodyAccess On
SecResponseBodyMimeType text/plain text/html text/xml application/octet-stream
SecDataDir /tmp
SecPcreMatchLimit 200000
SecPcreMatchLimitRecursion 200000
Step 3: Restart Apache and let us know if this solved your issue.
Hi Gabriel,
Thank you for a good how-to. It’s easy to follow, and very well written.
I have just implemented this on a CentOS server, Apache/2.4.6
WordPress has some issues on running under ModSecurity.
I get the following:
[Wed Jan 20 12:08:11.847695 2016] [:error] [pid 15574] [client 87.58.xx.xx] ModSecurity: Access denied with code 403 (phase 2). Pattern match “([\\\\~\\\\!\\\\@\\\\#\\\\$\\\\%\\\\^\\\\&\\\\*\\\\(\\\\)\\\\-\\\\+\\\\=\\\\{\\\\}\\\\[\\\\]\\\\|\\\\:\\\\;\\”\\\\’\\\\\\xc2\\xb4\\\\\\xe2\\x80\\x99\\\\\\xe2\\x80\\x98\\\\`\\\\].*?){8,}” at REQUEST_COOKIES:wp-settings-1. [file “/etc/httpd/crs-tecmint/owasp-modsecurity-crs/base_rules/modsecurity_crs_41_sql_injection_attacks.conf”] [line “157”] [id “981172”] [rev “2”] [msg “Restricted SQL Character Anomaly Detection Alert – Total # of special characters exceeded”] [data “Matched Data: & found within REQUEST_COOKIES:wp-settings-1: widgets_access=off&libraryContent=browse&editor=tinymce&imgsize=medium&align=center&wplink=1&advImgDetails=show&hidetb=1&urlbutton=none&uploader=1”] [ver “OWASP_CRS/2.2.9”] [maturity “9”] [accuracy “8”] [tag “OWASP_CRS/WEB_ATTACK/SQL_INJECTION”] [hostname “www.domain.tld”] [uri “/favicon.ico”] [unique_id “Vp9qmwOusPjUGtqIlfGyogAAAAo”]
Hy Gabriel!
Congratulation for this good tutorial.
There is one thing that bothers me.
In /etc/sudoers you have :
“Defaults:apache !requirett”
This option normally gives permission to apache user to run script without tty.
Then you say that is very important to comment out “#Defaults requiretty” in /etc/sudoers file.
Maybe it’s not clear for me! Isn’t setting “Defaults:apache !requiretty” sufficient for this purpose?
Thanks!!
@Sorin,
Great catch! I must have missed that. Yes, “Defaults:apache !requiretty” should do the trick. Please test and let us know how it goes! (I don’t have the VM I used for this article anymore).
A very useful and well explained article. Also for a newbie. You’re great!
Thank you! Hope you keep coming to Tecmint.com where you will find new quality articles on a daily basis!
Having Problem with the ban_scrip
if i run it error message iptables drop
I’m using centos 6 and i follow all the steps, when i try to access my server i can see the following in error_logs
[Sun Jun 28 02:32:59 2015] [error] [client 101.50.86.217] ModSecurity: Access denied with code 403 (phase 2). Pattern match “([\\\\~\\\\!\\\\@\\\\#\\\\$\\\\%\\\\^\\\\&\\\\*\\\\(\\\\)\\\\-\\\\+\\\\=\\\\{\\\\}\\\\[\\\\]\\\\|\\\\:\\\\;\\”\\\\’\\\\\\xc2\\xb4\\\\\\xe2\\x80\\x99\\\\\\xe2\\x80\\x98\\\\`\\\\].*?){8,}” at REQUEST_COOKIES:ci_session. [file “/etc/httpd/crs/owasp-modsecurity-crs/base_rules/modsecurity_crs_41_sql_injection_attacks.conf”] [line “157”] [id “981172”] [rev “2”] [msg “Restricted SQL Character Anomaly Detection Alert – Total # of special characters exceeded”] [data “Matched Data: ; found within REQUEST_COOKIES:ci_session: a:5:{s:10:\\x22session_id\\x22;s:32:\\x2292931d80e9c40fa57870192dedbc19d7\\x22;s:10:\\x22ip_address\\x22;s:12:\\x22101.50.95.45\\x22;s:10:\\x22user_agent\\x22;s:72:\\x22Mozilla/5.0 (Windows NT 6.1; WOW64; rv:38.0) Gecko/20100101 Firefox/38.0\\x22;s:13:\\x22last_activity\\x22;i:1435432253;s:9:\\x22user_data\\x22;s:0:\\x22\\x22;}3d7af952b9686ed48e144b560e52c878be724458”] [ver “OWASP_CRS/2.2.9”] [maturity “9”] [accuracy “8”] [tag “OWASP_CRS/WEB_ATTACK/SQL_INJECTION”] [hostname “xxx.domain.com”] [uri “/icons/apache_pb.gif”] [unique_id “VY8Wi6dy2UwAAA9NGsEAAAAB”]
I’ve tried the steps above on CentOS 7 and I dont see the script run to block the IP hitting the web server with LOIC. LIOC just keeps hitting the webserver nonestop. Help will be appreciated.
FYI: installing mo_security using yum gives you a pretty old version (2.7.3) which is why many tutorials compile it from source instead.
I can remember you had a similar post on xmodulo a couple of months ago and wonder if you will incorporate the feedback (and tips) you received there in this post?
Also: I read at various places that modsec requires mod_unique_id to work properly but cant find that in your article – can you comment on that?
Another thing: CentOS 7 comes with firewalld, which you disabled – many users setting this up from scratch, might be on cos7.
I wonder if firewalld cant be used or if it just was for convinience to use iptables? If firewalld works, why not using it? Any hints on getting mod_evasive to update firewalld (can you provide a updated ban_ip_sh?).
Hi Gabriel
The mod_evasive not save the log and for this reason the script is not working, edit the configuration file and line agrégé DOSLogDir “/var/log/httpd/mod_evasive.log” file “mod_evasive.log” did not exist but I believe with “vi”. is this working because when testing with LOIC only allows 10 connections but does not run the script
I appreciate any help you can give me
Kind Regards !!!
@Francisco,
I had to struggle with that as well. I ended up troubleshooting it by enabling the apache user to log on as a regular user and use bash as default shell. I tried running the script as apache, and go from there. That is the first step. Then see what happens when you try to run it automatically. If it doesn’t, check the apache logs.
That being said, I guarantee that if you follow this article step by step it should work without issues. What distribution are you using? I wrote this article using a CentOS 7 box.
If you still run into any issues please post the relevant configuration files or upload them to a public service like Pastebin and we will take a look to see what could be wrong.
I try to use this on my iRedmail-setup and got an error saying i permisson denied on /mail. I have no clue witch conffile i should make changes in to fis this. Pls email me som suggestions.
br Stefan
@Stefan,
Other than this, is your iRedmail setup working? If so, please outline the steps that you followed for your installation and we will try to see how to apply mod_evasive and mod_security to it.
Your usage of iptables will results in slowing the machine to a crawl after 1000 to 2000 blocked ip addresses. Instead you should combine iptables with ipset to avoid tons of wasted CPU cycles.
iptables -A INPUT -m set -j DROP –match-set ban_http src
your block rule would then be similiar to this:
ipset add ban_http $s
@cybernard,
Thank you for your informative comment, and for bringing that fact to our attention. I’ll review the article accordingly. Thanks again!
Also note ipset needs to manually save its config and reload it on start up.
ipset save >/somewhere/all.txt
ipset restore >/somewhere/all.txt
The restore command will have to be done on start up, and before iptables loads its rules. Since iptables now invokes ban_http it has to exist before it is used in a rule/chain.
whoops I got the wrong redirect on ipset restore is supposed to be:
ipset restore </somewhere/all.txt
In addition, if your computer has more than 1 network interface, for example, a firewall with internal,dmz, and etc zones. Assume eth0 is the internet facing adapter. If the traffic is coming in on eth0 then jump the traffic to a new chain, chain_eth0 for example. Then place the iptables rule with ipset in it as part of chain_eth0. Then all of the traffic from the other network adapters, real or virtual, does not need it to incur the cpu utilization of checking a ban list of thousands of IP. Also do the same for the OUTPUT chain so the attacker can not get out if they get in.
what will effect take if i install on live server……..
and is it require to install on server…
Hello Ravi,
To resolve this issue I tried following solution.
#cp mod_evasive{20,24}.c
#sed s/remote_ip/client_ip/g -i mod_evasive24.c
Build mod_evasive for Apache 2.4.x:
#apxs -i -a -c mod_evasive24.c
Could you please confirm whether is it workable or not ?
Thanks,
Yogesh Patil.
Hi Ravi,
It does not give any error. But the configuration does not works. I have tried editing the values and also add my email address as mentioned above. But it does not works.
It works fine with Apache 2.2 but not with 2.4…any reason??
@Kunal,
Give us some time to update the article to support Apache 2.4 also..
Hi Ravi,
Thank you for the steps. But the mod_evasive is not compatible ti Apache 2.4, so any other security application we can install for Apache 2.4 ??
Awaiting your response…
@Kunal,
Did you received any errors? can you post here…
bhai having this error
[root@www ~]# sudo /etc/init.d/httpd restart
Stopping httpd: [FAILED]
Starting httpd: Syntax error on line 23 of /etc/httpd/conf.d/modsecurity.conf:
ModSecurity: No action id present within the rule
please help!
@Muneeb,
Can you post the parameters of line 23 from the /etc/httpd/conf.d/modsecurity.conf file
Hi Ravie, tks for tuto.
I have some problem , i had installed modsecurity as your description but with centos 6.5 , modsecurity 2.8 and CRS 2.9 .
My problem resolve when i tray to restart service httpd, i have always this error msg :
”Syntax error on line 23 of /etc/httpd/conf.d/modsecurity.conf:
ModSecurity: Found another rule with the same id”
even if i eliminate this rule , another error msg for next rule .
this is an example of modsecurity.conf line
SecRule REQUEST_HEADERS:Content-Type “text/xml” \
“id:’200000′,phase:1,t:none,t:lowercase,pass,nolog,ctl:requestBodyProcessor=XML”
there is a problem with the id of rule.
can you help me please ?
It seems to me a bug in latest mod_security version, try to report a bug at Centos forum or you give a unique number or download a latest rules set from mod security site.
thinks for your help Ravi.
I had downgrade mod_security version , and it’s work well.
Thanks man! but still this article is little outdated, so I need to make it compatible according to latest release of mod_security. If it worked successfully, can you send us an email about instructions, so other can also benefit from this.
I need some help please
I’m new to linux and just bought a raspberry pi to build a web server with it. I’m getting this error when I run the make command for mod_security:
modsecurity.h:22:25: fatal error: libxml/tree.h: No such file or directory
Here’s what i’m using to configure it:
sudo ./configure –prefix=/mnt/2gb-usb/lib/modsecurity –with-apxs=/mnt/2gb-usb/apache2/bin –with-pcre=/mnt/2gb-usb/lib/pcre –with-apr=/mnt/2gb-usb/lib/apr –with-apu=/mnt/2gb-usb/lib/apr-util –with-libxml=/mnt/2gb-usb/lib/libxml2
Thanks :-)
I think xml libraries are missing, you need to install it before compiling.
Hi Ravi, very nice tutorial, thanks!
Can you update it to CentOS 6.5? please!
Yes surely, the article in progress will publish soon, till then stay tuned for more such awesome articles..
Hi Ravi,
i want your help. can you tell me show can i configure mod security in XAMPP on centos environment.. share any doc or URL link…
Regards
Mohanraj
Hi sir,please update this tutorial for latest version,i used downloaded 2.8 in the first step and i got flooded with error,please update it ,thanks
I know friend, this article is too old and I haven’t been updated since long time, but due to lots of requests, will surely going to update this article. Stay updated…:)
Hello,
@ Rich: You must copy the file unicode.mapping your unzipped archive modsecurity-apache_2.7.7.tar.gz to the directory /etc/httpd/conf.d/ and everything will work.
After following your installation instructions I am receiving the following error upon apache restart:
Syntax error on line 212 of /etc/httpd/conf.d/modsecurity.conf:
Could not open unicode map file “/etc/httpd/conf.d/unicode.mapping”: No such file or directory
I then created an empty file called unicode.mapping in the directory and now I receive the following error:
Syntax error on line 23 of /etc/httpd/conf.d/modsecurity.conf:
ModSecurity: Found another rule with the same id
Not sure where to go from here. Any assistance would be greatly appreciated.
On which distro you’ve tried? that article bit too old. So, might some configuration paths changed in latest version, will check and update the article soon.
Hello,
I have installed mod_evasive successfully, but when I install mod_security I get the following error message on restarting apache:
Syntax error on line 23 of /etc/httpd/conf.d/modsecurity.conf:
ModSecurity: Found another rule with the same id.
Please assist.
You have explained each and every step in detail. thanks a lot…i hope it will in my apache config.
These instructions were great–thank you! Had to add the apxs, httpd-devel, pcre-devel, and curl-devel along the way.
Hi Ravi
Could you help me with this problem
httpd: Syntax error on line 177 of /usr/local/apache2/conf/httpd.conf: Cannot load modules/mod_evasive20.so into server: /usr/local/apache2/modules/mod_evasive20.so: undefined symbol: ap_log_rerro
Also in 177 simple i have
LoadModule evasive20_module modules/mod_evasive20.so
Just found out my RHEL release is 5.7 (Red Hat Enterprise Linux Server release 5.7 (Tikanga)
)
Will that be the root cause of my issue?
Hi Ravi, I installed & configured mod_evasive (I skipped mod_security). No issue encountered. But when I used ab (apachebench) to test the server using 600 concurrent requests it does not send out any email (abuse report) or blacklist/block my access . Can you tell me where is the log indicates the action taken by the mod_evasive? or any place to find out if it is working correctly. Thanks.
We haven’t enabled log in the article, to enable logs simple place the following line inside ifmodule section and restart apache.
Thanks Ravi. I added this line and restart apache but still got nothing. /var/log/mod_evasive did not show up at all. Any pointers you can give to help me debug this?
this is in httpd.conf
DOSHashTableSize 3097
DOSPageCount 5
DOSSiteCount 50
DOSPageInterval 1
DOSSiteInterval 1
DOSBlockingPeriod 3600
DOSLogDir /var/log/mod_evasive
DOSEmailNotify [email protected]
This is the 600 concurrent requests I sent and it went through.
$ ab -n 600 -c 600 http://www.invescoperpetual.dev.invesco.net/portal/site/ip/home/
This is ApacheBench, Version 2.0.40-dev apache-2.0
Copyright 1996 Adam Twiss, Zeus Technology Ltd, http://www.zeustech.net/
Copyright 2006 The Apache Software Foundation, http://www.apache.org/
Benchmarking http://www.invescoperpetual.dev.invesco.net (be patient)
Completed 100 requests
Completed 200 requests
Completed 300 requests
Completed 400 requests
Completed 500 requests
Finished 600 requests
Thanks for the quick reply Ravi, i took back the changes on “httpd.conf” file but webserver still doesn’t response. I also mailed you my ssh access info if you would like to take a look. Thanks in advance.
When i restart services after i modified “httpd.conf” file i get these problems on the below and webserver stop responding, what should i do ? (I have Centos 5.9 – VPS)
Stopping httpd: [FAILED]
Starting httpd: httpd: Syntax error on line 62 of /etc/httpd/conf/htt tc/httpd/modules/mod_security2.so: cannot open shared object file: No
[FAILED]
Stopping httpd: [FAILED]
Starting httpd: Syntax error on line 7 of /etc/httpd/conf.d/modsecuri
Invalid command ‘SecRuleEngine’, perhaps misspelled or defined by a m
Let me re-check again, why such error its throwing. Will update you soon..
Hi,
I have installed mod_security in my server. I want to check mod_security is working on my server or not.
Please tell me how can i check?
Create a file “phpinfo.php” in your website root directory and add the following lines to it.
Add call the file from the browser and search for mod_security term.
Hi Ravi…
Thanks for great tutorial. I’ve installed successfully. One small correction at step 4
for :
Include modsecurity-apache/modsecurity.conf
Read :
Include conf.d/modsecurity.conf
But how could we confirm that these both modules are working fine and our site is safe.
Thanx..
Thanks man, updated the article..
Hi again,
I got stuck at step 3 because of the invalid link, I couldn’t restart httpd so I want to start again from zero. How can I uninstall Mod_Security first? I already deleted the lines in httpd . Any help is appreciated.
The article is little outdated due to new release of mod_security. We update it and make compatible for all distros.
Thanks for your quick response. I appreciate it, but I’m still seeing the same link : http://downloads.sourceforge.net/project/mod-security/modsecurity-crs/0-CURRENT/modsecurity-crs_2.2.5.tar.gz
Hi Lau,
Download that tar pkg from below link
http://pkgs.fedoraproject.org/repo/pkgs/mod_security_crs/modsecurity-crs_2.2.5.tar.gz/aaeaa1124e8efc39eeb064fb47cfc0aa/modsecurity-crs_2.2.5.tar.gz
Thanx
Hi, I got stuck at Step 3 (Step 3: Downloading OWASP Mod_Security Core Rule Set)
# wget http://downloads.sourceforge.net/project/mod-security/modsecurity-crs/0-CURRENT/modsecurity-crs_2.2.5.tar.gz. What other link should I use?
–2013-08-04 21:02:40– http://downloads.sourceforge.net/project/mod-security/modsecurity-crs/0-CURRENT/modsecurity-crs_2.2.5.tar.gz
Resolving downloads.sourceforge.net… 216.34.181.59
Connecting to downloads.sourceforge.net|216.34.181.59|:80… connected.
HTTP request sent, awaiting response… 404 Not Found
2013-08-04 21:02:40 ERROR 404: Not Found.
Sorry, links were outdated, just added new updated links. Please check and let me know.
I’m receiving the same error on the link and do not see an update.
Hi Ravi.
On ./configure i get an error “configure: error: pcre library is required” but thing is “Package pcre-7.8-6.el6.x86_64 already installed and latest version” so how can i get past it? :)
I have a similar but odder problem. ./configure finds the PCRE library and it’s components (config etc.). The resulting Makefile fais saying it can’t find PCRE. Is there an error in the config file? Is there a way to tell the Makefile where the library and the develpment compnents are?
i dont have you email id
Use our contact us form..
hey Ravi i need your help to install these mods on my server, i dont want to play with my live site, and im willing to pay for this job,
Ok we setup and install these mods on your server. Just mail me all your server details, so we could start working on it.
Hello
I want to install mod_security, when i enter the following command (./configure) I see the following result what can I do?
checking for a BSD-compatible install… /usr/bin/install -c
checking whether build environment is sane… yes
checking for a thread-safe mkdir -p… /bin/mkdir -p
checking for gawk… gawk
checking whether make sets $(MAKE)… yes
checking build system type… x86_64-unknown-linux-gnu
checking host system type… x86_64-unknown-linux-gnu
checking for style of include used by make… GNU
checking for gcc… no
checking for cc… no
checking for cl.exe… no
configure: error: in `/usr/src/modsecurity-apache_2.7.4′:
configure: error: no acceptable C compiler found in $PATH
See `config.log’ for more details.
My OS is: centos 6.4
htppd: Apache/2.2.25 (Unix)
Thanks in advance
Install missing gcc Development Tools using yum package manager.
i installed mod_evasive as per your instructions and voila it saved me from a 500mb ddos attack, thanks alot
Hi,
I had a problem saying “Couldn’t find apxs” when trying to do ./configure of modsecurity step 2…
this package wasn’t installed on my os… I followed this post to do so :
http://www.ehow.com/how_8671217_install-apxs-centos-54.html
It worked just fine so I thought it might help others…
Cheers :)
Is there any simple url script to check if mod security is enabled and working. I tried with generic samples from the web, but all of them give ‘Not Found’ error instead of Access Denied.
Thanks but with this 2 module my ram usage uts 500 mb with out any site on my VPS.
How to uninstall this 2 module ?
Thanks
gracias, funciona muy bien.
paul either you can use openvas or nessus(only for non-commercial) tool to check server’s security
Thanks for the info, very helpful. Can you recommend a methodology to test the efficacy of the server’s security? I’m not a hacker, and do not have a strong understand of their approach
Hello,
Can we install this on Centos 6.3 ?
@Series Parlotte,
Yes! You can install it. go ahead..
Works great! Very nice and helpful tutorial. Thank you.
@ Rohit,
The directory activated_rules contains some rules that comes with modsecurity 2.2.5 version and are not comptaible with the modsecurity version 2.6.6. In version 2.6.6 there is no such activated_rules directory exists. see my article did i mentioned the directory above.
This above artilce is works with modsecurity 2.6.6 only..
Syntax error on line 47 of /etc/httpd/modsecurity.d/activated_rules/base_rules/modsecurity_crs_21_protocol_anomalies.conf:
ModSecurity: SkipAfter actions can only be specified by chain starter rules.
please help me out in this.
Now set the basic rule set in your httpd.conf file. Add the following lines of code at the end of the file ?
Include modsecurity-crs/modsecurity_crs_10_config.conf
Include modsecurity-crs/base_rules/*.conf
my configure is error ? please give me example
Thanks
Dear Sholeh,
Use command as httpd -t and tell me the output of the error.