Is your screen (or external monitor) resolution is low? thus making the items on your screen look larger and less clear? Or do you want to simply increase the current maximum resolution or add a custom resolution?
In this article, we will show how to add missing or set custom display resolution in Ubuntu and its derivatives such as Linux Mint. By the end of this article, you will be able to set to a higher resolution, making content on your screen appear sharper and clearer.
Changing the Resolution or Orientation of the Screen Using Displays
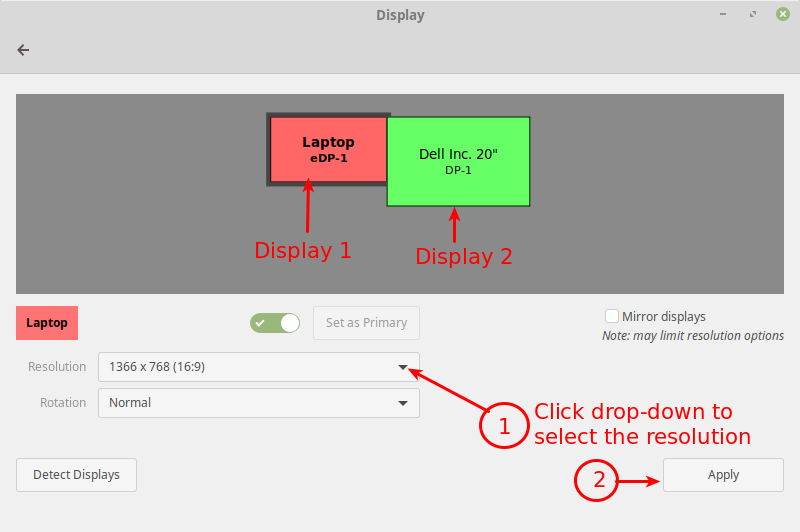
Normally, to change the resolution or orientation of the screen, you can use the Displays graphical user interface tool (open the Activities overview and type Displays, click to open it or System Menu then type Displays and open it).
Note: In case you have multiple displays connected to your computer (as shown in the following image), if they are not mirrored, you can have different settings on each display. To change the settings for a display device, select it in the preview area.
Next, select the resolution or scale you want to use, and choose the orientation then click Apply. Then select Keep This Configuration.
Changing the Resolution or Orientation of the Screen Using Xrandr
Alternatively, you can also use the powerful xrandr tool (a command-line interface to RandR (Resize and Rotate) X Window System extension) which is used to set the size, orientation and/or reflection of the outputs for a screen.
You can also use it to set the screen size or list all active monitors as shown.
$ xrandr --listactivemonitors

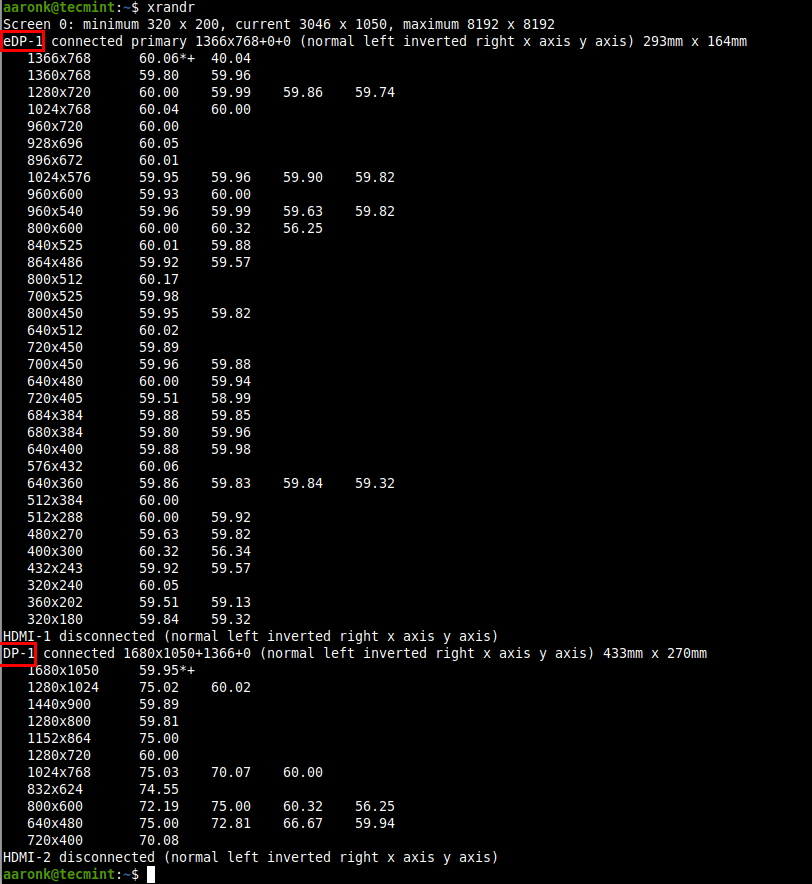
To show the names of different outputs available on your system and resolutions available on each, run xrandr without any arguments.
$ xrandr
Set Screen Resolution in Ubuntu
To set the resolution for a screen for an external monitor named DP-1 to 1680×1050, use the --mode flag as shown.
$ xrandr --output DP-1 --mode 1680x1050
You can also set the refresh rate using the --rate flag as shown.
$ xrandr --output DP-1 --mode 1680x1050 --rate 75
You can also use the --left-of, --right-of, --above, --below, and --same-as options to arrange your screens either relatively to each other.
For example, I want my external monitor (DP-1) to be positioned left of the Laptop screen (eDP-1) in correspondence to the actual physical positioning:
$ xrandr --output DP-1 --left-of eDP-1
Keep in mind that any changes made using xrandr will only last until you log out or restart the system. To make xrandr changes persistently, use the xorg.conf configuration files for Xorg X server (run man xorg.conf for details on how to create a xorg.conf file) – this is the most effective method.
You can also use the ~/.xprofile file (add xrandr commands in it), however, there are some disadvantages of using this method, one is that this script is read fairly late in the startup process, thus it will not alter the resolution of the display manager (if you use one e.g lightdm).
How to Add Missing or Set Custom Display Resolution Using xrandr
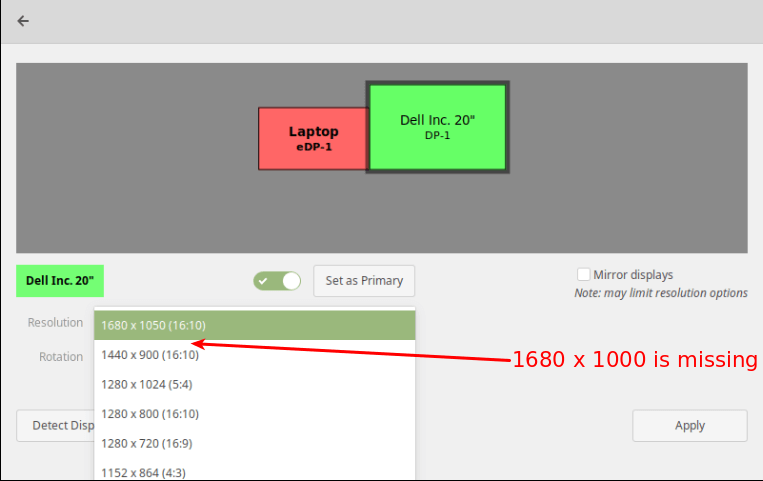
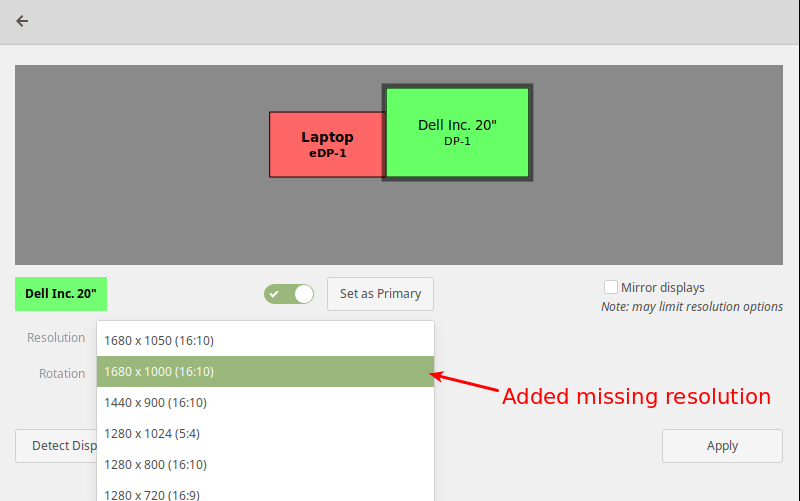
It is possible to add a missing or custom display resolution e.g 1680 x 1000 to Displays panel, for a specific display device (DP-1), as explained below.
To add a missing or custom display resolution, you need to calculate the VESA Coordinated Video Timing (CVT) modes for it. You can do this using the cvt utility as follows.
For example, if you need a horizontal and vertical resolution of 1680 x 1000, run the following command.
$ cvt 1680 1000
Next, copy the Modeline (“1680x1000_60.00″ 139.25 1680 1784 1960 2240 1000 1003 1013 1038 -hsync +vsync) from the output of the cvt command and use it to create a new mode using the xrandr as shown.
$ xrandr --newmode "1680x1000_60.00" 139.25 1680 1784 1960 2240 1000 1003 1013 1038 -hsync +vsync
Then add the new mode to the display.
$ xrandr --addmode DP-1 "1680x1000_60.00"

Now open the Displays and check if the new resolution has been added.
The above changes are only temporary and work for the current session (they last until you log out or restart the system).
To add the resolution permanently, create a script called external_monitor_resolution.sh in the directory /etc/profile.d/.
$ sudo vim /etc/profile.d/external_monitor_resol.sh
Then add the following lines in the file:
xrandr --newmode "1680x1000_60.00"  139.25  1680 1784 1960 2240  1000 1003 1013 1038 -hsync +vsync
xrandr --addmode DP-1 "1680x1000_60.00"
Save the changes and exit the file.
For more information on how xrandr works and how to use it, read its man page:
$ man xrandr
That brings us to the end of this article. If you have any thoughts to share or queries, reach us via the feedback form below.
I followed the steps and added a new resolution to the display. A 1440×2560, unfortunately when the apply button is hit it comes back with the error message:
The current Input timing is not supported by the monitor display.
Please change your input timing to 2560×1440,60Hz or any
other monitor listed timing as per monitory specifications.
U2518D
What I did was the following:
Thank you. Worked like a charm on my Linux Distro!
My CPU was working perfectly but just for some reason, I disconnected my Monitor from my CPU now when I make it connected my screen resolution is changed and I try a lot of methods but did not work.
Now I found your’s said method then i try it too but when I give a command in terminal xrandr:
I get this message
xrandr: Failed to get size of gamma for output default
Screen 0: minimum 640 x 480, current 640 x 480, maximum 640 x 480
default connected primary 640×480+0+0 0mm x 0mm
640×480 73.00*
uhammad@uhammad-X58-USB3:~$ cvt 1680 1000
# 1680×1000 59.89 Hz (CVT) hsync: 62.17 kHz; pclk: 139.25 MHz
Modeline “1680x1000_60.00” 139.25 1680 1784 1960 2240 1000 1003 1013 1038 -hsync +vsync
uhammad@uhammad-X58-USB3:~$ xrandr –newmode “1680x1000_60.00”
139.25 1680 1784 1960 2240 1000 1003 1013 1038 -hsync +vsync
xrandr: Failed to get size of gamma for output default
uhammad@uhammad-X58-USB3:~$ xrandr –addmode DP-1 “1680x1000_60.00”
xrandr: Failed to get size of gamma for output default
xrandr: cannot find output “DP-1”
uhammad@uhammad-X58-USB3:~$ sudo vim /etc/profile.d/external_monitor_resol.sh
[sudo] password for uhammad:
sudo: vim: command not found
uhammad@uhammad-X58-USB3:~$
Please if have time reply to me.
Greetings from an ancient warier (82).
I am using a smart tv as a second display: HDMI attached to a PC. (Linux Mint 20.1). PC Display settings have the smart TV as a Philips 65″ in fact it is a 50″.
xrandr provides:
HDMI-0 connected primary 1024×768+0+0 (normal left inverted right x axis y axis) 1440mm x 810mm
1920×1080 60.00 + 50.00 59.94 30.00 25.00 24.00 29.97 23.98
I wish to change this to :
HDMI-0 connected primary 1920×1080+0+0 (normal left inverted right x axis y axis) 1090mm x 610mm
How do I actually make these changes, please?
@Philip,
Run the following command to get the list of available resolutions.
The set the corresponding pixel values to set the resolution to 1920×1080 as shown.
Wow! This worked for me.
You saved me.
Great! It worked for me!
Thanks! It worked for my old monitor with 1280×1024 in Debian 10.
Wow, Thank you. Well done.
I have recently upgraded to ubuntu 20 and I had these 16:10 resolutions. I wanted a 1920×1080 which I got.
Got stuck at adding a newmode with modeline as is:
with the below responses:
X Error of failed request: BadName (named color or font does not exist)
Major opcode of failed request: 140 (RANDR)
Minor opcode of failed request: 16 (RRCreateMode)
Serial number of failed request: 28
Current serial number in output stream: 28
Hi there, I would say change the name to something simple, like “1920” instead.
Use the name from the `# xrandr` output. In this example, we have DP-1 while it was “Virtual1” in my case. I use ubuntu 20 in VirtualBox.
Can I get something like virtual super-resolution in Linux? I use Manjaro.
I tried this, and the option showed up in my display settings, but once I selected and applied it, the screen went blank and said “out of range”
Wow, this worked! Great job :)
I had all 16:9 aspect ratio resolutions missing, had to manually add 1920×1080. Running Ubuntu on a Virtualbox
I’ve got a weird case that I want to share. I’ve been running Ubuntu desktop on Raspberry Pi and I had a problem with setting custom resolution. I did manage to set it temporarily, but when I tried to set it the way that I have it after restart I’ve been ending up only with completely not working at all or black screen and total system crash, so I’ve put all those comments to executable file and added it to autostart (I know it very brute force, but it works) and I find that way more stable.
Simply, THANK YOU VERY MUCH!!!
I really appreciate the effort that you have put in this little tutorial. It was very easy to understand and to follow the further steps.
Best regards.
xrandr
cvt 1920 1080 60
sudo xrandr –newmode “1920x1080_60.00” 173.00 1920 2048 2248 2576 1080 1083 1088 1120 -hsync +vsync
sudo xrandr –addmode Virtual1 “1920x1080_60.00”
xrandr –output Virtual1 –mode 1920x1080_60.00
Hi Aaron,
I think you are the person who can help me fix something. I have had the same external monitor attached to my Ubuntu 18.04 for a while. When I retired it from desktop duty I moved it to a different location. Here the external monitor is to the right of the laptop, whereas before it was on the left. I switched the positions around through the GUI tool in the System menu. (I don’t remember exactly now, but I may have had my panel on the external before, but now it is on the laptop screen.)
The geometry is messed up now. Ubuntu treats the laptop screen as 1920×1080 when it is really a 1600×900. The external is 1920×1080 and I think it is running at 1920×1080, but it may be running at 1600×900. I’m not sure. My sticky notes that were just above the panel have disappeared. When dialog boxes open by default in the upper left corner of the default display, it is invisible to me! The Keyring password dialog, for example, always opens there, invisible. It takes the password input because the cursor is in the text field by default, so I manage.
Other Open/Save dialogs also open in the corner, and they are unusable. In some cases, a panel item is created, and I can right-click and Move the box. I want to manually edit the config file, but I don’t remember where it is, and what it is called now. Is it Xorg.conf? Any help would be greatly appreciated.
TIA
It worked quite nicely in a VMWare Workstation VM running Ubuntu Mate 20.04.
I had the problem that the very standard resolution for FullHD 1920×1080 wasn’t listed in the drop-down. But I needed that VM to be exactly at this resolution. And it was a pain to resize the window to exactly that size (automatic match of resolution to windows size – but even when VMWare showed the correct numbers for the Window size it jumped +-1 after releasing the mouse button…)
Worked like a charm. Finally, an easy way to hit that resolution without minutes of 1-px-border-drag-and-drop fiddeling.
Thanks!
Great instructions, well written and easy to follow, but I encountered the error “unsupported signal format” after following the steps in “How to Add Missing or Set Custom Display Resolution Using xrandr”. Is there anything else I could try?
The details:
My HD monitor’s listed maximum resolution is 1920×1080. I connect to it using VGA from my laptop. But after creating and selecting this resolution, I get a dark screen and the error on the screen of “unsupported signal format”. I get this error under both Ubuntu 20 and LinuxLite 5.0, using the same hardware each time, a Lenovo G555, and a Toshiba 37SL833.
By the way, this is the result of xrandr for the external monitor after following your steps:
there is another way to do it.
@federico
Please do share it with us. We will be grateful.
this works only, when I’m login in ubuntu. how can I do it permanently?
@federico
It should work permanently. Isn’t it working for you?
Hi, may sound odd but I don’t know how to save a script once created (I’m a newbie).
Can you please help?
Thanks
@Trent
This depends on the file editor you are using:
In Vim –> Press
Esc, then:wq.Nano –> Press
Ctrl + o.It did not work on my Acer Laptop. Windows uses 1366×768. Cvt cannot create Modeline wants 1368×768 xrandr fails with that.
@Philipp
Can you share the exact error you encountered here, if possible?
Meanwhile, I found a solution. After recognizing that the live systems of lm and also open suse used the proper resolution. I use now
nouveau.modeset=0and the older kernel version which was used by the live system. But now I do not dare to update the kernelPlease tell me details about how have you fix it? My resolution is 1366×768 facing the same problem and now I am fade up… nothing working… I will be really helpful if you reply…
Thank you! worked on my Linux Mint 19.3 Cinnamon. I have a 2nd monitor with VGA cable connected through a VGA to DVI adapter. and now I can use it with its native resolution 1280×1024 :)
@Emmanuel
Sounds nice! Many thanks for the feedback.
Hi, I found a bug related to this, when you name it “1680x1000_60.00” that “_60.00” extra part can cause a bug for Minecraft 12.2 (and probably older versions as well) that use java8 and the LWJGL 2.
I fixed it leaving that to “1680×1000“.
In my case was “1280x1024_60.00” and caused an error when loading the game:
“OpenGL: ~~ERROR~~ RuntimeException: No OpenGL context found in the current thread.”
That caused the LWJGL 2.9.4, 2.9.3, and 2.9.2 to have an issue detecting the mode in that way. The LWJGL 2.9.1 worked fine cause it uses an older/different method.