In this Part 7 of Ansible Series, you will learn how to create and use templates in Ansible to create customized configurations on managed nodes. Templating in Ansible is an easy and friendly way of pushing custom configurations to managed nodes running different systems with minimal editing of playbook files.
What is Templating in Ansible?
To get a better sense of what a template is, let’s consider an IT manager drafting an email to invite his department for a cocktail party. The email is sent to each of the members an also invites them to tag along with their spouses.
The email has been customized such that the body of the email remains the same, but the addressees and the names of their respective spouses vary. The email becomes the template, while the recipients and respective spouses are variables.
That was a generic example. Ansible uses Jinja2 which is a modern templating engine for Python frameworks used to generate dynamic content or expressions. Templating is extremely useful when creating custom configuration files for multiple servers but unique for each of them.
Jinja2 uses the double curly braces {{ ... }} to enclose a variable that has been defined. For comments, use {{# #} and for conditional statements use {% … %}.
Let’s assume that you have a data model of VLANs in your network with host systems that you want to push to their respective VLANs as shown.
vlans:
  - id: 10
    name: LB
  - id: 20
    name: WB_01
  - id: 30
    name: WB_02
  - id: 40
    name: DB
To render this configuration, the corresponding jinja2 template called vlans.j2 would appear as shown. As you can see, the variables vlan.id and vlan.name have been enclosed in curly braces.
vlan {{ vlan.id }}
  name {{ vlan.name }}
Putting it all together in a playbook which places different host machines, this would appear as shown:
    - hosts
  tasks:
    - name: Rendering VLAN configuration
      template:
         src: vlans.j2
         dest: "vlan_configs/{{ inventory_hostname }}.conf"
Example 1: Configuring Web Servers in Different Distros
In this example, we shall create index.html files that will display information about the hostname & the OS of 2 web servers running CentOS & Ubuntu.
Setup
Ubuntu 18 - IP address: 173.82.202.239
CentOS 7 -  IP address: 173.82.115.165
Apache webserver has already been installed on both servers.
For CentOS 7
For Ubuntu 18.04
So let’s create a playbook test_server.yml as shown:
---

 - hosts: all
   become: yes

   tasks:

    - name: Install index.html
      template:
        src: index.html.j2
        dest: /var/www/html/index.html
        mode: 0777
Our Jinja file template is index.html.j2 which will be pushed to the index.html file on each webserver. Always remember to put the extension .j2 at the end to signify that it’s a jinja2 file.
Let’s now create the template file index.html.j2.
<html>
<center>
   <h1> The hostname of this webserver is {{ ansible_hostname }}</h1>
   <h3> It is running on {{ ansible_os_family}}system </h3>
</center>
</html>
This template is a basic HTML file where the ansible_hostname and ansible_os_family are built-in variables that will be substituted with the respective hostnames and operating systems of the individual webservers on the browser.
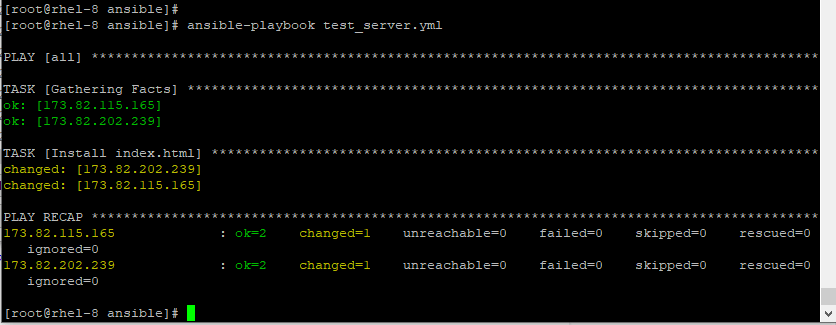
Now, Let’s run the playbook.
# ansible-playbook test_server.yml
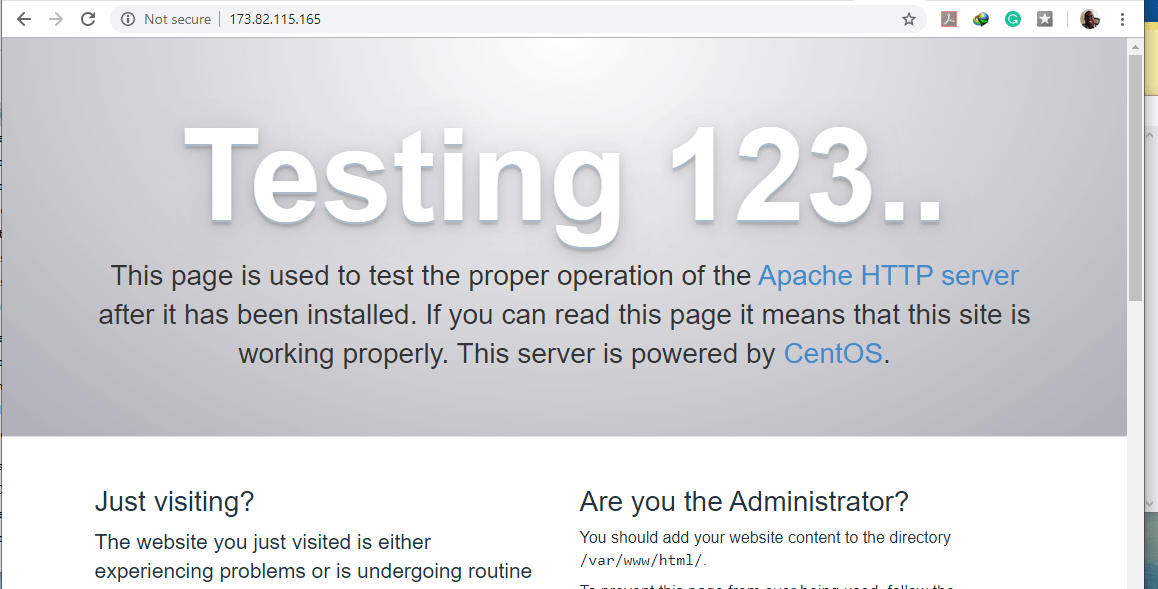
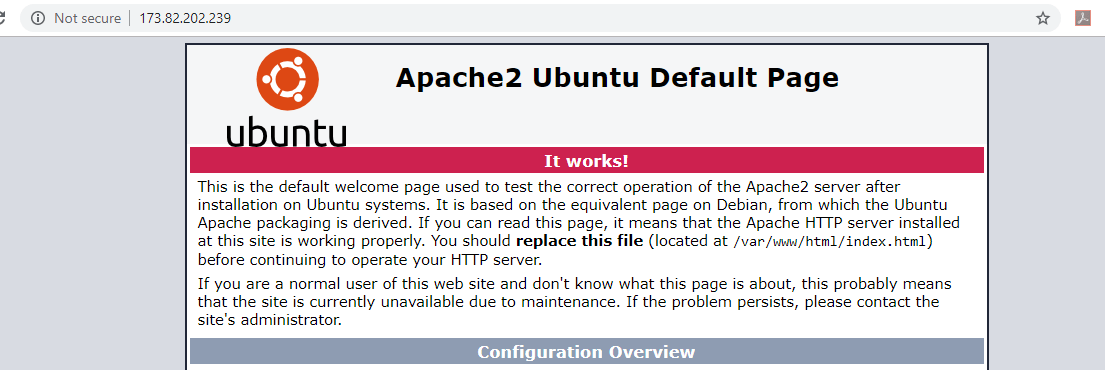
Now let’s reload the webpages for both CentOS 7 and Ubuntu webservers.
For CentOS 7

For Ubuntu 18.04

As you can see, different information about the hostname and family of OS has been displayed on each server. And that’s how cool Jinja2 templating is!
FILTERS:
Sometimes, you may decide to substitute the value of a variable with a string that appears in a certain manner.
Example 1: Make Strings Appear in Uppercase/lowercase
For instance, in the previous example, we can decide to make the Ansible variables appear in Uppercase. To do so, append the value upper to the variable. This way the value in the variable is converted to Uppercase format.
{{ ansible_hostname | upper }} => CENTOS 7
{{ ansible_os_family | upper }} => REDHAT

Similarly, you can convert the string output to lowercase by appending the lower argument.
{{ ansible_hostname | lower }}  => centos 7
{{ ansible_os_family | lower }} => redhat

Example 2: Replace a String with Another
Additionally, you can replace a string with another.
For example:
The movie title is {{ movie_name }} => The movie title is Ring.
To replace the output with another string, use the replace argument as shown:
The movie title is {{ movie_name | replace (“Ring“,”Heist”) }} => The movie title is Heist.
Example 3: Lists and Sets Filters
To retrieve the smallest value in an array, use the min filter.
{{ [ 2, 3, 4, 5, 6, 7 ] | min }} => 2
Similarly, to retrieve the largest number, use the max filter.
{{ [ 2, 3, 4, 5, 6, 7 ] | max }} => 7
To display unique values, use the unique filter.
{{ [ 2, 3, 3, 2, 6, 7 ] | unique }} => 2, 3
Use the random filter to obtain a random number between 0 and the value.
{{ 50 | random }} => Some random number
LOOPS:
Just like in programming languages, we have loops in Ansible Jinja2.
For example, to generate a file containing a list of numbers use the for loop as shown in the example below:
Example 1:
{% for number in [0, 1, 2, 3, 4, 5, 6, 7]  %}
{{ number }}
{% end for %}
You can also combine the for loop with if-else statements to filter and obtain certain values.
Example 2:
{% for number in [0, 1, 2, 3, 4, 5, 6, 7]  %}
{% if number == 5 %}
         {{ number }}
{% endif%}
{% endfor %}
And that’s it for this lecture. Join us in the next topic where we will venture into working with ansible variables and facts.