In the last article of this series, we reviewed how to set up a Samba share over a network that may consist of multiple types of operating systems. Now, if you need to set up file sharing for a group of Unix-like clients you will automatically think of the Network File System, or NFS for short.

In this article we will walk you through the process of using Kerberos-based authentication for NFS shares. It is assumed that you already have set up a NFS server and a client. If not, please refer to install and configure NFS server – which will list the necessary packages that need to be installed and explain how to perform initial configurations on the server before proceeding further.
In addition, you will want to configure both SELinux and firewalld to allow for file sharing through NFS.
The following example assumes that your NFS share is located in /nfs in box2:
# semanage fcontext -a -t public_content_rw_t "/nfs(/.*)?"
# restorecon -R /nfs
# setsebool -P nfs_export_all_rw on
# setsebool -P nfs_export_all_ro on
(where the -P flag indicates persistence across reboots).
Finally, don’t forget to:
Create NFS Group and Configure NFS Share Directory
1. Create a group called nfs and add the nfsnobody user to it, then change the permissions of the /nfs directory to 0770 and its group owner to nfs. Thus, nfsnobody (which is mapped to the client requests) will have write permissions on the share) and you won’t need to use no_root_squash in the /etc/exports file.
# groupadd nfs
# usermod -a -G nfs nfsnobody
# chmod 0770 /nfs
# chgrp nfs /nfs
2. Modify the exports file (/etc/exports) as follows to only allow access from box1 using Kerberos security (sec=krb5).
Note: that the value of anongid has been set to the GID of the nfs group that we created previously:
/nfs box1(rw,sec=krb5,anongid=1004)
3. Re-export (-r) all (-a) the NFS shares. Adding verbosity to the output (-v) is a good idea since it will provide helpful information to troubleshoot the server if something goes wrong:
# exportfs -arv
4. Restart and enable the NFS server and related services. Note that you don’t have to enable nfs-lock and nfs-idmapd because they will be automatically started by the other services on boot:
# systemctl restart rpcbind nfs-server nfs-lock nfs-idmap
# systemctl enable rpcbind nfs-server
Testing Environment and Other Prerequisites
In this guide we will use the following test environment:
- Client machine [box1: 192.168.0.18]
- NFS / Kerberos server [box2: 192.168.0.20] (also known as Key Distribution Center, or KDC for short).
Note: that Kerberos service is crucial to the authentication scheme.
As you can see, the NFS server and the KDC are hosted in the same machine for simplicity, although you can set them up in separate machines if you have more available. Both machines are members of the mydomain.com domain.
Last but not least, Kerberos requires at least a basic schema of name resolution and the Network Time Protocol service to be present in both client and server since the security of Kerberos authentication is in part based upon the timestamps of tickets.
To set up name resolution, we will use the /etc/hosts file in both client and server:
192.168.0.18    box1.mydomain.com    box1
192.168.0.20    box2.mydomain.com    box2
In RHEL 7, chrony is the default software that is used for NTP synchronization:
# yum install chrony
# systemctl start chronyd
# systemctl enable chronyd
To make sure chrony is actually synchronizing your system’s time with time servers you may want to issue the following command two or three times and make sure the offset is getting nearer to zero:
# chronyc tracking

Installing and Configuring Kerberos
To set up the KDC, install the following packages on both server and client (omit the server package in the client):
# yum update && yum install krb5-server krb5-workstation pam_krb5
Once it is installed, edit the configuration files (/etc/krb5.conf and /var/kerberos/krb5kdc/kadm5.acl) and replace all instances of example.com (lowercase and uppercase) with mydomain.com as follows.
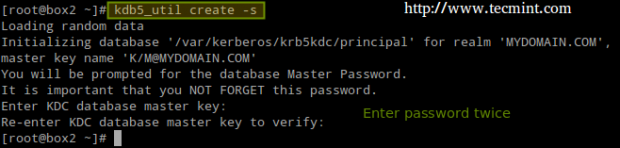
Now create the Kerberos database (please note that this may take a while as it requires a some level of entropy in your system. To speed things up, I opened another terminal and ran ping -f localhost for 30-45 seconds):
# kdb5_util create -s
Next, enable Kerberos through the firewall and start / enable the related services.
Important: nfs-secure must be started and enabled on the client as well:
# firewall-cmd --permanent --add-service=kerberos
# systemctl start krb5kdc kadmin nfs-secure
# systemctl enable krb5kdc kadmin nfs-secure
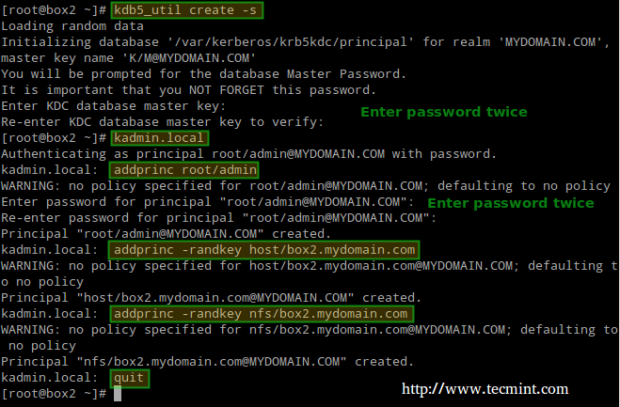
Next, using the kadmin.local tool, create an admin principal for root:
# kadmin.local
# addprinc root/admin
And add the Kerberos server to the database:
# addprinc -randkey host/box2.mydomain.com
Same with the NFS service for both client (box1) and server (box2). Please note that in the screenshot below I forgot to do it for box1 before quitting:
# addprinc -randkey nfs/box2.mydomain.com
# addprinc -randkey nfs/box1.mydomain.com
And exit by typing quit and pressing Enter:
Then obtain and cache Kerberos ticket-granting ticket for root/admin:
# kinit root/admin
# klist

The last step before actually using Kerberos is storing into a keytab file (in the server) the principals that are authorized to use Kerberos authentication:
# kadmin.local
# ktadd host/box2.mydomain.com
# ktadd nfs/box2.mydomain.com
# ktadd nfs/box1.mydomain.com
Finally, mount the share and perform a write test:
# mount -t nfs4 -o sec=krb5 box2:/nfs /mnt
# echo "Hello from Tecmint.com" > /mnt/greeting.txt

Let’s now unmount the share, rename the keytab file in the client (to simulate it’s not present) and try to mount the share again:
# umount /mnt
# mv /etc/krb5.keytab /etc/krb5.keytab.orig
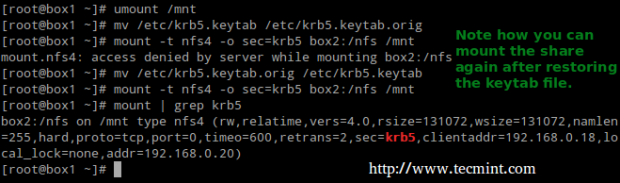
Now you can use the NFS share with Kerberos-based authentication.
Summary
In this article we have explained how to set up NFS with Kerberos authentication. Since there is much more to the topic than we can cover in a single guide, feel free to check the online Kerberos documentation and since Kerberos is a bit tricky to say the least, don’t hesitate to drop us a note using the form below if you run into any issue or need help with your testing or implementation.


Hi,
Why for box1 is not created a principal like addprinc -randkey nfs/box1.mydomain.com?
In order to get this to work, I had to manually copy the keytab file from the server into the client and run “kinit -k -t /etc/krb5.keytab” in order to then be able to mount the directory. If not I got an “Operation Not Permitted“.
mount.nfs4: Operation not permitted
How to solve this error?
mount.nfs: access denied by server while mounting server.example.com:/nfssecure
@Senthil,
Could you share the /etc/exports file here? I mean how you added the NFS mount point?
if you are using Kerberos-based Authentication please make sure relam should be in capital where it was in capital by default.
when i am trying to mount filesystem i am getting “mount.nfs4: Operation not permitted” error.
Try this: http://metekarar.blogspot.com.ar/2012/09/nfs-sharing-for-linux.html
no luck..I was already using fsid=0 option with root share. And also nfs4 without kerberos is working fine for me.
I am getting mount.nfs4: Operation not permitted error when trying to mount nfs filesystem on client. any suggestions?
Hi Gabriel,
a typo at the last kerberos step
kadmin.local rather than kdadmin
great article, very useful thank you!
also you can use /local/pv test.file > /nfs/test.file
as file copy test to see the bandwidth rate
@Zermok,
Thanks for notifying us, corrected in the writeup..
Instead of using the public_content_t SELinux context, you can use nfs_t, then you don’t need to enable the nfs_export_all_rw/nfs_export_all_ro booleans.
Thanks for the kerberos info, it was good and I found some extra info that helped me get this set up with NFS here, hope it may help someone else too.
What version of RHEL/CentOS do you use here?
On RHEL 7.1, the nfs-secure is a static service and cannot be enabled. It is started by the nfs-client.target service assuming the file /etc/krb5.keytab is present on the system.
@Tomas,
We used RHEL 7.0. Thank you for bringing this to our attention.
@Ravi,
Please add a clarification as per Tomas’ observation.
@Tomas,
Yes, as @Gabriel stated, we’ve used RHEL 7.0 for this setup and nfs-secure comes a service and can be started using systemctl as instructed in this guide, about RHEL 7.1 we’ve no idea about this….Have you tried starting nfs-secure service using systemctl in RHEL 7.1? what error you received? could you share it with us?
RHCE exam is now based on RHEL 7.1, just so you know.
To answer your question, I have tried starting the nfs-secure service on RHEL 7.1 and it works, however, being a static service, it cannot be enabled. If you restart the server, it won’t come up. Therefore you must enable the nfs-client.target service.
@Tomas,
Yes, we know that the RHCE exam now based on 7.1, but I really don’t think any major changes in exam objectives nor in distribution, may be some minor changes to some services or packages..nothing to worry….
You need to enable the nfs-client.target service on RHEL 7.1, otherwise you have no working NFS client configuration after system reboot. And you fail the exam, surely nothing to worry about.
The big question in my mind is “why?”.
What advantages does using kerberos for authentication give over the standard authentication?
Does this stop an exploit whereby a user who has obtained root can su to another user and pilfer files over nfs under that users creds?
@sloop,
Perhaps you raised an important point in that no authentication method is 100% fool-proof. You may want to refer to this paper in the Kerberos website that explains in detail why you should consider using this method above others. Hope it helps: http://www.kerberos.org/software/whykerberos.pdf
@sloop Shortly, an NFS server does NOT require authentication and only enforces access restrictions that are based on IP addresses or host names of a client. Using the default security method, which is sec=sys, the NFS server trusts ANY UID that is sent by the client.
Now using Kerberos, the client must prove identity first, and only then standard Linux file permissions apply. Kerberos can also ensure that all requests between the client and the server are encrypted.
Hello, when i try to mount the kerberized NFS it says “mount.nfs4: an incorrect mount option was specified”
Whole error is:
mount -t nfs4 -o sec=krb5 servername.tld:/home/share/ /mnt/
mount.nfs4: timeout set for Sun Feb 28 02:43:49 2016
mount.nfs4: trying text-based options ‘sec=krb5,addr=1.2.3.4,clientaddr-1.2.3.4’ – i have changed the real IP in this line
mount.nfs4: mount(2): Invalid argument
mount.nfs4: an incorrect mount options was specified
Does anyone know what could be the problem?
@Martin,
Make sure you have started and enabled the nfs-secure and nfs-client services:
systemctl start nfs-secure nfs-client && systemctl enable nfs-secure nfs-client
Then try again and please get back to us.
Hello
thanks a lot it’s really amazing article but this command # kdb5_util create -s must be execute before # systemctl start krb5kdc kadmin nfs-secure due to the second command raise up an error for missing of db directory
@Gabriel,
Could you check @mozufferhago comment and verify that the given suggestion was correct?
@Ravi,
I agree. Please make the necessary correction in the writeup.
@Gabriel,
Done changes as suggested in the writeup..