During this series we have explored in detail at least two access control methods: standard ugo/rwx permissions (Manage Users and Groups – Part 3) and access control lists (Configure ACL’s on File Systems – Part 7).
Although necessary as first level permissions and access control mechanisms, they have some limitations that are addressed by Security Enhanced Linux (aka SELinux for short).
One of such limitations is that a user can expose a file or directory to a security breach through a poorly elaborated chmod command and thus cause an unexpected propagation of access rights. As a result, any process started by that user can do as it pleases with the files owned by the user, where finally a malicious or otherwise compromised software can achieve root-level access to the entire system.
With those limitations in mind, the United States National Security Agency (NSA) first devised SELinux, a flexible mandatory access control method, to restrict the ability of processes to access or perform other operations on system objects (such as files, directories, network ports, etc) to the least permission model, which can be modified later as needed. In few words, each element of the system is given only the access required to function.
In RHEL 7, SELinux is incorporated into the kernel itself and is enabled in Enforcing mode by default. In this article we will explain briefly the basic concepts associated with SELinux and its operation.
SELinux Modes
SELinux can operate in three different ways:
- Enforcing: SELinux denies access based on SELinux policy rules, a set of guidelines that control the security engine.
- Permissive: SELinux does not deny access, but denials are logged for actions that would have been denied if running in enforcing mode.
- Disabled (self-explanatory).
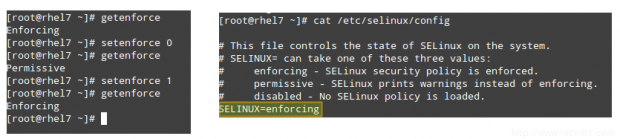
The getenforce command displays the current mode of SELinux, whereas setenforce (followed by a 1 or a 0) is used to change the mode to Enforcing or Permissive, respectively, during the current session only.
In order to achieve persistence across logouts and reboots, you will need to edit the /etc/selinux/config file and set the SELINUX variable to either enforcing, permissive, or disabled:
# getenforce
# setenforce 0
# getenforce
# setenforce 1
# getenforce
# cat /etc/selinux/config
Typically you will use setenforce to toggle between SELinux modes (enforcing to permissive and back) as a first troubleshooting step. If SELinux is currently set to enforcing while you’re experiencing a certain problem, and the same goes away when you set it to permissive, you can be confident you’re looking at a SELinux permissions issue.
SELinux Contexts
A SELinux context consists of an access control environment where decisions are made based on SELinux user, role, and type (and optionally a level):
- A SELinux user complements a regular Linux user account by mapping it to a SELinux user account, which in turn is used in the SELinux context for processes in that session, in order to explicitly define their allowed roles and levels.
- The concept of role acts as an intermediary between domains and SELinux users in that it defines which process domains and file types can be accessed. This will shield your system against vulnerability to privilege escalation attacks.
- A type defines an SELinux file type or an SELinux process domain. Under normal circumstances, processes are prevented from accessing files that other processes use, and and from accessing other processes, thus access is only allowed if a specific SELinux policy rule exists that allows it.
Let’s see how all of that works through the following examples.
EXAMPLE 1: Changing the default port for the sshd daemon
In Securing SSH – Part 8 we explained that changing the default port where sshd listens on is one of the first security measures to secure your server against external attacks. Let’s edit the /etc/ssh/sshd_config file and set the port to 9999:
Port 9999
Save the changes, and restart sshd:
# systemctl restart sshd
# systemctl status sshd
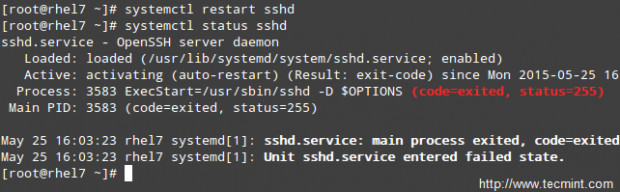
As you can see, sshd has failed to start. But what happened?
A quick inspection of /var/log/audit/audit.log indicates that sshd has been denied permissions to start on port 9999 (SELinux log messages include the word “AVC” so that they might be easily identified from other messages) because that is a reserved port for the JBoss Management service:
# cat /var/log/audit/audit.log | grep AVC | tail -1

At this point you could disable SELinux (but don’t!) as explained earlier and try to start sshd again, and it should work. However, the semanage utility can tell us what we need to change in order for us to be able to start sshd in whatever port we choose without issues.
Run,
# semanage port -l | grep ssh
to get a list of the ports where SELinux allows sshd to listen on.
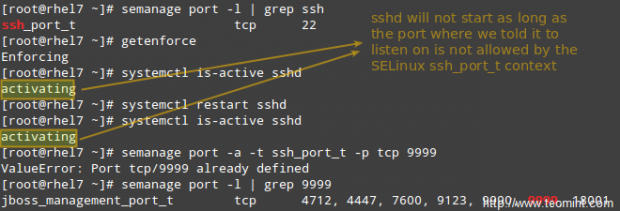
So let’s change the port in /etc/ssh/sshd_config to Port 9998, add the port to the ssh_port_t context, and then restart the service:
# semanage port -a -t ssh_port_t -p tcp 9998
# systemctl restart sshd
# systemctl is-active sshd

As you can see, the service was started successfully this time. This example illustrates the fact that SELinux controls the TCP port number to its own port type internal definitions.
EXAMPLE 2: Allowing httpd to send access sendmail
This is an example of SELinux managing a process accessing another process. If you were to implement mod_security and mod_evasive along with Apache in your RHEL 7 server, you need to allow httpd to access sendmail in order to send a mail notification in the wake of a (D)DoS attack. In the following command, omit the -P flag if you do not want the change to be persistent across reboots.
# semanage boolean -1 | grep httpd_can_sendmail
# setsebool -P httpd_can_sendmail 1
# semanage boolean -1 | grep httpd_can_sendmail

As you can tell from the above example, SELinux boolean settings (or just booleans) are true / false rules embedded into SELinux policies. You can list all the booleans with semanage boolean -l, and alternatively pipe it to grep in order to filter the output.
EXAMPLE 3: Serving a static site from a directory other than the default one
Suppose you are serving a static website using a different directory than the default one (/var/www/html), say /websites (this could be the case if you’re storing your web files in a shared network drive, for example, and need to mount it at /websites).
a). Create an index.html file inside /websites with the following contents:
<html>
<h2>SELinux test</h2>
</html>
If you do,
# ls -lZ /websites/index.html
you will see that the index.html file has been labeled with the default_t SELinux type, which Apache can’t access:

b). Change the DocumentRoot directive in /etc/httpd/conf/httpd.conf to /websites and don’t forget to update the corresponding Directory block. Then, restart Apache.
c). Browse to http://<web server IP address>, and you should get a 503 Forbidden HTTP response.
d). Next, change the label of /websites, recursively, to the httpd_sys_content_t type in order to grant Apache read-only access to that directory and its contents:
# semanage fcontext -a -t httpd_sys_content_t "/websites(/.*)?"
e). Finally, apply the SELinux policy created in d):
# restorecon -R -v /websites
Now restart Apache and browse to http://<web server IP address> again and you will see the html file displayed correctly:

Summary
In this article we have gone through the basics of SELinux. Note that due to the vastness of the subject, a full detailed explanation is not possible in a single article, but we believe that the principles outlined in this guide will help you to move on to more advanced topics should you wish to do so.
If I may, let me recommend two essential resources to start with: the NSA SELinux page and the RHEL 7 SELinux User’s and Administrator’s guide.
Don’t hesitate to let us know if you have any questions or comments.


Isn’t “restorecon -R -v /websites” restoring the original context to the /websites folder?