As a system administrator you will often have to log on to remote systems to perform a variety of administration tasks using a terminal emulator. You will rarely sit in front of a real (physical) terminal, so you need to set up a way to log on remotely to the machines that you will be asked to manage.
In fact, that may be the last thing that you will have to do in front of a physical terminal. For security reasons, using Telnet for this purpose is not a good idea, as all traffic goes through the wire in unencrypted, plain text.
In addition, in this article we will also review how to configure network services to start automatically at boot and learn how to set up network and hostname resolution statically or dynamically.

Installing and Securing SSH Communication
For you to be able to log on remotely to a RHEL 7 box using SSH, you will have to install the openssh, openssh-clients and openssh-servers packages. The following command not only will install the remote login program, but also the secure file transfer tool, as well as the remote file copy utility:
# yum update && yum install openssh openssh-clients openssh-servers
Note that it’s a good idea to install the server counterparts as you may want to use the same machine as both client and server at some point or another.
After installation, there is a couple of basic things that you need to take into account if you want to secure remote access to your SSH server. The following settings should be present in the /etc/ssh/sshd_config file.
1. Change the port where the sshd daemon will listen on from 22 (the default value) to a high port (2000 or greater), but first make sure the chosen port is not being used.
For example, let’s suppose you choose port 2500. Use netstat in order to check whether the chosen port is being used or not:
# netstat -npltu | grep 2500
If netstat does not return anything, you can safely use port 2500 for sshd, and you should change the Port setting in the configuration file as follows:
Port 2500
2. Only allow protocol 2:
Protocol 2
3. Configure the authentication timeout to 2 minutes, do not allow root logins, and restrict to a minimum the list of users which are allowed to login via ssh:
LoginGraceTime 2m
PermitRootLogin no
AllowUsers gacanepa
4. If possible, use key-based instead of password authentication:
PasswordAuthentication no
RSAAuthentication yes
PubkeyAuthentication yes
This assumes that you have already created a key pair with your user name on your client machine and copied it to your server as explained here.
Configuring Networking and Name Resolution
1. Every system administrator should be well acquainted with the following system-wide configuration files:
- /etc/hosts is used to resolve names <---> IPs in small networks.
Every line in the /etc/hosts file has the following structure:
IP address - Hostname - FQDN
For example,
192.168.0.10 laptop laptop.gabrielcanepa.com.ar
2. /etc/resolv.conf specifies the IP addresses of DNS servers and the search domain, which is used for completing a given query name to a fully qualified domain name when no domain suffix is supplied.
Under normal circumstances, you don’t need to edit this file as it is managed by the system. However, should you want to change DNS servers, be advised that you need to stick to the following structure in each line:
nameserver - IP address
For example,
nameserver 8.8.8.8
3. 3. /etc/host.conf specifies the methods and the order by which hostnames are resolved within a network. In other words, tells the name resolver which services to use, and in what order.
Although this file has several options, the most common and basic setup includes a line as follows:
order bind,hosts
Which indicates that the resolver should first look in the nameservers specified in resolv.conf and then to the /etc/hosts file for name resolution.
4. /etc/sysconfig/network contains routing and global host information for all network interfaces. The following values may be used:
NETWORKING=yes|no
HOSTNAME=value
Where value should be the Fully Qualified Domain Name (FQDN).
GATEWAY=XXX.XXX.XXX.XXX
Where XXX.XXX.XXX.XXX is the IP address of the network’s gateway.
GATEWAYDEV=value
In a machine with multiple NICs, value is the gateway device, such as enp0s3.
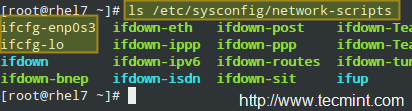
5. Files inside /etc/sysconfig/network-scripts (network adapters configuration files).
Inside the directory mentioned previously, you will find several plain text files named.
ifcfg-name
Where name is the name of the NIC as returned by ip link show:

For example:
Other than for the loopback interface, you can expect a similar configuration for your NICs. Note that some variables, if set, will override those present in /etc/sysconfig/network for this particular interface. Each line is commented for clarification in this article but in the actual file you should avoid comments:
HWADDR=08:00:27:4E:59:37 # The MAC address of the NIC
TYPE=Ethernet # Type of connection
BOOTPROTO=static # This indicates that this NIC has been assigned a static IP. If this variable was set to dhcp, the NIC will be assigned an IP address by a DHCP server and thus the next two lines should not be present in that case.
IPADDR=192.168.0.18
NETMASK=255.255.255.0
GATEWAY=192.168.0.1
NM_CONTROLLED=no # Should be added to the Ethernet interface to prevent NetworkManager from changing the file.
NAME=enp0s3
UUID=14033805-98ef-4049-bc7b-d4bea76ed2eb
ONBOOT=yes # The operating system should bring up this NIC during boot
Setting Hostnames
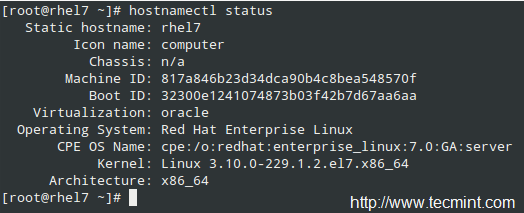
In Red Hat Enterprise Linux 7, the hostnamectl command is used to both query and set the system’s hostname.
To display the current hostname, type:
# hostnamectl status
To change the hostname, use
# hostnamectl set-hostname [new hostname]
For example,
# hostnamectl set-hostname cinderella
For the changes to take effect you will need to restart the hostnamed daemon (that way you will not have to log off and on again in order to apply the change):
# systemctl restart systemd-hostnamed

In addition, RHEL 7 also includes the nmcli utility that can be used for the same purpose. To display the hostname, run:
# nmcli general hostname
and to change it:
# nmcli general hostname [new hostname]
For example,
# nmcli general hostname rhel7

Starting Network Services on Boot
To wrap up, let us see how we can ensure that network services are started automatically on boot. In simple terms, this is done by creating symlinks to certain files specified in the [Install] section of the service configuration files.
In the case of firewalld (/usr/lib/systemd/system/firewalld.service):
[Install]
WantedBy=basic.target
Alias=dbus-org.fedoraproject.FirewallD1.service
To enable the service:
# systemctl enable firewalld
On the other hand, disabling firewalld entitles removing the symlinks:
# systemctl disable firewalld

Conclusion
In this article we have summarized how to install and secure connections via SSH to a RHEL server, how to change its name, and finally how to ensure that network services are started on boot. If you notice that a certain service has failed to start properly, you can use systemctl status -l [service] and journalctl -xn to troubleshoot it.
Feel free to let us know what you think about this article using the comment form below. Questions are also welcome. We look forward to hearing from you!


Hi,
Thank you for the effort.
As I know and I just to inform you that the better way to configure network on RHEL7 is with using “nmcli” or “nmtui” commands.
The second one is graphical mode.
Thanks.
Thanks a lot for sharing! Great tutorial.
Hello Gabriel,
Excellent post, congratulations.
May I recommend a little correction in your text?
The structure of the /etc/hosts file is:
IP HostFQDN HostAlias[,HostAlias…]
The file format was initially defined in RFC952 and the hostname in RFC953.
As your artcles are a good reference, could be interesting to show it this way.