As we have anticipated in previous tutorials of this LFCE (Linux Foundation Certified Engineer) series, in this article we will discuss the routing of IP traffic statically and dynamically with specific applications.

Introducing The Linux Foundation Certification Program
First things first, let’s get some definitions straight:
- In simple words, a packet is the basic unit that is used to transmit information within a network. Networks that use TCP/IP as network protocol follow the same rules for transmission of data: the actual information is split into packets that are made of both data and the address where it should be sent to.
- Routing is the process of “guiding” the data from source to destination inside a network.
- Static routing requires a manually-configured set of rules defined in a routing table. These rules are fixed and are used to define the way a packet must go through as it travels from one machine to another.
- Dynamic routing, or smart routing (if you wish), means that the system can alter automatically, as needed, the route that a packet follows.
Advanced IP and Network Device Configuration
The iproute package provides a set of tools to manage networking and traffic control that we will use throughout this article as they represent the replacement of legacy tools such as ifconfig and route.
The central utility in the iproute suite is called simply ip. Its basic syntax is as follows:
# ip object command
Where object can be only one of the following (only the most frequent objects are shown – you can refer to man ip for a complete list):
- link: network device.
- addr: protocol (IP or IPv6) address on a device.
- route: routing table entry.
- rule: rule in routing policy database.
Whereas command represents a specific action that can be performed on object. You can run the following command to display the complete list of commands that can be applied to a particular object:
# ip object help
For example,
# ip link help
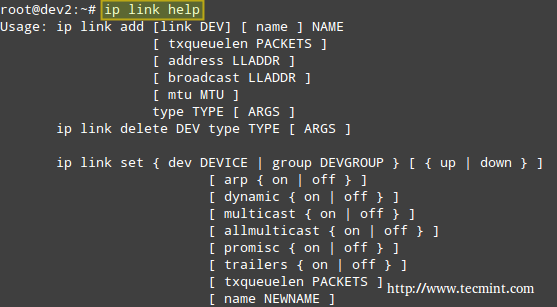
The above image shows, for example, that you can change the status of a network interface with the following command:
# ip link set interface {up | down}
For such more examples of ‘ip‘ command, read 10 Useful ‘ip’ Commands to Configure IP Address
Example 1: Disabling and enabling a network interface
In this example, we will disable and enable eth1:
# ip link show
# ip link set eth1 down
# ip link show
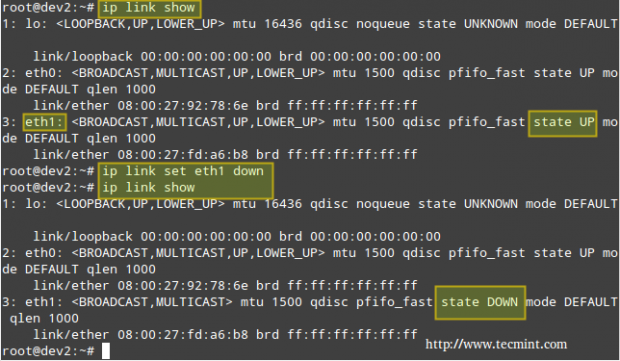
If you want to re-enable eth1,
# ip link set eth1 up
Instead of displaying all the network interfaces, we can specify one of them:
# ip link show eth1
Which will return all the information for eth1.
Example 2: Displaying the main routing table
You can view your current main routing table with either of the following 3 commands:
# ip route show
# route -n
# netstat -rn
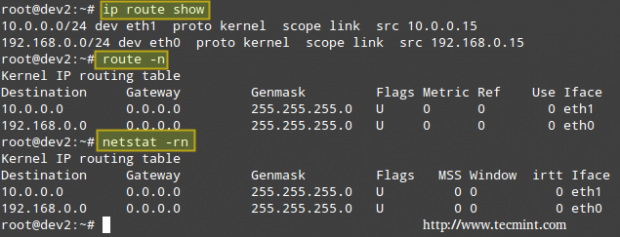
The first column in the output of the three commands indicates the target network. The output of ip route show (following the keyword dev) also presents the network devices that serve as physical gateway to those networks.
Although nowadays the ip command is preferred over route, you can still refer to man ip-route and man route for a detailed explanation of the rest of the columns.
Example 3: Using a Linux server to route packets between two private networks
We want to route icmp (ping) packets from dev2 to dev4 and the other way around as well (note that both client machines are on different networks). The name of each NIC, along with its corresponding IPv4 address, is given inside square brackets.
Our test environment is as follows:
Client 1: CentOS 7 [enp0s3: 192.168.0.17/24] - dev1
Router: Debian Wheezy 7.7 [eth0: 192.168.0.15/24, eth1: 10.0.0.15/24] - dev2
Client 2: openSUSE 13.2 [enp0s3: 10.0.0.18/24] - dev4
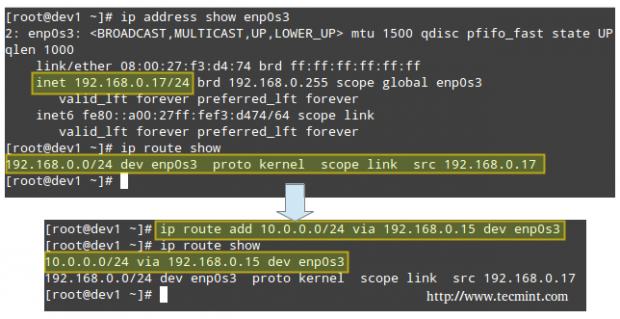
Let’s view the routing table in dev1 (CentOS box):
# ip route show
and then modify it in order to use its enp0s3 NIC and the connection to 192.168.0.15 to access hosts in the 10.0.0.0/24 network:
# ip route add 10.0.0.0/24 via 192.168.0.15 dev enp0s3
Which essentially reads, “Add a route to the 10.0.0.0/24 network through the enp0s3 network interface using 192.168.0.15 as gateway”.
Likewise in dev4 (openSUSE box) to ping hosts in the 192.168.0.0/24 network:
# ip route add 192.168.0.0/24 via 10.0.0.15 dev enp0s3
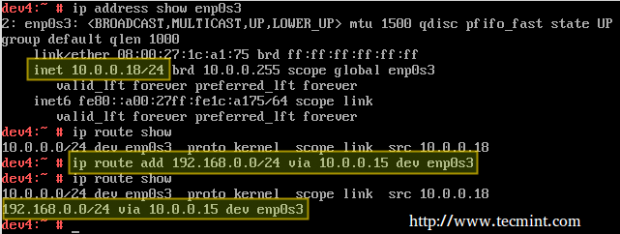
Finally, we need to enable forwarding in our Debian router:
# echo 1 > /proc/sys/net/ipv4/ip_forward
Now let’s ping:

and,

To make these settings persistent across boots, edit /etc/sysctl.conf on the router and make sure the net.ipv4.ip_forward variable is set to true as follows:
net.ipv4.ip_forward = 1
In addition, configure the NICs on both clients (look for the configuration file within /etc/sysconfig/network on openSUSE and /etc/sysconfig/network-scripts on CentOS – in both cases it’s called ifcfg-enp0s3).
Here’s the configuration file from the openSUSE box:
BOOTPROTO=static
BROADCAST=10.0.0.255
IPADDR=10.0.0.18
NETMASK=255.255.255.0
GATEWAY=10.0.0.15
NAME=enp0s3
NETWORK=10.0.0.0
ONBOOT=yes
Example 4: Using a Linux server to route packages between a private networks and the Internet
Another scenario where a Linux machine can be used as router is when you need to share your Internet connection with a private LAN.
Router: Debian Wheezy 7.7 [eth0: Public IP, eth1: 10.0.0.15/24] - dev2
Client: openSUSE 13.2 [enp0s3: 10.0.0.18/24] - dev4
In addition to set up packet forwarding and the static routing table in the client as in the previous example, we need to add a few iptables rules in the router:
# iptables -t nat -A POSTROUTING -o eth0 -j MASQUERADE
# iptables -A FORWARD -i eth0 -o eth1 -m state --state RELATED,ESTABLISHED -j ACCEPT
# iptables -A FORWARD -i eth1 -o eth0 -j ACCEPT
The first command adds a rule to the POSTROUTING chain in the nat (Network Address Translation) table, indicating that the eth0 NIC should be used for outgoing packages.
MASQUERADE indicates that this NIC has a dynamic IP and that before sending the package to the “wild wild world” of the Internet, the private source address of the packet has to be changed to that of the public IP of the router.
In a LAN with many hosts, the router keeps track of established connections in /proc/net/ip_conntrack so it knows where to return the response from the Internet to.
Only part of the output of:
# cat /proc/net/ip_conntrack
is show in the following screenshot.

Where the origin (private IP of openSUSE box) and destination (Google DNS) of packets is highlighted. This was the result of running:
# curl www.tecmint.com
on the openSUSE box.
As I’m sure you can already guess, the router is using Google’s 8.8.8.8 as nameserver, which explains why the destination of outgoing packets points to that address.
Note: That incoming packages from the Internet are only accepted is if they are part of an already established connection (command #2), while outgoing packages are allowed “free exit” (command #3).
Don’t forget to make your iptables rules persistent following the steps outlined in Part 8 – Configure Iptables Firewall of this series.
Dynamic Routing with Quagga
Nowadays, the tool most used for dynamic routing in Linux is quagga. It allows system administrators to implement, with a relatively low-cost Linux server, the same functionality that is provided by powerful (and costly) Cisco routers.
The tool itself does not handle the routing, but rather modifies the kernel routing table as it learns new best routes to handle packets.
Since it’s a fork of zebra, a program whose development ceased a while ago, it maintains for historical reasons the same commands and structure than zebra. That is why you will see a lot of reference to zebra from this point on.
Please note that it is not possible to cover dynamic routing and all the related protocols in a single article, but I am confident that the content presented here will serve as a starting point for you to build on.
Installing Quagga in Linux
To install quagga on your chosen distribution:
# aptitude update && aptitude install quagga 				[On Ubuntu]
# yum update && yum install quagga 					[CentOS/RHEL]
# zypper refresh && zypper install quagga 				[openSUSE]
We will use the same environment as with Example #3, with the only difference that eth0 is connected to a main gateway router with IP 192.168.0.1.
Next, edit /etc/quagga/daemons with,
zebra=1
ripd=1
Now create the following configuration files.
# /etc/quagga/zebra.conf
# /etc/quagga/ripd.conf
and add these lines (replace for a hostname and password of your choice):
service quagga restart
hostname    	dev2
password    	quagga
# service quagga restart

Note: That ripd.conf is the configuration file for the Routing Information Protocol, which provides the router with the information of which networks can be reached and how far (in terms of amount of hops) they are.
Note that this is only one of the protocols that can be used along with quagga, and I chose it for this tutorial due to easiness of use and because most network devices support it, although it has the disadvantage of passing credentials in plain text. For that reason, you need to assign proper permissions to the configuration file:
# chown quagga:quaggavty /etc/quagga/*.conf
# chmod 640 /etc/quagga/*.conf
Example 5: Setting up quagga to route IP traffic dynamically
In this example we will use the following setup with two routers (make sure to create the configuration files for router #2 as explained previously):
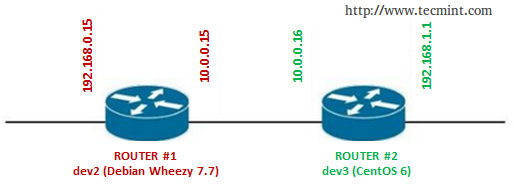
Important: Don’t forget to repeat the following setup for both routers.
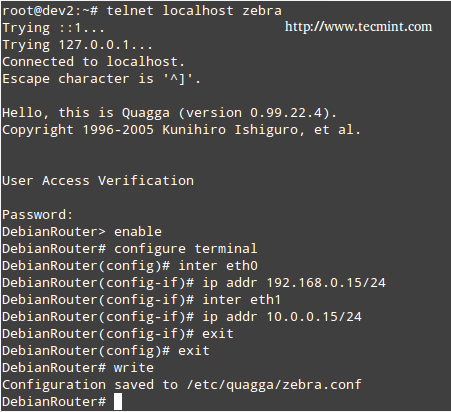
Connect to zebra (listening on port 2601), which is the logical intermediary between the router and the kernel:
# telnet localhost 2601
Enter the password that was set in the /etc/quagga/zebra.conf file, and then enable configuration:
enable
configure terminal
Enter the IP address and network mask of each NIC:
inter eth0
ip addr 192.168.0.15
inter eth1
ip addr 10.0.0.15
exit
exit
write
Now we need to connect to the RIP daemon terminal (port 2602):
# telnet localhost 2602
Enter username and password as configured in the /etc/quagga/ripd.conf file, and then type the following commands in bold (comments are added for the sake of clarification):
enable turns on privileged mode command.
configure terminal changes to configuration mode. This command is the first step to configuration
router rip enables RIP.
network 10.0.0.0/24 sets the RIP enable interface for the 10.0.0.0/24 network.
exit
exit
write writes current configuration to configuration file.
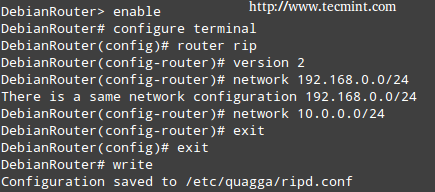
Note: That in both cases the configuration is appended to the lines that we added previously (/etc/quagga/zebra.conf and /etc/quagga/ripd.conf).
Finally, connect again to the zebra service on both routers and note how each one of them has “learned” the route to the network that is behind the other, and which is the next hop to get to that network, by running the command show ip route:
# show ip route
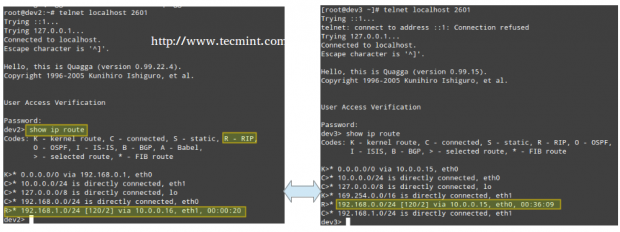
If you want to try different protocols or setups, you may want to refer to the Quagga project site for further documentation.
Conclusion
In this article we have explained how to set up static and dynamic routing, using a Linux box router(s). Feel free to add as many routers as you wish, and to experiment as much as you want. Do not hesitate to get back to us using the contact form below if you have any comments or questions.


In the internet sharing scenario, why do I need to set up forwarding if the default policy for delivering in iptables is ACCEPT?
Great blog post, It definitely helped in setting my home lab.
Folks,
I understand how the router works . I am wondering If I make the Centos as a router how the data travel inside the Centos computer ?
Lets explain and open my question : Is the data passing from one NIC card to another directly after I configure the system ? Is the driver of the NIC on Centos will handle the routing process from RX to TX buffer and vise versa ?
I need to get access to the data in processor instead directly routed from eth0 to eth1 . I want to open the data before passing Through to the other hand ? how can be possible ? could you please help me
Thanks
Ashkan Golestani
The answer to your first question is Yes. You can test yourself with a network monitoring tool such as Wireshark.
As for your second question, I’m afraid I don’t understand what you mean by I want to open the data before passing Through to the other hand ? how can be possible ?.
Thanks for the answer,
Wireshark is monitoring the data which I don’t need it .
I need to receive the data from known port and then process it inside the memory then send to another known port .
Data From eth0 –> processor ,RAM–> data to eth1
thanks again
Ash
That is out of the scope of the LFCE certification (which is what this series is about). We also provide paid services to investigate requests like yours. If you’re interested, go to About at the top of the page and contact us for a quote.
Look up Squid proxying. This may be more of what you are looking for.
I think something similar to what was described in this article was done to my router by a hacker. I know very little about anything computer related but what I do know is I had a device on my network made by Elitegroup with an IP of 10.10.10.99.
I tried out a device called Cujo that was supposed to watch all packet traffic but it did not. IP addresses kept changing to 192 and dns on my iPad would switch from the one I personally imputed to 8.8.8.8 or 8.4.4.4, which matches what you said about using google.
I eventually removed the Cujo because it seemed to be causing even more security issues than before I had it. Now, my router which is an almond made by securifi is now reading as a ralink Linux based router with an open port listed as 8888. Layer3Forwarding(1), WANIPConnection(1), WANCommonInterfaceConfig(1), WFAWLANConfig(1) is all listed.
I believe someone set up a Linux router to reroute all of my network packets which made the Cujo not work properly. I can no longer sign into my router interface page, and I don’t want to reset in case there is evidence on there.
My cable company told me that during several days in September and August, huge amounts of bandwidth was being used. 20GB, 16GB etc. I would love to speak with a Linux expert on what to do to find more information about what is happening, removing then securing my network. I’ve had issues for years with network security and I’m tired of it and I’m ready to start making police reports. Can the author of this article contact me?
@Krista,
Just emailed you at the address specified in your comment.
I’m in the exact same situation. And I’m fed up with this. Can you please contact me?
hello.. great atricle.. but i cant find the previous 9 Parts.. !!??
@Sulaiman,
You can find all parts of this LFCE series here: https://www.tecmint.com/category/lfce/
Nice article.
A few years ago I worked at a college with four campuses connected with 100 Mb lines. We had linux routers, using old Dell Poweredge servers which had gone out of warranty, everything was Linux back then, virtually.
After a while during the Labour years of plenty we upgraded to a 3com 7700 (I think it was), on the main campus, as the core router. I waited for someone somewhere to mention the speed increase, nobody noticed.
After a few weeks the board on the 7700 failed and to our horror we discovered that the support with 3Com meant we had to wait 30 days for a new replacement.
As an emergency measure we configured a Dell gx240 workstation as a router, this with a 100 Mb card. Fully expecting it to run like a bag of nails, to my surprise it coped perfectly well. This was in a campus with about 400 machines, give or take.
On the other campus we removed the old poweredge server and replaced it with a 3Com 5500, same result nobody seemed to notice any speed increase.
Always made me wonder if these super expensive routers are actually worth it for small to medium size companies.
The users don’t notice anyway.
@Ian,
I can’t thank you enough for sharing this experience! It goes to show the power of Linux to boost even old hardware to provide outstanding results. Best regards.
Thanks for wirting artcile on LFCE.
Please change Packages to Packets in “Example 3: Using a Linux server to route packages between two private networks”
@Arun,
Thanks for pointing out error, fixed….