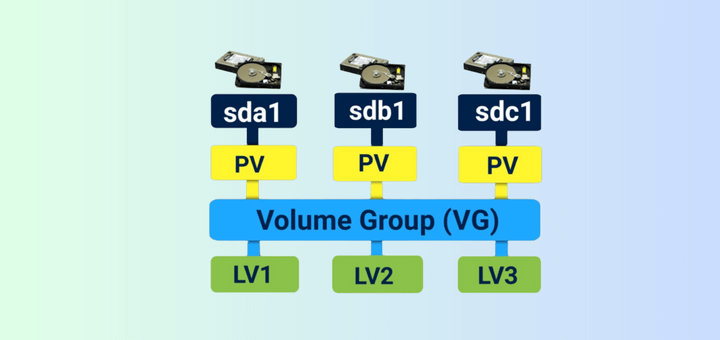
LUN is a Logical Unit Number, which shared from the iSCSI Storage Server. The Physical drive of iSCSI target server shares its drive to initiator over TCP/IP network. A Collection of drives called LUNs to form a large storage as SAN (Storage Area Network). In real environment LUNs are defined in LVM, if so it can be expandable as per space requirements.
Why LUNS are Used?
LUNS used for storage purpose, SAN Storage’s are build with mostly Groups of LUNS to become a pool, LUNs are Chunks of a Physical disk from target server. We can use LUNS as our systems Physical Disk to install Operating systems, LUNS are used in Clusters, Virtual servers, SAN etc. The main purpose of Using LUNS in Virtual servers for OS storage purpose. LUNS performance and reliability will be according to which kind of disk we using while creating a Target storage server.
Requirements
To know about creating a ISCSI Target Server follow the below link.
Master Server Setup
System information’s and Network setup are same as iSCSI Target Server as shown in Part – I, As we are defining LUNs in same server.
- Operating System – CentOS release 6.5 (Final)
- iSCSI Target IP – 192.168.0.200
- Ports Used : TCP 860, 3260
- Configuration file : /etc/tgt/targets.conf
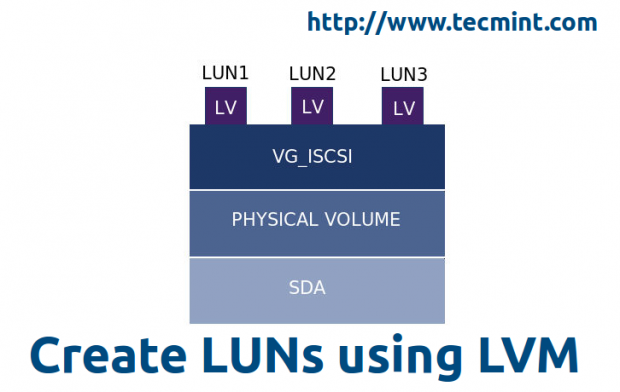
Creating LUNs using LVM in iSCSI Target Server
First, find out the list of drives using fdisk -l command, this will manipulate a long list of information of every partitions on the system.
# fdisk -l
The above command only gives the drive information’s of base system. To get the storage device information, use the below command to get the list of storage devices.
# fdisk -l /dev/vda && fdisk -l /dev/sda

NOTE: Here vda is virtual machines hard drive as I’m using virtual machine for demonstration, /dev/sda is added additionally for storage.
Step 1: Creating LVM Drive for LUNs
We going to use /dev/sda drive for creating a LVM.
# fdisk -l /dev/sda

Now let’s Partition the drive using fdisk command as shown below.
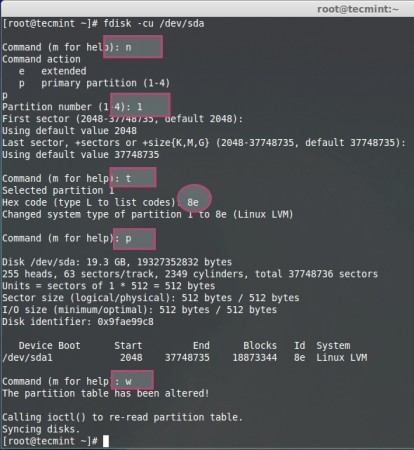
# fdisk -cu /dev/sda
- The option ‘-c‘ switch off the DOS compatible mode.
- The option ‘-u‘ is used to listing partition tables, give sizes in sectors instead of cylinders.
Choose n to create a New Partition.
Command (m for help): n
Choose p to create a Primary partition.
Command action
   e   extended
   p   primary partition (1-4)
Give a Partition number which we need to create.
Partition number (1-4): 1
As here, we are going to setup a LVM drive. So, we need to use the default settings to use full size of Drive.
First sector (2048-37748735, default 2048):
Using default value 2048
Last sector, +sectors or +size{K,M,G} (2048-37748735, default 37748735):
Using default value 37748735
Choose the type of partition, Here we need to setup a LVM so use 8e. Use l option to see the list of type.
Command (m for help): t
Choose which partition want to change the type.
Selected partition 1
Hex code (type L to list codes): 8e
Changed system type of partition 1 to 8e (Linux LVM)
After changing the type, check the changes by print (p) option to list the partition table.
Command (m for help): p

Disk /dev/sda: 19.3 GB, 19327352832 bytes
255 heads, 63 sectors/track, 2349 cylinders, total 37748736 sectors
Units = sectors of 1 * 512 = 512 bytes
Sector size (logical/physical): 512 bytes / 512 bytes
I/O size (minimum/optimal): 512 bytes / 512 bytes
Disk identifier: 0x9fae99c8

   Device Boot      Start         End      Blocks   Id  System
/dev/sda1            2048    37748735    18873344   8e  Linux LVM
Write the changes using w to exit from fdisk utility, Restart the system to make changes.
For your reference, I’ve attached screen shot below that will give you a clear idea about creating LVM drive.
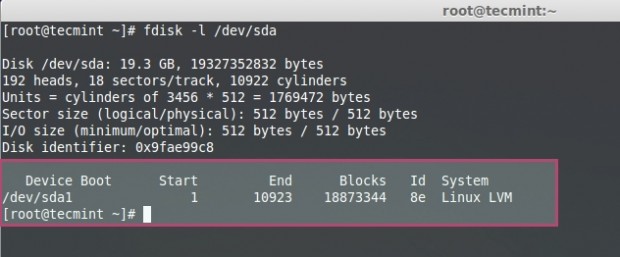
After system reboot, list the Partition table using the following fdisk command.
# fdisk -l /dev/sda
Step 2: Creating Logical Volumes for LUNs
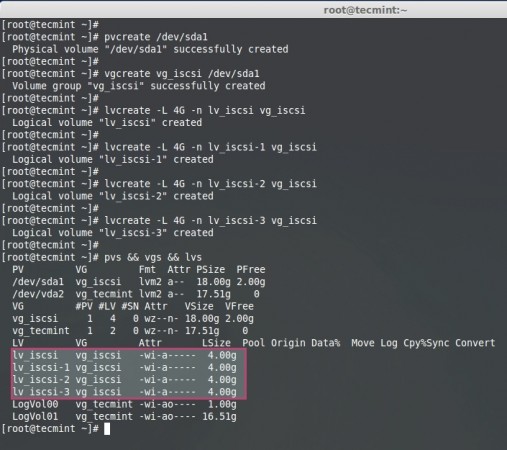
Now here, we going to create Physical volume using using ‘pvcreate’ command.
# pvcreate /dev/sda1
Create a Volume group with name of iSCSI to identify the group.
# vgcreate vg_iscsi /dev/sda1
Here I’m defining 4 Logical Volumes, if so there will be 4 LUNs in our iSCSI Target server.
# lvcreate -L 4G -n lv_iscsi vg_iscsi

# lvcreate -L 4G -n lv_iscsi-1 vg_iscsi

# lvcreate -L 4G -n lv_iscsi-2 vg_iscsi

# lvcreate -L 4G -n lv_iscsi-3 vg_iscsi
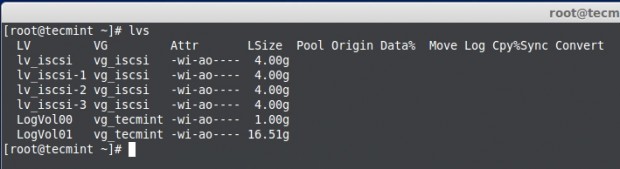
List the Physical volume, Volume group, logical volumes to confirm.
# pvs && vgs && lvs
# lvs
For better understanding of the above command, for your reference I’ve included a screen grab below.
Step 3: Define LUNs in Target Server
We have created Logical Volumes and ready to use with LUN, here we to define the LUNs in target configuration, if so only it will be available for client machines (Initiators).
Open and edit Targer configuration file located at ‘/etc/tgt/targets.conf’ with your choice of editor.
# vim /etc/tgt/targets.conf
Append the following volume definition in target conf file. Save and close the file.
<target iqn.2014-07.com.tecmint:tgt1>
       backing-store /dev/vg_iscsi/lv_iscsi
</target>
<target iqn.2014-07.com.tecmint:tgt1>
       backing-store /dev/vg_iscsi/lv_iscsi-1
</target>
<target iqn.2014-07.com.tecmint:tgt1>
       backing-store /dev/vg_iscsi/lv_iscsi-2
</target>
<target iqn.2014-07.com.tecmint:tgt1>
       backing-store /dev/vg_iscsi/lv_iscsi-3
</target
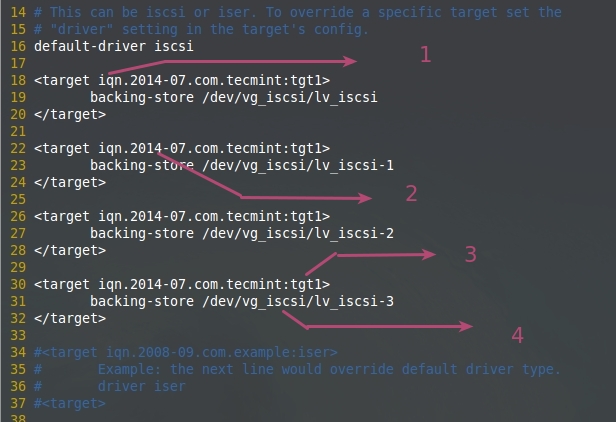
- iSCSI qualified name (iqn.2014-07.com.tecmint:tgt1).
- Use what ever as your wish.
- Identify using target, 1st target in this Server.
- 4. LVM Shared for particular LUN.
Next, reload the configuration by starting tgd service as shown below.
# /etc/init.d/tgtd reload

Next verify the available LUNs using the following command.
# tgtadm --mode target --op show
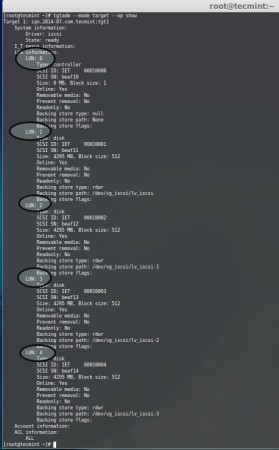
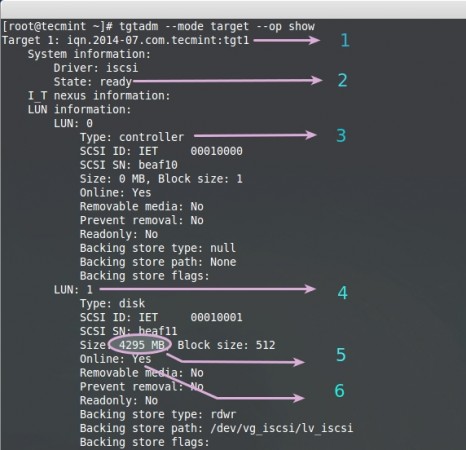
The above command will give long list of available LUNs with following information.
- iSCSI Qualified Name
- iSCSI is Ready to Use
- By Default LUN 0 will be reserved for Controller
- LUN 1, What we have Defined in the Target server
- Here i have defined 4 GB for a single LUN
- Online : Yes, Its ready to Use the LUN
Here we have defined the LUNs for target server using LVM, this can be expandable and support for many features such as snapshots. Let us see how to authenticate with Target server in PART-III and mount the remote Storage locally.


How to delete multiple IP addresses from a single Ip address in Linux?
@Rocky,
I didn’t understand your question? could you explain more? what are you trying to delete?
After creating Partïon using “fdisk” utility you don’t need to reboot the server or your system. just run “partprobe /dev/sd* CMD after exiting from disk.
Hello Admins,
I gone through the post it is very good, but I want to know the commands for removing or deleting the luns, acl in iscsi targets..?
Thanks in advance!!
$ sudo fdisk -cu /dev/sdb
Usage:
fdisk [options] change partition table
fdisk [options] -l list partition table(s)
fdisk -s give partition size(s) in blocks
Options:
-b sector size (512, 1024, 2048 or 4096)
-c[=] compatible mode: ‘dos’ or ‘nondos’ (default)
-h print this help text
-u[=] display units: ‘cylinders’ or ‘sectors’ (default)
-v print program version
-C specify the number of cylinders
-H specify the number of heads
-S specify the number of sectors per track
supper explained
upon reloading the configuration by starting tgd service is shows as failed.
need your help
TIA
@Fahad Hasni,
Suspect there is some configuration error, Could you please provide us /var/log/messages while you try to start the service it will help us to know what’s wrong.
Thanks & Regards,
Bobin Lonston
Bobin,
Thanks for your reply. the issue is fixed now :)
Keep up the good work (Y)
This article is awsm…….
Hello, I am a big fan of tecmint. As usual, very good article.. It explanation is like awesome. Keep rocking.
@ Abhi Thanks for your valuable feedback
I have followed all steps which gave above and created a lun of 500 MB and shared to 2 nodes and now that disk got full and just increased size to 1gb of the logical volume which i used in iscsi target….but on client side on that 2 nodes disk size is showing me only 500mb which it should show me 1gb
@Kishore how you have extended the size ? using -l (small l ) or L ? Some mb will be took for metadata, except that you will get around 800 to 9xx mbs. May be i think you have used -L +1GB instead of using -l xxx extend values.
everything look good, but i don’t know, what about a let’s said 10TB, fdisk can’t format a 10TB, pared can, so what can i do about making volume in the 10TB volume created by parted?
thanks so much.
i’m a new to linux.
You can do the same steps for creating a LUN even using parted for partitioning the large disks. fdisk will support upto 2 TB if we need more than 2TB only way to partition is by using parted.
Thanks for the reply, i mistype parted, ok let say i already make the partition using parted let’s say, /dev/sdb1, what’s next?
Thanks in advance.
or may i email you and you can make some money in the process? :)
All 3 articles are great.If i configure Veritas cluster with two Cent os node. I wish to use this Iscsi storage server (your tutorial)instead of openfiler So can i go for it. As openfiler has gui and few others features. but your one is really nice.What changes I will need to make in my configuration ?With Veritas volume manager too ?
Thank you.
I have not worked with symantec veritas, But instead of using open-filer you can use this setup. open-filer have limitations i think
backing-store /dev/vg_iscsi/lv_iscsi-3
”
can u Pls share the last part configuration link
is there a way to make them scsi-3 persistent reservations? when i try to point my ms cluster to this shared storage it fails the validation test.
@George Please verify once again in the following file /etc/tgt/targets.conf for logical volumes what you have defined.
backing-store /dev/vg_iscsi/lv_iscsi
backing-store /dev/vg_iscsi/lv_iscsi-1
backing-store /dev/vg_iscsi/lv_iscsi-2
backing-store /dev/vg_iscsi/lv_iscsi-3
Hi, I was following the steps mentioned above but ran into problem when I tried tgtd reload:
Updating SCSI target daemon configuration: [FAILED]
Dear,
Yet now i have not tried in 7, Nothing much changes will be in 7, client package was same as 6, no idea about Target package, will update soon with centos 7. Thanks for you Valuable comment.
Hi,
woho woho !!! ,got second part and its awesome. I tried at my end successfully. You compelled me to put comments…………
Thanks Medhansh, Keep on watching Updates for part III
Excellent, thank you very much, this works on Centos 7? Greetings.
Why not, This setup will work with RHEL, Centos, Oracle Linux go head to setup your environment.