Virtual Hosting is a concept where multiple websites or domains are hosted on a single server, which is done to reduce resource overhead and running costs of a business or organization.
Apache web server simplifies hosting multiple sites by allowing system administrators to easily configure virtual hosts for each website. Virtual hosting can either be IP-based or name-based.
In this tutorial, we explore how to set up virtual hosting in RHEL-based distributions such as Fedora, CentOS Stream, Rocky Linux, and Alma Linux using both IP-based and name-based virtual hosts in Linux.

The concepts of Shared Web Hosting and Reseller Web Hosting are based primarily on this feature of Apache.
Table of Contents
Types of Apache Virtual Hosting in Linux
There are two types of Virtual Hosting is available with Apache.
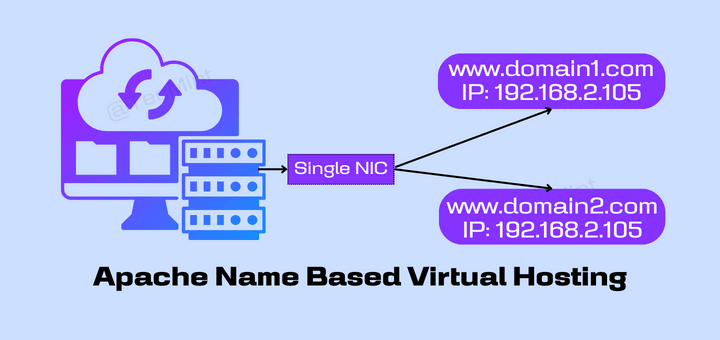
Name Based Virtual Hosting
In this type of hosting, several domains or websites can be hosted on a single server using just a single IP address. Simply put, all domains will share a single IP address. This is the easiest virtual hosting type to configure since all you need to do is map the domain names to the IP address and then configure Apache virtual hosts for each of the domain names.
IP Based Virtual Hosting
IP-based virtual hosting is where each domain is assigned a unique IP address. These IP addresses can be attached to the server using multiple NIC cards or a single NIC card.

Testing Environment
- OS – Fedora 34
- Application – Apache Web Server
- IP Address – 192.168.2.105
- IP Address – 192.168.2.106
- Domain – www.mydomain1.com
- Domain – www.mydomain2.com
How to Setup IP Based and Name-Based Apache Virtual Hosts
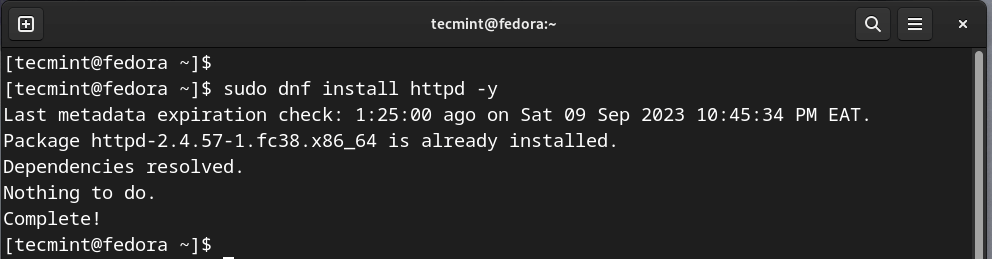
Before you get started, ensure that the Apache web server is installed on your system using the dnf command as shown.
$ sudo dnf install httpd -y
Setup Name-Based Virtual Hosting
The first step in setting up name-based virtual hosting is to set up domain name resolution in the /etc/hosts file. Therefore, run the following commands as root user to add the domain name entries pointing to the host’s IP address.
$ echo '192.168.2.105 www.mydomain1.com' >> /etc/hosts
$ echo '192.168.2.105 www.mydomain2.com' >> /etc/hosts
The next step is to create a directory that will contain the website files. Therefore, we will create two directories for the virtual hosts in the Document Root which is the /var/www/html folder in the Apache configuration.
$ sudo mkdir /var/www/html/mydomain1.com/
$ sudo mkdir /var/www/html/mydomain2.com/
The next step is to modify the virtual host file which will instruct Apache the IP to listen on for incoming Apache web server requests for all the domain names. Therefore, open the Apache configuration file using your preferred text editor.
$ sudo vim /etc/httpd/conf/httpd.conf
Add the following code blocks for the two virtual hosts.
<VirtualHost 192.168.2.105:80>
   ServerName mydomain1.com
   ServerAlias www.mydomain1.com
   DocumentRoot /var/www/html/mydomain1.com/
ErrorLog logs/www.mydomain1.com-error_log
CustomLog logs/www.mydomain1.com-access_log common
</VirtualHost>


<VirtualHost 192.168.2.105:80>
    ServerName mydomain2.com
    ServerAlias www.mydomain2.com
    DocumentRoot /var/www/html/mydomain2.com
ErrorLog logs/www.mydomain2.com-error_log
CustomLog logs/www.mydomain2.com-access_log common
</VirtualHost>
Save the changes and exit. Next, check if the syntax is okay and that there are no errors.
$ httpd -t
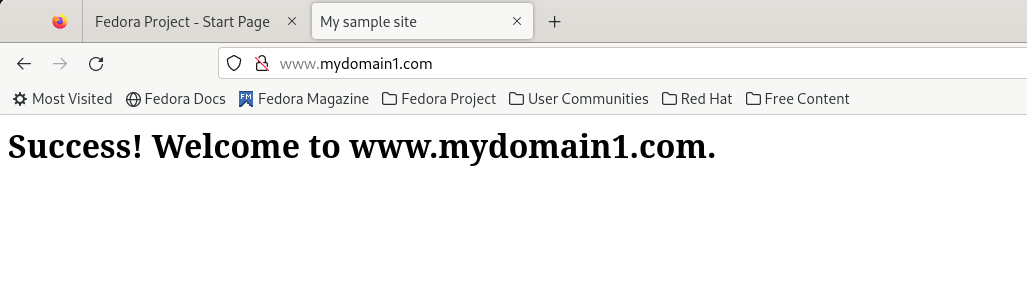
Next, we will create HTML test pages for each of the domains and add some content as a way of confirming if everything is working properly from the browser.
For mydomain1.com
Create an index.html file under the mydomain1.com directory.
$ sudo vim /var/www/html/mydomain1.com/index.html
Paste the following lines.
<html>
  <head>
    <title>My sample site</title>
  </head>
  <body>
    <h1>Success! Welcome to mydomain1.com.</h1>
  </body>
</html>
Save the changes and exit the file.
For mydomain2.com
Create an index.html file under mydomain2.com directory.
$ sudo vim /var/www/html/mydomain2.com/index.html
Paste the following lines.
<html>
<head>
<title>My sample site</title>
</head>
<body>
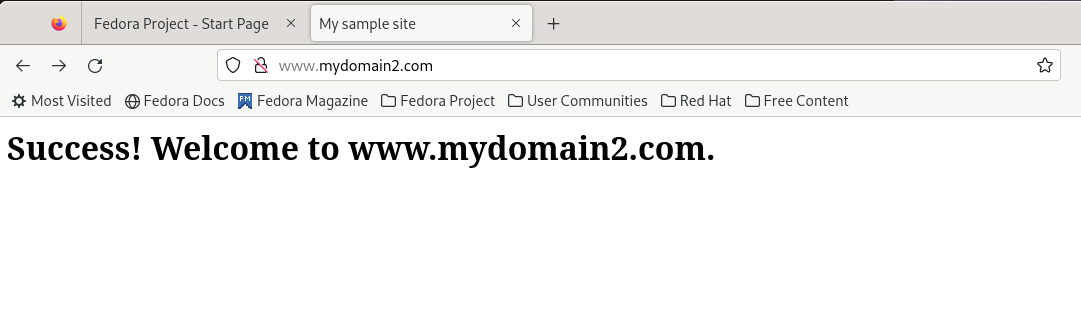
<h1>Success! Welcome to mydomain2.com.</h1>
</body>
</html>
Save the changes and exit the file.
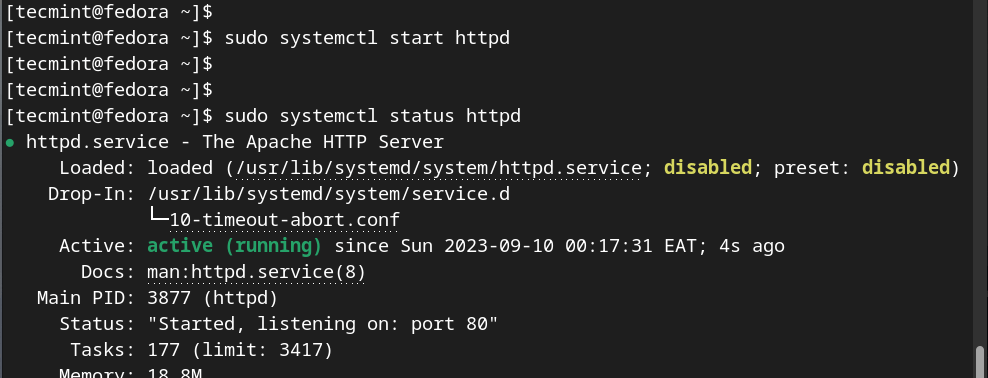
Now start the Apache web server and confirm that it is running.
$ sudo systemctl start httpd
$ sudo systemctl status httpd
If you have a firewall enabled, allow the HTTP and HTTPS ( when necessary) traffic.
$ sudo firewall-cmd --add-service=http --zone=public --permanent
$ sudo firewall-cmd --add-service=https --zone=public --permanent
$ sudo firewall-cmd --reload
Now test the domains from a browser.
Setup IP Based Virtual Hosting Linux
IP-based virtual hosting, as the name suggests, involves multiple IP addresses assigned to your Linux server. In most cases, two or more NIC cards are attached to your system to provide multiple IP addresses.
The goal of IP-based virtual hosting is to assign each domain to a unique IP address that will not be used by any other domain.
This is ideal for situations when you have websites encrypted with an SSL certificate (mod_ssl) or running on different ports. In our setup, we have two NIC adapters.
To view the IP configuration on your system, run the ifconfig or ip a command.
$ ifconfig
OR
$ ip addr
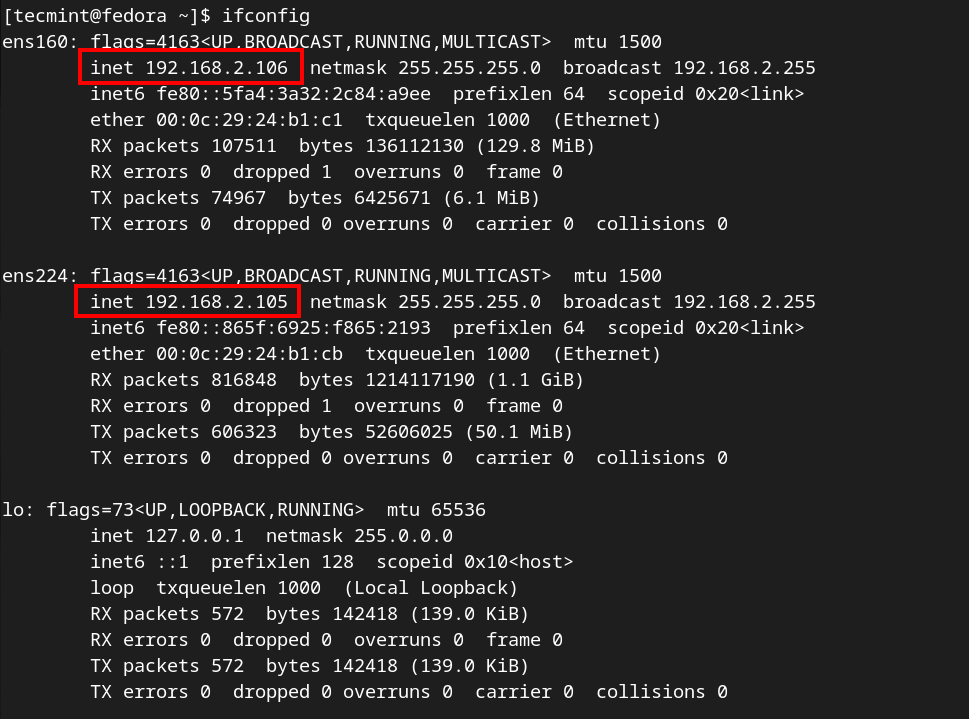
Our server has two IP addresses, each assigned to one NIC. The IP 192.168.2.106 is assigned to ens160 and 192.168.2.105 is assigned to ens224.
Once again, let’s configure the httpd.conf file.
$ sudo vim /etc/httpd/conf/httpd.conf
Create virtual hosts for both domains as shown. Be sure that each IP address is assigned to its respective virtual host configuration.
<VirtualHost 192.168.2.105:80>
   ServerName mydomain1.com
   ServerAlias www.mydomain1.com
   DocumentRoot /var/www/html/mydomain1.com/
ErrorLog logs/www.mydomain1.com-error_log
CustomLog logs/www.mydomain1.com-access_log common
</VirtualHost>


<VirtualHost 192.168.2.106:80>
    ServerName mydomain2.com
    ServerAlias www.mydomain2.com
    DocumentRoot /var/www/html/mydomain2.com
ErrorLog logs/www.mydomain2.com-error_log
CustomLog logs/www.mydomain2.com-access_log common
</VirtualHost>
Save and exit the configuration file. Next, modify the /etc/hosts file as shown.
$ echo '192.168.2.105 www.mydomain1.com' >> /etc/hosts
$ echo '192.168.2.106 www.mydomain2.com'>> /etc/hosts
Confirm the entries:
$ cat /etc/hosts

192.168.2.105 www.mydomain1.com
192.168.2.106 www.mydomain2.com
Next, restart the Apache webserver for the changes to come into effect.
$ sudo systemctl restart httpd
Finally, test your IP-based Virtual hosting setup by accessing the URLs as shown.
http://192.168.2.105
http://192.168.2.106
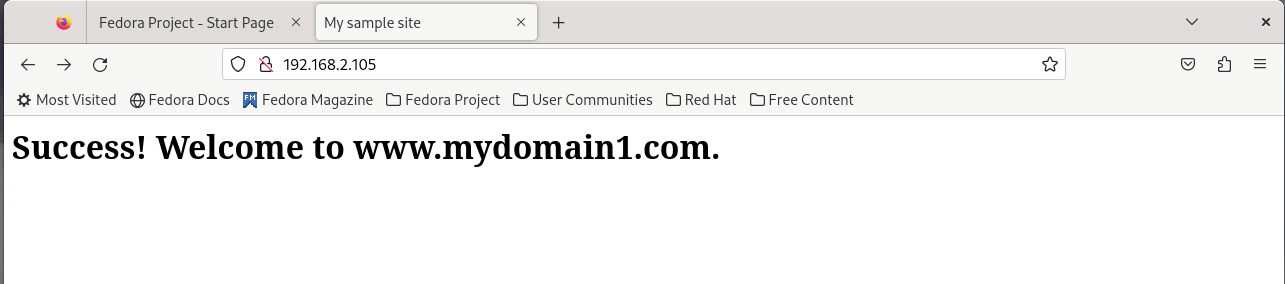
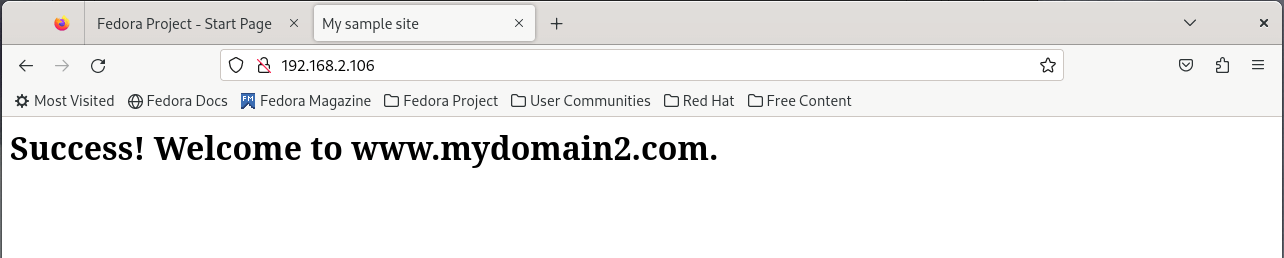
This test confirms that the IP-based virtual hosting is working just as expected!
Conclusion
And that’s it for this lecture. We hope that you can seamlessly configure both types of virtual hosting without much of a problem. Your feedback on this guide is much appreciated.


I have DNS Server configured, so where to put DNS entry in this scenario?
What you mentioned in this article about virtual hosting, is it the best practice to apply it in the production?? if not can you give us use case or real experience ?
Regards,
In the IP-based example of lines for the .conf file, there is a missing less-than character at the start of the first line
@Dennis,
Thanks a ton for pointing out, corrected in the article..:)
I am not getting the line NameVirtualHost in vi /etc/httpd/conf/httpd.conf file.
@Rajendra,
You will find NameVirtualHost line at the bottom of the httpd.conf file.
there is no httpd.conf and no httpd to install as
PRETTY_NAME=”Debian GNU/Linux 9 (stretch)”
NAME=”Debian GNU/Linux”
VERSION_ID=”9″
VERSION=”9 (stretch)”
ID=debian
HOME_URL=”https://www.debian.org/”
SUPPORT_URL=”https://www.debian.org/support”
BUG_REPORT_URL=”https://bugs.debian.org/”
when try to install it
sudo apt install httpd
Reading package lists… Done
Building dependency tree
Reading state information… Done
Package httpd is a virtual package provided by:
apache2 2.4.25-3+deb9u2
yaws 2.0.4+dfsg-1
webfs 1.21+ds1-12
tntnet 2.2.1-3+b1
ocsigenserver 2.7-1+b4
nginx-light 1.10.3-1+deb9u1
nginx-full 1.10.3-1+deb9u1
nginx-extras 1.10.3-1+deb9u1
mini-httpd 1.23-1.2
micro-httpd 20051212-15.1
lighttpd 1.4.45-1
ebhttpd 1:1.0.dfsg.1-4.3+b2
aolserver4-daemon 4.5.1-18.1
aolserver4-core 4.5.1-18.1
You should explicitly select one to install.
E: Package ‘httpd’ has no installation candidate
Isn’t it better to use /var/www/domain.tld/public_html instead of /var/www/html/domain.tld/public_html because 000-default.conf points to /var/www/html and if enabled you can jump to other sites document if you know the folder name.
Hi, thanks for the material but thing is I followed the steps what you provided for name-based web server but I am not able to get the output can you please provide the full clear material to my mail [email protected]
@Mallikarjuna,
What output you getting and where? could you share here so that we can provide more better solution on Apache named-based setup.
Purpose of implementing IP based virtual hosting is to assign implementing for each domain and that particular IP will not be used by any other domain. *didn’t understand*
I have tried your steps, but not able to see the output. config files are correct, services are running, selinux is disabled, still no success.
Please let me know the step to get output. my workaround.
Example1.com output
Example1.com Output
@Arun,
May I know what output you getting while accessing these domains via web browser? Also could you share your VirtualHost configuration for these domains in httpd.conf file?
Hello,
I have one domain, do I need to add my IP address of server to their control panel (for their DNS ) ?
Do I need to install DNS server or apache is enough ?
Thank you
Norbert
@Norbert,
Just point the domain to IP address of the server in your Hosting DNS control panel, no need to install DNS server, onl Apache is enough to run your website..
i want to redirect my website from http to https. i changed many configuration like .htaccess file and httpd file but i am not getting solution. could help me.
@Arjun,
Create a .htaccess file in root of domain or website that you want to redirect to HTTPS and add the following rules.
RewriteEngine On RewriteCond %{HTTPS} off RewriteRule (.*) https://%{HTTP_HOST}%{REQUEST_URI} [R,L]I have already added this code in .htaccess file in website root but i am not getting solution. i want to know you i am also unable to open website in local network from http with domain name but i able open http with ip domain address.
@Arjun,
Make sure that “AllowOverride All” is set in your httpd.conf file and also make sure you have added DNS ‘A’ record for you domain and point back to the server IP address.
No it shouldn’t be the same hostname.
You don’t have to use the same local FQDN as your vhost FQDN(ServerName). Create an ‘CNAME’ record lets say ‘www2 CNAME http://www.example1.com‘ & put the ServerName www2.example1.com. Thats all. 8-)
hii.. please help me . i want to know what is your FQDN name. if your FQDN is http://www.example1.com then, is your host name is www ???
I expect FQDN can be example1.mycompany.com then domain is mycompany and example1 is host name. FQDN is nothing but host name along with domain name.
Hi ravi/Tarun ,
In our case we are using tomcat Apache reverse proxy server . In our application(peoplesoft ) we create authentication domain as well as cookie doamin.
After Siteminder authentication, reverse proxy tries to handshake with our application , but connection is not established to our app , authentication domain not allowing to connect . Can you please help on this .
Where to add the authentication domain or cookie domain in apache config files.
Hi Tarunika,
Thank you for your tutorial, very helpful but i am still having problem about the local DNS entry for ServerName, http://www.example1.com and example2.com.
when i put http://www.example1.com ….”error can’t connect to server”
i have been looking for a week to find the clue but it seems no luck yet.
could you please help with adding more tutorial to this ?
Thank you in advance.
Bun Hin
@Bunhin
I think issue with your DNS settings..
thanks buddy
Hi,
Nice article , I followed same steps mentioned by you but still unable to connect by any way i mean neither by ip or by vhostname, it onle works for first entry in httpd.conf file, os is CentOS release 6.5 (Final)
plz help..
Hi Ganesh,
Please check your httpd.conf syntax by httpd -t command.
Also check httpd error.log file, if any error is there.
hey Tarunika, Great Post !!!
There is a small correction required.
Listen 192.168.0.100:80 only allow to connect to example1.com and it wouldn’t allow to access example2.com
and for the same you need to put Listen *:80
@Sameer,
Thanks for the correction..udpated the same in the write up..
Hi Tarunika,
can u plz tell me how i can make multiple domain(.net, .org etc) configuration or host multiple website in single server.
Hi Tarunika,
Can you Please upload an article on how to install multiple instances of apache in a single centos machine.
Hi Tarunika, I’m new to Linux. I’ve been working on Windows though for many years. I was practicing Apache hosting but really confused as to how would you host more than one websites on one server which is in local environment i.e. 192.168.1.8. Now we don’t have Internet nor we have DNS server. How would we tweak Hosts file and also what would be entered in httpd.conf “VirtualHost” section. Please reply by email. Thanks
Hi Tarunika,
Nice one …is there any requirement to configure DNS / hosts for resolve the hostname correctly …if yes ..could you please tell me how can we configure it …and which is the best method…
hi Tarunika Shrivastava
it is really really help me. you are a god for me, hh.
but this content have some errors. especially syntax
for example
mkdir /var/www/html/example1.com/
but
ServerAdmin [email protected]
DocumentRoot /var/www/html/example1
ServerName http://www.example1.com
ErrorLog logs/www.example1.com-error_log
CustomLog logs/www.example1.com-access_log common
DocumentRoot example1.
but we make example1.com
please correct errors
Thanks, corrected in write up..
HI Tarunika,
Have configured IP base hosting but unable to access second domain i.e example2.com
It redirecting me to online site.
Hi Tarunika,
Thank you for this wonderfull artical.It helped me alot to understand concepts regarding virtual host and apache web server. Really appriciate for this. Thank you for Tecmint .
Please keep posting such informative articals :-)
Hi Suvarna,
Thanks for your good words, it really means a lot to me… :)
hi Tarunika
i am doubt in ipbased virtual host , im create multple ip adress in my system ,but not display alias ip adress keep command ifconfig,so how it resolv and then conf.
ipbased host in my system……….please rectify me…….
@bijoy prajapati Follow below link
http://computernetworkingnotes.com/network-administrations/web-server.html
host a apachee server on your hostname =”wwwX.example.com”
pc hostname: desktop45.example.com
path /var/www/virtual/index .html
I did all the configuration correctly, plz follow :..
vim /etc/httpd/conf/httpd.conf
Nme VirtualHost: desktop45.example.com
VirtualHost desktop45.example.:80>
ServerAdmin [email protected]
DocumentRoot /var/www/virtual
ServerName wwwX.example.com
ErrorLog logs/wwwX.example.com-error_log
TransferLog logs/www.example1.com-access_log
plz help as soon as possible……
USEFUL ONE..BUT I AM HAVING A DOUBT….WHICH IS HOW MANY VIRTUAL HOSTS CAN BE CREATED IN APACHE WEB SERVER….I THINK IT HAS NO LIMITS….BUT I AM NOT SURE..ANY ONE IF KNOW ABOUT THIS PLEASE REPLY HERE OR CONTACT THRU MY ID [email protected]….
Hi Arun,
Yes, There is no limit, you can add n numbers of Virtual hosts according to your server resources. :)
i have tried out 15
@ satish,
There is no option to list out directory files except “ls” in linux instead of listing files you can use find command to check the corresponding files.
# find / -name “filename”
If you want to count the files use below commands.
1) ls -l | wc -l (To count only current directory file and folders)
2) find -type f | wc -l ( To count file and folders recursively)
2) find -type f | wc -l ( To count file and folders recursively)
Hi Magesh, the above one only count the files not folders.
need small change like this, find -type d | wc -l ( To count folders recursively)
I would like to have a module for authentication squid proxy users using a web login form.
When a users tries to access the internet, first it should redirect to web login form,then after authentication only users should access internet…..!
Can any once suggest me how to do this….!
One really useful apache command to see whether name based or ip based virtual hosting is applied to various IP/port/default combinations is to run:
‘httpd -S’
It also does a syntax check of the config file like -t does.
nice one.
Thanks for it..
Its Really good for understand a newbie, simple language with best example.. keep it up..
Regards
Rahul Patadiya
it really helps us………….thank you very much…………….i would like to ask one question if you please reply me….configuration of qmail server?????????? and one more
if suppose we have directory in that we have 1 million file so we which command we have to used to see list of file……………in that directory?i know that ls is not option……….