A LFCE (Linux Foundation Certified Engineer) is a professional who has the necessary skills to install, manage, and troubleshoot network services in Linux systems, and is in charge of the design, implementation and ongoing maintenance of the system architecture in its entirety.

Introducing The Linux Foundation Certification Program.
In previous posts we discussed how to install Squid + squidGuard and how to configure squid to properly handle or restrict access requests. Please make sure you go over those two tutorials and install both Squid and squidGuard before proceeding as they set the background and the context for what we will cover in this post: integrating squidguard in a working squid environment to implement blacklist rules and content control over the proxy server.
Requirements
- Install Squid and SquidGuard – Part 1
- Configuring Squid Proxy Server with Restricted Access – Part 5
What Can / Cannot I use SquidGuard For?
Though squidGuard will certainly boost and enhance Squid’s features, it is important to highlight what it can and what it cannot do.
squidGuard can be used to:
- limit the allowed web access for some users to a list of accepted/well known web servers and/or URLs only, while denying access to other blacklisted web servers and/or URLs.
- block access to sites (by IP address or domain name) matching a list of regular expressions or words for some users.
- require the use of domain names/prohibit the use of IP address in URLs.
- redirect blocked URLs to error or info pages.
- use distinct access rules based on time of day, day of the week, date etc.
- implement different rules for distinct user groups.
However, neither squidGuard nor Squid can be used to:
- analyze text inside documents and act in result.
- detect or block embedded scripting languages like JavaScript, Python, or VBscript inside HTML code.
BlackLists – The Basics
Blacklists are an essential part of squidGuard. Basically, they are plain text files that will allow you to implement content filters based on specific keywords. There are both freely available and commercial blacklists, and you can find the download links in the squidguard blacklists project’s website.
In this tutorial I will show you how to integrate the blacklists provided by Shalla Secure Services to your squidGuard installation. These blacklists are free for personal / non-commercial use and are updated on a daily basis. They include, as of today, over 1,700,000 entries.
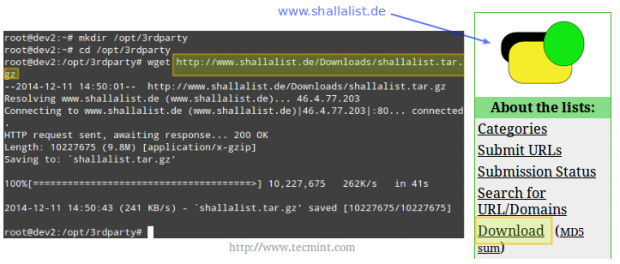
For our convenience, let’s create a directory to download the blacklist package.
# mkdir /opt/3rdparty
# cd /opt/3rdparty
# wget http://www.shallalist.de/Downloads/shallalist.tar.gz
The latest download link is always available as highlighted below.
After untarring the newly downloaded file, we will browse to the blacklist (BL) folder.
# tar xzf shallalist.tar.gz
# cd BL
# ls
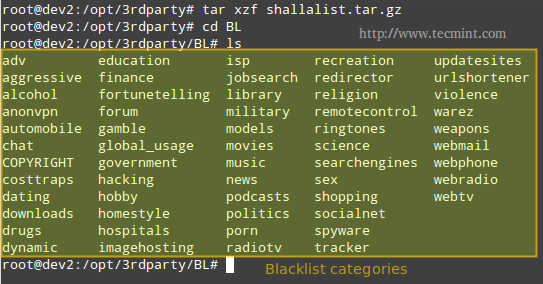
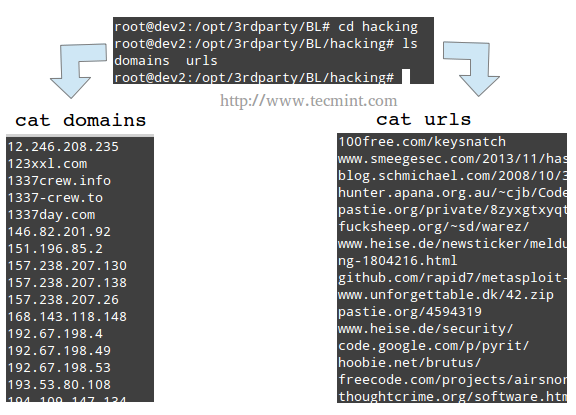
You can think of the directories shown in the output of ls as backlist categories, and their corresponding (optional) subdirectories as subcategories, descending all the way down to specific URLs and domains, which are listed in the files urls and domains, respectively. Refer to the below image for further details.
Installing Blacklists
Installation of the whole blacklist package, or of individual categories, is performed by copying the BL directory, or one of its subdirectories, respectively, to the /var/lib/squidguard/db directory.
Of course you could have downloaded the blacklist tarball to this directory in the first place, but the approach explained earlier gives you more control over what categories should be blocked (or not) at a specific time.
Next, I will show you how to install the anonvpn, hacking, and chat blacklists and how to configure squidGuard to use them.
Step 1: Copy recursively the anonvpn, hacking, and chat directories from /opt/3rdparty/BL to /var/lib/squidguard/db.
# cp -a /opt/3rdparty/BL/anonvpn /var/lib/squidguard/db
# cp -a /opt/3rdparty/BL/hacking /var/lib/squidguard/db
# cp -a /opt/3rdparty/BL/chat /var/lib/squidguard/db
Step 2: Use the domains and urls files to create squidguard’s database files. Please note that the following command will work for creating .db files for all the installed blacklists – even when a certain category has 2 or more subcategories.
# squidGuard -C all
Step 3: Change the ownership of the /var/lib/squidguard/db/ directory and its contents to the proxy user so that Squid can read the database files.
# chown -R proxy:proxy /var/lib/squidguard/db/
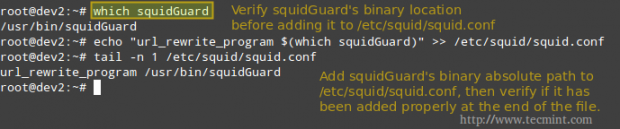
Step 4: Configure Squid to use squidGuard. We will use Squid’s url_rewrite_program directive in /etc/squid/squid.conf to tell Squid to use squidGuard as a URL rewriter / redirector.
Add the following line to squid.conf, making sure that /usr/bin/squidGuard is the right absolute path in your case.
# which squidGuard
# echo "url_rewrite_program $(which squidGuard)" >> /etc/squid/squid.conf
# tail -n 1 /etc/squid/squid.conf
Step 5: Add the necessary directives to squidGuard’s configuration file (located in /etc/squidguard/squidGuard.conf).
Please refer to the screenshot above, after the following code for further clarification.
src localnet {
        ip      192.168.0.0/24
}

dest anonvpn {
        domainlist      anonvpn/domains
        urllist         anonvpn/urls
}
dest hacking {
        domainlist      hacking/domains
        urllist         hacking/urls
}
dest chat {
        domainlist      chat/domains
        urllist         chat/urls
}

acl {
        localnet {
                        pass     !anonvpn !hacking !chat !in-addr all
                        redirect http://www.lds.org
                }
        default {
                        pass     local none
        }
}
Step 6: Restart Squid and test.
# service squid restart 		[sysvinit / Upstart-based systems]
# systemctl restart squid.service 	[systemctl-based systems]
Open a web browser in a client within local network and browse to a site found in any of the blacklist files (domains or urls – we will use http://spin.de/ chat in the following example) and you will be redirected to another URL, www.lds.org in this case.
You can verify that the request was made to the proxy server but was denied (301 http response – Moved permanently) and was redirected to www.lds.org instead.

Removing Restrictions
If for some reason you need to enable a category that has been blocked in the past, remove the corresponding directory from /var/lib/squidguard/db and comment (or delete) the related acl in the squidguard.conf file.
For example, if you want to enable the domains and urls blacklisted by the anonvpn category, you would need to perform the following steps.
# rm -rf /var/lib/squidguard/db/anonvpn
And edit the squidguard.conf file as follows.
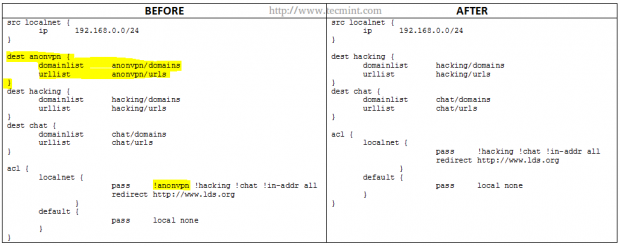
Please note that parts highlighted in yellow under BEFORE have been deleted in AFTER.
Whitelisting Specific Domains and URL’s
On occasions you may want to allow certain URLs or domains, but not an entire blacklisted directory. In that case, you should create a directory named myWhiteLists (or whatever name you choose) and insert the desired URLs and domains under /var/lib/squidguard/db/myWhiteLists in files named urls and domains, respectively.
Then, initialize the new content rules as before,
# squidGuard -C all
and modify the squidguard.conf as follows.
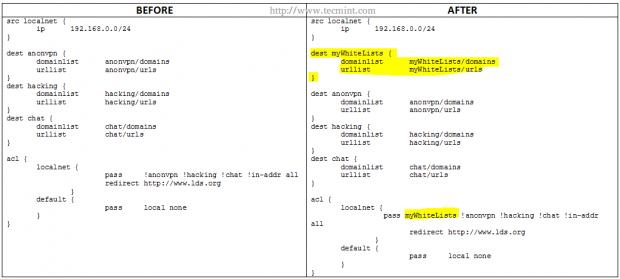
As before, the parts highlighted in yellow indicate the changes that need to be added. Note that the myWhiteLists string needs to be first in the row that starts with pass.
Finally, remember to restart Squid in order to apply changes.
Conclusion
After following the steps outlined in this tutorial you should have a powerful content filter and URL redirector working hand in hand with your Squid proxy. If you experience any issues during your installation / configuration process or have any questions or comments, you may want to refer to squidGuard’s web documentation but always feel free to drop us a line using the form below and we will get back to you as soon as possible.


Hello, when I run the command “squidGuard -C all” nothing happens.
Thank you in advance.
I’m using lastest squid – squidguard on centos 7
Solved. Thank you indeed.
Brother Gabriel, how to block https websites in squid / squidGuard in Ubuntu 16.04? I can only block http websites in squidGuard. Thank you.
It is worth mentioning:
squidGuard is not in the CentOS 7 repositories. A repository called the EPEL needs to be added first. http://fedoraproject.org/wiki/EPEL
Also, on CentOS 7, squidGuard db is located at /var/squidGuard NOT /var/lib/squidguard. (note the capital G)
Following the tutorial results in a segmentation fault when reaching the db creation command. /etc/squid/squidGuard.conf needs to be correctly setup first.
As always, thank you Tecmint team for all your hard work in providing us these guides. You are doing the industry a great service!
@Michael,
Thank you for pointing that out. The thing is, this tutorial (actually, the LFCS and LFCE series) was written with CentOS 6 in mind as that was the version of the distribution that was available to take the exam at the time. However, beginning on Feb. 2016, CentOS will no longer be available to take either exam so before that deadline we will review the topics of these series to make sure they match the required domains and competencies.
Hi
how to set per user bandwidth limit. It may be hourly, daily, weekly or monthly.
Regards,
Hi Gabriel,
I am also facing the same issue. Despite putting the required database in place, the proxy sites starting with https are getting opened.
Also I want to give selected access to my clients – they should be able to open secured sites like search engine like google, mails like yahoo and gmail but not facebook or proxy server sites.
Can you please explain in detail how to accomplish the same ?
Thanking in Advance
We specialize in serving intelligent network administrators high quality blacklists for effective, targeted inline web filtering leveraging Squid proxy. We are the worlds leading and ONLY publisher of blacklists tailored specifically for use with Squid Proxy Native ACL. We also publish the worlds LARGEST adult domain blacklist, as well, as the worlds first blasphemy blacklist. Our works are available in several alternative formats for compatibility with multiple other web filter platforms. There is a demand for a better blacklist. And with few alternatives available, we intend to fill that gap.
Squidblacklist.org Est. 2012. Owned and maintained by Benjamin E. Nichols & Co. It is an extension of the work I have been doing for years applying filters to my own networks with squid proxy and firewalls. Squidblacklist.org is platform whereby I hope to share the amalgamation of these works with the community, in the hopes that it will serve the greater good, helping to secure networks while providing a useful resource for individuals looking for a reasonable level of control of http traffic on their respective networks using a range of filtering solutions.
It would be our pleasure to serve you,
Signed,
Benjamin E. Nichols
http://www.squidblacklist.org
Congratulations one more time! ;)
Gabriel, if you allow me, I would like to add the option “-d” on squidGuard command when it is use to create .db urls/domains files.
Thereby —>> squidGuard -d -C all
Because -d allow we see stdout errors. And it’s easier to debug mistakes on configuration process.
Thanks
Best regards
Another point is to run these commands after Removing Restrictions part.
After we remove the configure on /etc/squidguard/squidguarad we need to run:
squidGuard -d -C all
squid -k reconfigure
And it is good clean web browser cache, too.
In my experience work this way.
@Eduardo,
Thanks for pointing out those two important facts. It is much appreciated. You have enriched this tutorial, so thank you again!
Hi Gabriel,
First I’d like to thank you fou the great tutorials. You also helped a lot in Summarizing the LFCS contents. I’m studding for LFCE and I jus what to be sure that SquidGuard is part of the requirements has I can’s find it in the Overview of Domains and Competencies at the Linux Foundation website. Thans a lot.
Martim
@Martim,
You are correct. The LFCE certification does not explicitly cover squidGuard but we decided to include that topic in this series just in case, and since it has direct application and integrates seamlessly with squid.
Hi Gabriel,
Thanks a lot for the quick reply. Keep the good work.
@Gabriel,
I have already checked with squid it by pass HTTPs traffic, then I blocked HTTPs traffic with iptables. please let me know if It is possible with squid.
@Shahid,
Make sure you follow the steps outlined in this article and you should be able to block https traffic as well. You may not be shown the Squid access denied page, but the proxy will refuse to serve the content. If not, please get back to me using this same comment form and we’ll work it out together.
Hi Gabriel,
How we can block HTTPs traffic i-e facebook,youtube etc with squid.
Regards,
Muhammad Shahid