In this Part 5 of Ansible Series, we will explain how to create Ansible Plays and Playbooks using Ansible modules.
Ansible ships with standalone scripts called modules that are used in playbooks for the execution of specialized tasks on remote nodes.
Modules come in handy for automating tasks such as package management, archiving and copying files to mention just a few. They allow you to make tweaks on configuration files and manage devices such as routers, switches, load balancers, firewalls and a host of other devices.
The objective of this subtopic is to give you an overview of various tasks that can be accomplished by Ansible modules:
Package Management in Linux
Package management is one of the most essential and frequent tasks carried by systems administrators. Ansible ships with modules that help you execute package management tasks both in RedHat and Debian based systems.
They are relatively easy to guess. There is the apt module for APT package management for Debian based, the old yum module for YUM package management and dnf module associated with newer RHEL distributions.
Below are a few examples of how the modules can be used in a playbook:
Example 1: Installing the Apache Webserver on RHEL 8
---
- name: install Apache webserver
  hosts: webservers

  tasks:
       - name: install httpd
         dnf:
          name: httpd
          State: latest
Example 2: Installing the Apache Webserver on Debian 10
---
- name: install Apache webserver
  hosts: databases

  tasks:
       - name: install Apache webserver
         apt:
          name: apache2
          State: latest
Service Module
The service module allows system administrators to start, stop, update, upgrade and reload services on the system.
Example 1: Starting Apache Webserver
---
- name: Start service httpd, if not started
  service:
    name: httpd
    state: started
Example 2: Stopping Apache Webserver
---
- name: Stop service httpd
  service:
    name: httpd
    state: stopped
Example 3: Restarting a Network Interface enp2s0
---
- name: Restart network service for interface eth0
  service:
    name: network
    state: restarted
    args: enp2s0
Copy Module
As the name suggests, copy module copies files from one location on the remote machine to a different location on the same machine.
Example 1: Copying Files from Local to Remote Linux
---
- name: Copy file with owner and permissions
  copy:
    src: /etc/files/tecmint.conf
    dest: /srv/tecmint.conf
    owner: tecmint
    group: tecmint
    mode: '0644'
The playbook copies the config file tecmint.conf from /etc/files/ directory to /srv/ directory as tecmint user with 0644 permissions.
Permissions can also be represented using symbolic representation as shown in the last line.
Example 2: Copying Files from Local to Remote Linux
---
- name: Copy file with owner and permissions
  copy:
    src: /etc/files/tecmint.conf
    dest: /srv/tecmint.conf
    owner: tecmint
    group: tecmint
    mode: u=rw, g=r, o=r
The permissions in the previous example can be represented as shown in the last line, The user is assigned read and write permissions, the group is assigned write permissions, and the rest of the world is assigned read permissions.
File Module
The file module is used to carry many file operations including creating files & directories, assigning file permissions, and setting symlinks.
Example 1: Perform Linux File Permissions
---
- name: Change file ownership, group, and permissions
  file:
    path: /etc/tecmint.conf
    owner: tecmint
    group: tecmint
    mode: '0644'
The above play creates a file called tecmint.conf in the /etc directory setting permissions to 0644.
Example 2: Delete Linux File
---
- name: Remove file (delete file)
  file:
    path: /etc/tecmint.conf
    state: absent
This removes or deletes the file tecmint.conf.
Example 3: Create a Directory
---
- name: create a directory if it doesn’t exist
  file:
    path: /etc/mydirectory
    State: directory
    mode: '0777'
This will create a directory in the /etc directory setting permissions to 0777.
Example 4: Recursiverly Delete a Directory
---
- name: Recursively deleting a  directory
  file:
    path: /etc/tecmint.conf
    state: absent
The above play recursively deletes a directory.
Lineinfile Module
The lineinfile module is helpful when you want to change a single line in a file. It can replace an existing line.
Example 1: Manipulate Files in Linux
---
 - name: Ensure SELinux is set to enforcing mode
  lineinfile:
    path: /etc/selinux/config
    regexp: '^SELINUX='
    line: SELINUX=disabled
The play above sets SELINUX value to disabled.
SELINUX=disabled
Example 2: Alter Files in Linux
---
- name: Add a line to a file if the file does not exist, without         passing regexp
  lineinfile:
    path: /etc/hosts
    line: 10.200.50.51 tecmint.com
    create: yes
This adds the entry 10.200.50.51 tecmint.com to the /etc/hosts file.
Archive Module
An Archive module is used for the creation of a compressed archive of a single or multiple files. It assumes the compression source exists is present on the target destination. After archival, the source file can later be deleted or removed using the statement remove=True.
Example 1: Create a Archive File
- name: Compress directory /path/to/tecmint_dir/ into /path/to/tecmint.tgz
  archive:
    path: /path/to/tecmint_dir
    dest: /path/to/tecmint.tgz

This compresses the /path/to/tecmint_dir  directory to /path/to/tecmint.tgz
Example 2: Create a Archive File and Remove
- name: Compress regular file /path/to/tecmint into /path/to/foo.gz and remove it
  archive:
    path: /path/to/tecmint
    dest: /path/to/tecmint.tgz
    remove: yes
In the above play, the source file /path/to/tecmint is deleted after the archival is complete.
Example 3: Create a Archive File
- name: Create a bz2 archive of /path/to/tecmint
  archive:
    path: /path/to/tecmint
    format: bz2
This creates a compressed file in bz2 format from the /path/to/tecmint file.
Git Module
The module manages git checkouts of software repositories.
Example 1: Check Git Repositoires
- git:
    repo: 'https://foosball.example.org/path/to/repo.git'
    dest: /srv/checkout
    version: release-0.22
Command Module
One of the most commonly used modules, the command module takes the command name and later followed by a list of arguments. The command is a passed the same way that you’d type in a Linux shell.
Example 1: Run a Command
- name: Executing a command using the command module
  command: cat helloworld.txt
Example 2: Check Uptime of Remote Linux
---
 - name: Check the remote host uptime
    hosts: servers
    tasks:
      - name: Execute the Uptime command over Command module
        register: uptimeoutput
        command: "uptime"

- debug:
          var: uptimeoutput.stdout_lines
The command module retrieves the uptime of remote servers.
Variables to Retrieve the Results of Running Commands
Usually, Ansible playbooks are used to execute tasks on managed hosts without displaying the output on the command line. There are instances, however, that you may be required to capture the output or results. In this section, we walk you through how you can capture the output of a playbook in a variable and later display it.
An ansible register is used for capturing a task’s output and save it a variable. The variable will thereafter contain the stdout of the task.
For instance, let us assume that you want to check disk usage of managed nodes in respective root directories using the df -Th / command. You are going to use the ‘command’ module to define the command and ‘register’ to save the std output in a variable.
To display the command, you will use the ‘debug’ module alongside the stdout return value.
---

 - hosts: all
   become: yes

   tasks:
     - name: Execute /boot usage on Hosts
       command: 'df -Th /'
       register: df

     - debug: var=df.stdout
Now, let’s run the playbook. In this case, we have named our playbook check_disk_space.yml.
# ansible-playbook check_disk_space.yml
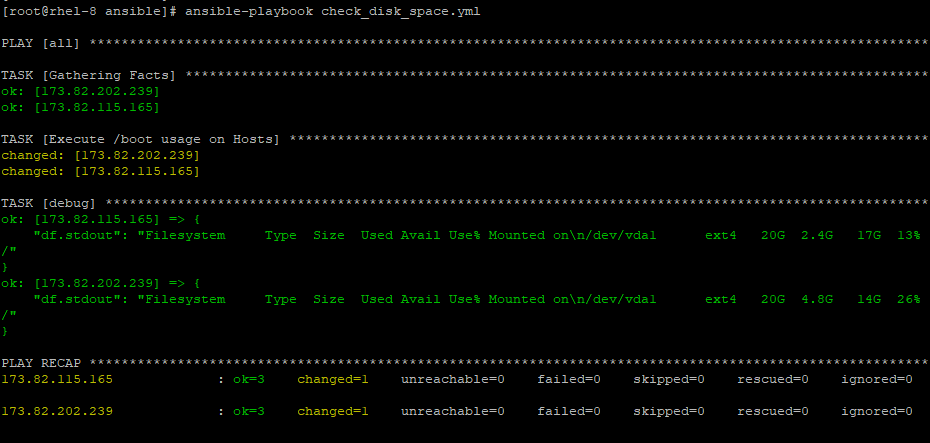
As you have seen, the output is all jumbled up and makes it difficult to follow along.
To align the output and make it easier to read, replace the stdout return value with stdout_lines.
---

 - hosts: all
   become: yes

   tasks:
     - name: Execute /boot usage on Hosts
       command: 'df -Th /'
       register: df

     - debug: var=df.stdout_lines
Use Conditionals to Control Play Execution
Just like in programming languages, conditional statements are used when more than one outcome is possible. Let’s have a look at some of the commonly used conditional statements in Ansible playbooks.
When statement
Sometimes, you may want to perform tasks on specific nodes and not others. The 'when' conditional statement is quite easy to use and implement in a playbook. When using the 'when' clause simply declare the condition adjacent to the clause as shown:
when: condition
When the condition is satisfied, then the task is performed on the remote system.
Let’s check out a few examples:
Example 1: Using When Operator
---
- hosts: all

  tasks:
  - name: Install Nginx on Debian
     apt: name=nginx state=present
     when: ansible_os_family == “Debian”
The play above installs Nginx webserver on hosts running the Debian family of distros.
You can also use the OR and AND operator alongside the when the conditional statement.
Example 2: Using AND Operator with When
---
- hosts: all

  tasks:
  - name: Install Nginx on Debian
     apt: name=nginx state=present
     when: ansible_os_family == “Debian” and
           ansible_distribution_version == “18.04”
When using the AND operator, both statements must be satisfied for the task to be executed.
The play above installs Nginx on Nodes running a Debian family of OS which is version 18.04. Obviously, this will be Ubuntu 18.04.
Example 3: Using OR Operator with When
With OR operator, the task is executed if either of the conditions is fulfilled.
---
- hosts: all

  tasks:
  - name: Install Nginx on Debian
     apt: name=nginx state=present
     when: ansible_os_family == “Debian” or
	      Ansible_os_family == “SUSE”
The play above installs Nginx webservers on either Debian or SUSE family of OS or both of them.
NOTE: Always ensure to use the double equality sign == when testing a condition.
Conditionals in loops
Conditionals can also be used in a loop. Say for instance you have a list of multiple packages that need to be installed on remote nodes.
In the playbook below, we have an array called packages containing a list of packages that need to be installed. These tasks will be carried out one after the other if the required clause is set to True.
---
 - name: Install Software packages
    hosts: all
    vars:
	packages:
    • name: nginx
required: True
    • name: mysql
required: True
    • name: apache
required: False


   tasks:
    • name: Install “{{ item.name }}”on Debian
apt:
 name: “{{ item.name }}”
 state: present
When: item.required == True
loop: “{{ packages }}”
Configure Error Handling
Sometimes, tasks fail when running playbooks. Let’s assume you are running 5 tasks on 3 servers as shown in the playbook below. If an error occurs on task 3 (Starting MySQL) on server 2, Ansible will stop executing the remaining tasks on server 2 and attempt to complete the remaining tasks on the rest of the servers.
---
 - name: Install Software packages
   hosts: server1, server2, server3
   tasks:
- name: Install dependencies
<< some code >>

- name: Install MySQL database
<< some code >>

- name: Start MySQL
<< some code >>

- name: Install Nginx
<< some code >>

- name: Start Nginx
<< some code >>
If you want consistency in the execution of the playbook, for example, stop the execution of a playbook, should one of the servers fail, add the option.
---
 - name: Install Software packages
   hosts: server1, server2, server3
   any_errors_fatal:  true
   tasks:
This way, if one task fails on one server, Ansible will stop the execution of the entire playbook on all the servers and exit.
If you would like the playbook to ignore the errors and proceed to execute the remaining set of tasks, then use the ignore_errors: True option.
---
 - name: Install Software packages
   hosts: server1, server2, server3
   tasks:
- name: Install dependencies
<< some code >>
     ignore_errors: True
Create Playbooks to Configure Systems to a Specified State
In this section, we look at some additional options that are available when running a playbook.
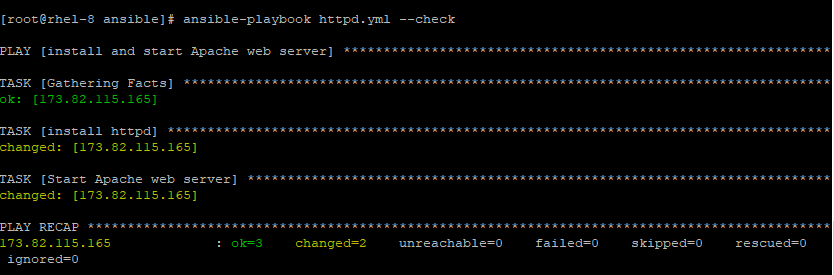
Let’s begin with the Check mode or Dry run option. The dry run or check mode option is used when running a playbook to check if any errors will be encountered and if there are any changes that will be made on the managed hosts. It, however, does not make any changes to the remote nodes.
For example, to dry run a playbook called httpd.yml that installs and starts the Apache webserver run:
# ansible-playbook httpd.yml --check
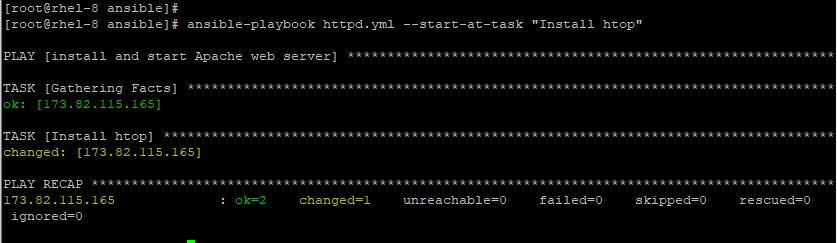
The other option we need to look at is the --start-at-task option. This is used when specifying the name of the task that the playbook should begin or start at.
Let’s take an example: The playbook below spells out 2 tasks: The first play installs Apache web server and the second installs htop utility.
---
 - name: Install httpd

   hosts: all
   tasks:
    yum:
name: httpd
     state: Installed

- name: Install htop

      yum:
      name: htop
      state: started
If you want to skip installing Apache webserver and instead install htop utility run:
# ansible-playbook playbook.yml --start-at-task “Install htop”
Lastly, you can tag your tasks or plays by adding the tags option to your playbook as shown. This comes in handy when you have quite a large playbook and you want to run specific tasks from the entire playbook.
---
 - name: Install httpd
   tags: Install and start
   hosts: all
   tasks:
    yum:
name: httpd
     state: Installed

   tags: Install

    • service:
name: httpd
state: started
# ansible-playbook playbook.yml -tags "Install"
To omit the tags use the --skip-tags options as shown.
# ansible-playbook playbook.yml --skip-tags "Install"
Conclusion
In this topic, we took you through the commonly used modules in Ansible, how to retrieve stdout from the execution of a playbook for analysis, using conditionals in the playbook and how to manage errors that may occur when running tasks. Lastly, we recapped the configuration of playbooks and how you can use additional options to decide which tasks to run if you do not intend to run the entire playbook.


Hello, This code doesn’t seem to work as-is. I thought you might like to know.
Example 2: Check Uptime of Remote Linux
--- - name: Check the remote host uptime hosts: servers tasks: - name: Execute the Uptime command over Command module register: uptimeoutput command: "uptime" - debug: var: uptimeoutput.stdout_linesHey Craig,
The indentation of the debug module should be the same as that of the “- name” parameter. They should appear in the same vertical alignment. Please check on that.