Linux supports the implementation of a software network bridge to reproduce the function of a network bridge, a networking device that interconnects two or more communication networks or network segments providing a way for them to work as a single network. It acts almost like a network switch, and in a software sense, it is used to implement the concept of a “virtual network switch”.
A typical use case of software network bridging is in a virtualization environment to connect virtual machines (VMs) directly to the host server network. This way, the VMs are deployed on the same subnet as the host and can access services such as DHCP and much more.
In this article, you will learn different ways to set up a network bridge in Ubuntu and use it within a virtualization environment to create virtual networking in a bridged mode under VirtualBox and KVM, to connect Virtual Machines to the same network as the host.
On this page:
Installing Network Bridge Utilities in Ubuntu
Begin by installing the bridge-utils package which contains utilities for configuring the Ubuntu ethernet bridge using the apt package manager as shown.
$ apt-get install bridge-utils
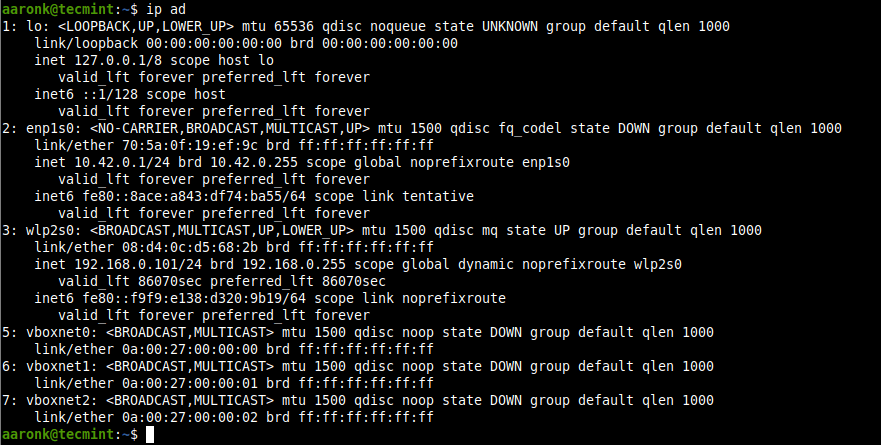
Next, identify the interface name for your ethernet device using the IP command as shown.
$ ip ad
OR
$ ip add
Creating a Network Bridge Using NetPlan in Ubuntu
Netplan is a simple and easy-to-use front-end utility for configuring networking in Linux using the YAML format. It currently supports NetworkManager and systemd-netword as backend tools.
To configure networking for an interface such as a bridge, edit your netplan configuration file found in /etc/netplan/ directory.
The following is an example configuration file, where the renderer is systemd-netword which is the default (replace enp1s0 with your ethernet interface name).
network:
  version: 2
  renderer: networkd
  ethernets:
    enp1s0:
      dhcp4: no
  bridges:
    br0:
      dhcp4: yes
      interfaces:
	     - enp1s0

Save the configuration file and apply the configuration to enable the bridge network by running the following command.
$ sudo netplan apply
Then use the brctl command to show all bridges on the system. In this case, the Ethernet interface is automatically added as a port to the bridge.
$ sudo brctl show

If you want to bring down or deactivate the created network bridge, then delete it using the following commands.
$ sudo ip link set enp1s0 up
$ sudo ip link set br0 down
$ sudo brctl delbr br0
OR
$ sudo nmcli conn up Wired\ connection\ 1
$ sudo nmcli conn down br0
$ sudo nmcli conn del br0
$ sudo nmcli conn del bridge-br0
Creating a Network Bridge Using Nmcli in Ubuntu
nmcli is a widely-used network manager command-line tool to administer NetworkManager (create, show, edit, delete, activate, and deactivate network connections) and displaying network device status.
To create a network bridge using nmcli, run the following command.
$ sudo nmcli conn add type bridge con-name br0 ifname br0

Then add the Ethernet interface as a port in the bridge as shown (remember to replace enp1s0 with your device name).
$ sudo nmcli conn add type ethernet slave-type bridge con-name bridge-br0 ifname enp1s0 master br0

Next, confirm that the bridge has been created by showing all network connections.
$ sudo nmcli conn show --active

Next, activate the bridge connection as follows (you can use either the connection/interface name or the UUID).
$ sudo nmcli conn up br0
OR
$ sudo nmcli conn up e7385b2d-0e93-4a8e-b9a0-5793e5a1fda3

Then deactivate the Ethernet interface or connection.
$ sudo nmcli conn down Ethernet\ connection\ 1
OR
$ sudo nmcli conn down 525284a9-60d9-4396-a1c1-a37914d43eff

Now try to view active connections once more, the Ethernet interface should now be a slave in the bridge connection as shown in the following screenshot.
$ sudo nmcli conn show --active

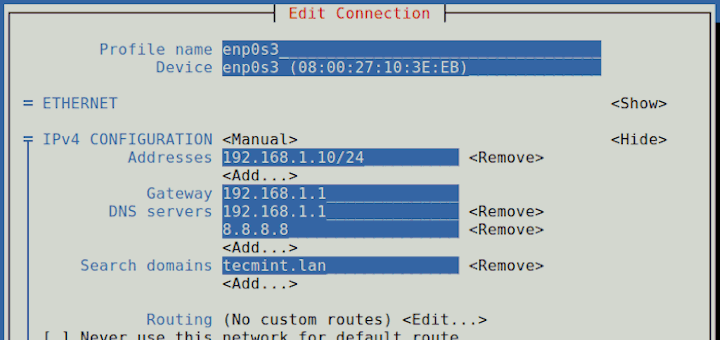
Creating a Network Bridge Using nm-connection-editor Tool
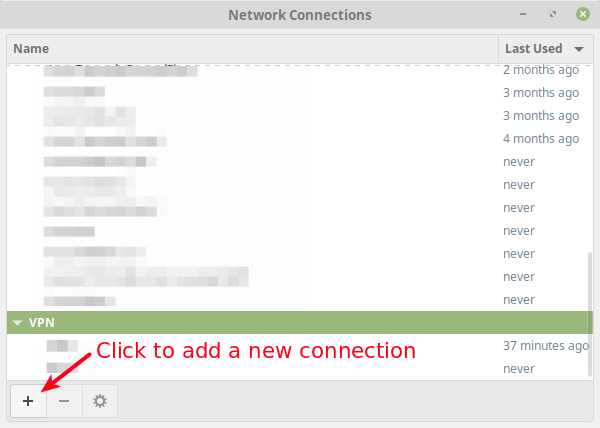
To open the nm-connection-editor application, run the following command from the terminal.
$ nm-connection-editor
From the network connections editor window, click on the + sign to add a new connection profile.
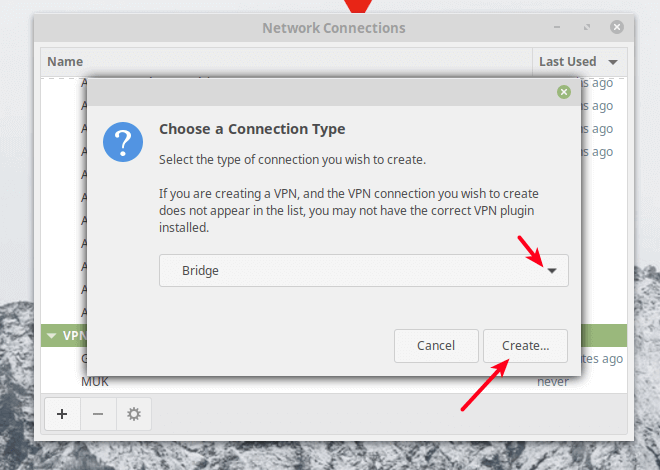
Next, choose the connection type as Bridge from the drop-down and click Create.
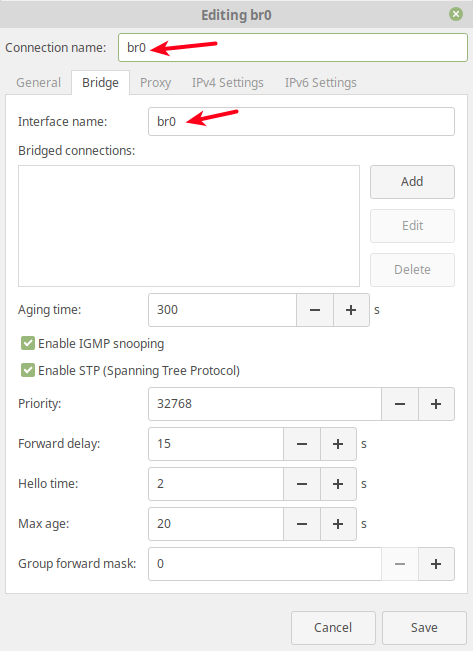
Next, set the bridge connection name and the interface name.
Then click the Add button to add the bridge slave ports i.e the Ethernet interface as shown in the following screenshot. Select Ethernet as the connection type and click Create.
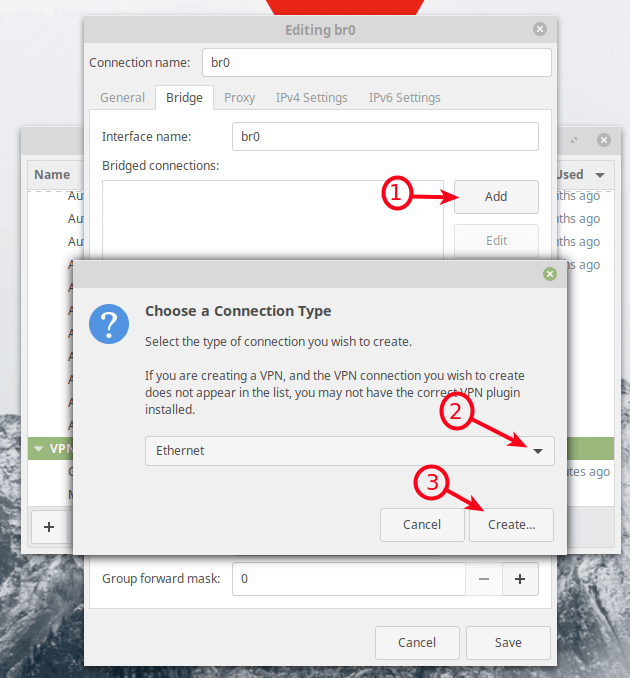
Next, set the connection name according to your preference and click Save.
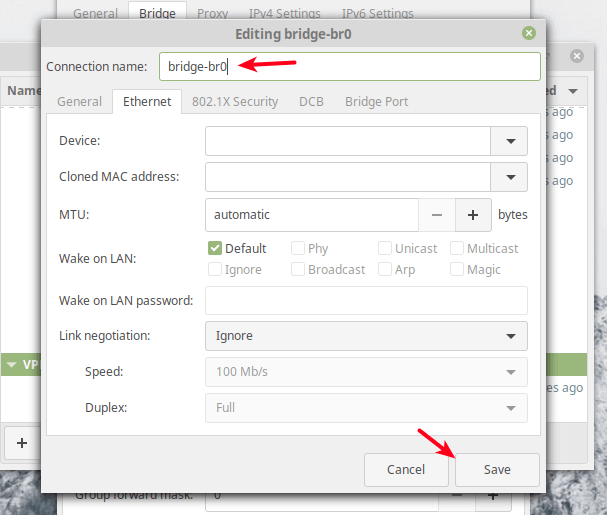
Under bridged connections, the new connection should now appear.

Now if you open the network connection editor once more, the new bridge interface and the slave interface should exist as indicated in the following screenshot.

Next, activate the bridge interface and deactivate the Ethernet interface, using the nmcli command.
$ sudo nmcli conn up br0
$ sudo nmcli conn down Ethernet\ connection\ 1
How to Use a Network Bridge in a Virtualization Software
After setting up a network bridge (virtual network switch), you can use it in a virtualization environment such as Oracle VirtualBox and KVM to connect VMs to the host network.
Using a Network Bridge in Oracle VirtualBox
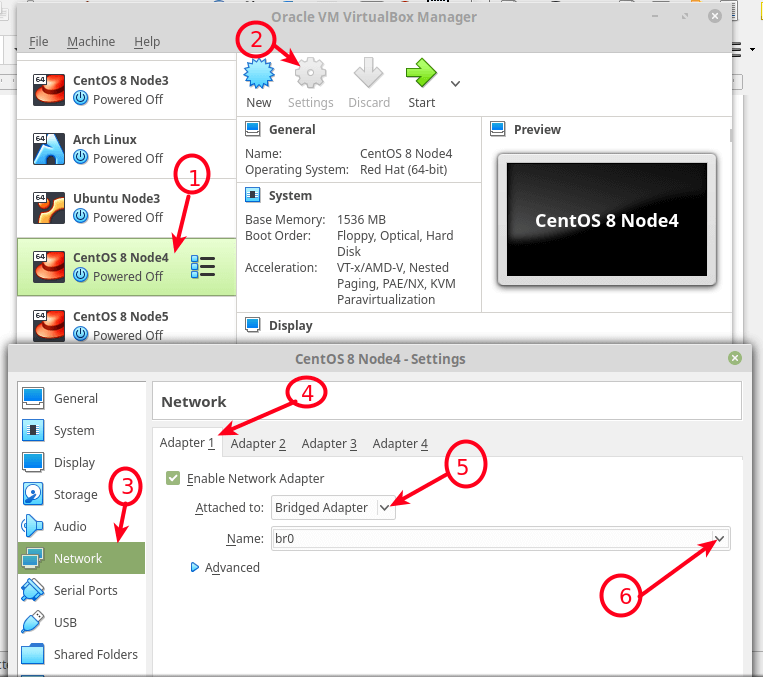
Open VirtualBox, then from the list of VMs, select a VM, then click on its settings. From the settings window, go to the Network option and select an adapter (e.g Adapter 1).
Then check the option Enable Network Adapter, set the value of the attached to the field to Bridged Adapter, then set the Name of the bridged interface (e.g br0) as indicated in the following screenshot. Then click Ok.
Using a Network Bridge in KVM
You can use the new network bridge under KVM by adding the --network=bridge=br0 option while creating a new virtual machine, using the virt-install command.
# virt-install --virt-type=kvm --name Ubuntu18.04 --ram 1536 --vcpus=4 --os-variant=ubuntu18.04 --cdrom=/path/to/install.iso --network=bridge=br0,model=virtio --graphics vnc --disk path=/var/lib/libvirt/images/ubuntu18.04.qcow2,size=20,bus=virtio,format=qcow2
From the web console, it will be select automatically. Besides, you can also configure a network bridge using the virsh command-line tool, and a VM’s XML configuration file.
For more details, read the netplan and nmcli man pages (by running man netplan and man nmcli) as well as virtual networking in libvirt and virtual networking in VirtualBox. You can post any queries to us via the comment section below.
I guess I’ll go somewhere else and look up “Netplan” since this tutorial skipped that part entirely.
@eric,
Thank you for your feedback!
I understand your concern that the tutorial focuses on creating a network bridge, and while Netplan is a key part of network configuration in newer Ubuntu versions, we didn’t gone through into it in this guide.
I tried creating a network bridge in the Ubuntu system, but when I disconnect the original Ethernet connection, it is named ‘Wired connection 1‘ on my system.
I have only ‘br0‘ as an active connection and see no ‘bridge-br0‘ connection. And have no network anymore.
Any ideas on what is going wrong here?
Whenever I try to set up a bridge with NetPlan, I lose access to the Host machine (SSH, etc.).
Can someone help me with this issue?
@Guilherme,
Are you setting up a bridge network in Virtualbox? if yes then you need to enable the promisquous mode in the virtual box network setting.
No, it’s KVM.
To add the interface to the bridge I usually enter:
# nmcli connection add ifname virbrX type bridge con-name virbrX bridge.stp no

# nmcli connection add type bridge-slave ifname enpXsX master virbrX
and in virsh:
$ virsh attach-interface --domain myserver --type bridge --source virbrX --model virtio --config
“nmcli conn down” does not work for me.
The network manager just switches to another profile for the port and the ethernet port is still up. The bridge stays down.
Hi, being able to make the bridge work on quemu has turned into a nightmare. I am using Ubuntu 18.04 server. Guest, windows 10 on which I should install a game server. The VM, therefore, must access the internet and be visible from the internet. I tried to follow a large number of articles but without results. From the guest, I can ping the internet but not vice versa.
Getting help would be very welcome.
Thanks in advance
Thank you so much for this information.
I just hope that I can figure out how to do this.
Every time I try to setup a bridge for my VM my server loses its IP-address.
is there a way to avoid that?
I just installed KVM/emu and virt-manager on the arch. During the creation of a virtual machine, the installer automatically configured my network bridge.
@Bob
Yes, there is a default network bridge under KVM, but it is configured to run in NAT mode if I am not mistaken. This may not allow your VM to be accessible from the LAN.
As iproute2 maintainer, and former maintainer of Linux bridge, thank you for the article.
Bridge utils like ifconfig is a legacy command; and therefore receives no updates.
Please use the new bridge utility which is part of iproute2
@Stephen
Many thanks for the useful information, we are truly grateful.