In an Internet world and the world of Internet we need a Website/Blog for our business and product or to express ourselves. A website today means a brand tomorrow, but starting a blog can be a very difficult thought specially when you are not technically sound.
That’s the reason we have decided to share our ideas through this blog post on how to start a website or blog today.
We super thankful to HostGator, an official WordPress recommended hosting provider, has agreed to offer all our readers a 45% discount on all Hostgator hosting plans. Read on if you’re interested!
Why HostGator Hosting
Hostgator is one of the leading hosting company that provides unlimited web hosting for almost 13+ years (founded in the year 2002), it has hosted more than 8 million domains and it’s known for one of the best web hosting company in the today’s hosting industry. It provides round the clock (24×7) technical support and 99.9% uptime is enough to say the kind of service they are intended in providing.
This award winning hosting company provides you Unlimited Disk Space, Unlimited Bandwidth, single click installation of CMS like WordPress, Drupal, Magento, etc.
Personally, we’ve hosted more than 3 sites on Hostgator at this moment, Here we’re sharing a maximum Hostgator Discount coupon, which will never going to expire and you can take advantage of this huge discount when you buy hosting from hostgator using our coupon code.
Your benefit as a Tecmint Reader : Flat 45% OFF
Note: Remember this offer is valid only for your first bill and will not be valid for subsequent bills.
Why Would You Want to Start a Blog?
One of the best ways to remember a concept is to put in writing everything that you have learned about it. If you are like me, early in the process you will start feeling you don’t know enough. Regardless of it being the case or not, writing and sharing your knowledge certainly makes you feel more confident about a given topic.
We are well aware that our vast audience is mostly composed of system administrators, prospective Linux users, and a small portion of developers. Perhaps you identify yourself with one or more of those groups and would like to start writing about your experiences in your daily job. Or perhaps you are a new user and want to document the things you learn as you go.
Either way, you and others may benefit of your efforts because you will be able to use your write-ups to refresh your memory down the road, or help another person who may have questions.
Here are some extra reasons why you should consider starting your own blog:
- It doesn’t take any previous coding knowledge.
- Search engines (such as Google) love blogs – so you can start reaping the benefits of your efforts (visitors and probably make some money as well) very fast.
- If you are a freelancer or a business owner, starting a blog and update it regularly can help you experience steady growth.
INFORMATION BOX: Before you can get a website up and running, you need to buy a hosting package. You can think of a hosting service as a house where your website will live, whereas the domain name is your home address. While you can, in theory, locate your home using GPS coordinates, it is much easier to do so through an address in a given city, state, and country.
How to Start a Blog
If you Google the above heading, you will find LOTS of resources for starting on your blogging journey. But that will take time – time that we often don’t have or don’t want to dedicate to browse a thousand websites searching for ideas, guidance, and the best prices for buying domain names and hosting.
And that is where we, your friends at Tecmint.com, come in.
We have been blogging for quite a while and would like to share with you what we believe can make all the difference. We highly encourage you to consider using Hostgator for these simple reasons:
- Our readers get a 45% discount on all Hostgator hosting plans.
- Professional 24/7/365 support is included with all hosting plans. Don’t worry if you get stuck setting up your preferred blogging software – you’ll always get the help that you need.
- Tens of ready-to-go, 1-click installs. You do not necessarily need to be an experienced web developer or system administrator to get things up and running. Just point and click, and you are done.
- Free website templates. If you want to set up a website instead of a blog, Hostgator is also perfect for you. You will be able to set up a website without much hassle and start reaping the benefits of an online presence.
- Easy migration from other hosts. If you already have a blog elsewhere and want to migrate to Hostgator, their Migration team is ready to assist.
- 99.9% uptime. The gator and the staff are working hard day and night to make sure your blog is up all the time.
- 45-day money back guarantee. If for some reason you are not satisfied with the service, you can cancel it and get a complete refund within 45 days of your order.
How to Purchase HostGator Hosting Plan
1. First go the Hostgator Hosting page and click on “Get Started” to Choose a Plan.
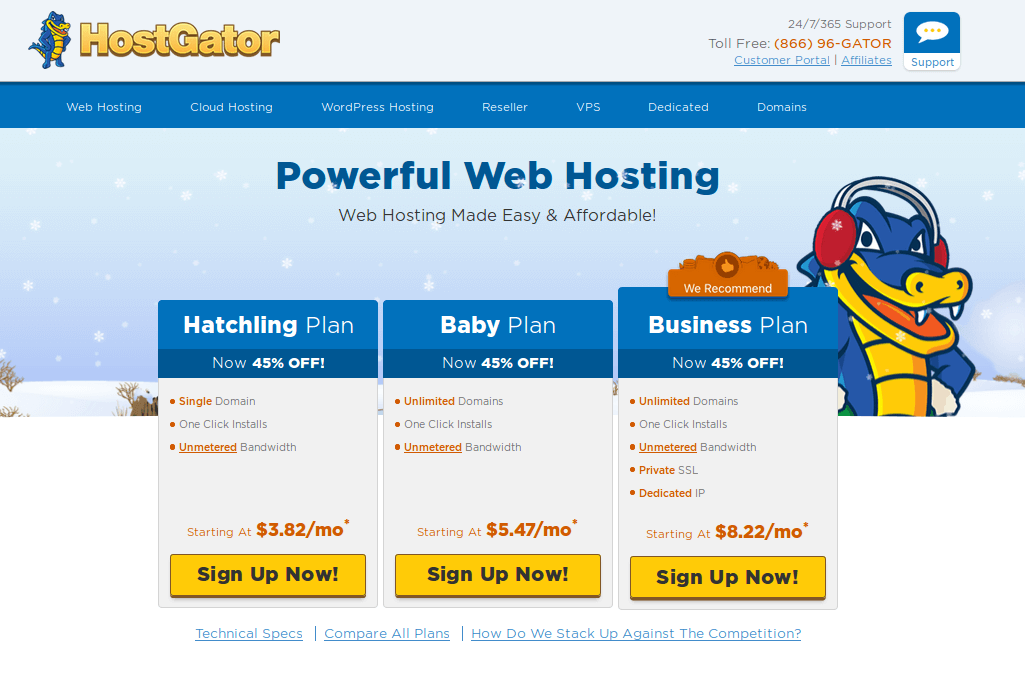
There are three hosting plan listed along with their details and they are:
- Hatchling Plan – Single Domain, Unlimited Space, Bandwidth, Professional Email and Shared SSL certificate.
- Baby Plan – Unlimited Domains, Unlimited Space, Bandwidth, Professional Email and Shared SSL certificate.
- Business Plan – Unlimited Domains, Unlimited Space, Bandwidth, Professional Email, Private SSL, Free IP and a Toll Free number.
Just select the best hosting plan as per your need and click on Sign up Now!. If you have already setup an account with Hostgator previously, you just need to click Sign in.
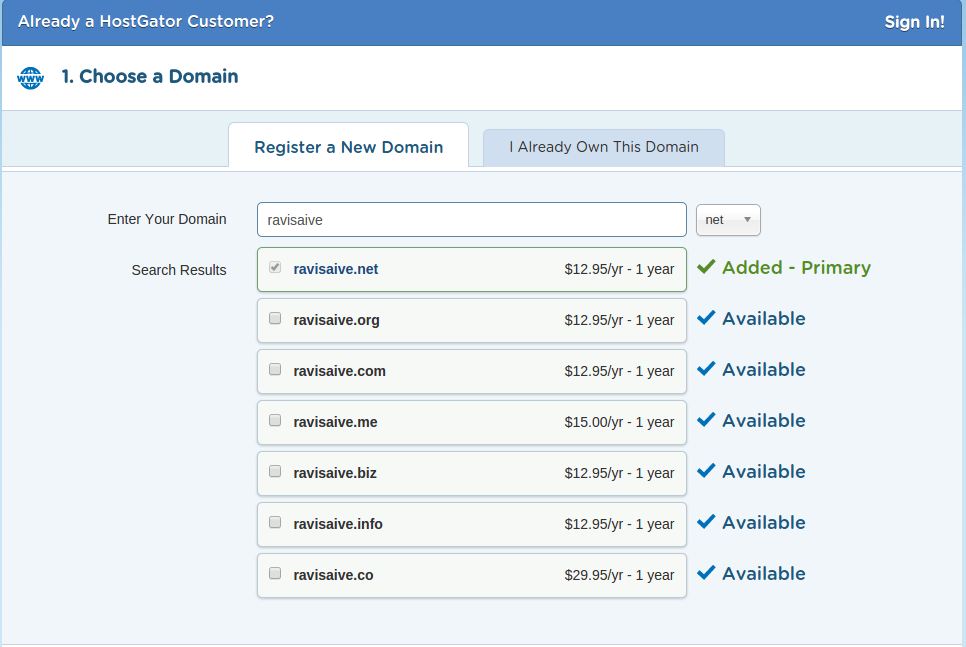
3. Enter a Domain Name to register. If you already own a domain name you may click “Already own this domain”. It will show information if your preferred domain is available or not. It will also show suggestions for your preferred domain.
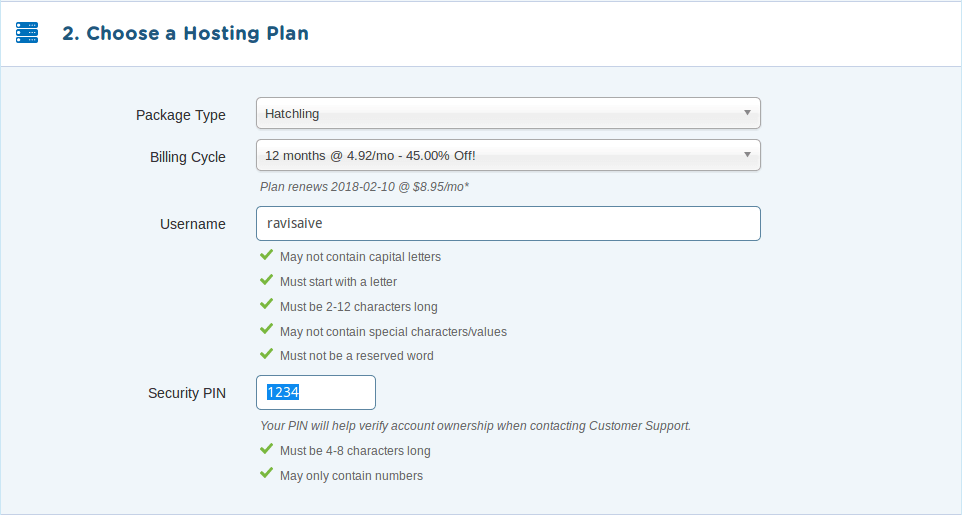
4. Choose a hosting plan. Fill the required information as shown.
- Package Type: Select the type of plan as per your requirement, but as a starting point I suggest you to choose Hatchling plan.
- Billing Cycle: Select your billing cycle for your selected hosting plan. For starting point, select 6 months or 1 year.
- Username: This username is used to login into your Hosting account.
- Security PIN: This security PIN is used to verify your account ownership when contacting customer support.
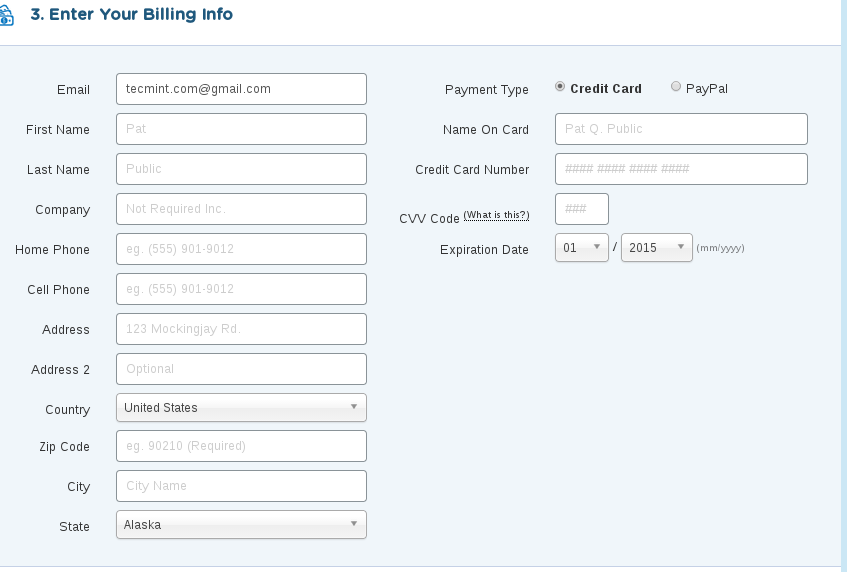
5. Enter you contact details and select the payment option. You may choose credit card or PayPal information.
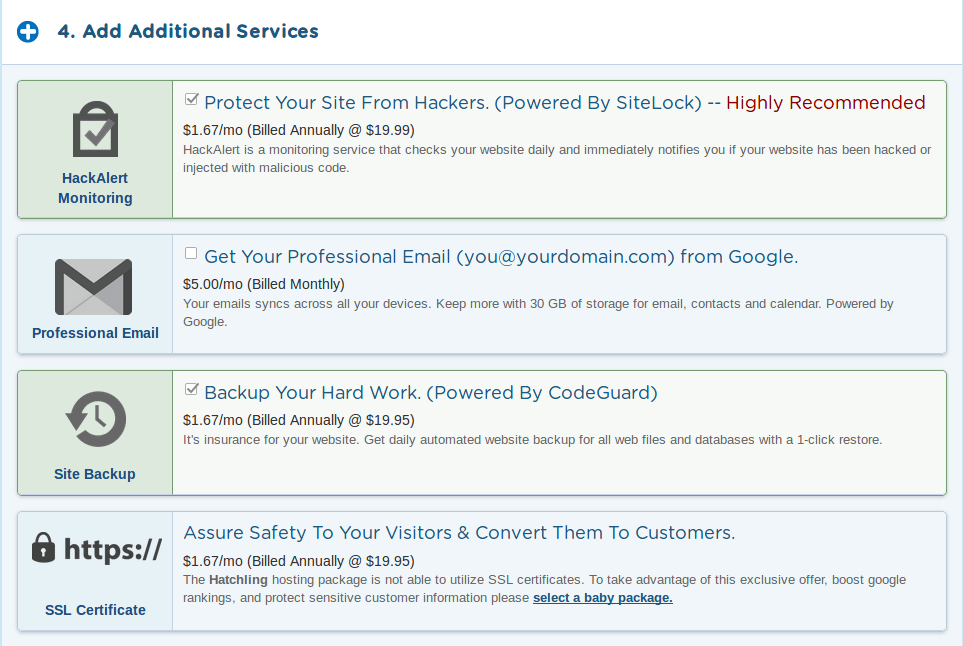
6. In the additional service section, make sure you uncheck everything, most of these paid add-ons are not worth.
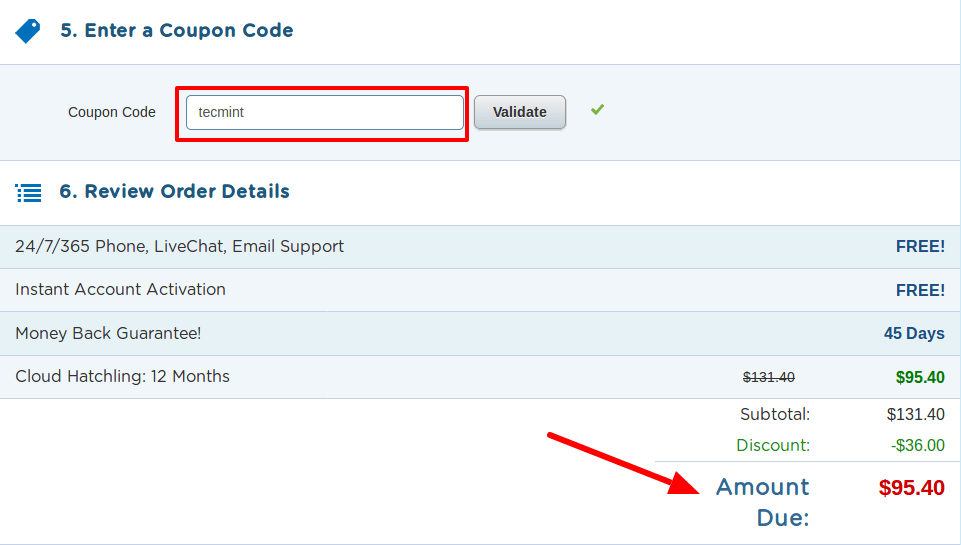
7. In the coupon code field, keep “tecmint” and click on validate. This will give you flat 45% discount on your total order.
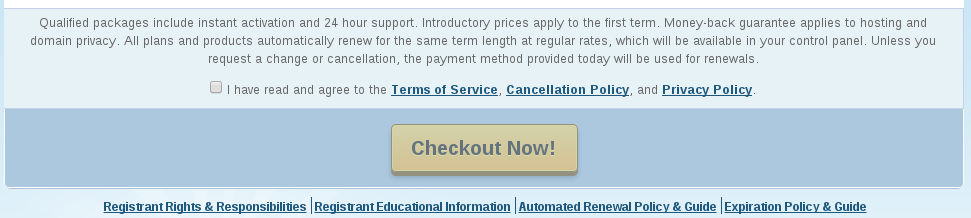
8. The last step is to agree to their services and policies and checkout!
Refund: Remember you will get a money back guarantee of 45 days, if in-case you’re not satisfied with their services or you may try out their services without any risk.
In about a minute you will receive an email with your new hosting account details from Hostgator team.
Bottom line is, once you start using Hostgator you will not look back.
Next, we will proceed to explain how to install WordPress, the well-known blogging and content management system platform on HostGator.
Installing WordPress on HostGator
Before proceeding, make sure that you have registered a domain and that it is properly propagated. If you need help to do that, you can refer to the support portal knowledge base for step by step instructions.
Once you have purchased a hosting plan, follow these steps to install WordPress:
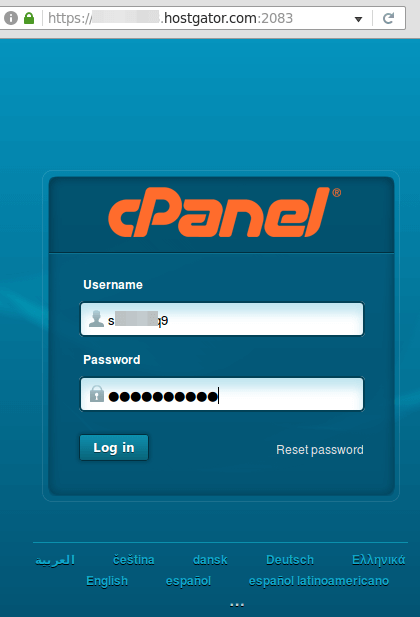
1. Go to the Control Panel URL and enter the login credentials provided by Hostgator. If your first language is not English, you can choose another one by clicking on the appropriate link at the bottom. Then click Log in or press Enter to access your Hostgator control panel.
2. After logging in, go to the Essentials menu under Websites and click on WordPress Installer:

3. Select the domain where you want to install WordPress (linuxsharing.com in this example). If you leave the text box at the right blank, WordPress will be installed at the top level of your website, which is what we will do here.
This means that our website will be available for your visitors at yourdomain.com. If you decide to install it on a different location (perhaps yourdomain.com/myblog), just type myblog inside the text box.
Another option is to install WordPress on a subdomain (which must be created previously very easily from Websites → Domains → Subdomains).
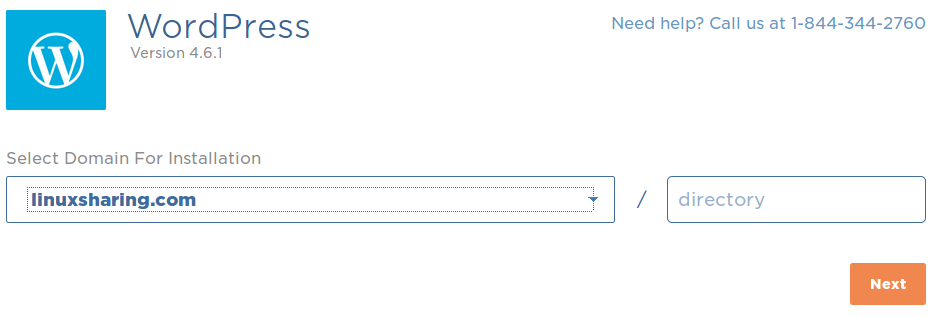
Click Next to continue.
4. Enter information about your blog. Under Blog Title you can choose whatever you wish the title of your blog to be. This will be displayed in the browser window’s title when someone visits your site and in certain parts of your blog as content. The other fields are self-explanatory.

Accept the Terms of Service Agreement and click Install Now to continue. As part of the WordPress installation, a database will be set up automatically for you. Isn’t that great? Among other things, this database will be used to store the content of your pages and posts.
5. Take note of the password that WordPress created for your admin user. Next, go to yourdomain.com, click Admin Login and enter the username and password chosen in the previous step:

As you can see, the title in the browser tab displays the text that we chose earlier as Blog title. After clicking Login, you will be taken to the WordPress dashboard.
6. Create a home page or welcome post. Until you add some actual content to your site, your visitors will see the Website Coming Soon page when they point their browsers to yourdomain.com.
If you have worked with WorPress before, you can add a home page or a welcome post using the corresponding menu in the left bar. Otherwise, you may want to leverage the site builder – which is available when you first login:

If you followed the above steps, you should now have a working site. From now on, you can customize WordPress to your liking by choosing a different theme (the “look”) and adding plugins to enhance the functionality of your website.
Following are some of the resources from where you can download Free WordPress Themes and WordPress Plugins. But I always vouch for WordPress Premium Themes if you’re planning to build a professional website on WordPress.
One of the great things of hosting your website and domain with Hostgator is the unbeatable price they offer to our readers. On top of that, installing software to manage your site is only a click away.
Also we have highlighted some of the reasons why you may want to consider starting your own tech blog. Additionally, whether you want to keep it simple or want to take it to the next level and aspire to blog professionally, Hostgator has your back.
We hope that you start blogging soon…
Go ahead and try them out, we promise you will not be disappointed! Also, every purchase that is done through the links on this post helps us keep Tecmint.com alive – and it gets you a 45% discount right off the bat!
If you face any issues regarding Selecting Domain, Hosting and WordPress installation on HostGator, feel free to let us know via comments or contact me at [email protected].