Written in PHP, Akaunting is a feature-rich and open-source online accounting software that allows users to manage finances and keep track of all the invoices, payments, and expenses, to mention just but a few of the financial-related tasks.
It’s an ideal online accounting platform for small businesses that do not have the financial wherewithal to procure pricey accounting software. Akaunting provides an elegant and intuitive UI will all the features and controls needed to stay abreast of your cashflows and transactions.
Akaunting Features
Notable features include:
- Multi-currency support.
- Visual reporting using graphs.
- Vendor management system.
- Ability to send invoices to clients via the SMTP protocol (Requires a mail server configured on your server).
- Creation and management of bills, invoices, and other payments for jobs in progress.
- Ability to accept bulk payments.
- Discount management system.
- Customer Summary.
In this guide, we will walk you through the installation of Akaunting self-hosted free Accounting software on Ubuntu 20.04.
Step 1: Install LAMP Stack on Ubuntu
Since Akaunting is accessed mostly from the front-end by clients and the Administrator and requires a database server to store all of its data, we need to start off by installing the LAMP stack. We already have an elaborate guide on how to install the LAMP stack on Ubuntu 20.04. This will come in handy before proceeding further.
Some additional PHP modules are required for Akaunting Software to function without any issues. Therefore, install the following PHP modules.
$ sudo apt install libapache2-mod-php php7.4-mysql php7.4-gd php7.4-cli php7.4-imagick php7.4-common php7.4-mysql php7.4-gd php7.4-bcmath php7.4-json php7.4-curl php7.4-zip php7.4-xml php7.4-mbstring php7.4-bz2 php7.4-intl php7.4-imap php7.4-ldap php7.4-xmlrpc php7.4-soap
Step 2: Create a Akaunting Database
Next, we are going to create a database for Akaunting in the MariaDB database server. This the database that the Akaunting application will use to store all of its data.
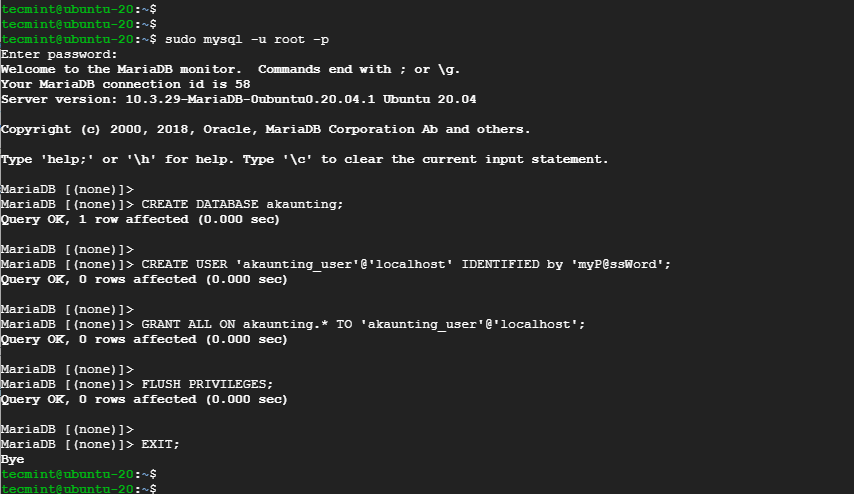
Therefore, log in to the MariaDB server.
$ sudo mysql -u root -p
Create the database and the database user.
MariaDB [(none)]> CREATE DATABASE akaunting;
MariaDB [(none)]>CREATE USER 'akaunting_user'@'localhost' IDENTIFIED by 'myP@ssWord';
Then grant all privileges to the user on the database.
MariaDB [(none)]>GRANT ALL ON akaunting.* TO 'akaunting_user'@'localhost';
Finally, save the changes and exit the MariaDB prompt.
MariaDB [(none)]>FLUSH PRIVILEGES;
MariaDB [(none)]>EXIT;
Step 3: Install Akaunting Software on Ubuntu
With the database in place, we are next going to download the latest release of Akaunting which comes in a zipped archive. To do so, use the wget command as shown.
$ wget -O Akaunting.zip https://akaunting.com/download.php?version=latest
Next, create a directory in the webroot directory,
$ sudo mkdir -p /var/www/akaunting/
And thereafter, extract the contents of the zipped archive in the directory.
$ sudo unzip Akaunting.zip -d /var/www/akaunting/
Next, set the ownership of the directory to the www-data user and group.
$ sudo chown www-data:www-data -R /var/www/akaunting/
And the permissions as follows.
$ sudo chmod -R 755 /var/www/akaunting/
Step 4: Configure Apache Virtual Host for Akaunting on Ubuntu
We need to define a virtual host file for the Akaunting site. This will allow Apache to host the site without any conflict with the default Apache virtual host file.
Using your favorite text editor, define the virtual host file as follows.
$ sudo vim /etc/apache2/sites-available/akaunting.conf
Paste the content shown. Be sure to replace yourdomain.com with your fully qualified domain name or server IP.
<VirtualHost *:80>
    ServerName yourdomain.com
    DocumentRoot /var/www/akaunting/

    <Directory /var/www/akaunting/>
       DirectoryIndex index.php
       Options +FollowSymLinks
       AllowOverride All
       Require all granted
    </Directory>

    ErrorLog ${APACHE_LOG_DIR}/akaunting.error.log
    CustomLog ${APACHE_LOG_DIR}/akaunting.access.log combined

</VirtualHost>
Save the changes and exit the configuration file. Then enable the virtual host file and Apache rewrite module.
$ sudo a2ensite akaunting.conf
$ sudo a2enmod rewrite
Additionally, disable the default Apache virtual host file.
$ sudo a2dissite 000-default.conf
For the changes to come into effect, restart Apache.
$ sudo systemctl restart apache2
Step 5: Complete the Setup of Akaunting on Ubuntu
All the configuration and settings are now in place. The only step remaining is to complete the setup from a web browser. To launch your browser and visit your server’s IP address or Fully Qualified Domain Name (FQDN).
http://server-IP or domain name
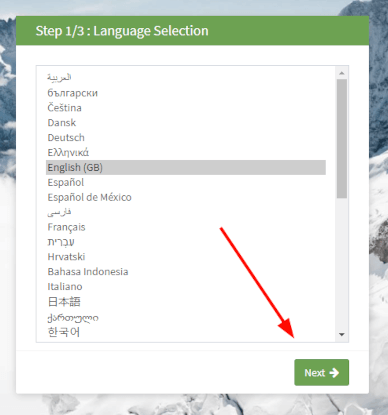
You will be greeted by the setup page below prompting you to select your preferred language.
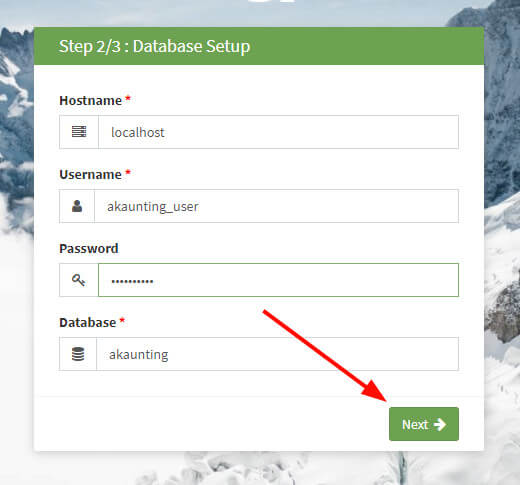
Next, provide the database details that you defined when creating the database and click ‘Next’.
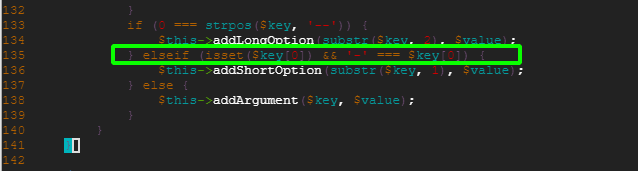
NOTE: The current release at the time of penning down this guide ( 1.3.17 ) contains a bug, which yields a PHP error that is displayed on the browser. Here’s a snippet of the error.
(1/1) ErrorException
Trying to access array offset on value of type int
in ArrayInput.php line 135
As a workaround, open the ArrayInput.php file.
$ sudo vim akaunting/vendor/symfony/console/Input/ArrayInput.php
Head over to line 135, and change it from:
} elseif ('-' === $key[0]) {
to:
} elseif (isset($key[0]) && '-' === $key[0]) {
Save your file, then refresh the installation page.
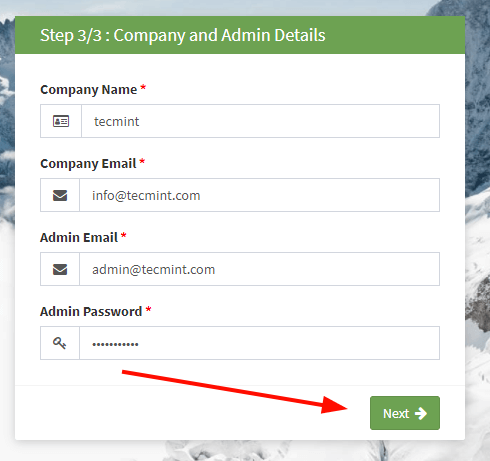
In the last step, fill out the Company and Admin details, and click ‘Next’.
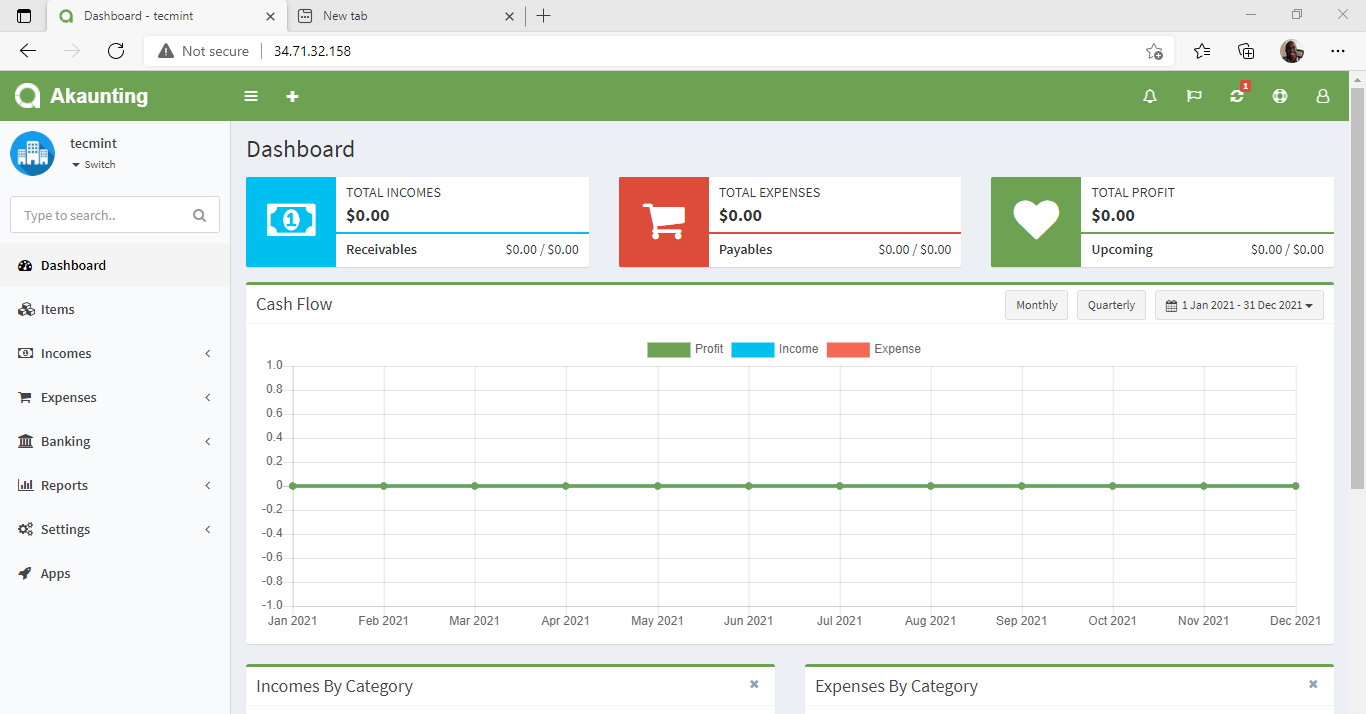
Finally, the dashboard comes into view. From here, you can proceed to perform your financial calculations and monitoring expenses.
This brings to an end this guide on the installation of Akauting software on Ubuntu 20.04.


How can I set up subdomains to access the same instance of Laravel Installation of Akaunting?
For example, Akaunting is installed on example.com and I created another domain like sub.example.com. Now I want to use the same instance for both of my domains.