In this guide we’ll discuss how to secure Nginx web server in FreeBSD with TLS/SSL certificates offered for by Let’s Encrypt Certificate Authority. We’ll also show you how to automatically renew the Lets’ Encrypt certificates before the expiring date.
TLS, an acronym for Transport Layer Security, is a protocol which runs under HTTP protocol and uses certificates and keys in order to encapsulate the packets and encrypt the data exchanged between a server and a client, or in this case between Nginx web server and client’s browser, in order to secure the connection, so that a third party, who might intercept traffic, cannot decrypt the transmission.
Read Also: Install Let’s Encrypt for Apache on FreeBSD
The process of obtaining a free Let’s Encrypt certificate in FreeBSD can be greatly simplified by installing certboot client utility, which is the official Let’s Encrypt client used for generating and downloading certificates.
Requirements
Step 1: Configure Nginx TLS/SSL
1. By default, the TLS/SSL server configuration is not enabled in FreeBSD because the TLS server block statements are commented in Nginx default configuration file.
In order to activate the TLS server in Nginx, open nginx.conf configuration file, search for the line which defines the starting of SSL server and update the entire block to look like in the below sample.
# nano /usr/local/etc/nginx/nginx.conf
Nginx HTTPS block excerpt:
server {
       listen 443 ssl  default_server;
       server_name  www.yourdomain.com;

	access_log /var/log/nginx/access.log;
	error_log /var/log/nginx/error.log;
	error_page   500 502 503 504  /50x.html;

	location = /50x.html {
            root   /usr/local/www/nginx-dist;
        }

	location / {
	    root   /usr/local/www/nginx;
       	    index  index.html index.htm;
	    try_files $uri $uri/ /index.php?$args;
				}

	ssl_certificate "/usr/local/etc/letsencrypt/live/www.yourdomain.com/cert.pem";
	ssl_certificate_key "/usr/local/etc/letsencrypt/live/www.yourdomain.com/privkey.pem";
	ssl_protocols TLSv1 TLSv1.1 TLSv1.2;
	ssl_dhparam /usr/local/etc/nginx/dhparam.pem;
	ssl_session_cache shared:SSL:1m;
	ssl_session_timeout 10m;
	ssl_ciphers HIGH:!aNULL:!MD5;
	ssl_prefer_server_ciphers  on;

	# Use gzip compression
gzip on;
gzip_disable "msie6";
gzip_vary on;
gzip_proxied any;
gzip_comp_level 5;
gzip_buffers 16 8k;
gzip_http_version 1.0;

	# Set a variable to work around the lack of nested conditionals

	set $cache_uri $request_uri;

	location ~ /.well-known {
	allow all;
		}


        location ~ \.php$ {
        root	/usr/local/www/nginx;
        fastcgi_pass   127.0.0.1:9000;
        fastcgi_index  index.php;
        #fastcgi_param  SCRIPT_FILENAME /scripts$fastcgi_script_name;
        fastcgi_param SCRIPT_FILENAME $request_filename;
		include        fastcgi_params;
        }
    }
The above block, in addition to SSL block, also contains some statements for enabling gzip compression and FastCGI Process Manager, used for passing PHP code to PHP-FPM gateway in order to run dynamic web applications.
After you’ve added the above code to Nginx main configuration file, do not restart the daemon or apply the settings before installing and obtaining an Let’s Encrypt certificate for your domain.
Step 2: Install Certbot Client in FreeBSD
2. The process of installing Let’s Encrypt certbot client utility in FreeBSD involves downloading the source code for py-certbot and locally compile it, by issuing the below commands.
# cd /usr/ports/security/py-certbot
# make install clean
3. Compiling the py-certbot utility takes a lot of time comparing to installing a regular binary package. During this time, a series of dependencies are required to be downloaded in compiled locally in FreeBSD.
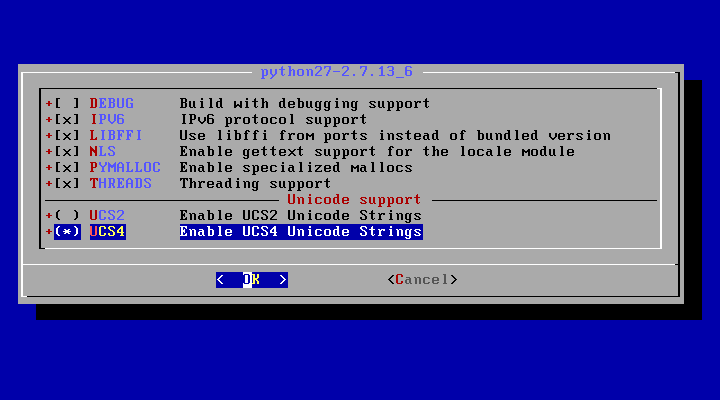
Also, a series of prompts will appear on your screen, demanding you to select what packages will be used at compile time for each dependency. At the first screen, select the following tools, by pressing [space] key, for compiling the python27 dependency, as illustrated in the below image.
- IPV6
- LIBFFI
- NLS
- PYMALLOC
- THREADS
- UCS4 for Unicode support
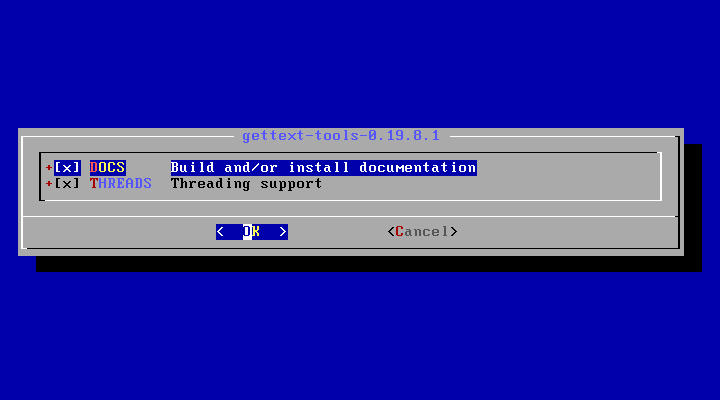
4. Next, select DOCS and THREADS for gettext-tools dependency and press OK to continue as shown in the below image.
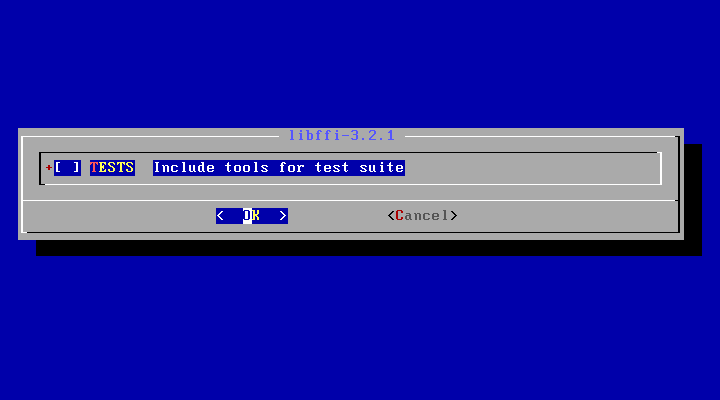
5. On the next screen leave the TESTS option disabled for libffi-3.2.1 and press OK to move further.
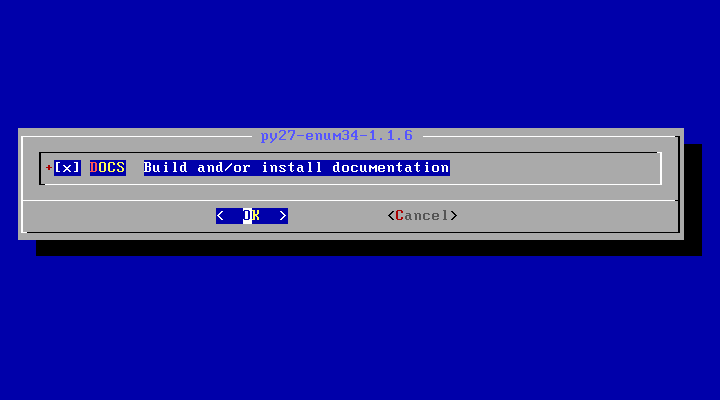
6. Next, hit space to select DOCS for py27-enum34 dependency, which will install the documentation for this tool, and press OK to continue, as illustrated in the below screenshot.
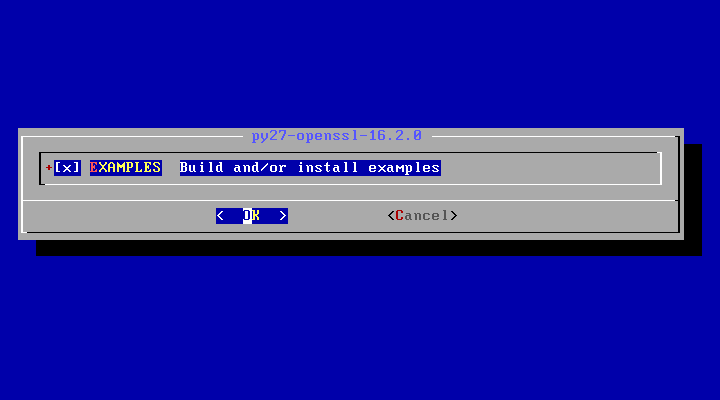
7. Finally, choose to install example samples for py27-openssl dependency by pressing [space] key and hit OK to finish the compilation and installation process for py-certbot client.
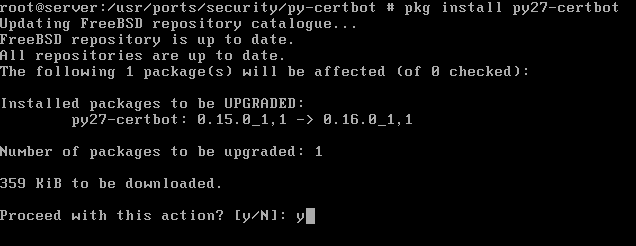
8. After the process of compiling and installing py-certbot utility finishes, run the below command in order to upgrade the tool at the latest version of the package as illustrated in the below screenshots.
# pkg install py27-certbot
9. In order to avoid some issues it might occur while obtaining a free Let’s Encrypt certificate, the most common error being “pkg_resources.DistributionNotFound”, make sure the following two dependencies are also present in you system: py27-salt and py27-acme.
# pkg install py27-salt
# pkg install py27-acme
Step 3: Install Let’s Encrypt Certificate for Nginx on FreeBSD
10. In order to obtain a Let’s Encrypt standalone certificate for your domain, run the following command and provide you domain name and all subdomains you wish to obtain certificates for by implying the -d flag.
# certbot certonly --standalone -d yourdomain.com -d www.yourdomain.com
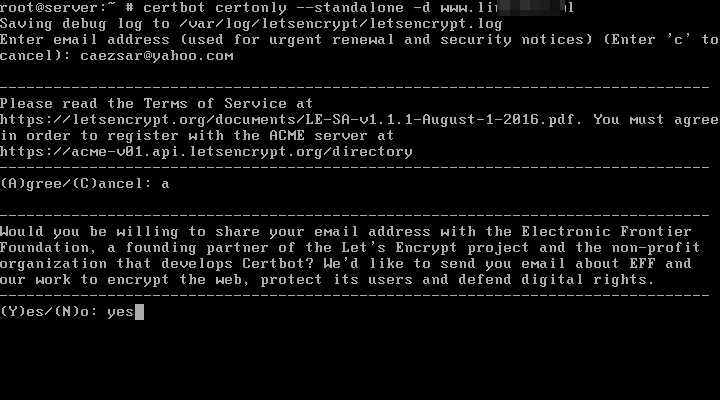
11. While generating the certificate you will be asked to enter you email address and to agree with Let’s Encrypt terms of service. Type a from keyboard to agree and continue and you will also be asked if you willing to share your email address with Let’s Encrypt partners.
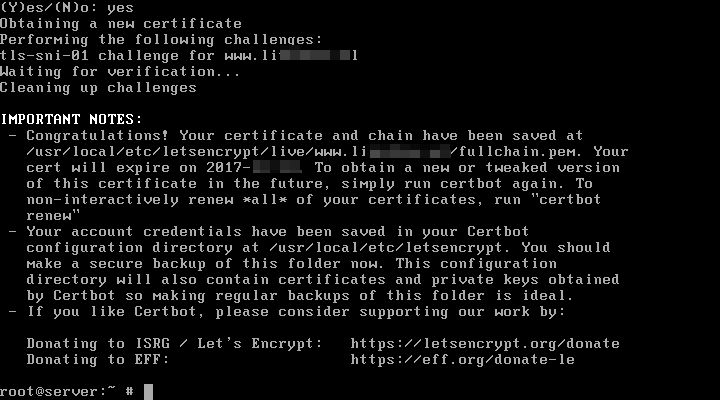
In case you don’t want to share your email address, just type no word in the prompt and press [enter] key to continue. After the certificates for your domain had been successfully obtained, you will receive some important notes which will inform you where the certificates are stored in your system and when they expire.
12. In case you want to obtain a Let’s Encrypt certificate using the “webroot” plugin by adding the webroot directory of Nginx server for your domain, issue the following command with the --webroot and -w flags. By default, if you haven’t changed Nginx webroot path, it should be located in /usr/local/www/nginx/ system path.
# certbot certonly --webroot -w /usr/local/www/nginx/ -d yourdomain.com -d www.yourdomain.com
As in the --strandalone procedure for obtaining a certificate, the --webroot procedure will also ask you to supply an email address for certificate renewal and security notices, to press a to agree with Let’s Encrypt terms and conditions and no or yes to or not share the email address Let’s Encrypt partners as illustrated in the below sample.
Be aware that certbot client can detect a fake email address and will not let you continue with generating a certificate until you supply a real email address.
Cerbot sample:
Saving debug log to /var/log/letsencrypt/letsencrypt.log Enter email address (used for urgent renewal and security notices) (Enter 'c' to cancel):[email protected] #A fake email address will be detected There seem to be problems with that address. Enter email address (used for urgent renewal and security notices) If you really want to skip this, you can run the client with --register-unsafely-without-email but make sure you then backup your account key from /etc/letsencrypt/accounts (Enter 'c' to cancel):[email protected] ------------------------------------------------------------------------------- Please read the Terms of Service at https://letsencrypt.org/documents/LE-SA-v1.1.1-August-1-2016.pdf. You must agree in order to register with the ACME server at https://acme-v01.api.letsencrypt.org/directory ------------------------------------------------------------------------------- (A)gree/(C)ancel:a------------------------------------------------------------------------------- Would you be willing to share your email address with the Electronic Frontier Foundation, a founding partner of the Let's Encrypt project and the non-profit organization that develops Certbot? We'd like to send you email about EFF and our work to encrypt the web, protect its users and defend digital rights. ------------------------------------------------------------------------------- (Y)es/(N)o:nObtaining a new certificate Performing the following challenges: http-01 challenge for www.domain.com Using the webroot path /usr/local/www/nginx/ for all unmatched domains. Waiting for verification... Cleaning up challenges IMPORTANT NOTES: - Congratulations! Your certificate and chain have been saved at /usr/local/etc/letsencrypt/live/www.yourdomain.com/fullchain.pem. Your cert will expire on 2017-12-28. To obtain a new or tweaked version of this certificate in the future, simply run certbot again. To non-interactively renew *all* of your certificates, run "certbot renew" - Your account credentials have been saved in your Certbot configuration directory at /usr/local/etc/letsencrypt. You should make a secure backup of this folder now. This configuration directory will also contain certificates and private keys obtained by Certbot so making regular backups of this folder is ideal. - If you like Certbot, please consider supporting our work by: Donating to ISRG / Let's Encrypt: https://letsencrypt.org/donate Donating to EFF: https://eff.org/donate-le
Step 4: Update Nginx TLS Certificates
13. The location of obtained Let’s Encrypt certificates and keys in FreeBSD is /usr/local/etc/letsencrypt/live/www.yourdomain.com/ system path. Issue ls command in order to display the components of your Let’s Encrypt certificate: the chain file, the fullchain file, the private key and the certificate file, as illustrated in the following example.
# ls /usr/local/etc/letsencrypt/live/www.yourdomain.com/

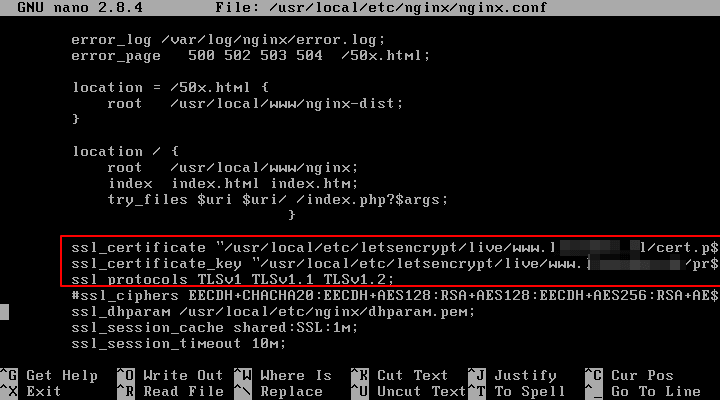
14. In order to install Let’s Encrypt certificates for your domain in Nginx web server, open Nginx main configuration file or the configuration file for Nginx TLS server, in case it’s a separate file, and modify the below lines to reflect the path of let’s Encrypt issued certificates as illustrated below.
# nano /usr/local/etc/nginx/nginx.conf
Update the following lines to look like in this sample:
ssl_certificate "/usr/local/etc/letsencrypt/live/www.yourdomain.com/cert.pem";
	ssl_certificate_key "/usr/local/etc/letsencrypt/live/www.yourdomain.com/privkey.pem";
15. Also, if the line ssl_dhparam is present in Nginx SSL configuration, you should generate a new 2048 bit Diffie–Hellman key with the following command:
# openssl dhparam –out /usr/local/etc/nginx/dhparam.pem 2048
16. Finally, in order to activate Nginx TLS configuration, first check Nginx global configuration for possible syntax errors and, then, restart Nginx service to apply the SSL configuration by issuing the following commands.
# nginx -t
# service nginx restart
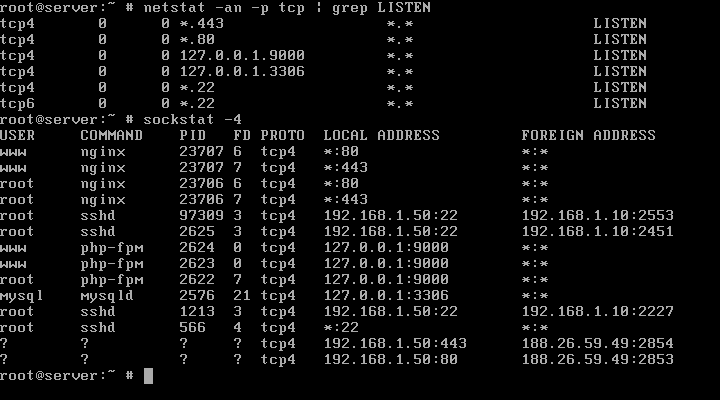
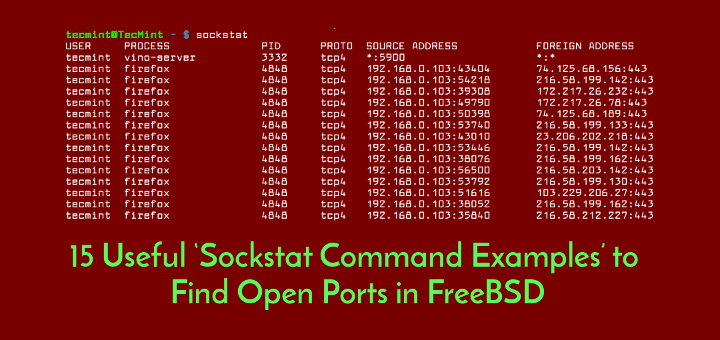
17. Confirm if Nginx daemon is binding on 443 port by issuing the following commands which can list all opened network sockets in the system in listening state.
# netstat -an -p tcp| grep LISTEN
# sockstat -4
18. You can also visit your domain address via HTTPS protocol by opening a browser and type the following address in order to confirm that Let’s Encrypt certificates are working as expected. Because you’re using certificates generated by a valid Certificate Authority, no error should be displayed in the browser.
https://www.yourdomain.com
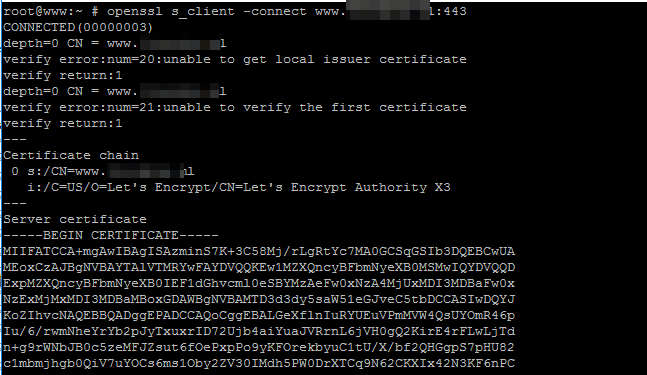
19. Openssl utility can also help you find information about a certificate obtained from Let’s Encrypt CA, by running the command with the following options.
# openssl s_client -connect www.yourdomain.com:443
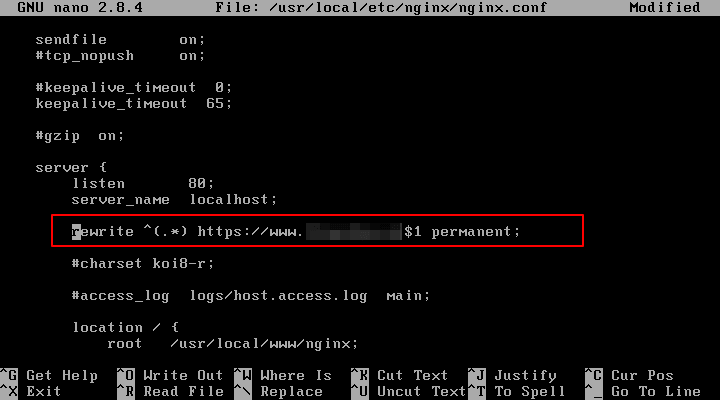
In case you want to force Nginx to direct all http to https requests received for your domain on port 80 to HTTPS, open Nginx configuration file, locate the server directive for port 80 and add the below line after server_name statement as illustrated in the below example.
rewrite ^(.*) https://www.yourdomain.com$1 permanent;
20. Setting up auto renewal for certificate issued by Let’s Encrypt authority before they expire can be done by scheduling a cron job to run once a day by issuing the following command.
# crontab -e
Cron task to renew certificate.
0 0 * * * certbot renew >> /var/log/letsencrypt.log
That’s all! Nginx can now serve secured web applications to your visitors using Let’s Encrypt free certificates.
Hi, thanks for the tutorial. It is great. I am using Freebsd 11.1 and this command did not work for me:
it returned no match
However, certbot alone did work and took me through all the steps above. It also gave me the option to secure all my domains. I entered
yes, and everything else worked just like above.Thanks again.
Thanks for the tutorial. I think ‘–strandalone‘ is incorrect?
! Step 4- 13, we can see your domain!