Odoo, formerly known as OpenERP, is an Open Source Enterprise Resource Planning ERP web based business software written in Python which comes with a suite of web apps designed for every business, such as Website Builders, eCommerce modules, Billing and Accounting, Human Resources, Point of Sale, Customer Relationship Management, Inventory module, Live Chat and many other apps and features.
This tutorial will guide you on you how to install the latest stable version of Odoo (version 9) on a RHEL/CentOS/Fedora or Debian/Ubuntu based systems with Nginx server to act as a reverse proxy in frontend in order to access the web interface faster, securely and from standard web browsing ports, without the need to burden the users to use browser redirect ports.
Step 1: Install and Secure PostgreSQL Database
1. Before you start proceeding with Odoo installation first assure that your system ships with packages provided by Epel repositories in order to install the backend PostgreSQL database.
Also make sure the server is up-to-date with the latest security packages and patches by issuing the below commands:
----------- On RedHat/CentOS based systems -----------
# yum update
# yum install -y epel-release

----------- On Debian/Ubuntu based systems -----------
# apt-get update && sudo apt-get upgrade # On Debian
2. Next, go ahead and install PostgreSQL database server, which is the default database used by Odoo to store information.
----------- On RedHat/CentOS based systems -----------
# yum install postgresql-server

----------- On Debian/Ubuntu based systems -----------
# apt-get install postgresql postgresql-client
Initialize PostgreSQL database.
# postgresql-setup initdb
Now finally start the PostgreSQL database by issuing the below command:
----------- On SystemD systems -----------
# systemctl start postgresql

----------- On SysVinit systems -----------
# service postgresql start
As an additional step to secure PostgreSQL default user, which has a blank password, issue the below command with root privileges in order to change the password:
sudo -u postgres psql
postgres=# \password postgres
Step 2: Install Odoo 9 – OpenERP
3. In order to install Odoo 9 from official repository, first create new yum repository file for Odoo with the following content:
On CentOS/RHEL Systems
# vi /etc/yum.repos.d/odoo.repo
Add the following excerpt to file odoo.repo.
[odoo-nightly]
name=Odoo Nightly repository
baseurl=http://nightly.odoo.com/9.0/nightly/rpm/
enabled=1
gpgcheck=1
gpgkey=https://nightly.odoo.com/odoo.key
On Debian/Ubuntu Systems
On Debian/Ubuntu issue the following command to add the Odoo repositories:
# wget -O - https://nightly.odoo.com/odoo.key | apt-key add -
# echo "deb http://nightly.odoo.com/9.0/nightly/deb/ ./" >> /etc/apt/sources.list
4. Next install Odoo 9 software from binaries.
----------- On RedHat/CentOS based systems -----------
# yum install odoo

----------- On Debian/Ubuntu based systems -----------
# apt-get update && sudo apt-get install odoo
Next, start it and check daemon status by issuing the below commands:
----------- On SystemD systems -----------
# systemctl start odoo
# systemctl status odoo

----------- On SysVinit systems -----------
# service odoo start
# service odoo status
As an additional step you can verify Odoo service listening port by running the ss or netstat command:
# ss -tulpn
OR
# netstat -tulpn
By default, Odoo listens for network connections on port 8069/TCP.
Step 3: Configure Odoo from Web Interface
5. In order to configure Odoo further fire-up a browser and access Odoo web interface at the following URI:
http://host-or-IP-address:8069/
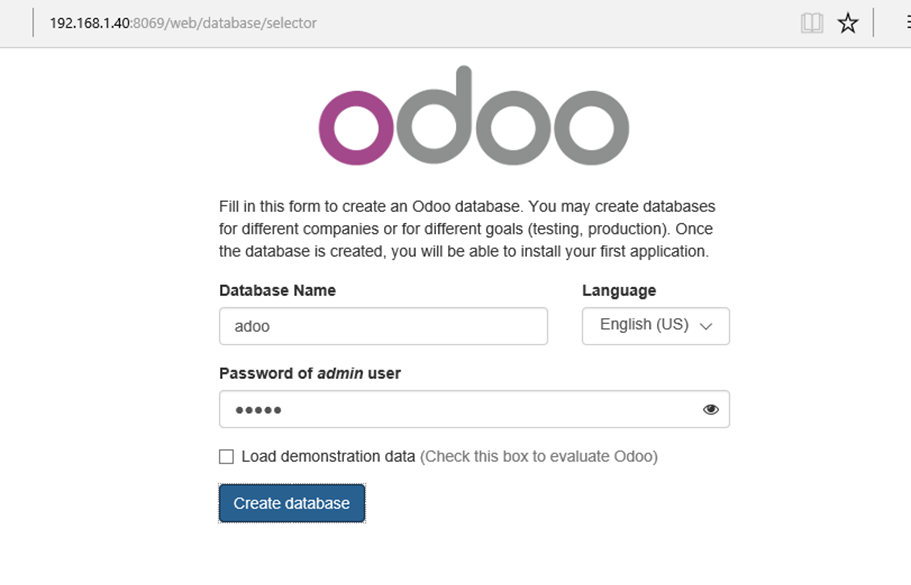
6. Next you will be prompted to create a new database for Odoo and set a strong password for admin account.
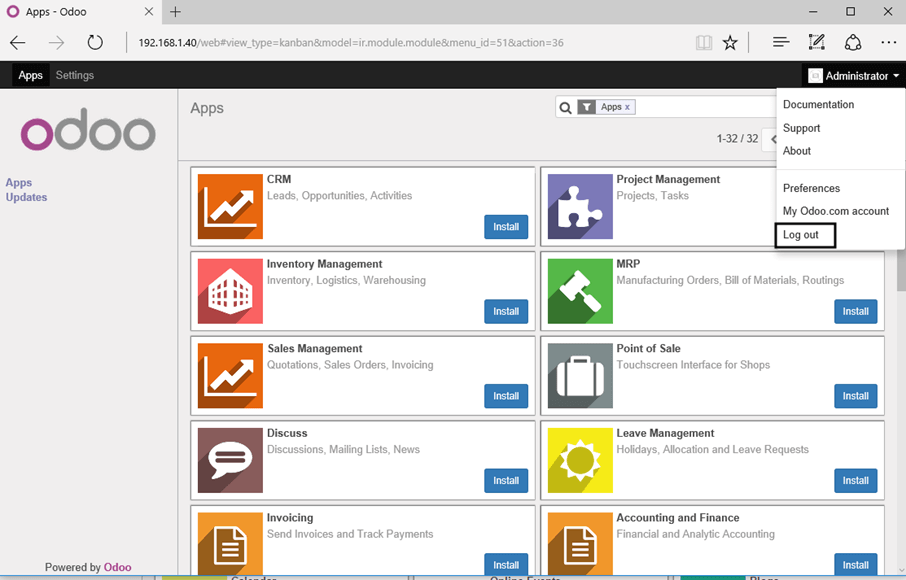
7. Once the database has been created you will be redirected to the administration web panel where you can further install applications and configure your ERP. For the moment leave the application as default and log out.
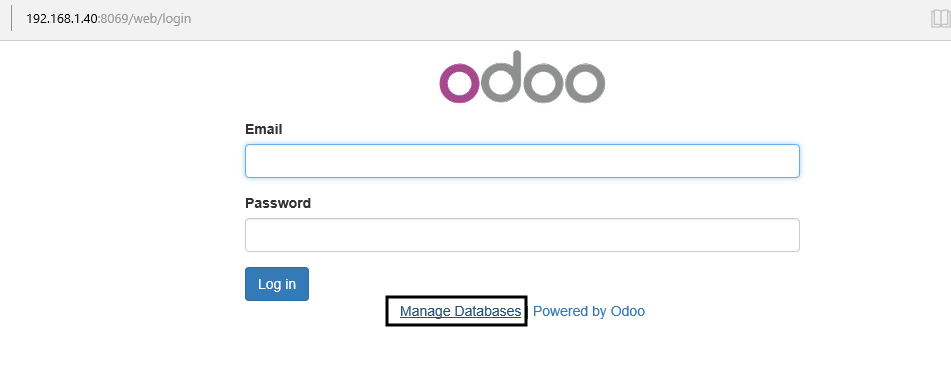
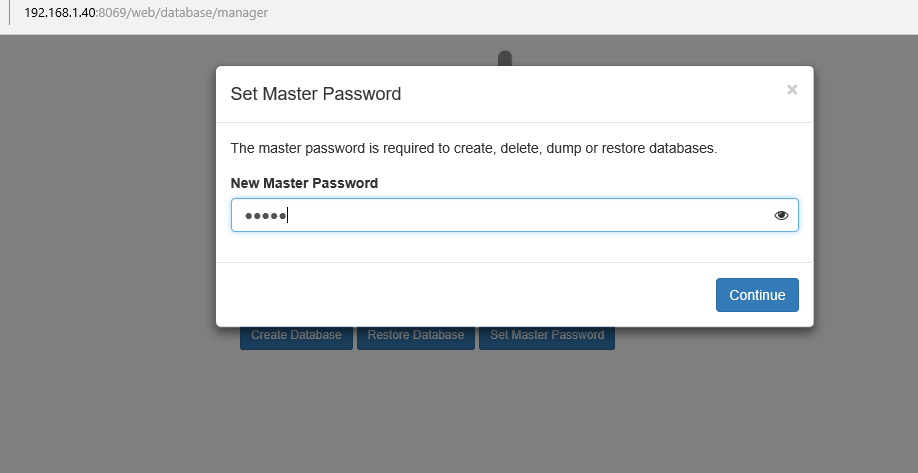
8. Once returned at the login screen, hit on Manage Databases link and Set a master password in order to secure Odoo database manager.
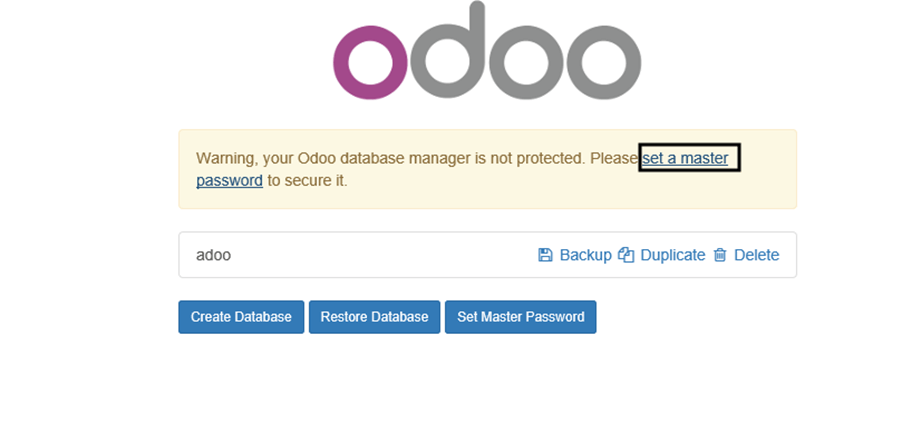
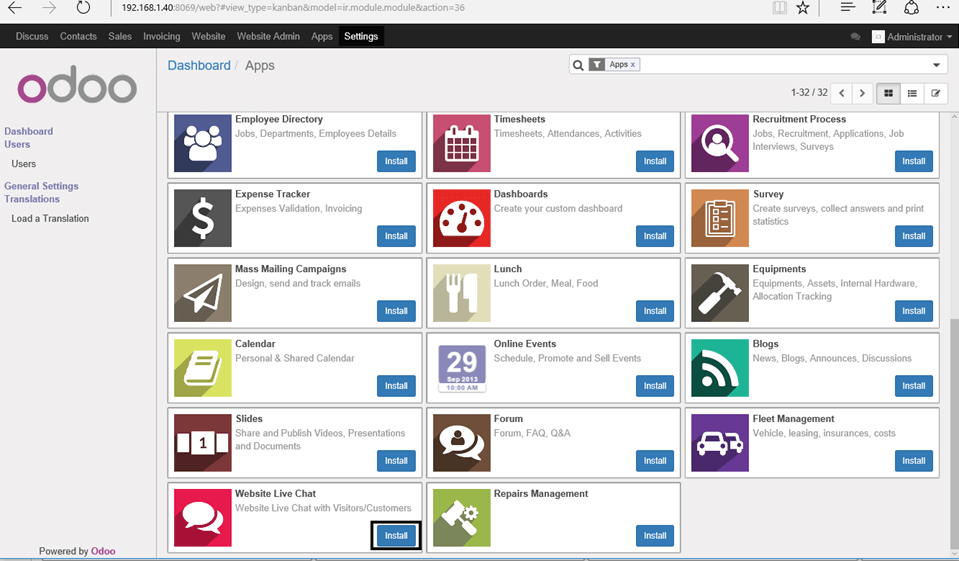
9. Once you have secured Odoo database manager you can login on your application and start to configure it further with your required apps and settings.
Step 4: Access Odoo from Nginx Frontend
You can configure the system so that users can access Odoo web panel via Nginx reverse proxy. This can facilitate the users to navigate Odoo web interface faster, due to some Nginx frontend caching, on standard HTTP ports without the need to manually enter the http port 8069 on their browsers.
In order to configure this setting first you need to install and configure Nginx on your system by issuing the following steps.
10. First install Nginx web server with the following command:
----------- On RedHat/CentOS based systems -----------
# yum install nginx

----------- On Debian/Ubuntu based systems -----------
# apt-get install nginx
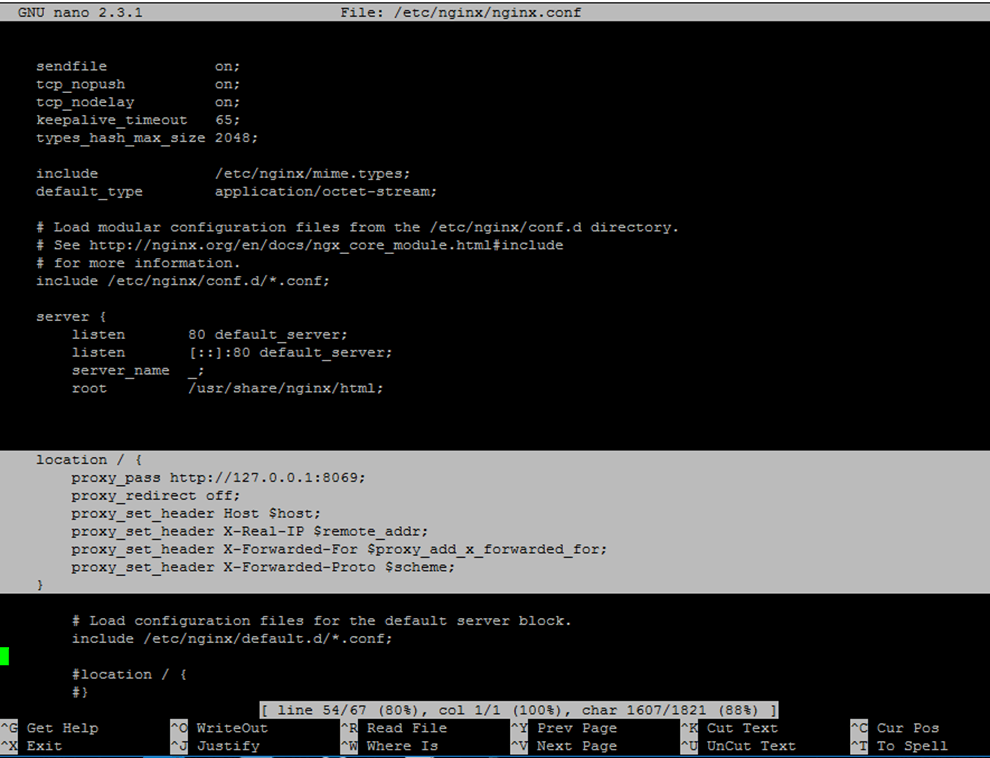
11. Next, open Nginx main configuration file with a text editor and insert the following block after the line which specifies Nginx document root location.
----------- On RedHat/CentOS based systems -----------
# vi /etc/nginx/nginx.conf

----------- On Debian/Ubuntu based systems -----------
# nano /etc/nginx/sites-enabled/default
Add the following configuration excerpt to nginx.conf file:
 location / {
        proxy_pass http://127.0.0.1:8069;
        proxy_redirect off;
        proxy_set_header Host $host;
        proxy_set_header X-Real-IP $remote_addr;
        proxy_set_header X-Forwarded-For $proxy_add_x_forwarded_for;
        proxy_set_header X-Forwarded-Proto $scheme;
Also, comment Nginx location statement by placing a # in front of the following lines. Use the below screenshot as a guide.
#location / {
                # First attempt to serve request as file, then
                # as directory, then fall back to displaying a 404.
        #       try_files $uri $uri/ =404;
        #}
12. After you’ve made all the above changes, restart Nginx daemon but not before you run getenforce command to check if Selinux in enabled on your machine.
On CentOS/RHEL Systems
In case the policy is set to Enforced disable it by issuing the below commands:
# setenforce 0
# getenforce
To completely disable Selinux, open /etc/selinux/config file with a text editor and set the line SELINUX to disabled.
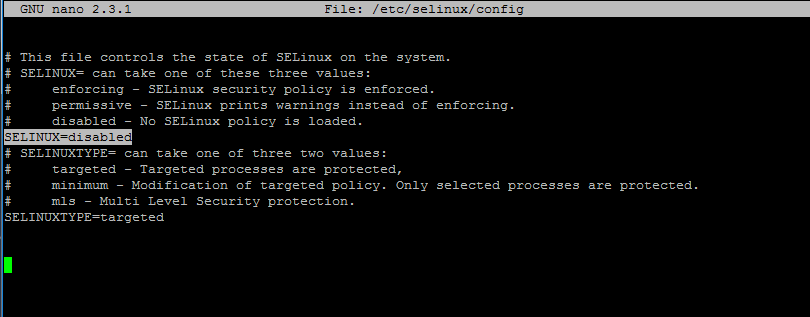
If you don’t want to completely disable Seliux policy and just want to relax the rules in order to grant Nginx proxy with permissive access to network socket run the following command:
# setsebool httpd_can_network_connect on -P
# getsebool -a | grep httpd
Then, restart Nginx daemon to reflect the changes made above:
# systemctl restart nginx
OR
# service nginx restart
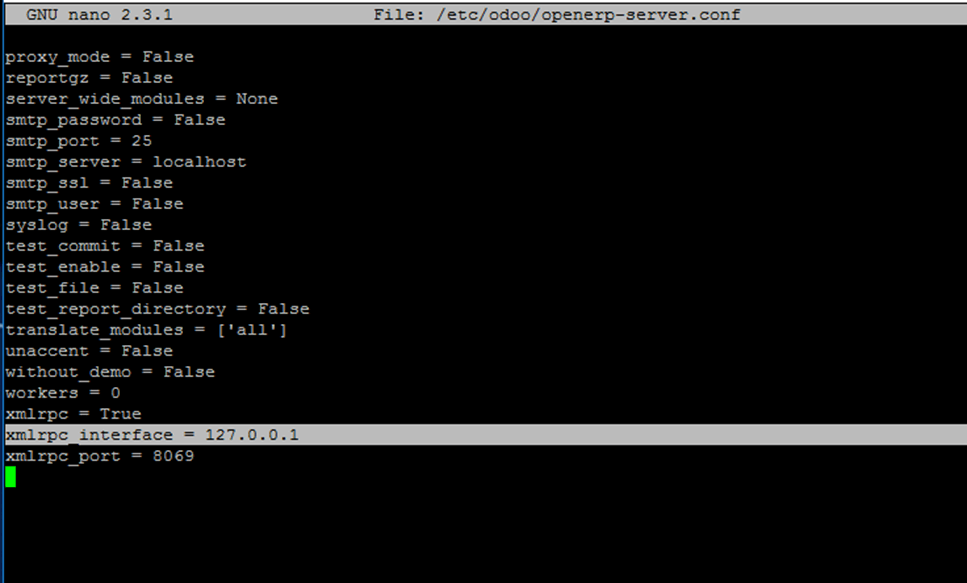
13. This next step is a security optional feature and implies the change of the network socket that Odoo application is listening, changing the binding address from all interfaces (or address) to localhost only.
This change must be done only in conjunction with Nginx reverse proxy due to the fact that binding the application on localhost only implies that Odoo will not be accessible from users inside the LAN or other networks.
In order to active this change, open /etc/odoo/openerp-server.conf file and edit xmlrpc_interface line to bind on localhost only as suggested on the below screenshot.
xmlrpc_interface = 127.0.0.1
In order to reflect changes restart Odoo service by running the below command:
# systemctl restart odoo.service
OR
# service odoo restart
14. In case your machine has a network defense line provided by the firewall, issue the following commands in order to open firewall ports to outside world for Nginx proxy:
----------- On FirewallD based systems -----------
# firewall-cmd --add-service=http --permanent
# firewall-cmd --reload
----------- On IPTables based systems -----------
# iptables -A INPUT -p tcp -m tcp --sport 80 -j ACCEPT
# iptables -A OUTPUT -p tcp -m tcp --dport 80 -j ACCEPT
# /etc/init.d/iptables save
----------- On UFW Firewall systems -----------
# ufw allow http
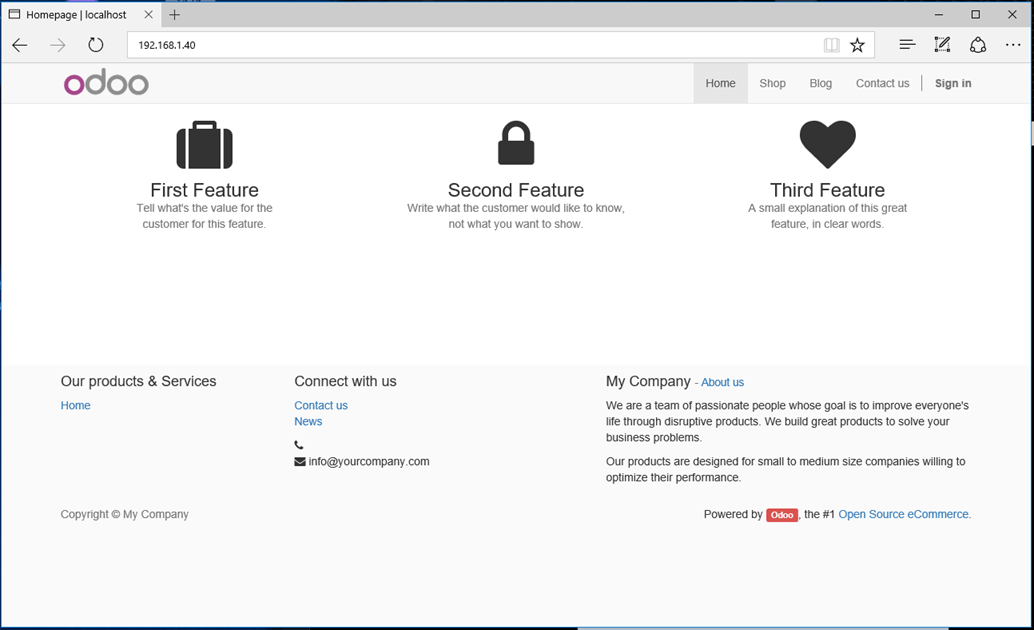
15. That’s it! Now you can successfully access your ERP Odoo application by visiting your server IP Address or domain name.
http://192.168.1.40
http://domain.tld
16. In order to automatically run the services after a system reboot issue the following command to enable all the daemons system-wide with one-shot.
------------ On SystemD Systems ------------
# systemctl enable postgresql.service
# systemctl enable odoo.service
# systemctl enable nginx.service
------------ On SysVinit Systems ------------

# chkconfig postgresql on
# chkconfig odoo on
# chkconfig nginx on
NOTE: For PDF reports, you must manually download and install wkhtmltopdf binary packages for your own distribution by visiting the following link Install wkhtmltopdf to Convert HTML Page to PDF.


It works well on Ubuntu 15.10, whereas from Cent 6/7, it stucks with the python dependency error. Is there any solution to overcome?
What error throws you? What kind of dependency?
Doesnt work!
How to setup odoo on IPv6 port 80? Is it possible to use nginx to do the same?
Why do you want to setup Odoo to listen on IPv6 on localhost? Use nginx frontend to be accessed from IPv6 with the below configuration: listen [::]:80;
You would have to create some subdomains (virtual hosts) with nginx and use redirection, but that’s tricky with odoo. Why not just leave it all to HTTPS?
Hello and thank you for the great tutorial. In odoo you can create a website and an e-commerce webpage and those usually are public pages and there’s a login button above that let’s you login to the erp system.
My question is, how can we make the public pages non HTTPS and when the user want to login, he gets redirected to HTTPS and stays in HTTPS while using the ERP system? I’m aware that he can setup another instance of odoo and sync the data but this way some integration features will be lost. Is there a way to do that on a single odoo instance?