PowerDNS is a DNS server running on many Linux/Unix derivatives. It can be configured with different backends including BIND style zone files, relational databases or load balancing/failover algorithms. It can also be setup as a DNS recursor running as a separate process on the server.
The latest version of PowerDNS Authoritative server is 3.4.4, but the one available in the EPEL repository right now is 3.4.3. I would recommend installing the one for the EPEL repository due to the fact that this version is tested in CentOS and Fedora. That way you will also be able to easily update PowerDNS in future.
This article intends to show you how to install and setup master PowerDNS server with a MariaDB backend and the PowerAdmin – a friendly web interface managing tool for PowerDNS.
For the purpose of this article I will be using server with:
Hostname: centos7.localhost
IP Address 192.168.0.102
Step 1: Installing PowerDNS with MariaDB Backend
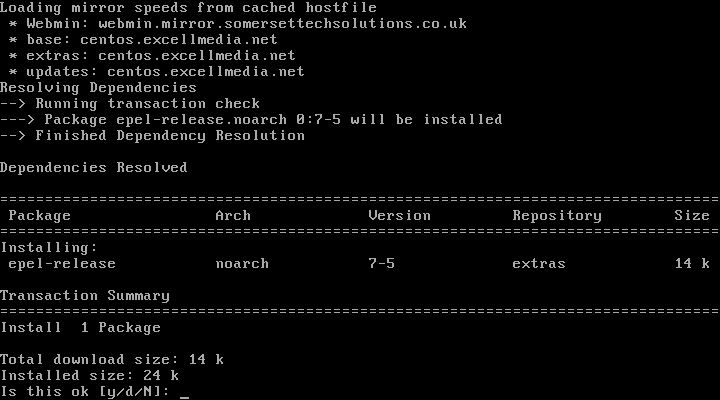
1. First you need to enable the EPEL repository for your server simply use:
# yum install epel-release.noarch
2. The next step is to install the MariaDB server. This can be easily done by running the following command:
# yum -y install mariadb-server mariadb

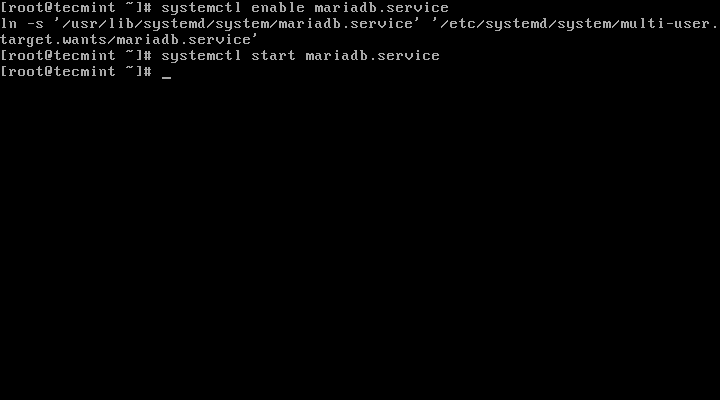
3. Next we will configure MySQL to enable and start upon system boot:
# systemctl enable mariadb.service
# systemctl start mariadb.service
4. Now that the MySQL service is running, we will secure and setup a password for MariaDB by running:
# mysql_secure_installation
Follow Instructions
/bin/mysql_secure_installation: line 379: find_mysql_client: command not found

NOTE: RUNNING ALL PARTS OF THIS SCRIPT IS RECOMMENDED FOR ALL MariaDB
      SERVERS IN PRODUCTION USE!  PLEASE READ EACH STEP CAREFULLY!

In order to log into MariaDB to secure it, we'll need the current
password for the root user.  If you've just installed MariaDB, and
you haven't set the root password yet, the password will be blank,
so you should just press enter here.

Enter current password for root (enter for none):  Press ENTER
OK, successfully used password, moving on...

Setting the root password ensures that nobody can log into the MariaDB
root user without the proper authorisation.

Set root password? [Y/n] y
New password:  ← Set New Password
Re-enter new password:  ← Repeat Above Password
Password updated successfully!
Reloading privilege tables..
 ... Success!


By default, a MariaDB installation has an anonymous user, allowing anyone
to log into MariaDB without having to have a user account created for
them.  This is intended only for testing, and to make the installation
go a bit smoother.  You should remove them before moving into a
production environment.

Remove anonymous users? [Y/n] y ← Choose “y” to disable that user
 ... Success!

Normally, root should only be allowed to connect from 'localhost'.  This
ensures that someone cannot guess at the root password from the network.

Disallow root login remotely? [Y/n] n ← Choose “n” for no
 ... skipping.

By default, MariaDB comes with a database named 'test' that anyone can
access.  This is also intended only for testing, and should be removed
before moving into a production environment.

Remove test database and access to it? [Y/n] y ← Choose “y” for yes
 - Dropping test database...
 ... Success!
 - Removing privileges on test database...
 ... Success!

Reloading the privilege tables will ensure that all changes made so far
will take effect immediately.

Reload privilege tables now? [Y/n] y ← Choose “y” for yes
 ... Success!

Cleaning up...

All done!  If you've completed all of the above steps, your MariaDB
installation should now be secure.

Thanks for using MariaDB!
5. Once MariaDB configuration done successfully, we can proceed further with the installation of PowerDNS. This is easily completed by running:
# yum -y install pdns pdns-backend-mysql

6. The configuration file for PowerDNS is located in /etc/pdns/pdns, but before editing it, we will setup a MySQL database for PowerDNS service. First we will connect to the MySQL server and will create a database with name powerdns:
# mysql -u root -p
MariaDB [(none)]> CREATE DATABASE powerdns;

7. Next, we will create a database user called powerdns:
MariaDB [(none)]> GRANT ALL ON powerdns.* TO 'powerdns'@'localhost' IDENTIFIED BY 'tecmint123';
MariaDB [(none)]> GRANT ALL ON powerdns.* TO 'powerdns'@'centos7.localdomain' IDENTIFIED BY 'tecmint123';
MariaDB [(none)]> FLUSH PRIVILEGES;
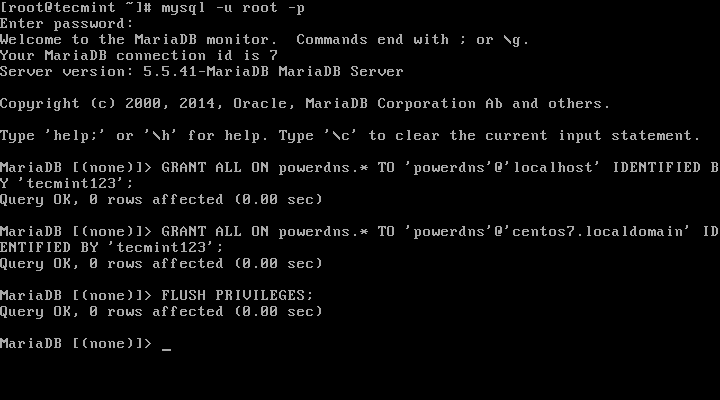
Note: Replace “tecmint123” with the actual password that you want to use for your setup.
8. We proceed by creating the database tables used by PowerDNS. Execute those block by block:
MariaDB [(none)]> USE powerdns;
MariaDB [(none)]> CREATE TABLE domains (
id INT auto_increment,
name VARCHAR(255) NOT NULL,
master VARCHAR(128) DEFAULT NULL,
last_check INT DEFAULT NULL,
type VARCHAR(6) NOT NULL,
notified_serial INT DEFAULT NULL,
account VARCHAR(40) DEFAULT NULL,
primary key (id)
);

MariaDB [(none)]> CREATE UNIQUE INDEX name_index ON domains(name);
MariaDB [(none)]> CREATE TABLE records (
id INT auto_increment,
domain_id INT DEFAULT NULL,
name VARCHAR(255) DEFAULT NULL,
type VARCHAR(6) DEFAULT NULL,
content VARCHAR(255) DEFAULT NULL,
ttl INT DEFAULT NULL,
prio INT DEFAULT NULL,
change_date INT DEFAULT NULL,
primary key(id)
);

MariaDB [(none)]> CREATE INDEX rec_name_index ON records(name);
MariaDB [(none)]> CREATE INDEX nametype_index ON records(name,type);
MariaDB [(none)]> CREATE INDEX domain_id ON records(domain_id);

MariaDB [(none)]> CREATE TABLE supermasters (
ip VARCHAR(25) NOT NULL,
nameserver VARCHAR(255) NOT NULL,
account VARCHAR(40) DEFAULT NULL
);

You can now exit the MySQL console by typing:
MariaDB [(none)]> quit;
9. Finally we can proceed with configuring our PowerDNS in a way that, it will use MySQL as backend. For that purpose open PowerDNS configuration file located at:
# vim /etc/pdns/pdns.conf
In that file look for the lines looking like this:
#################################
# launch        Which backends to launch and order to query them in
#
# launch=
Just after that put the following code:
launch=gmysql
gmysql-host=localhost
gmysql-user=powerdns
gmysql-password=user-pass
gmysql-dbname=powerdns
Change “user-pass” with the actual password that you set earlier. Here is how my configuration looks like:

Save your change and exit from.
10. Now we will start and add PowerDNS to the list of services starting at system boot:
# systemctl enable pdns.service
# systemctl start pdns.service

At this point your PowerDNS server is up and running. For more information about PowerDNS you can refer to the manual available at http://downloads.powerdns.com/documentation/html/index.html

Excellent article. Unlike anything, I was able to find anywhere else. Thanks so much!
One suggestion I would give to everyone is to determine what PDNS version you have by paying attention to the version number after the yum command. If you are already past that point, run the following command:
Then go to the official website to download the schema that matches the same version that is installed on your system. In my case, I kept using the wrong schema and caused me more frustration than necessary. The schema seems to change between each incremental release and is not forward or backward compatible.
I have error when I connect MySQL with pdns with this databases, for fixed I create the format of databases from the official website of powerdns.
how zone data will replicate on ns1 and ns2 ?
I appreciate to this person but “Username – username for the PowerAdmin.” you have a typo :(
Looks like there was a pdns schema change and some of the tables have changed. powerdns not longer works for me
i tried updating the schema to : https://doc.powerdns.com/md/authoritative/backend-generic-mypgsql/
Hi Ravi,
I installed powerdns and login in to the poweradmin,but my dns is not resolving.
[root@server1 ~]# nslookup server2
;; Got SERVFAIL reply from 192.168.1.17, trying next server
;; Got SERVFAIL reply from 192.168.1.17, trying next server
;; Got SERVFAIL reply from 192.168.1.17, trying next server
Server: 192.168.1.1
Address: 192.168.1.1#53
** server can’t find server2: NXDOMAIN
Hi,
can you plese assist how to upgrade the version from 3.3 to 4.x.
@Sanjay,
Have you tried PowerDNS using default EPEL repository using Yum package manager? if not, try it or compile it from source to get latest version of PowerDNS.
Hi Ravi,
Thanks for your reply,
I have tried with YUM with EPEL repo. I have installed version 3.3. let me try with with source code, or if you with any docs to compile via source code please share.
@Sanjay,
I think you can install latest PowerDNS using official PowerDNS yum repositories, as shown in this documentations here: https://repo.powerdns.com/
I installed powerdns, follow the link https://www.tecmint.com/install-powerdns-poweradmin-mariadb-in-centos-rhel/ .
When I do dig command into self LAN of the pdns I always receive:
;; WARNING: recursion requested but not available
anything is default setting… where is the log file?
how can I understand how resolve?
pdns.conf
setuid=pdns
setgid=pdns
launch=bind
launch=gmysql
gmysql-host=localhost
gmysql-user=powerdns
gmysql-password=XXXX
gmysql-dbname=powerdns
recursor=8.8.8.8
from my machine to pdns:
nmap -v -sT 192.168.1.123
PORT STATE SERVICE
22/tcp open ssh
53/tcp open domain
80/tcp open http
3306/tcp open mysql
nmap -v -sU 192.168.1.123
PORT STATE SERVICE
53/udp open|filtered domain
; <> DiG 9.8.3-P1 <> gs.mydomain.com @192.168.1.123
;; global options: +cmd
;; Got answer:
;; ->>HEADER<<- opcode: QUERY, status: SERVFAIL, id: 58633
;; flags: qr aa rd; QUERY: 1, ANSWER: 0, AUTHORITY: 0, ADDITIONAL: 0
;; WARNING: recursion requested but not available
;; QUESTION SECTION:
;gs.mydomain.com. IN A
;; Query time: 1 msec
;; SERVER: 192.168.1.123#53(192.168.1.123)
;; WHEN: Fri Jul 22 18:15:12 2016
;; MSG SIZE rcvd: 31
no firewall, selinux disabled
thanks a lot
I get “Authentication failed! ” error in GUI , Once i launched the GUI, When i try logging in to the GUI with my admin user and password. Can you help.
@Vivan,
Please check your PowerAdmin username and password that you were created on Step 16..
Actually correct way to create tables would be to use: /usr/share/doc/pdns-backend-mysql-3.X.X folder which consists from database schema files. In case you want to deploy powerdns with DNSSEC, schema will be there.
mysql -uroot -p powerdns < /usr/share/doc/pdns-backend-mysql-3.X.X/schema.mysql.sql
Please update your directions:
GRANT ALL ON powerdns.* TO ‘powerdns’@’localhost’ IDENTIFIED BY ‘passWord1’;
ERROR 1064 (42000): You have an error in your SQL syntax; check the manual that corresponds to your MariaDB server version for the right syntax to use near ‘‘passWord1’’ at line 1
@Sirmonkey,
Yes, the apostrophe are mentioned wrongly, corrected in the writeup and thanks for notifying us…