The Domain Name System (DNS) is a method used to translate human-readable domain names (or Fully Qualified Domain Names (FQDN)) to machine-readable IP addresses, to locate a computer in a network such as the Internet.
In computer and network systems, this is necessary because, although the FQDNs are easy for humans to remember and use, computers (clients) access resources or services on other computers (servers) based on IP addresses.
In this regard, a DNS server (also known as a name server) maintains a directory of FQDNs and translates them to IP addresses; it can also return an IP address when a hostname/FQDN is provided. There are different types of DNS servers including authoritative name server, caching name server and many others.
In this article, we will walk you through the steps to install and configure a private/internal, authoritative DNS server on RHEL 8 using BIND open source software.
Requirements:
- RHEL 8 with Minimal Installation
- RHEL 8 with RedHat Subscription Enabled
- RHEL 8 with Static IP Address
My Testing Environment:
Domain: tecmint.lan
DNS Server IP and hostname: 192.168.56.100, dns-primary.tecmint.lan
DNS Client IP and hostname: 192.168.56.104, tecmint.tecmint.lan
Step 1: Installing Bind DNS on RHEL 8
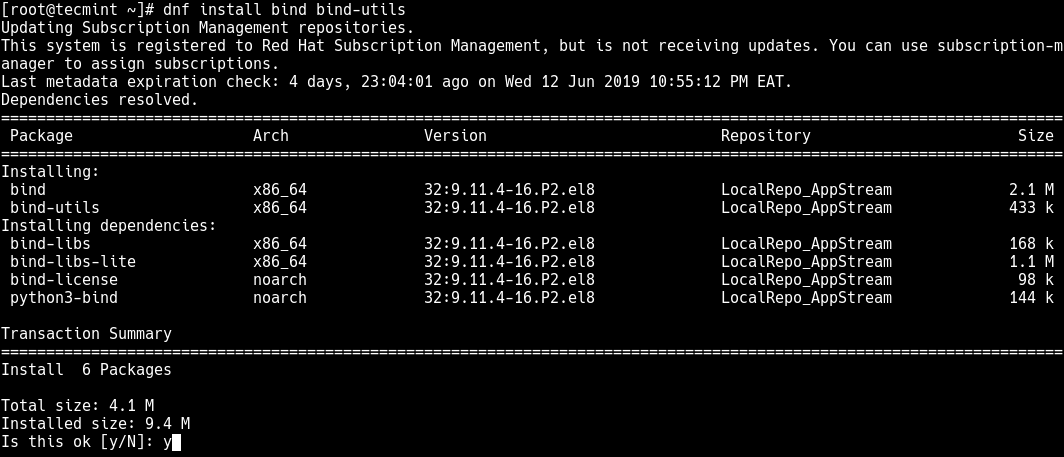
1. To install bind and its utilities on your server, run the following cdnf command.
# dnf install bind bind-utils
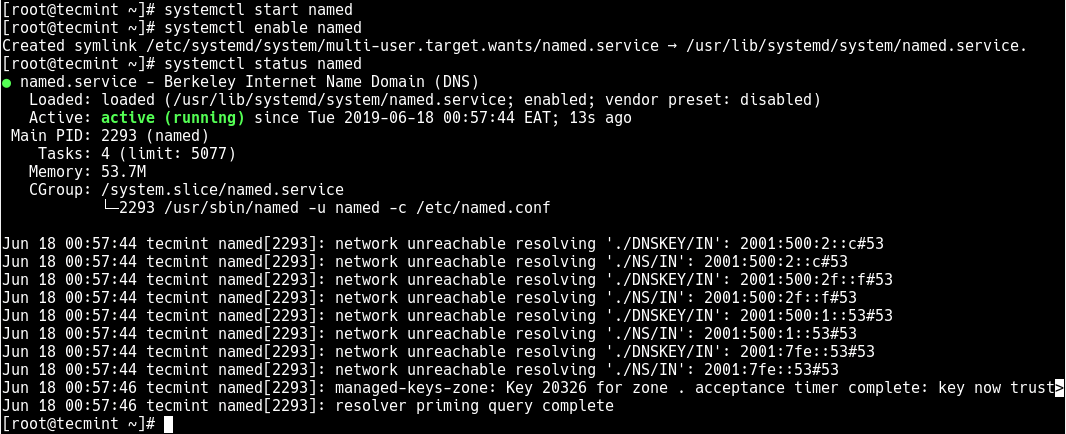
2. Next, start the DNS service for now, then enable it to auto-start at system boot and check if it is up and running using the systemctl commands.
# systemctl start named
# systemctl enable named
# systemctl status named
Step 2: Configuring BIND DNS on RHEL 8
3. To configure Bind DNS server, first you need to take a backup of the original configuration file /etc/named.conf using following cp command.
# cp /etc/named.conf /etc/named.conf.orig
4. Now open /etc/named.conf configuration file for editing using your favorite command line text editor as follows.
# vi /etc/named.conf
Under the options configuration section, comment out the following lines.
options {
        #listen-on port 53 { 127.0.0.1; };
        #listen-on-v6 port 53 { ::1; };
        directory       "/var/named";
5. Next, look for the allow-query parameter and set its value to your network, which means that only hosts on your local network can query the DNS server.
allow-query {localhost; 192.168.56.0/24}
Step 3: Creating the Forward and Reverse DNS Zones
A Forward Zone is where the hostname (or FQDN) to IP address relations are stored; it returns an IP address using the hostname. Note that normal DNS queries are forward lookup queries. On the other hand, a Reverse Zone returns the FQDN of a host based on its IP address.
6. To define the forward and reverse zones, add the following lines at the end of the /etc/named.conf file.
//forward zone
zone "tecmint.lan" IN {
     type master;
     file "tecmint.lan.db";
     allow-update { none; };
    allow-query {any; }
};
//backward zone
zone "56.168.192.in-addr.arpa" IN {
     type master;
     file "tecmint.lan.rev";
     allow-update { none; };
    allow-query { any; }
};
Let’s briefly explain the options in the above zone configurations:
- type: Defines the role of this server for the zone. The value “master” means it’s an authoritative server where the master copy of the zone data is maintained.
- file: specifies the zone’s database file.
- allow-update: specifies the hosts which allowed to submit Dynamic DNS updates for master zones. None in this case.
Step 4: Creating Forward DNS Zone File
7. First, create a Forward zone file under the /var/named directory.
# vi /var/named/tecmint.lan.db
Add the following configuration in it.
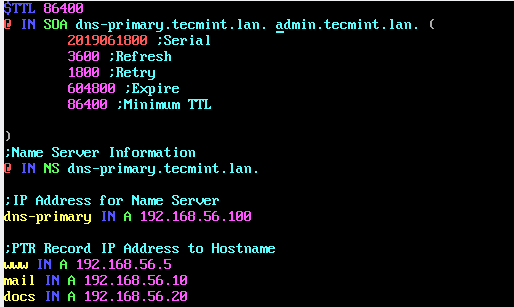
$TTL 86400
@ IN SOA dns-primary.tecmint.lan. admin.tecmint.lan. (
    2019061800 ;Serial
    3600 ;Refresh
    1800 ;Retry
    604800 ;Expire
    86400 ;Minimum TTL
)

;Name Server Information
@ IN NS dns-primary.tecmint.lan.

;IP for Name Server
dns-primary IN A 192.168.56.100

;A Record for IP address to Hostname
www IN A 192.168.56.5
mail IN A 192.168.56.10
docs  IN A 192.168.56.20
Let’s briefly explain the above zone definition and the parameters.
- TTL: specifies the time-to-live of the RR and $TTL directive gives a default TTL for every RR without a specific TTL set.
- @: It is an alias for the domain name (e.g tecmint.lan) defined in the main configuration file.
- IN: means the Internet.
- SOA: specifies the Start of Authority: who the authoritative name server is (dns-primary.tecmint.lan), the administrator’s contact info (admin.tecmint.lan, the @ sign is replaced by a period) and other related information.
- NS: means name server.
- Serial: this value is used by the DNS server to verify that the contents of a particular zone file are up-to-date.
- Refresh: specifies how often a slave DNS server should perform a zone transfer from the master.
- Retry: specifies how often a slave should retry a failed zone transfer.
- Expire: determines how long a slave server should wait before answering client query when a master is unreachable.
- Minimum: sets the minimum TTL for the zone.
- A: A host address.
Step 5: Creating Reverse DNS Zone File
8. Similary, create a Reverse zone file under the /var/named directory.
# vi /var/named/tecmint.lan.rev
Then add the following lines in it. Here, the PTR is the opposite of A record used to map an IP address to a hostname.
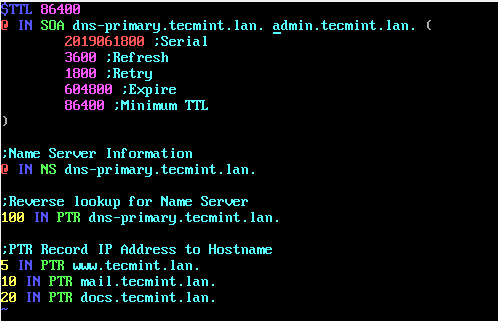
$TTL 86400
@ IN SOA dns-primary.tecmint.lan. admin.tecmint.lan. (
    2019061800 ;Serial
    3600 ;Refresh
    1800 ;Retry
    604800 ;Expire
    86400 ;Minimum TTL
)
;Name Server Information
@ IN NS dns-primary.tecmint.lan.

;Reverse lookup for Name Server
100 IN PTR dns-primary.tecmint.lan.

;PTR Record IP address to HostName
5 IN PTR www.tecmint.lan.
10 IN PTR mail.tecmint.lan.
20 IN PTR docs.tecmint.lan.
9. Set the correct ownership permissions on the zone files as follows.
# chown :named /var/named/tecmint.lan.db
# chown :named /var/named/tecmint.lan.rev
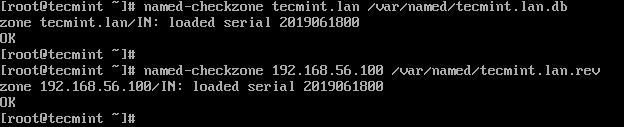
10. Finally, check the DNS configuration and the zone files has the correct syntax after making the above changes, using the named-checkconf utility (no out means no error):
# named-checkconf
# named-checkzone tecmint.lan /var/named/tecmint.lan.db
# named-checkzone 192.168.56.100 /var/named/tecmint.lan.rev
11. Once you have performed all the necessary configuration, you need to restart the DNS service for the recent changes to take effect.
# systemctl restart named
12. Next, before any clients can access the DNS service configurations on the server, you need to add the DNS service in the system firewall config and reload the firewall settings using the firewall-cmd utility, as follows:
# firewall-cmd --permanent --zone=public --add-service=dns
# firewall-cmd --reload
Step 6: Testing DNS Service From a Client
13. In this section, we will show how to test the DNS service from a client side. Log into the client machine, configure it to use the above DNS server. On a Linux system, open the file /etc/resolve.conf using your favorite text editor.
# vi /etc/resolve.conf
Add the following entry in it, which tells the resolver to use the specified nameserver.
nameserver 192.168.56.100
Save the file and close it. Note that you also have to specify the DNS server in the network interface configuration file.
14. Add the DNS servers IP 192.168.56.100 as resolver to the client machine network interface configuration file /etc/sysconfig/network-scripts/ifcfg-enp0s3 as shown in the following figure.
TYPE=Ethernet
PROXY_METHOD=none
BROWSER_ONLY=no
BOOTPROTO=dhcp
DEFROUTE=yes
IPV4_FAILURE_FATAL=no
IPV6INIT=yes
IPV6_AUTOCONF=yes
IPV6_DEFROUTE=yes
IPV6_FAILURE_FATAL=no
IPV6_ADDR_GEN_MODE=stable-privacy
NAME=enp0s3
UUID=aba298ca-fa65-48cd-add9-6c3f1f28cee2
DEVICE=enp0s3
ONBOOT=no
DNS=192.168.56.100
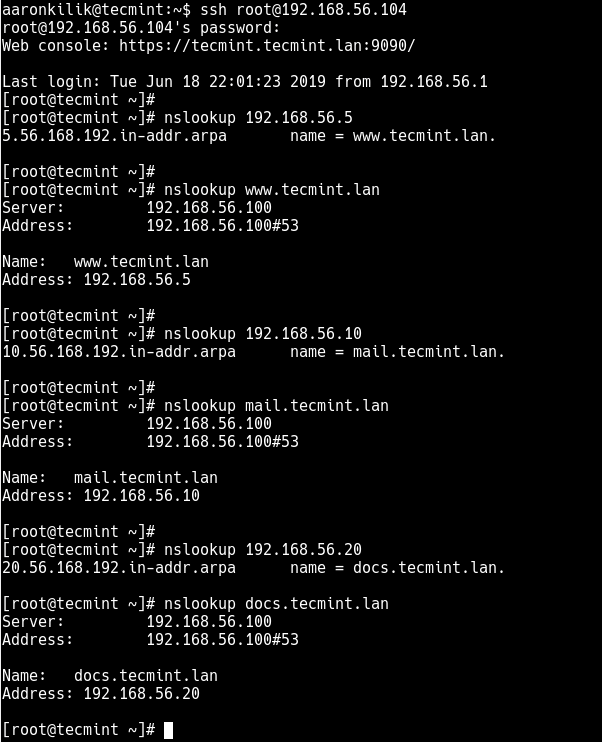
15. Then use the nslookup utility to query the IP using the hostname and vise versa, of the www, mail and docs servers in your network as shown.
# nslookup 192.168.56.5
# nslookup www.tecmint.lan
# nslookup 192.168.56.10
# nslookup mail.tecmint.lan
# nslookup 192.168.56.20
# nslookup docs.tecmint.lan
# nslookup 192.168.56.100
# nslookup dns-primary.tecmint.lan
Summary
In this article, we have shown how to install and configure a private, authoritative DNS server on RHEL 8 using BIND software. We hope everything worked fine for you, otherwise, send us your queries or any other comments via the feedback form below.