Installing Windows 7 over PXE Network Boot Server on RHEL/CentOS 7 using WinPE ISO Image – Part 2

Continuing the series regarding installing Windows 7 over RHEL/CentOS 7 PXE Network Boot, where in the first part I have only covered setting up prerequisites on PXE Server, now in this article will be going to discuss how to build WinPE ISO image with the help of Windows Automated Installation Kit on Windows and then move the build image to PXE Server TFTP default location to access and install Windows 7 over PXE network.

Install Windows 7 over PXE Boot in Linux
Install Windows 7 over PXE Boot in CentOS

Requirements

  1. Configure PXE Server to Install Windows 7 over PXE Network Boot – Part 1

Step 1: Download and Install Windows Automated Installation Kit

1. On this second part, logon to a Windows 7 Operating System computer, go to Microsoft Download Center and download Windows Automated Installation Kit ISO image file by using the following link.
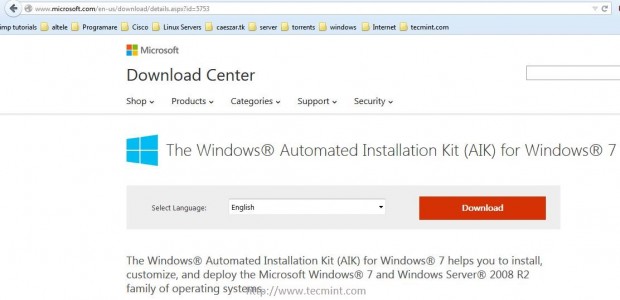
  1. http://www.microsoft.com/en-us/download/details.aspx?id=5753
Download Windows Automated Installation Kit

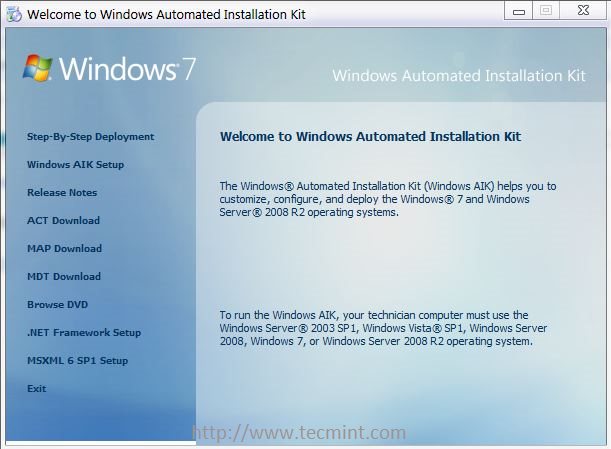
2. After AIK ISO image finishes downloading, mount the image using a Windows mount software (Daemon Tools Lite Free Edition will do the job) and install Windows Automated Installation Kit software.
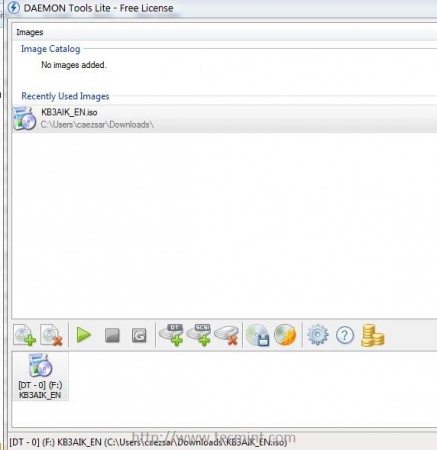
Mount Windows Automated Installation Kit
Welcome to Windows AIK

Step 2: Create WinPE ISO Image on Windows 7

3. After Windows AIK software is installed on your system go to Windows Start -> All Programs -> Microsoft Windows AIK -> right click on Deployment Tools Command Prompt and select Run as Administrator and a new Windows Shell console should open on your screen.
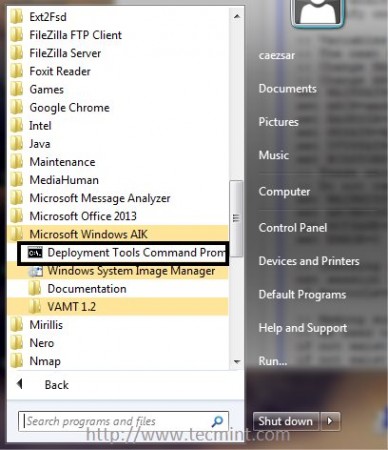
Create WinPE ISO Image

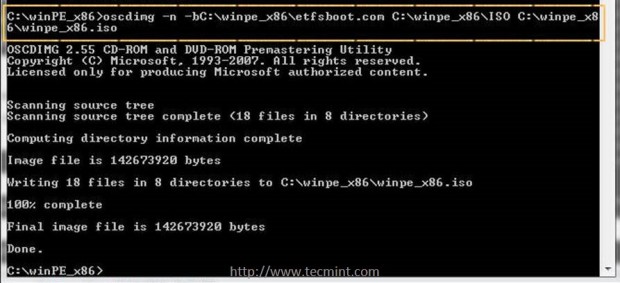
4. Now it’s time to build the Windows 7 Preinstallation Environment (WinPE) x86 boot image by issuing the following commands on Deployment Tools Command Prompt.

copype x86 C:\winPE_x86
copy "C:\Program Files\Windows AIK\Tools\PETools\x86\winpe.wim" C:\winpe_x86\ISO\Sources\Boot.wim
copy "C:\Program Files\Windows AIK\Tools\x86\Imagex.exe" C:\winpe_x86\ISO\
oscdimg -n -bC:\winpe_x86\etfsboot.com C:\winpe_x86\ISO C:\winpe_x86\winpe_x86.iso
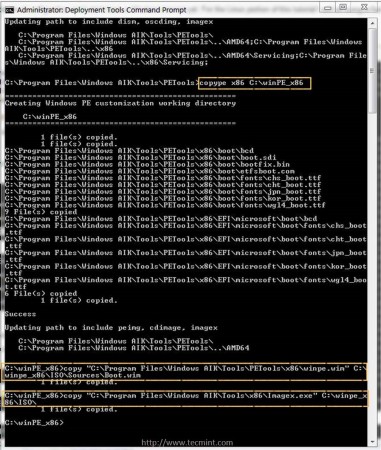
Build WinPE Image
Build WinPE Image
Copy WinPE ISO Image

5. Although for this tutorial just the WinPE x86 Boot ISO Image is required, below you can find the commands to build PE Images for Windows 7 64-bit and Windows 8 architectures also.

To build WinPE Boot images for Windows 7 64-bit use the following commands:
copype amd64 C:\winPE_amd64
copy "C:\Program Files\Windows AIK\Tools\PETools\amd64\winpe.wim" C:\winpe_amd64\ISO\Sources\Boot.wim
copy "C:\Program Files\Windows AIK\Tools\amd64\Imagex.exe" C:\winpe_amd64\ISO\
oscdimg -n -bC:\winpe_amd64\etfsboot.com C:\winpe_amd64\ISO C:\winpe_amd64\winpe_amd64.iso
To build Windows 8 32-bit WinPE bootable images run the following commands:
copype x86 C:\Win8PE_x86
MakeWinPEMedia /ISO C:\Win8PE_x86 C:\Win8PE_x86\WinPE_x86.iso
To build Windows 8 64-bit WinPE bootable images run the following commands:
copype amd64 C:\Win8PE_amd64
MakeWinPEMedia /ISO C:\Win8PE_amd64 C:\Win8PE_amd64\Win8PE_amd64.iso

Step 3: Copy WinPE ISO Image to CentOS PXE Server

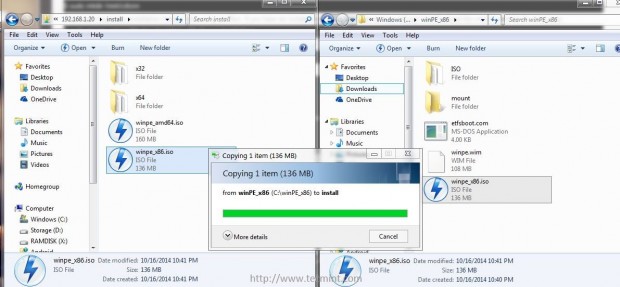
6. After Windows 7 Preinstallation Environment (WinPE) x86 boot image has been created, use Windows Explorer to copy winpe_x86.iso image located in C:\winpe_x86\ windows path to PXE Samba shared directory at \\192.168.1.20\install network location.
Copy WinPE ISO Image PXE Server

7. After WinPE x86 ISO file is completely transferred to Samba “install” shared directory go back to PXE Server console and move this image from root’s /windows directory to TFTP windows directory path to complete the entire installation process.

# mv /windows/winpe_x86.iso  /var/lib/tftpboot/windows/

Step 4: Boot and Install Windows 7 over PXE Network on Client Side

8. In order to boot and install Windows 7 via network and PXE server, first instruct the clients machines to boot over network by modifying BIOS device boot order or hit a custom key during BIOS post to select a network boot device.

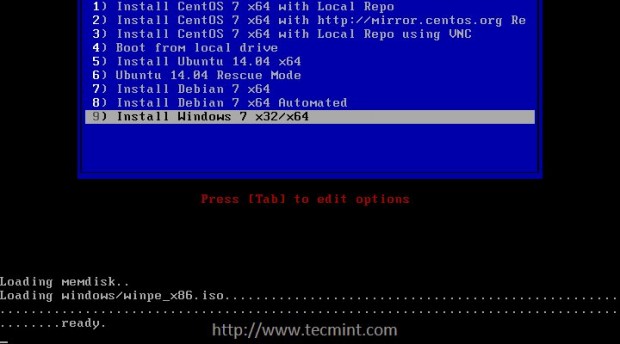
After the first PXE prompt appears press F8 and Enter keys to continue and then select Install Windows 7 from PXE menu.
Select Windows 7 from PXE Menu

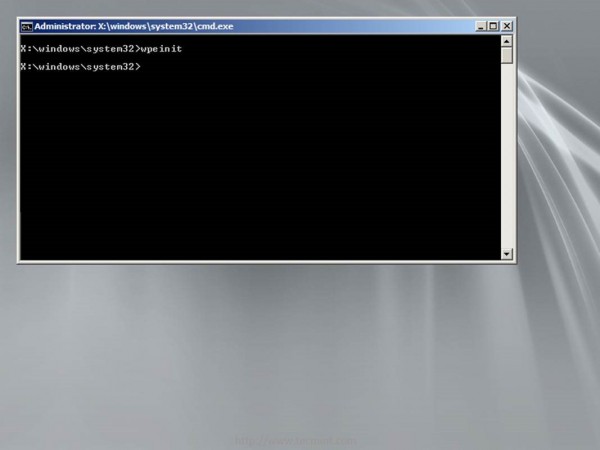
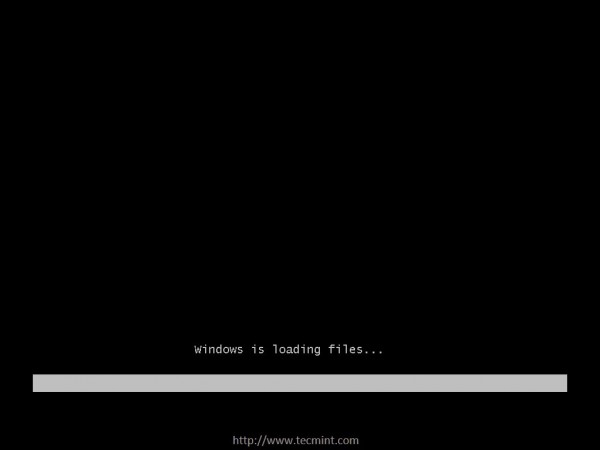
9. After WinPE image finishes loading, a customized minimal image of windows starts and a Command Prompt window will be displayed on screen.
Loading Windows 7 over PXE Boot
Starting Windows 7 over PXE Boot
Windows 7 Command Prompt

10. In order to install Windows 7 over a Network Share, in the Command Prompt window, map the Windows installation sources (use the architecture
path you want to install), configured on PXE Samba share directory, as a Network drive.

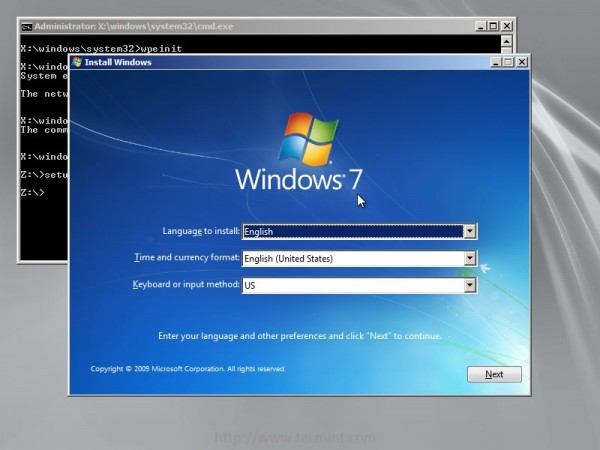
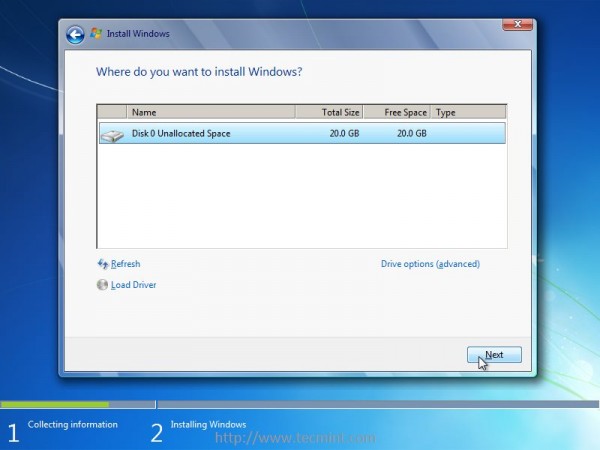
Then enter network drive share, by specifying the drive letter, and run setup.exe utility. Use the following commands to start the installation process (replace the samba network address location and network drive letter accordingly) and continue with the installation process as you normally do it from a local DVD media.

net use z: \2.168.1.20\install\x32
Z:
setup.exe
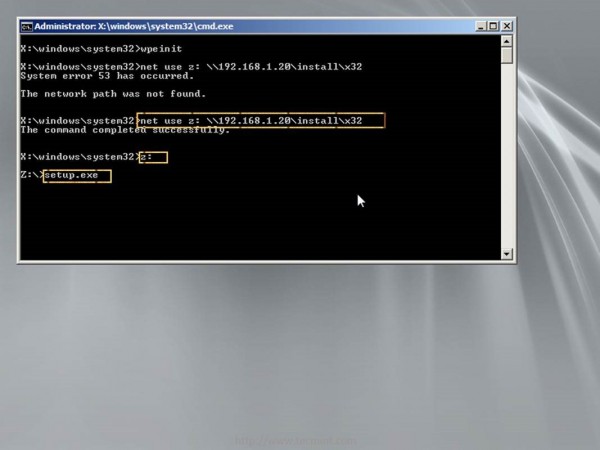
Enter Windows 7 Installation Source
Choose Windows 7 Language
Select Drive to Install Windows 7

11. If you want to install the 64-bit architecture, map the specific 64-bit network path using a different letter and continue the installation procedure by following the same steps explained above.

net use y : \2.168.1.20\install\x64
Y:
setup.exe
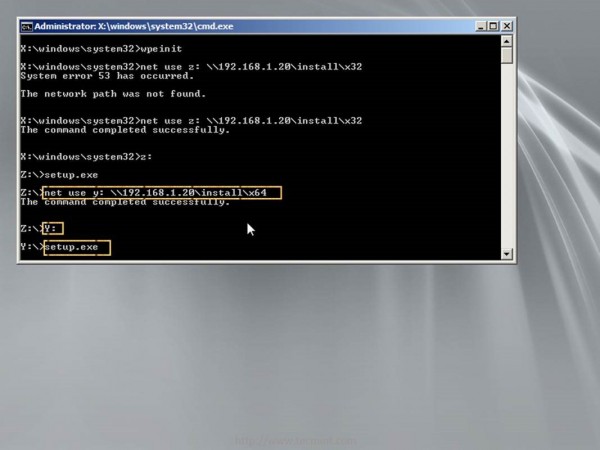
Choose Windows 7 Install Source
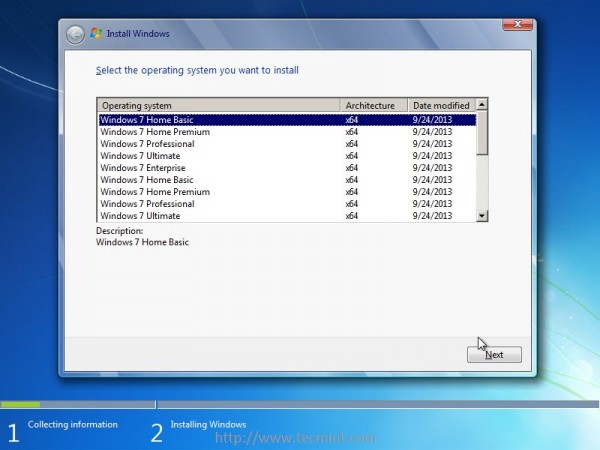
Select Windows 7 Home Basic

12. In case the installation sources are configured with authentication use the following command switch to specify the username.

net use y : \2.168.1.20\install\x64  /user:samba_username

13. After both architectures installation sources had been mapped you can change between them by switching to the designated network drive letter as presented in the screenshot below.
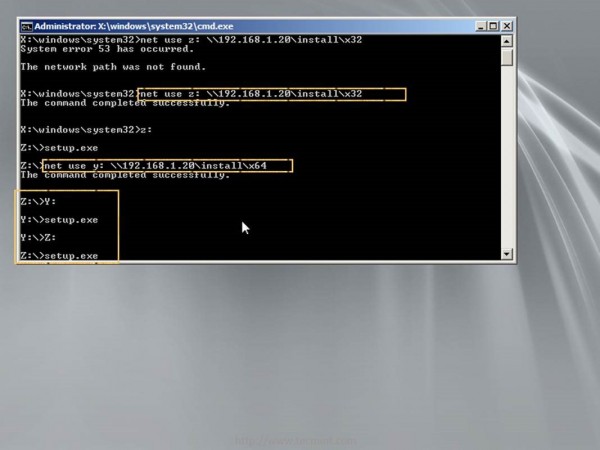
Change Network Installation Source

Thats all! Performing Windows installations over PXE and network has a lot of advantages, such as cutting down the installation time drastically, allowing the installation process to take place the same time on multiple machines without the need to use a physical installation media.

You can also setup multiple Windows Installation Sources (using Windows or Samba shares) on different machines over your network to avoid a bottleneck on RHEL/CentOS PXE Server, in case you install Windows on multiple machines the same time, and direct the network drive maps to use those specific network sources on installation process.

Matei Cezar
I'am a computer addicted guy, a fan of open source and linux based system software, have about 4 years experience with Linux distributions desktop, servers and bash scripting.

Each tutorial at TecMint is created by a team of experienced Linux system administrators so that it meets our high-quality standards.

Join the TecMint Weekly Newsletter (More Than 156,129 Linux Enthusiasts Have Subscribed)
Was this article helpful? Please add a comment or buy me a coffee to show your appreciation.

97 thoughts on “Installing Windows 7 over PXE Network Boot Server on RHEL/CentOS 7 using WinPE ISO Image – Part 2”

  1. So do we REALLY need a different winpe for Windows 7, 8, and 10 (making 3 PEs) or can we just make the 1 Windows 10 PE and then run setup.exe from whatever windows version’s folder it needs (like \win7\setup.exe OR \win8\setup.exe OR \win10\setup.exe)?

    I ask because I am doing a central pxe server for home (I spin up VMs all the time) that has ubuntu, windows server (various versions), windows client (various versions), and a few other utilities.

    Reply
  2. First thanks for all your job here. When I tried to launch the boot to install win7 this message appears “could not find ramdisq image : windows/winpe_x86.iso

    Any help please..

    Reply
  3. Very nice guide but when I launch the pxe boot it hangs at wpeinit, tried goggling but could not find a working solution. Have you come across this issue?

    Reply
  4. Hi Matei,

    This works perfect for me. Thanks!

    Now I have newer motherboards and the network don’t work. I think I have to include the NIC drivers for those board. Can you tell how to do that?

    Reply
  5. Is there a way to specify an unattend.txt answer file? Ideally I’d like to build the winpe to then get a just in time generated unattend.txt file from my katello/satellite6 server. My goal is to build win systems using Satellite that have puppet installed and use puppet for ALL post install work. The new systems would use a Satellite/katello capsule as the puppet master.

    Reply
  6. I have followed your guide, and well I have found some things to comment, and help this guide have the success that is expected, Then what I found and how to solve it:

    1.The file dnsmasq.conf, this line should be corrected dhcp-option=6,192.168.20.2,192.168.20.5, that my ip dns, use your property ip.

    2. In the case of the Samba server, if you have SELinux active as it should be my recommendation is to use these three additional commands so as not to inconvenience once you want to access from windows to the samba server.

    # setsebool -P samba_export_all_rw=1 samba_enable_home_dirs=1
    # setsebool -P samba_export_all_ro=1
    # setsebool -P samba_export_all_rw=1
    

    3. I had problems with the pxe when capturing the iso image, so I decided to make a change to use the same samba server to do the capture, leaving the menu as follows.

    #  nano /var/lib/tftpboot/pxelinux.cfg/default
    
    label 1
    menu label ^1) Install Windows 7 x32/x64
    KERNEL memdisk
    INITRD winpe_amd64.iso method=file:///192.168.20.5/windows
    APPEND iso raw
    
    Reply
  7. I would like to ask, after successfully configure linux in part 1 After that run on this step, the problem of windows installed Windows Automated Installation Kit it belong to? for sure in the previous step we just configure linux

    Reply
  8. Check permissions on the share, reboot the system, verify or turn off windows firewall and antivirus, check credentials, make sure the client has enough memory.
    Try to use the command as shown here:
    net use K: \\IP_of_share\path_to_share /user: your_share_user your_share password

    Reply
  9. Hi, used win 10 PE image, trying to install server 2012 over pxe.
    net use command gives the error: 58 the specified server cannot perform the requested operation
    Any help would be appreciated.

    Reply
  10. When trying to create winpe for windows 8 64 bit the first command ran successfully but the next command i.e “MakeWinPEMedia /ISO C:\Win8PE_amd64 C:\Win8PE_amd64\Win8PE_amd64.iso
    ” it shows an error ‘MakeWinPEMedia’ is not recognized as an internal or external command,
    operable program or batch file.

    Note: I am trying to run this command on window 8.1 64

    Please suggest….

    Reply
  11. i have the following issue : i pxe booted winpe iso but in the command prompt i cannot mount the samba share : i get error stating that error 1231 occurred ; if i run ipconfig in the prompt it does not report the ip . I think that network drivers were not compiled/copied during the winpe.iso creation.

    has anyone encountered what i mentioned above ?

    Reply
    • If you use a windows 7 compiled winpe image than it’s possible that most of network interface drivers won’t be available. Insted, you can install WAIK on a Windows 10 machine, create a WinPE image based on win 10, upload the image to tftp server and use that image. From my experience winpe images based on Windows 10 have better support for network drivers.

      Reply
  12. Very useful guide, it has helped me a lot.
    I recently deployed a similar setup using this guide (among many), however I have some issues with WinPE not finding the network drivers for the computers I boot on.

    I tried various images, one using the basic WinPE image and another one with a large amount of .inf drivers. None of them seem to find the network driver (out of 900+ .inf files).

    How do you manage all your computers to get direct access to the network upon booting to the WinPE through PXE?
    Keeping in mind I need to boot on very heterogeneous computers with different networking interfaces, while I am aware that I can load the drivers manually through WinPE, I’m looking for a more autonomous way.

    Sorry for the long post, but I’ve been scratching my head for a while, and I’m in need of more professional and experienced opinions.

    Thank you for your time, and keep up with the hard work :)

    Reply
    • This is a well known problem that Windows PE images have many issues with network cards not properly finding the network drivers .Lately, I’ve created a WinPE image based on Windows 10 and seems to do the job very well with different network adapters but I can’t guarantee it will work for all NICs, but you can try this solution.

      Install Windows Automated Installation Kit on a Windows 10 machine and create the WinPE image using the official guide from Microsoft (you can also load additional drivers to this image):

      https://msdn.microsoft.com/en-us/windows/hardware/commercialize/manufacture/desktop/winpe-create-a-boot-cd-dvd-iso-or-vhd and upload the ISO to PXE server root directory /var/lib/tftpboot/

      Another solution would be to create a custom ISO live image of Windows 10 using this project http://win10se.cwcodes.net/Compressed/index.php and deploy the ISO image via PXE server.

      It would take a longer to be uploaded via PXE since it’s larger than classical WinPE images but it can be highly tuned.

      The statements for pxelinux.cfg/defult file for uploading the custom WinPE ISO images via PXE are as follows:

      label 24
      menu label ^24) Install Windows via WinPE_10 Image
      kernel memdisk
      append initrd=winpe10/WinPE10_amd64.iso iso raw (use the name and path for your custom image here)

      Also, make sure that you use MEMDISK 4.05 20140113 version. Newer versions of memdisk seems not to properly load the ISO images.

      Reply
      • Thanks for the reply :)

        Indeed WinPE for Windows 10 seems to accept more NICs, I tried it shortly after having posted my comment (I should have done the opposite, I know ^^’).

        Now I’m just using the WinPE 10 image and so far I have not found a computer with an unsupported NIC, so here’s to hoping it continues like that :D

        BTW, I read in another article, and have used it since, instead of using pxelinux.0, using lpxelinux.0 allowed me to point the INITRD to an HTTP address of the PXE server. Using HTTP instead of TFTP has greatly improved the speeds at which the images are downloaded.
        I found the information useful, so I thought I’d share :D

        Reply
    • Glad to know that it worked for you and you shared this info with us. About that tip, can you please share with us where did you downloaded the lpxelinux.0 file and what changes have you done on default file?

      Reply
      • Well when using Ubuntu Server and Debian, the Syslinux package didn’t contain all the files I required, so I downloaded the tar.gz directly from the syslinux.org website (https://www.kernel.org/pub/linux/utils/boot/syslinux/) using wget. From the extracted folder I had a lot more files than from the apt package, including lpxelinux.0.

        To use HTTP, after having installed Apache2 I placed the ISO in the /var/www/html/ folder instead of the TFTP root folder.
        In the default file, whenever I need to load an ISO, instead of having something line “initrd=windows/winpe_amd64.iso”, I changed it to “initrd=http://192.168.1.210/winpe_amd64.iso”.

        Honestly, from what I tested so far, HTTP is a lot faster than TFTP, since the network is wired with full gigabit, in some case the download of WinPE was near instantaneous, so that’s great :D

        Reply
        • Thanks for this tip. I would try the deploy some images using http or ftp protocols to see how it works on my premises. Keep in touch!

          Reply
  13. Good day friends, great work that you are performing, my congratulations.

    I’ve followed your tutorial, but not able to set the in /var/lib/tftpboot/pxelinux.cfg/default, usually to mount an iso image of an operating system , the menu is written in the kernel and initrd, but as this is not windows then I can do.

    Please help me with this.
    THANK YOU! :3

    Reply
    • I don’t really understand your question! You need to run a ISO image from PXE server or you need to automatically mount a ISO directly from PXE menu?
      You can, possibly, run a ISO image by adding the following lines of code to default configuration file:

      LABEL Your_linux
      MENU LABEL Your_linux
      kernel memdisk
      append initrd=path/to/Linux_disto.iso iso raw

      Reply
  14. Also, booting the pxe winpe image from network can take a large amount of time depending on client resources and net bandwidth.

    Reply
  15. Why did you renamed winpe iso image. Check the configuration again, maybe there’s a typo. Also be aware that the client must have sufficient ram to load the image over network and the network sould operate properly without any congestion or packet loss. Also, be aware that not all machines can boot a pxe windows image over network. Any errors whatsoever?

    Reply
  16. Hello all,

    I have complete the above set. I get a menu, however when I press enter on install windows it does nothing. Same time I also have an option to install debian and it works perfectly fine. Please help.

    my pxelinux.cfg looks like :

    include debian-installer/amd64/boot-screens/menu.cfg
    PROMPT 0
    default debian-installer/amd64/boot-screens/vesamenu.c32
    MENU TITLE Network Boot Menu

    #DEAULT wheezy_amd64

    LABEL wheezy_amd64_nopart
    MENU LABEl wheezy 64bit (manual parition)
    kernel debian-installer/amd64/linux
    append vga=normal initrd=debian-installer/amd64/initrd.gz auto=true hostname=unassigned doma$

    LABEL Install Windows 7 x32/x64
    KERNEL memdisk
    APPEND iso raw INITRD=windows/win7.iso

    TIMEOUT 0

    NOTE: windows is a folder in the same directory and win7.iso (rename winpe_x86.iso)

    PLEASE HELP URGENT

    Reply
  17. Great tutorial! Everything works great.

    My question is, when Windows 7 goes down for the first restart, does it need to pxe boot into the winPE image again or can windows remember that the installation files are in a particular network location?

    Reply
  18. Hi
    i have a question , after step 6 (when i reach the coping part) i did’t understand what are //IP/install is , it is a folder i must create on my machine or what ?
    and when i apply this command # mv /windows/winpe_x86.iso /var/lib/tftpboot/windows/ it did;t work at all.
    Please help me
    i’m so sorry for my broken English

    Reply
    • \\IP\install is the share from the linux samba machine that you access from the windows machine in order to copy the winpe image. I’ve used this method to copy the winpe image from windows workstation to the linux pxe server because it requires no extra software to be installed on the windows machine. After you transfer winpe image on pxe linux server (by using the samba share) then you initiate the copying procedure to /var/lib/tftp directory. To put it simpler: on windows exporer you enter the share with \\ip\share , copy winpe from windows to linux, then enter linux cli and move, or copy, the image further on linux /var/lib/tftpboot/windows

      Reply
  19. Hi,

    I followed your guide which works with CentOS PXE, but when I try the winPE it does not work.
    From step 8 i get this error: could not find ramdisk image: windows\winpe_x86.iso

    I have verified that the file actually is located in: /var/lib/tftpboot/windows/

    Can you help me with this problem?

    Reply
    • It can be a problem with your network, maybe a network delay, a traffic congestion or a small bandwidth between the client and PXE server. You also need min 256MB of RAM to properly load the WinPE image on the client side. What error it throws you?
      Error 16 = not enough RAM on client
      Error 21 = network error

      Reply
  20. i succesfully got the command prompt after network booting through the winpe_x86.iso BUT when i use “net use z: \\192.168.1.254\install” it always shows me system error 53 has occured and network path not found. NOW in my case my RHEL host has a static ip of 192.168.1.254. is this causing a problem of network?? does this configuration only work on dhcp (because as the ip address shown here in this article is dynamic. i.e 192.168.1.20). please help me asap!

    Reply
    • You need to run DHCP server on the network in order to allocate IP address to the host from where you are performing net booting. Otherwise that host won’t any network configurations. Also, the samba machine where you keep the network share for windows installation files, it’s better to be configured with a static IP address. In your case, I assume that RHEL (192.168.1.254) machine is the PXE server and, the same time, the samba share server, where you host your windows installation files? or the windows installation files are located on a share somewhere else on your network? If this is the case then you need to provide the IP and path to samba share for windows installation sources.

      Reply
      • THANKS A LOT for your prompt reply!
        yes my pxe and samba share server are the same with static ip of 192.168.1.254. Now as per ur answer I should configure MY RHEL host with a dynamic(dhcp) n/w configuration and the samba share server with a static ip right? so how should i do that? and another thing i want to tell you is that when i try to ping (through the booted winpe_x86.iso) cmd, to my statically configured pxe server ip(192.168.1.254), it says request timed out and doesnt ping at all. so how should i proceed now?

        Reply
        • No, your RHEL server is correctly configured this way ( with static IP Address). Form this point you don’t need to change anything so far. It looks like the problem is on the winPE image side, it seems like the winPE image doesn’t configure the networking properly. You should add your machine network interface driver winPE image when you build the image. Look in Microsoft doc to see how it’s done. Also, a suggestion (don’t know if it will work), try to add a new physical NIC on the machine you are trying to boot from, maybe the winPE image automatically detects it.

          Reply
  21. on CMD stage (net use z: \\192.168.1.20\install\x32 Z: setup.exe) unable to ping my pxe server. LAN driver issue while installing win 7.
    How to add LAN drivers in iso image or packages? please Help

    Thank You.

    Reply
  22. There are some technical details of the way Windows PE works that conflicts with the information you provide. The backwards-compatibility layer for 32-bit applications running on a 64-bit operating system (WoW64) was not included with Windows PE, and including it is not an easy task nor is it officially supported. For that reason, the 64-bit ISO uses a native 64-bit executable for setup, and cannot be launched by x86 PE. A couple of workarounds, the first one of which I see you’ve used, is to combine the .WIM indexes from both 32-bit and 64-bit installations into a single .wim file using dism export commands in Windows, or use a command-line option on the 32-bit setup .EXE to point the installation source to the 64-bit .WIM file instead. Also, mounting the files to a directory should not be necessary. Windows should be able to pick up the files just fine where they are.

    Reply
  23. Hi Linux geeks,
    It is possible to install windows automatic? like setting default language, default partition, workgroup/domain name, time zones etc. (whatever ask when installing windows 7/8)
    If Yes, Can u say steps?
    Thanks in advance.

    Reply
  24. hi ….
    i did all servers but pxe booting problem in lan when i going boot fro pxe getting error PXE-E32 : TFTP open timeout ….

    how it will boot without tftp service you didnt configure a TFTP server please tell that….

    Reply
    • i read all 2 part steps but i am not greeting boot from PXE Server i did all steps complete ……

      i did one clonezilla server im my lab that working properly TFTP server am doing cloning to clients PCs…..

      Reply
  25. Help me!
    I see error:
    Could not find ramdisk image: /windows/winpe_x86.iso
    I copy winpe_x86.iso in /widows/ and /var/lib/tftpboot/windows/
    any idea?

    Reply
    • The memdisk image can be found under /usr/share/syslinux path . Copy it to /var/lib/tftpboot/ . If you get the same error, try to rebuild winPE image from windows side.

      Reply
  26. Hi, Very good information on installing Win7 via PXE. Don’t see much guides on net explain the process so easily. I just have one query, maybe I didn’t understand the process correctly. Installation process is happening over the network but where does the Windows 7 OS get installed actually? The local hard drive of the machine booting via PXE? or Server share folder via samba? (Which means every time the client machine boots via network n loads the OS frm network, local CPU/RAM/Display is only used)

    Thanks
    SM

    Reply
    • The OS gets installed on the target system HDD, just like a normal local DVD installation, but with PXE the OS is pulled and installed from the network rather than a local DVD drive. That’s way you boot from PXE because you might not use a local DVD drive.

      Reply
  27. I’d like to automatize the net use and setup steps. Can I create a BAT file ? Where should I put it ?
    This will work with unattended install for Win7 / Win81 ?

    Reply
    • I’m afraid that I don’t have that much knowledge about automating Windows installation process and I can’t give you any valid advices concerning this issue! You should probably visit specialized windows forums or their official help but i don’t think that .bat files would help you much!

      Reply
  28. You are using the wrong architecture version of Windows for installation. Use only the x32-bit setup.exe for both architectures to load the boot-up images!

    Reply
  29. Thanks for this great post.

    i follwoed all the steps, and when doing the setup.exe command for Windows 7 i get this error :
    the subsystem needed to support the image type is not present
    any idea??

    Reply
      • Looks like you’ve misconfigured a step or some directories! From that error i assume it must be the syslinux package. Try to rebuild the entire PXE server from scratch.

        Reply
  30. your post was tremendous gr8 which is helped me a lot coz i dont have win server lic. so my “boss” told me go with Cent OS and i “”Google”” #your post# ……..i followed your all steps but after booting PXE rom i am getting error ” could not find ramdisk image: /windows/winpe_x86.iso” i able to see winpe_x86.iso in /var/lib/tftpboot/windows/ ………….

    please help me regarding this ……………thanks in advance :)

    Reply
  31. Thank you very much for the how-to listed here. I had to make slight modifications because I am working on a Raspberry Pi, plus I had to add a few network drivers to my PE image so that I can actually access the network from the Win install command line. Needless to say this all worked quite well. I managed to learn a few things and now I have the ability to install Win7 over my network using my versatile little Pi =)

    For anyone that may run across this problem…. I have a x86 and x64 install disc for Win7 (both installs on a single disc), you have to build an x86 WinPE image to get the setup.exe to load properly; setup.exe will not load from a x64 WinPE image in this specific case.

    Reply
  32. Not having used this method before I have a simple question.

    After WinPE has finished and you enter the minimal CMD prompt, where you enter net use z: \\192.168.1.20\install\foo, would it be possible to use HTTP protocol example: — net use z: http://192.168.1.20/foo

    I have no practical experience with this CMD prompt and what is allowable, which is why I ask.

    Thanks in advance,

    Ian

    Reply
  33. I have setup everything as stated in this tutorial and I managed to get the PXE menu but when I select one of either the x86 or the x64 options, memdisk loads O.K., winpe_x86.iso or winpe_x64.iso starts loading but only up to 3 dots and then hangs there for a minute before returning back to the menu. I tried rebuilding the winpe iso files, I also tried increasing the memory using the uppermem to 1048576 without success. The installation would still abort with winpe_x86.iso unfinished loading.

    Any help please.

    Reply
  34. for windows 8 , after all the process i get could not find ramsidk iamge /windows
    i put in the tftp root folder and in the samba folder.
    still doesn’t work , can you help?

    it is accessible via samba – i checked it already.

    Reply
  35. Hi!

    I try to install Win7 x64 from a Debian 7 pxeserver. I create the WinPE based on this tutorial. But syslinux says the iso is doesn’t exist. I probe the server with some linux distributions and works fine. I try to upgrade the syslinux from 4.xx to 6.xx but nothing changes. This is a possible Debian bug? I should change the Debian to something else?

    Thanks,
    André

    Reply

Got something to say? Join the discussion.

Thank you for taking the time to share your thoughts with us. We appreciate your decision to leave a comment and value your contribution to the discussion. It's important to note that we moderate all comments in accordance with our comment policy to ensure a respectful and constructive conversation.

Rest assured that your email address will remain private and will not be published or shared with anyone. We prioritize the privacy and security of our users.