This tutorial will guide you on how to join an Ubuntu Desktop machine into a Samba4 Active Directory domain with SSSD and Realmd services in order to authenticate users against an Active Directory.
Requirements:
Step 1: Initial Configurations
1. Before starting to join Ubuntu into an Active Directory make sure the hostname is properly configured. Use hostnamectl command to set the machine name or manually edit /etc/hostname file.
$ sudo hostnamectl set-hostname your_machine_short_hostname
$ cat /etc/hostname
$ hostnamectl
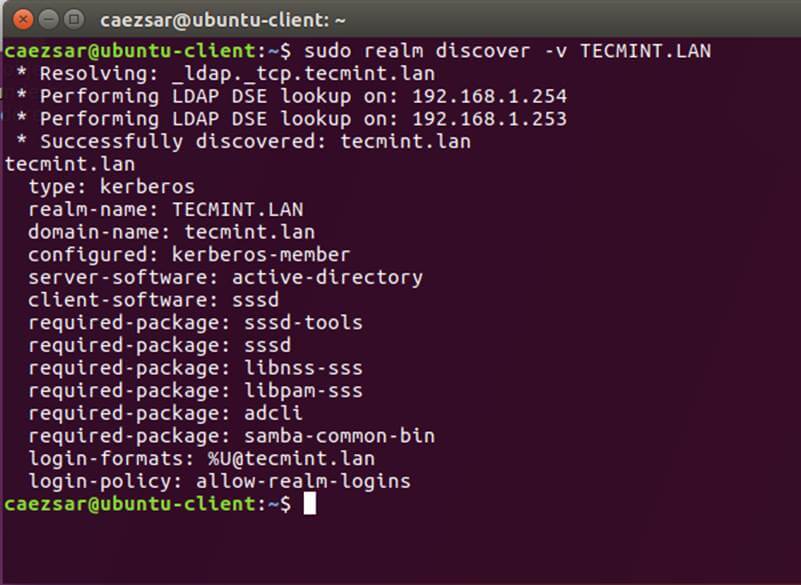
2. On the next step, edit machine network interface settings and add the proper IP configurations and the correct DNS IP server addresses to point to the Samba AD domain controller as illustrated in the below screenshot.
If you have configured a DHCP server at your premises to automatically assign IP settings for your LAN machines with the proper AD DNS IP addresses then you can skip this step and move forward.
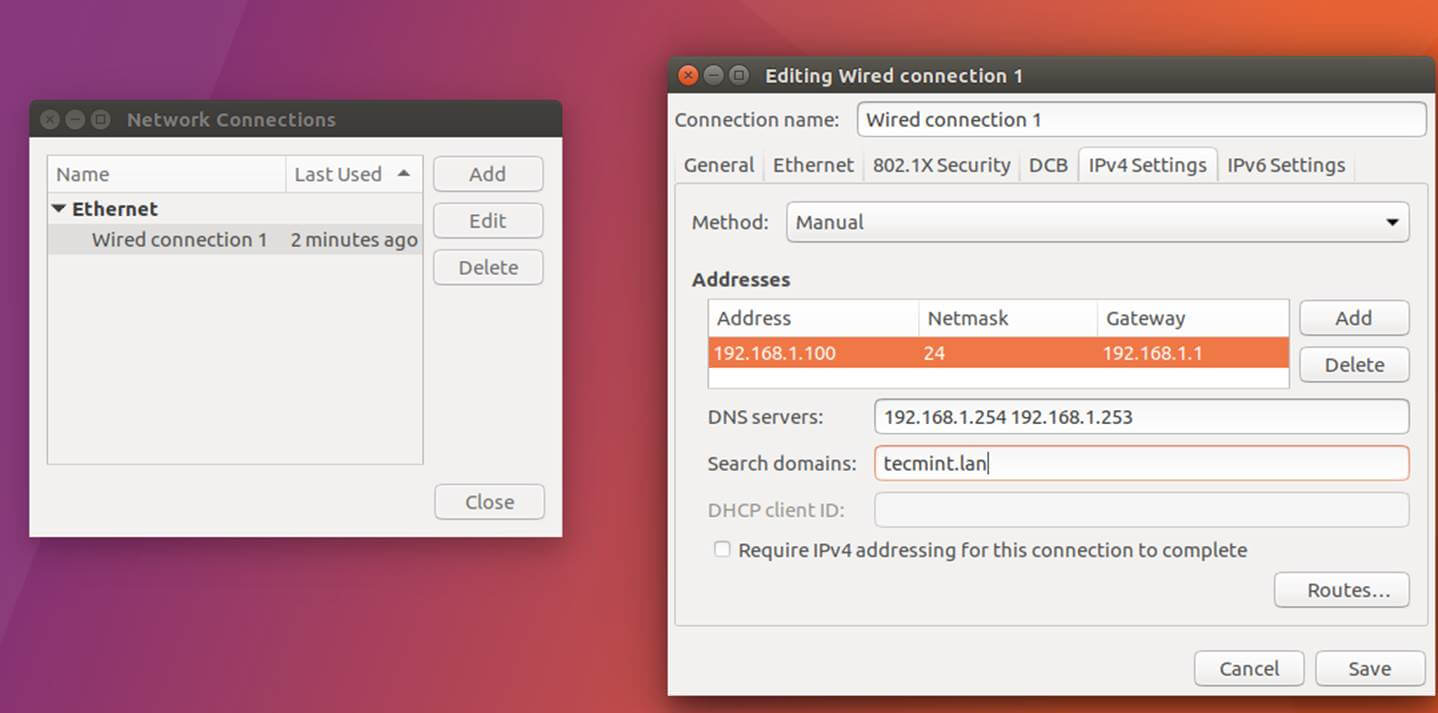
On the above screenshot, 192.168.1.254 and 192.168.1.253 represents the IP addresses of the Samba4 Domain Controllers.
3. Restart the network services to apply the changes using the GUI or from command line and issue a series of ping command against your domain name in order to test if DNS resolution is working as expected. Also, use host command to test DNS resolution.
$ sudo systemctl restart networking.service
$ host your_domain.tld
$ ping -c2 your_domain_name
$ ping -c2 adc1
$ ping -c2 adc2
4. Finally, make sure that machine time is in sync with Samba4 AD. Install ntpdate package and sync time with the AD by issuing the below commands.
$ sudo apt-get install ntpdate
$ sudo ntpdate your_domain_name
Step 2: Install Required Packages
5. On this step install the necessary software and required dependencies in order to join Ubuntu into Samba4 AD DC: Realmd and SSSD services.
$ sudo apt install adcli realmd krb5-user samba-common-bin samba-libs samba-dsdb-modules sssd sssd-tools libnss-sss libpam-sss packagekit policykit-1
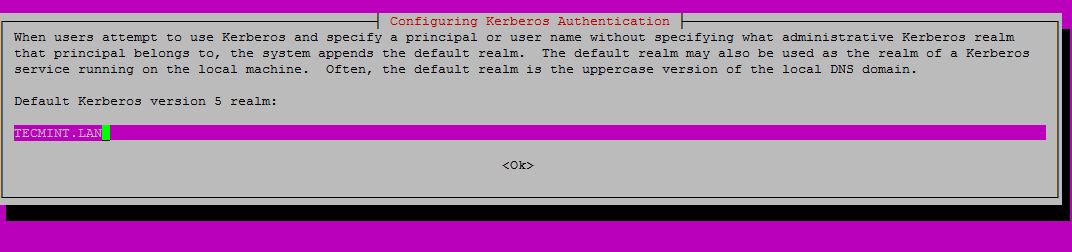
6. Enter the name of the default realm with uppercases and press Enter key to continue the installation.
7. Next, create the SSSD configuration file with the following content.
$ sudo nano /etc/sssd/sssd.conf
Add following lines to sssd.conf file.
[nss]
filter_groups = root
filter_users = root
reconnection_retries = 3

[pam]
reconnection_retries = 3

[sssd]
domains = tecmint.lan
config_file_version = 2
services = nss, pam
default_domain_suffix = TECMINT.LAN


[domain/tecmint.lan]
ad_domain = tecmint.lan
krb5_realm = TECMINT.LAN
realmd_tags = manages-system joined-with-samba
cache_credentials = True
id_provider = ad
krb5_store_password_if_offline = True
default_shell = /bin/bash
ldap_id_mapping = True
use_fully_qualified_names = True
fallback_homedir = /home/%d/%u
access_provider = ad

auth_provider = ad
chpass_provider = ad
access_provider = ad
ldap_schema = ad
dyndns_update = true
dyndns_refresh_interval = 43200
dyndns_update_ptr = true
dyndns_ttl = 3600
Make sure you replace the domain name in following parameters accordingly:
domains = tecmint.lan
default_domain_suffix = TECMINT.LAN
[domain/tecmint.lan]
ad_domain = tecmint.lan
krb5_realm = TECMINT.LAN
8. Next, add the proper permissions for SSSD file by issuing the below command:
$ sudo chmod 700 /etc/sssd/sssd.conf
9. Now, open and edit Realmd configuration file and add the following lines.
$ sudo nano /etc/realmd.conf
Realmd.conf file excerpt:
[active-directory]
os-name = Linux Ubuntu
os-version = 17.04

[service]
automatic-install = yes

 [users]
default-home = /home/%d/%u
default-shell = /bin/bash

[tecmint.lan]
user-principal = yes
fully-qualified-names = no
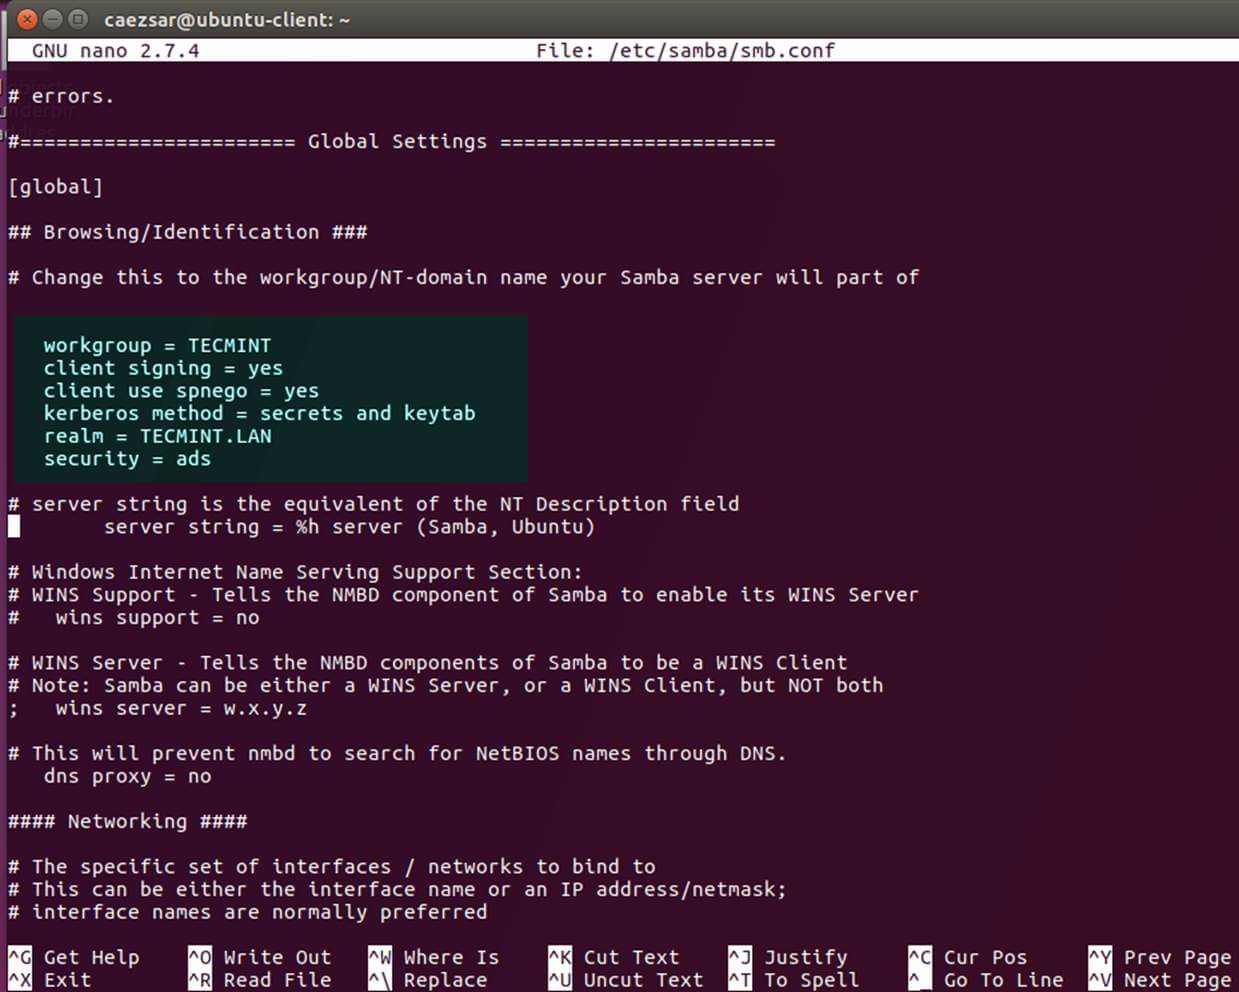
10. The last file you need to modify belongs to Samba daemon. Open /etc/samba/smb.conf file for editing and add the following block of code at the beginning of the file, after the [global] section as illustrated on the image below.
 workgroup = TECMINT
   client signing = yes
   client use spnego = yes
   kerberos method = secrets and keytab
   realm = TECMINT.LAN
   security = ads
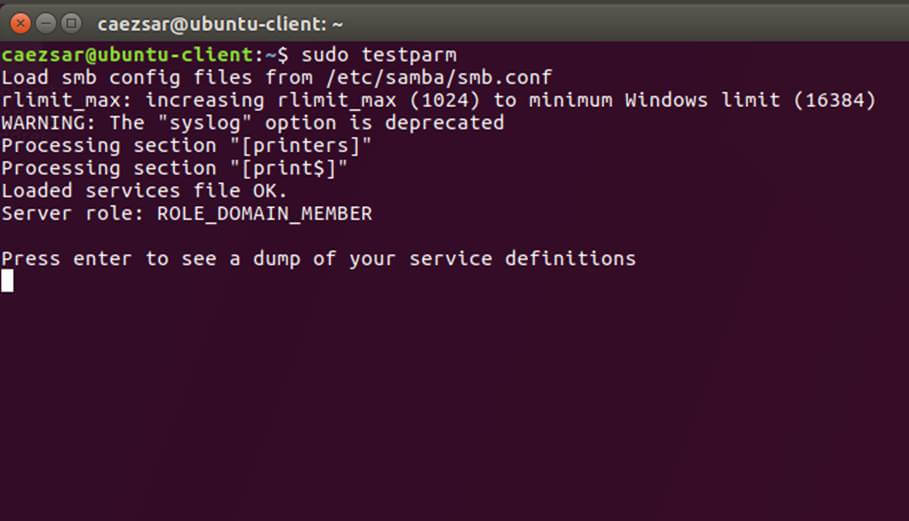
Make sure you replace the domain name value, especially the realm value to match your domain name and run testparm command in order to check if the configuration file contains no errors.
$ sudo testparm
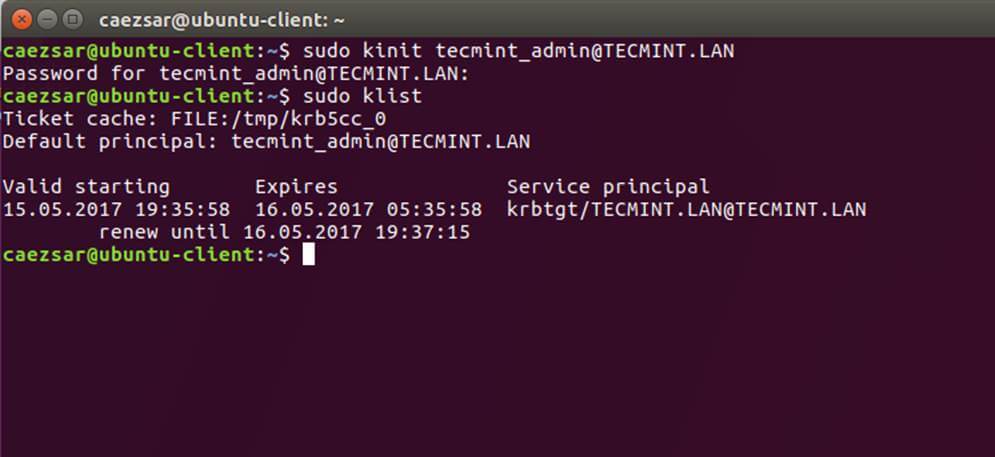
11. After you’ve made all the required changes, test Kerberos authentication using an AD administrative account and list the ticket by issuing the below commands.
$ sudo kinit [email protected]
$ sudo klist
Step 3: Join Ubuntu to Samba4 Realm
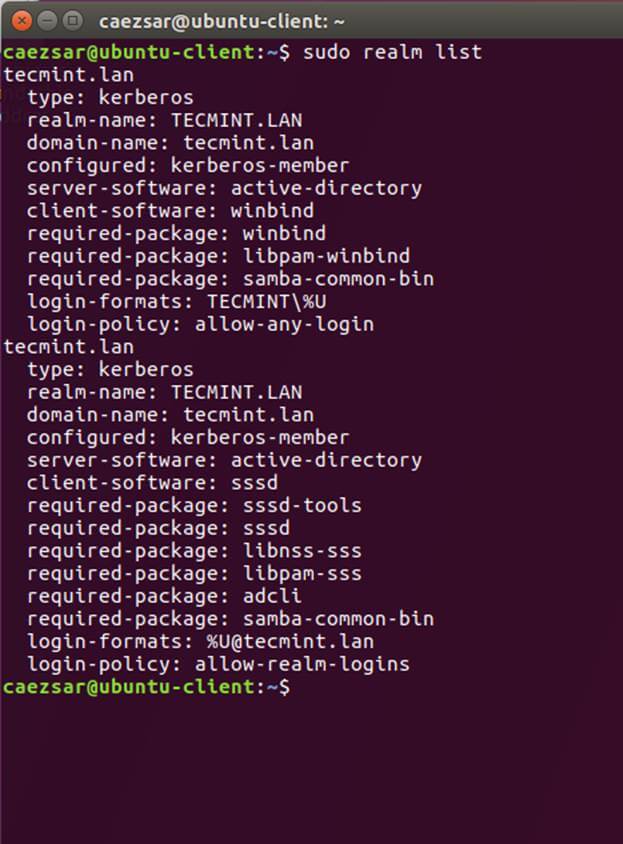
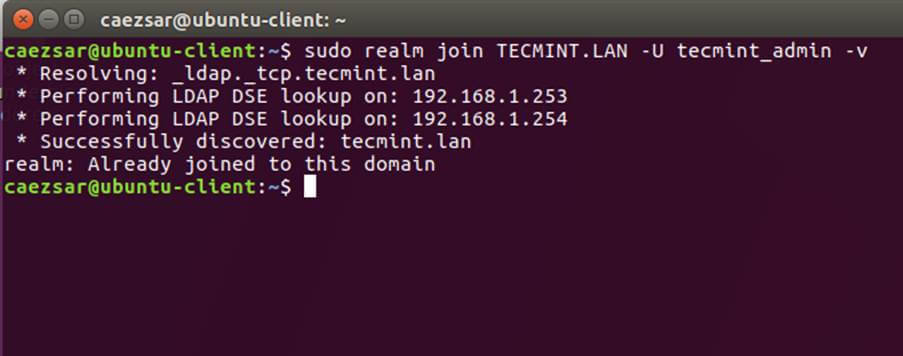
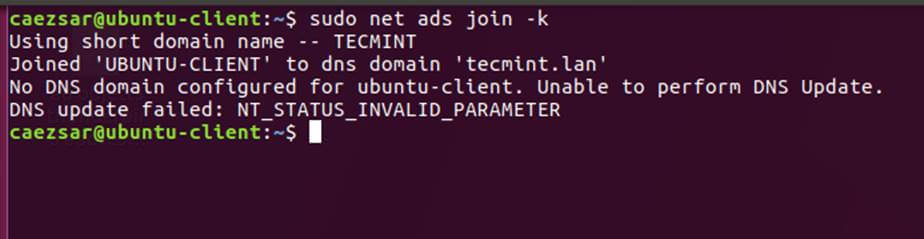
12. To join Ubuntu machine to Samba4 Active Directory issue following series of commands as illustrated below. Use the name of an AD DC account with administrator privileges in order for the binding to realm to work as expected and replace the domain name value accordingly.
$ sudo realm discover -v DOMAIN.TLD
$ sudo realm list
$ sudo realm join TECMINT.LAN -U ad_admin_user -v
$ sudo net ads join -k
13. After the domain binding took place, run the below command to assure that all domain accounts are permitted to authenticate on the machine.
$ sudo realm permit --all
Subsequently, you can allow or deny access for a domain user account or a group using realm command as presented on the below examples.
$ sudo realm deny -a
$ realm permit --groups ‘domain.tld\Linux Admins’
$ realm permit [email protected]
$ realm permit DOMAIN\\User2
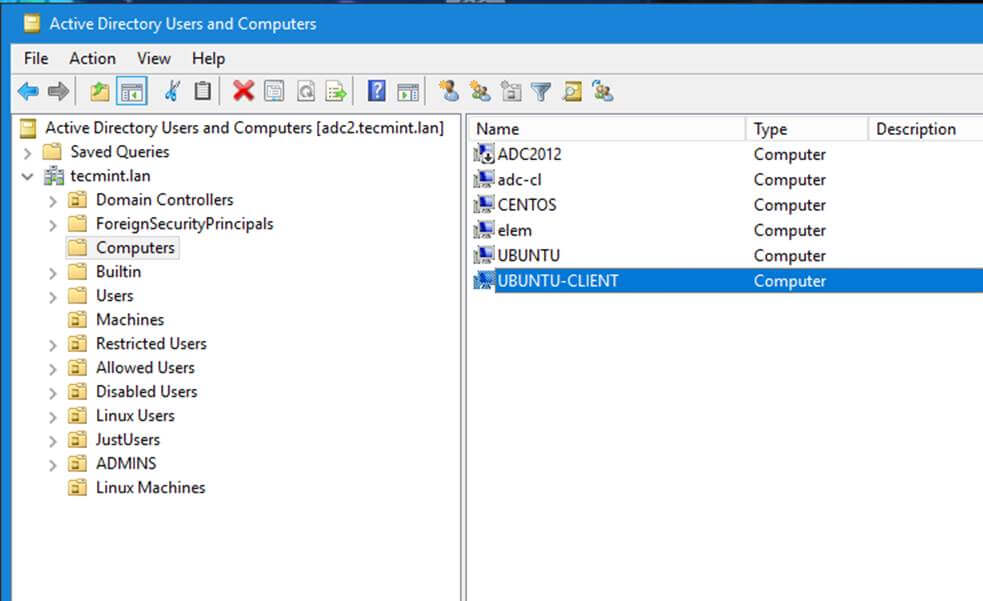
14. From a Windows machine with RSAT tools installed you can open AD UC and navigate to Computers container and check if an object account with the name of your machine has been created.
Step 4: Configure AD Accounts Authentication
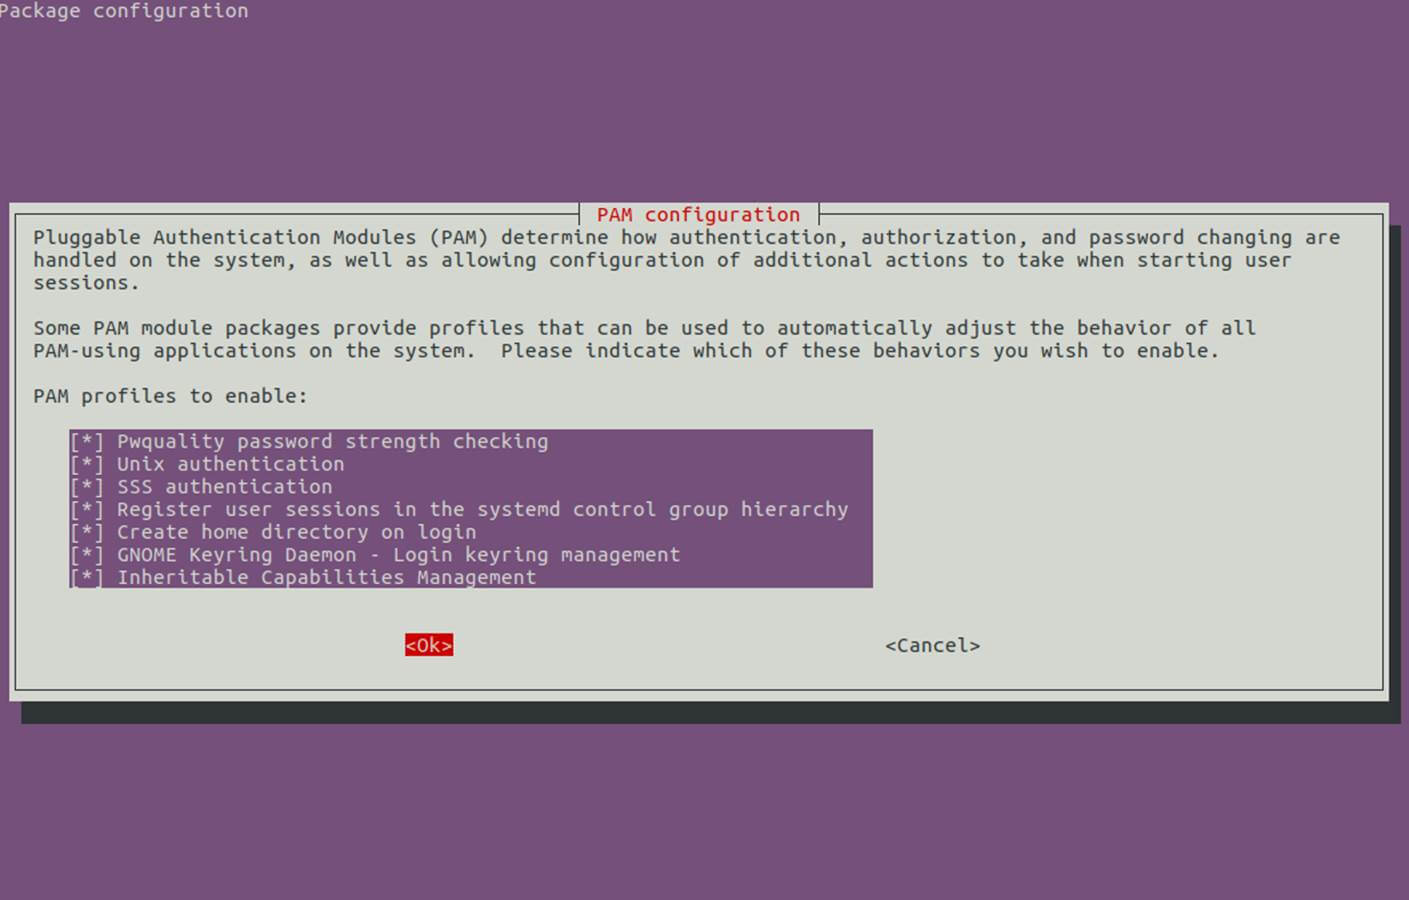
15. In order to authenticate on Ubuntu machine with domain accounts you need to run pam-auth-update command with root privileges and enable all PAM profiles including the option to automatically create home directories for each domain account at the first login.
Check all entries by pressing [space] key and hit ok to apply configuration.
$ sudo pam-auth-update
16. On systems manually edit /etc/pam.d/common-account file and the following line in order to automatically create homes for authenticated domain users.
session required pam_mkhomedir.so skel=/etc/skel/ umask=0022
17. If Active Directory users can’t change their password from command line in Linux, open /etc/pam.d/common-password file and remove the use_authtok statement from password line to finally look as on the below excerpt.
password [success=1 default=ignore] pam_winbind.so try_first_pass
18. Finally, restart and enable Realmd and SSSD service to apply changes by issuing the below commands:
$ sudo systemctl restart realmd sssd
$ sudo systemctl enable realmd sssd
19. In order to test if the Ubuntu machine was successfully integrated to realm run install winbind package and run wbinfo command to list domain accounts and groups as illustrated below.
$ sudo apt-get install winbind
$ wbinfo -u
$ wbinfo -g

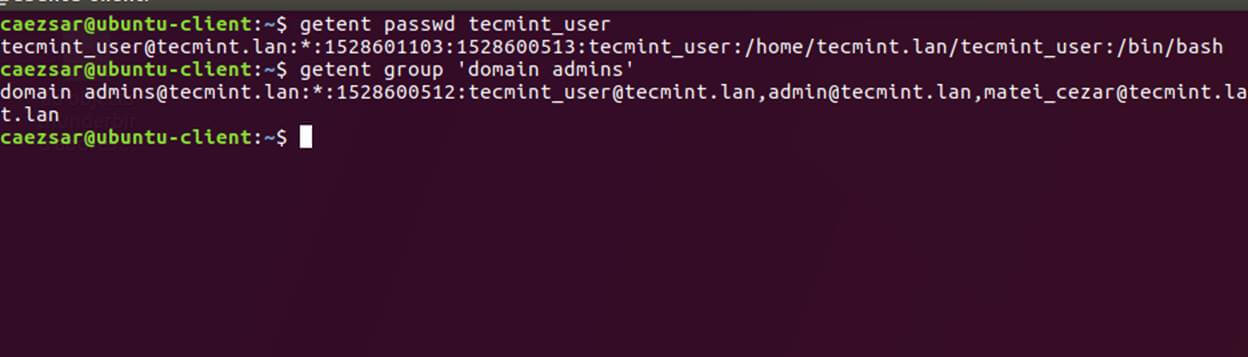
20. Also, check Winbind nsswitch module by issuing the getent command against a specific domain user or group.
$ sudo getent passwd your_domain_user
$ sudo getent group ‘domain admins’
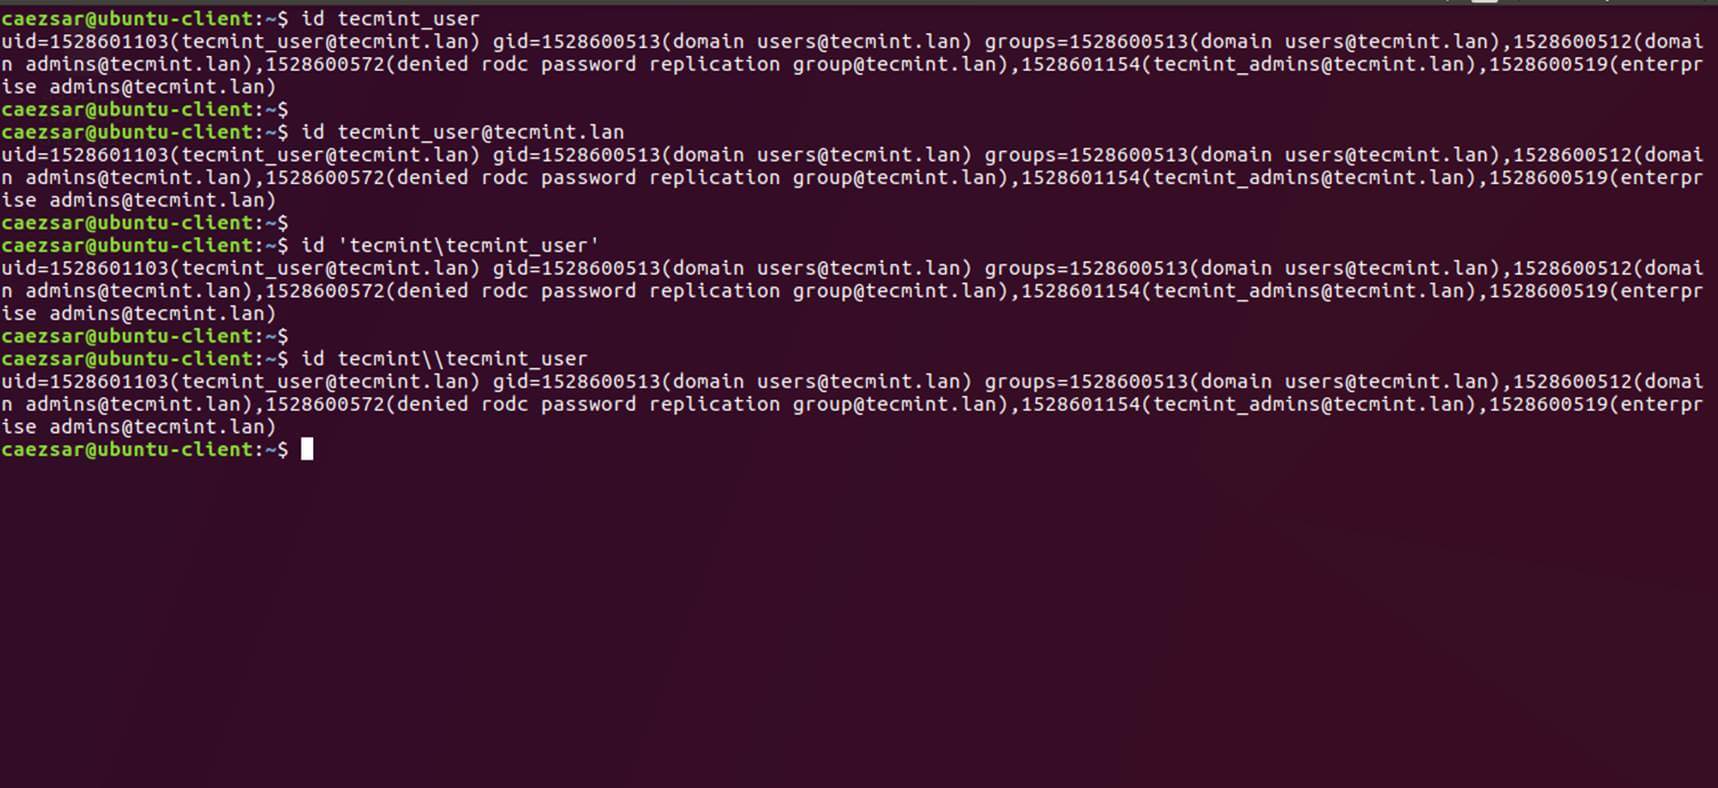
21. You can also use Linux id command to get info about an AD account as illustrated on the below command.
$ id tecmint_user
22. To authenticate on Ubuntu host with a Samba4 AD account use the domain username parameter after su – command. Run id command to get extra info about the AD account.
$ su - your_ad_user
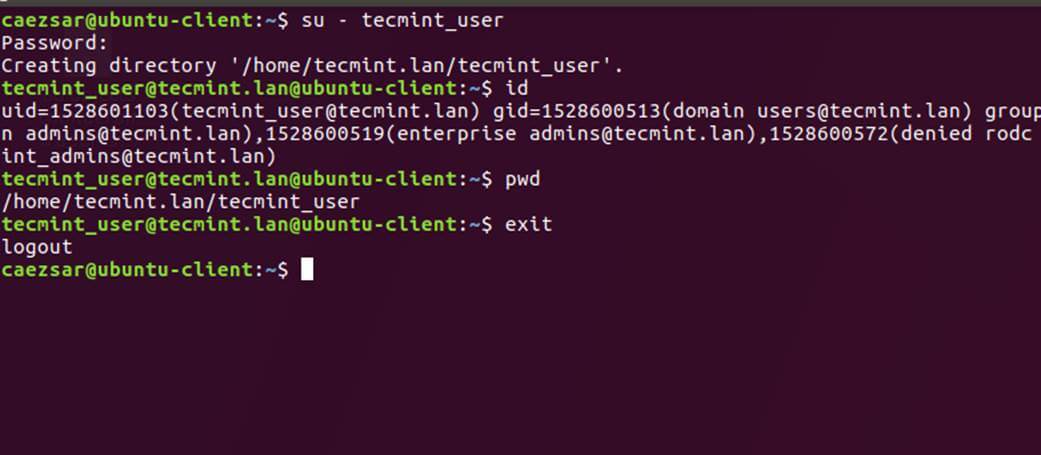
Use pwd command to see your domain user current working directory and passwd command if you want to change password.
23. To use a domain account with root privileges on your Ubuntu machine, you need to add the AD username to the sudo system group by issuing the below command:
$ sudo usermod -aG sudo [email protected]
Login to Ubuntu with the domain account and update your system by running apt update command to check root privileges.
24. To add root privileges for a domain group, open end edit /etc/sudoers file using visudo command and add the following line as illustrated.
%domain\ [email protected] ALL=(ALL:ALL) ALL
25. To use domain account authentication for Ubuntu Desktop modify LightDM display manager by editing /usr/share/lightdm/lightdm.conf.d/50-ubuntu.conf file, append the following two lines and restart lightdm service or reboot the machine apply changes.
greeter-show-manual-login=true
greeter-hide-users=true
Log in to Ubuntu Desktop with a domain account using either your_domain_username or your_domain_username@your_domain.tld syntax.
26. To use short name format for Samba AD accounts, edit /etc/sssd/sssd.conf file, add the following line in [sssd] block as illustrated below.
full_name_format = %1$s
and restart SSSD daemon to apply changes.
$ sudo systemctl restart sssd
You will notice that the bash prompt will change to the short name of the AD user without appending the domain name counterpart.
27. In case you cannot login due to enumerate=true argument set in sssd.conf you must clear sssd cached database by issuing the below command:
$ rm /var/lib/sss/db/cache_tecmint.lan.ldb
That’s all! Although this guide is mainly focused on integration with a Samba4 Active Directory, the same steps can be applied in order to integrate Ubuntu with Realmd and SSSD services into a Microsoft Windows Server Active Directory.


When I try to add Ubuntu 18.4. into AD domain it says:
realm couldn’t join realm insufficient permissions to join the domain
Command Issued:
realm join --computer-ou="OU=Servers_Linux" --user=Hi, all in Step 3.
I got this error: realm couldn’t change permitted logins the samba provider cannot restrict permitted logins
anyone can help me?
what about the gpo policy ? how it will apply on ubuntu domain users?
When I run command
sudo testparm.You have idea?
Hello, Thank you very much for such a good tutorial, everything went well, I could join my computer in the company AD, but in step # 20 I can not get any response with the getent command and therefore I can not log in with the users of the domain, any help here, am I stuck?
I get the same error, getent passwd not get domain user info
Thank you so much for this tutorial.
I tried so many different forum to troubleshoot my problem to join my ubuntu to my AD and I always failed until I found this one.
For sure you found a new reader of your forum and I will share it with other.
Thanks again!
thank you very much. worked without problems.
Hi,
Everything is set, I can also see all users when I type:
However, when I try to login, it only authenticates via pam_unix; pam_sss authentication is not at all checked.
How can I fix that? SSSD is enabled and running.
Run sudo pam-auth-update ans make sure you check sss authentication method in pam modules.
yes its already enabled
Good Evening,
When I restart the sssd service with this command systemctl restart sssd, i have this error.
Do you have an idea of the problem please?
Thanks
Excellent post!! Thank you very much!
Just a typo:
“sudo realm permit -all” should be “sudo realm permit –all” (that’s a double – instead of just one)
Also, in sssd.conf shouldn’t “dyndsn_refresh_interval = 43200” by “dyndns_refresh…” ?
@Fex,
Thanks for pointing out those typos, corrected in the article..:)
Is it possible to change the user desktop background from the Domain Controller?
if we want to set a particular image for all linux users?
All the settings for new users is in the skel dir.
Check this out
https://askubuntu.com/questions/62927/how-do-i-set-the-default-icon-set-and-wallpaper-for-new-users