NIC teaming presents an interesting solution to redundancy and high availability in the server/workstation computing realms. With the ability to have multiple network interface cards, an administrator can become creative in how a particular server is accessed or create a larger pipe for traffic to flow through to the particular server.
Read Also: How to Configure Network Bonding or Teaming in Ubuntu
This guide will walk through teaming of two network interface cards on a Debian system. The software known as ifenslave will be used to attach and detach NICs from a bonded device. The bond device then becomes the network device that interfaces with the kernel but physically use the actual network interface device (eth0, eth1, etc).
Bonding in Debian Linux
The first thing to do before any configurations, is to determine the type of bonding that the system actually needs to be implemented. There are six bonding modes supported by the Linux kernel as of this writing. Some of these bond ‘modes‘ are simple to setup and others require special configurations on the switches in which the links connect.
Understanding the Bond Modes
Bond Mode 0 – Balance-rr
This method of NIC teaming is called ‘Round-Robin‘, hence the ‘RR‘ in the name. With this bond method, networks packets are rotated through each of the network interface cards that make up the bonded interface.
For example, a system with eth0, eth1, and eth2 all slaved to a bond0 interface. This interface, when enabled with bond mode 0, would send the first packet out eth0, the second packet out eth1, the third packet our eth2, and then start back at eth0 with the fourth packet. This is where the mode gets its ‘round-robin‘ name.
Bond Mode 1 – Active-Backup
With this bond method, only one network interface is active while the other interfaces in the bond simply wait for a failure in the link to the primary network interface card.
Bond Mode 2 – Balance XOR
In a balance XOR bond mode the bond will evaluate the source and destination mac addresses to determine which interface to send the network packets out. This method will pick the same interface for a given mac address and as a result is capable of load balancing and fault tolerance.
Bond Mode 3 – Broadcast
In this method the bond device will transmit data out all slave interfaces hence the ‘broadcast‘ name of this particular bonding method. There are very few uses for this method but it does provide a level of fault tolerance.
Bond Mode 4 – 802.3ad
This is a special bond method for link aggregation and does require special configuration on the switch to which this particular bonded interface connects. This method follows the IEEE standards for link aggregation and provides both fault tolerance and increased bandwidth.
Bond Mode 5 – Transmit Load Balancing
In TLB the bond will receive traffic on the slave interfaces as normal but when the system needs to send traffic, it will determine which interface is the best to transmit data on based upon the load/queue for each of the interfaces.
Bond Mode 6 – Adaptive Load Balancing
In ALB the bond will load balance similar to Bond Mode 5 but with the added ability to load receive balance as well.
Depending on the role that the system will play, choosing the proper bond method is imperative. This tutorial will be done on Debian Jessie with two network interfaces (eth0 and eth1) and will be setup for bond mode 1 or active-backup.
However, it is very simple to switch between the different modes as it is merely a change in the network interfaces file (assuming that bond mode 4 isn’t being chosen as it requires switch configuration).
NIC Teaming Configuration
The first step to this process is to obtain the proper software from the repositories. The software for Debian is known as ifenslave and can be installed with ‘apt‘.
# apt-get install ifenslave-2.6
Once the software is installed, the kernel will need to be told to load the bonding module both for this current installation as well as on future reboots. To load the module this one time, the ‘modprobe‘ utility can be used to load the kernel modules.
# modprobe bonding
Again, in order to ensure that this bond is active on system reboots, the ‘/etc/modules‘ file needs to be modified to inform the kernel to load the bonding modules on startup.
# echo 'bonding' >> /etc/modules
Now that the kernel is made aware of the necessary modules for NIC bonding, it is time to create the actual bonded interface. This is done through the interfaces file which is located at ‘/etc/network/interfaces‘ and is editable with any text editor.
# nano /etc/network/interfaces
This file contains the network interface settings for all of the network devices the system has connected. This example has two network cards (eth0 and eth1). The appropriate bond interface to enslave the two physical network cards into one logical interface should be created in this file. This is a very simplistic interfaces file but it does everything necessary to create a working bond interface.
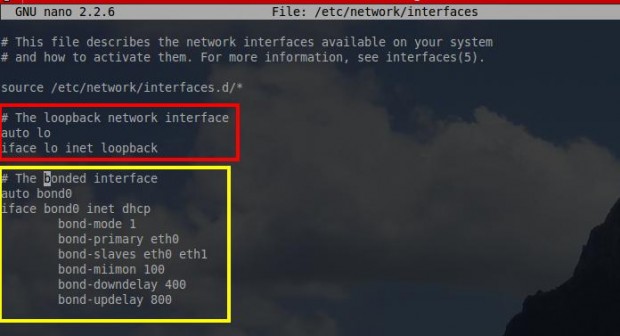
The first stanza (red box above) is the standard loopback interface configuration. ‘auto lo‘ informs the kernel to bring the adapter up automatically on start-up. ‘iface lo inet loopback‘ tells the system that this interface is the system’s loop-back interface or more commonly referenced as 127.0.0.1.
The second stanza (yellow box above) is the actual bond interface that will be used. The ‘auto bond0‘ tells the system to automatically initialize the bond upon system startup. ‘iface bond0 inet dhcp‘ may be obvious but just in case, this stanza states that the interface named bond0 should obtain its network information via DHCP (Dynamic Host Control Protocol).
The ‘bond-mode 1‘ is what is used to determine which bond mode is used by this particular bonded interface. In this instance bond-mode 1 indicates that this bond is an active-backup setup with the option ‘bond-primary‘ indicating the primary interface for the bond to use. ‘slaves eth0 eth1‘ states which physical interfaces are part of this particular bonded interface.
The next couple of lines are important for determining when the bond should switch from the primary interface to one of the slave interfaces in the event of a link failure. Miimon is one of the options available for monitoring the status of bond links with the other option being the usage of arp requests.
This guide will use miimon. ‘bond-miimon 100‘ tells the kernel to inspect the link every 100 ms. ‘bond-downdelay 400‘ means that the system will wait 400 ms before concluding that the currently active interface is indeed down.
The ‘bond-updelay 800‘ is used to tell the system to wait on using the new active interface until 800 ms after the link is brought up. A note about updelay and downdelay, both of these values must be multiples of the miimon value otherwise the system will round down.


bonding is not the same as teaming
Jester,
Can you please explain the difference between the two?
This doesn’t seem to work, when the 2 links are up,
bond0will show the IP address of the first card. If I remove the cable, the logs indeed showeth1being assigned as active, however it won’t get a new IP address therefore you can’t ping it.In your interfaces declaration you don’t specify what to do with eth0 and eth1 themselves.
it is not necessary to load the kernel module, the system will load it as it sees bond* stanza in /etc/network/interfaces
you should install ifenslave and no more ifenslave-2.6
regards
Outdated. Ifenslave isn’t even part of debian anymore.
Not exactly sure what you mean by this but according to the ifenslave package on Debian’s site, ifenslave is still very active and is in Jessie (newest release), Stretch (next release), and Sid (testing) currently.
For your reference: https://packages.debian.org/search?keywords=ifenslave
can you read up on teaming it is not the same as bonding