In this tutorial we’ll discuss the first configuration steps you need to take care of after a fresh installation of Red Hat Enterprise Linux 7 on a bare metal-server or on a Virtual Private Server.
Requirements
Important: CentOS 7 users, can follow this article to do a Initial Server Setup on CentOS 7.
Update RHEL 7 System
In the first step log in to your RHEL server console with an account with root privileges or directly as root and run the below command in order to fully update your system components, such as the installed packages, the kernel or apply other security patches.
# yum check-update
# yum update
In order to remove all locally downloaded packages and other related YUM caches, execute the below command.
# yum clean all
Install System Utilities on RHEL 7
These following utilities can prove to be useful for day-by-day system administration: nano (text editor to replace vi editor), wget, curl (utilities used for downloading packages over network mostly) net-tools, lsof (utilities for managing local networking) and bash-completion (command line autocomplete).
Install them all in one-shot by executing the below command.
# yum install nano wget curl net-tools lsof bash-completion
Setup Networking in RHEL 7
RHEL 7 has a wide range of tools that can be used to configure and manage networking, from manually editing the network configuration file to using commands such as ip, ifconfig, nmtui, nmcli or route.
The easiest utility a beginner can use to manage and change network configurations is nmtui graphical command line.
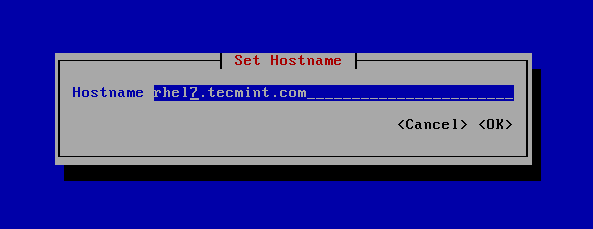
In order to change the system hostname via nmtui utility, execute nmtui-hostname command, set your machine hostname and press OK to finish, as illustrated in the below screenshot.
# nmtui-hostname
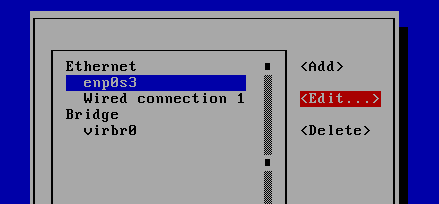
To manipulate a network interface, execute nmtui-edit command, choose the interface you want to edit and select edit from the right menu, as shown in the below screenshot.
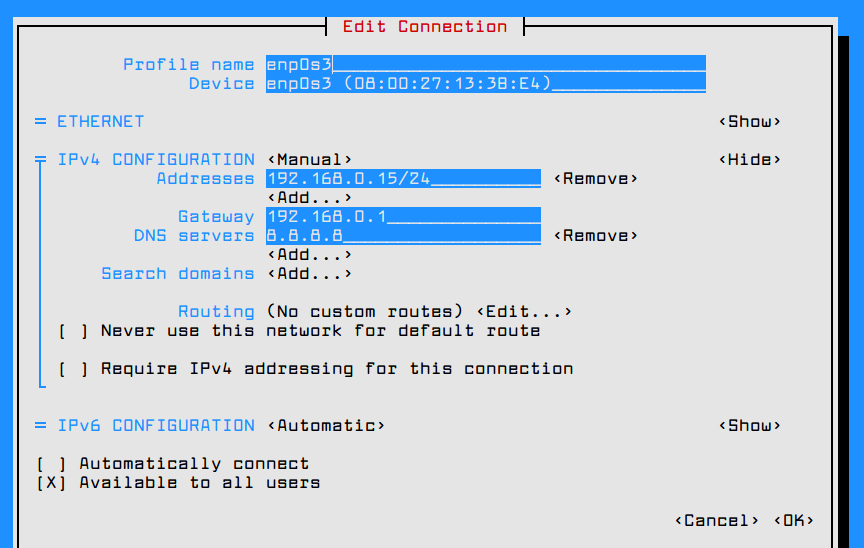
Once you’re in the graphical interface provided by nmtui utility you can setup the network interface IP settings as illustrated in the below screenshot. When you finish, navigate to OK using [tab] key to save the configuration and quit.
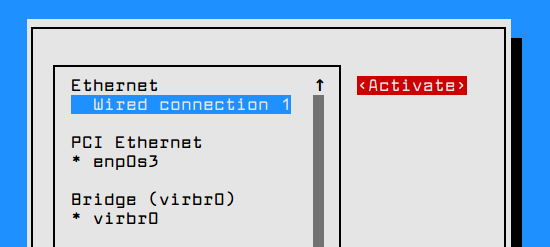
In order to apply the network interface new configuration, execute nmtui-connect command, select the interface you want to manage and hit on Deactivate/Activate option to decommission and rise-up the interface with the IP settings, as presented in the below screenshots.
# nmtui-connect
In order to view the network interface settings, you can inspect the content of the interface file or you can issue the below commands.
# ifconfig enp0s3
# ip a
# ping -c2 google.com
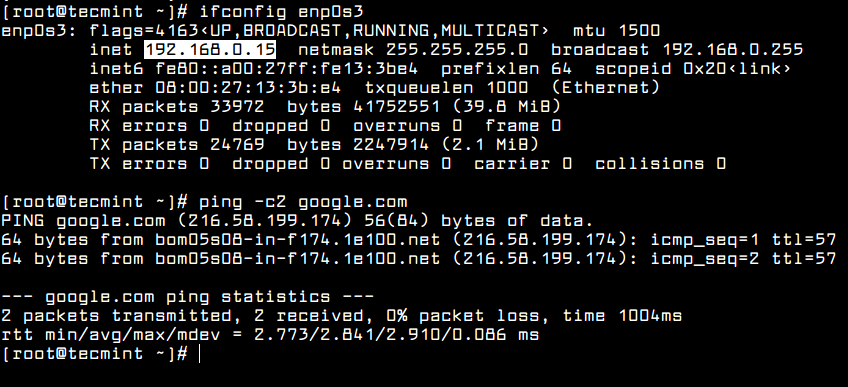
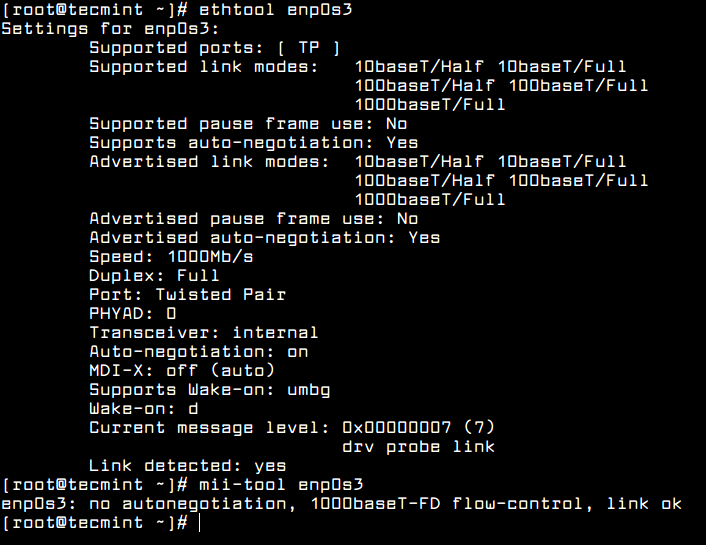
Other useful utilities that can be used to manage speed, link state or obtain information about machine network interfaces are ethtool and mii-tool.
# ethtool enp0s3
# mii-tool enp0s3
Create New User Account
On the next step, while logged in as root into your server, create a new user with the below command. This user will be used later to login into your system and perform administrative tasks.
# adduser tecmint_user
After you’ve added the user using the above command, setup a strong password for this user by issuing the below command.
# passwd tecmint_user
In cases where you want to force this new user to change its password at the first log in attempt, execute the below command.
# chage -d0 tecmint_user
This new user account with has regular account privileges for now and cannot perform administrative tasks via sudo command.
In order to avoid the use of the root account for performing administrative privileges, grant this new user with administrative privileges by adding the user to “wheel” system group.
The users belonging to the “wheel” group are allowed, by default in RHEL, to run commands with root privileges by using the sudo utility before writing the command needed for execution.
For instance, to add the user “tecmint_user” to “wheel” group, execute the below command.
# usermod -aG wheel tecmint_user
Afterwards, login to the system with the new user and try to update the system via ‘sudo yum update’ command to test if the user has root powers granted.
# su - tecmint_user
$ sudo yum update
Configure SSH Public Key Authentication on RHEL 7
On the next step in order to increase your RHEL serve security, configure SSH public key authentication for the new user. In order to generate a SSH Key Pair, the public and private key, execute the following command at your server console. Make sure you’re logged in to the system with the user you’re setting up the SSH key.
# su - tecmint_user
$ ssh-keygen -t RSA
While the key is generated, you will be prompted to add passphrase in order to secure the key. You can enter a strong passphrase or choose to leave the passphrase blank if you want to automate tasks via SSH server.
After the SSH key has been generated, copy the public key pair to a remote server by executing the below command. To install the public key to the remote SSH server you will need a user account that has credentials to log in to that server.
$ ssh-copy-id [email protected]
Now you should try to login via SSH to the remote server using the private key as authentication method. You should be able to log in automatically without the SSH server asking for a password.
$ ssh [email protected]
To see the content of your public SSH key if you want to manually install the key to a distant SSH server, issue the following command.
$ cat ~/.ssh/id_rsa
Secure SSH on RHEL 7
In order to secure the SSH daemon and disallow remote SSH access to the root account via password or key, open SSH server main configuration file and make the following changes.
$ sudo vi /etc/ssh/sshd_config
Search for the line #PermitRootLogin yes, uncomment the line by removing the # sign (hashtag) from the beginning of the line and modify the line to look like shown in the below excerpt.
PermitRootLogin no
Afterwards, restart the SSH server to apply the new settings and test the configuration by trying to login to this server with the root account. The access to root account via SSH should be restricted by now.
$ sudo systemctl restart sshd
There are situations where you might want to automatically disconnect all remote SSH connections to your server after a period of inactivity.
In order to enable this feature system-wide, execute the below command, which adds the TMOUT bash variable to main bashrc file and forces every SSH connection to be disconnected or dropped-out after 5 minutes of inactivity.
$ su -c 'echo "TMOUT=300" >> /etc/bashrc'
Run tail command to check if the variable has been correctly added at the end of /etc/bashrc file. All subsequent SSH connections will be automatically closed after 5 minutes of inactivity from now on.
$ tail /etc/bashrc
In the below screenshot, the remote SSH session from drupal machine to RHEL server has been auto-logout after 5 minutes.

Configure Firewall on RHEL 7
On the next step configure the firewall in order to further secure the system at network level. RHEL 7 ships with Firewalld application to manage iptables rules on the server.
First, make sure the firewall is running in your system by issuing the below command. If the Firewalld daemon is stopped you should start it with the following command.
$ sudo systemctl status firewalld
$ sudo systemctl start firewalld
$ sudo systemctl enable firewalld
Once the firewall is enabled and running in your system, you can use the firewall-cmd command line utility to set the firewall policy information and allow traffic to some specific network ports, such as SSH daemon, connection made to an internal web server or other related network services.
Because right now we’re just running a SSH daemon in our server, we can adjust the firewall policy to allow traffic for SSH service port by issuing the following command.
$ sudo firewall-cmd --add-service=ssh --permanent
$ sudo firewall-cmd --reload
To add a firewall rule on-fly, without applying the rule next time the server is started, use the below command syntax.
$ sudo firewall-cmd --add-service=sshd
If you install other network services in your server, such as HTTP server, a mail server or other network services, you can add rules to allow the specific connections as follows.
$ sudo firewall-cmd --permanent --add-service=http
$ sudo firewall-cmd --permanent --add-service=https
$ sudo firewall-cmd --permanent --add-service=smtp
To list all firewall rules run the below command.
$ sudo firewall-cmd --permanent --list-all
Remove Unneeded Services in RHEL 7
In order to get a list of all network services (TCP and UDP) running in your RHEL server by default, issue the ss command, as illustrated in the below sample.
$ sudo ss -tulpn
The ss command will reveal some interesting services which are started and running by default in your system, such as the Postfix master service and the server responsible for the NTP protocol.
If you’re not planning to configure this server a mail server, you should stop, disable and remove the Postfix daemon by issuing the below commands.
$ sudo systemctl stop postfix.service
$ sudo yum remove postfix
Recently, there have been reported some nasty DDOS attacks over NTP protocol. In case you’re not planning to configure your RHEL server to run as a NTP server in order for internal clients to sync time with this server, you should completely disable and remove the Chrony daemon by issuing the below commands.
$ sudo systemctl stop chronyd.service
$ sudo yum remove chrony
Again, run ss command to identify if other network services are running in your system and disable and remove them.
$ sudo ss -tulpn
In order to provide the accurate time for your server and synchronize time with a upper time peer server, you can install the ntpdate utility and sync time with a public NTP server, by executing the below commands.
$ sudo yum install ntpdate
$ sudo ntpdate 0.uk.pool.ntp.org
To automate the ntpdate time synchronize command to be executed every day without any user intervention, schedule a new crontab job to run at midnight with the following content.
$ sudo crontab -e
Crontab file excerpt:
@daily /usr/sbin/ntpdate 0.uk.pool.ntp.org
That’s all! Now, you RHEL server is prepared for installing additional software needed for custom network services or applications, such as installing and configuring a web server, a database server, a file share service or other specific applications.
To further secure and harden RHEL 7 server, check out these following articles.
- The Mega Guide To Harden and Secure RHEL 7 – Part 1
- The Mega Guide To Harden and Secure RHEL 7 – Part 2
If you’re planning to deploy websites on this RHEL 7 system, learn how to setup and configure LAMP stack or LEMP stack.


I am a big follower of your website tecmint.com.
Replace VIM with nano??? (๏_๏)