Apache Tomcat is an open source web container which allows you to deploy Java Servlets, JSP and Web Sockets to run a web server powered by Java code. It also can be identified as a cross-platform servlet container or a web container.
Simply, Tomcat is a very popular among many industrial stakeholders due to many advantages over other web containers on the market. You can create web archives from your Java project and simply deploy it within a tomcat container to host an HTTP web server coded by Java. Industries choose apache tomcat over other container due to following advantages.
- Light weight.
- Widely Used.
- Much faster than other containers.
- Easy to configure.
- Very flexible.
Usually, apache tomcat is a user-friendly product which gives the engineers space to deploy their WAR artifacts (Web ARchives) with a minimal configuration changes.
This post is targeting an audience which is already using tomcat and know how to start and use apache tomcat engine.
In apache tomcat, WARs should be put in to the webapps directory which the container deploys them by default. Simply, webapps directory acts as the main container of the Java code for tomcat to deploy it as a web server.
In a scenario which we need to host more than one web servers from a single tomcat container, you can use this post as a guide to accomplish it. I’m going to show you how to deploy multiple web applications or two web servers within one tomcat from this article.
Prerequisites: Java should be installed in the server. Preferably 1.7.x or above. In this tutorial I have Java 1.7 installed since I use the tomcat version 8.0.37.
You can install Java using your package manager such yum or apt as shown:
# yum install java              [On CentOS based Systems]
# apt-get install default-jre   [On Debian based Systems]
Step 1: Install Apache Tomcat Server
1. First create a separate tomcat user using root account.
# useradd tomcat
# passwd tomcat
Now login as tomcat user and download the latest apache tomcat bundle from the official site here: https://tomcat.apache.org/ or alternatively, you can use following wget command to download directly in the terminal.
In this case, I download Apache Tomcat, 8.5.5, which is one of the latest stable versions released by now.
$ wget http://redrockdigimark.com/apachemirror/tomcat/tomcat-8/v8.5.5/bin/apache-tomcat-8.5.5.tar.gz
2. Once file has been downloaded, uncompress the content using tar command and view the directory structure as shown:
$ tar -xvf apache-tomcat-8.5.5.tar.gz
$ cd apache-tomcat-8.5.5/
$ ls -l
total 112
drwxr-x---. 2 tomcat tomcat  4096 Sep 29 11:26 bin
drwx------. 2 tomcat tomcat  4096 Sep  1 01:23 conf
drwxr-x---. 2 tomcat tomcat  4096 Sep 29 11:26 lib
-rw-r-----. 1 tomcat tomcat 57092 Sep  1 01:23 LICENSE
drwxr-x---. 2 tomcat tomcat  4096 Sep  1 01:21 logs
-rw-r-----. 1 tomcat tomcat  1723 Sep  1 01:23 NOTICE
-rw-r-----. 1 tomcat tomcat  7063 Sep  1 01:23 RELEASE-NOTES
-rw-r-----. 1 tomcat tomcat 15946 Sep  1 01:23 RUNNING.txt
drwxr-x---. 2 tomcat tomcat  4096 Sep 29 11:26 temp
drwxr-x---. 7 tomcat tomcat  4096 Sep  1 01:22 webapps
drwxr-x---. 2 tomcat tomcat  4096 Sep  1 01:21 work
Step 2: Configure Apache Tomcat Server
3. The configuration change that we are looking for is lying within the conf directory, is being used to place all the configuration files that helps tomcat to start up.
The content of the conf directory looks like below.
$ cd conf/
$ ls -l
total 224
-rw-------. 1 tomcat tomcat  12502 Sep  1 01:23 catalina.policy
-rw-------. 1 tomcat tomcat   7203 Sep  1 01:23 catalina.properties
-rw-------. 1 tomcat tomcat   1338 Sep  1 01:23 context.xml
-rw-------. 1 tomcat tomcat   1149 Sep  1 01:23 jaspic-providers.xml
-rw-------. 1 tomcat tomcat   2358 Sep  1 01:23 jaspic-providers.xsd
-rw-------. 1 tomcat tomcat   3622 Sep  1 01:23 logging.properties
-rw-------. 1 tomcat tomcat   7283 Sep  1 01:23 server.xml
-rw-------. 1 tomcat tomcat   2164 Sep  1 01:23 tomcat-users.xml
-rw-------. 1 tomcat tomcat   2633 Sep  1 01:23 tomcat-users.xsd
-rw-------. 1 tomcat tomcat 168133 Sep  1 01:23 web.xml
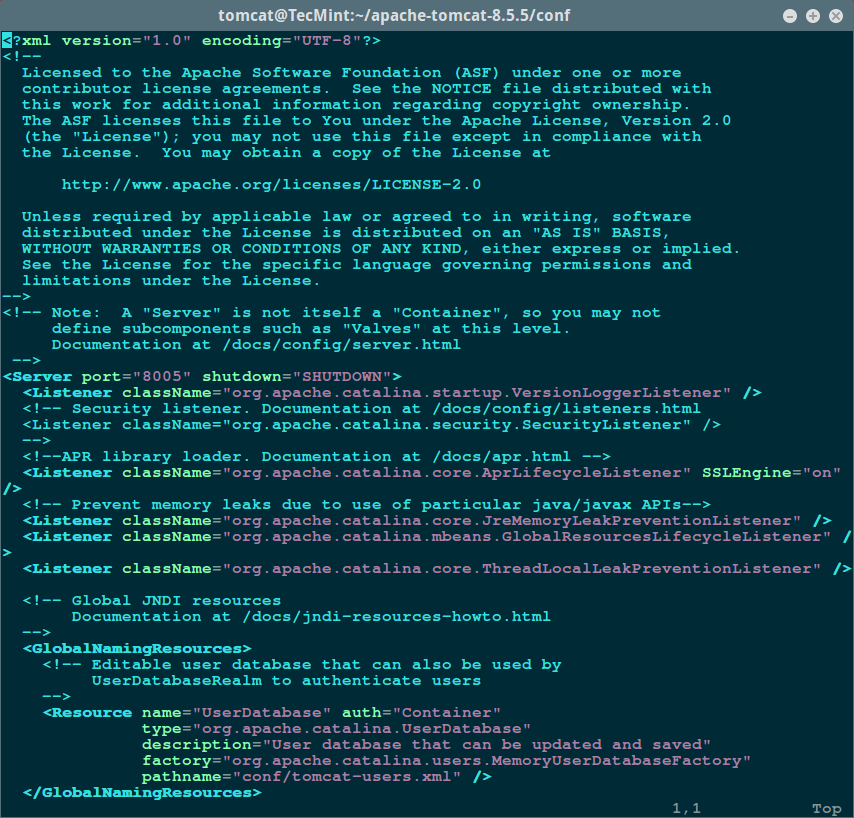
4. In this case, what’s important to me is the server.xml file. So I’m not going to do an in-depth explanation about other files or directories.
The server.xml is the configuration file which tells tomcat that which port to start it up, which directory content to deploy and many more main and basic configurations.
It basically looks like below after you open the file.
$ vim server.xml
Step 3: Deploying Web Apps in Apache Tomcat
5. Now we will deploy a new web application in Apache tomcat, first find the place where the service tag is closed </service> and insert below lines after the first closed service tag.
<Service name="webapps2">
    <Connector port="7070" maxHttpHeaderSize="7192"
        maxThreads="150" minSpareThreads="25" maxSpareThreads="75"
        enableLookups="false" redirectPort="7443" acceptCount="100"
        connectionTimeout="20000" disableUploadTimeout="true" />
        <Connector port="7072"
        enableLookups="false" redirectPort="7043" protocol="AJP/1.3" />

    <Engine name="webapps2" defaultHost="localhost">
        <Realm className="org.apache.catalina.realm.UserDatabaseRealm"
            resourceName="UserDatabase"/>
            <Host name="localhost" appBase="webapps2"
                unpackWARs="true" autoDeploy="true"
                 xmlValidation="false" xmlNamespaceAware="false">
            </Host>
    </Engine>
</Service>
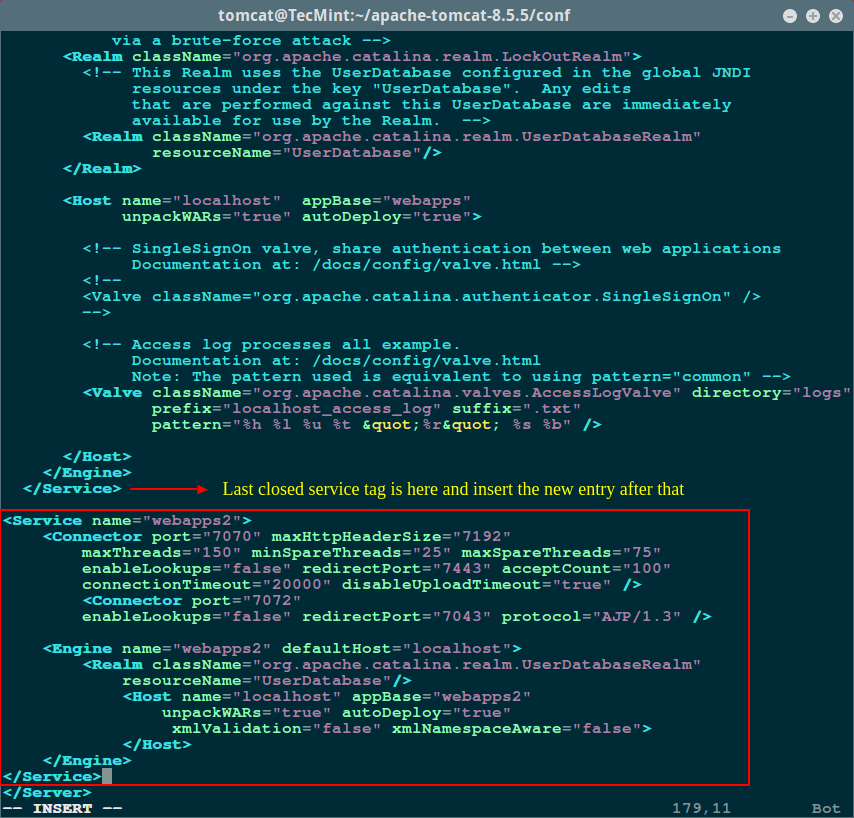
As you see, I’ve changed the connector port to 7070 in the newly inserted entry since the default tomcat starts with port 8080. After setting this up completely there will be two web servers running under the ports 8080 and 7070.
6. After saving the change made to server.xml, create a directory in the apache called webapps2 within the apache main.
$ cd /home/tomcat/apache-tomcat-8.5.5/
$ mkdir webapps2
If you observe the server.xml new entry I have provided, you should see that the service name, app base and the engine is named as webapps2. That’s the reason I created the directory named webapps2. You can create one as you desire, but make sure you make changes to the entry as it is needed.
7. To make sure the second web server is up and running, I copied the content of the webapps directory to webapps2 directory.
$ cp -r webapps/* webapps2/
8. Now the exciting part. We are going to start the server and see whether if it is working. Go to bin directory and execute the startup.sh script. You can view the logs in the catalina.out file resides in the logs directory.
$ cd bin/
$ ./startup.sh
Using CATALINA_BASE:   /home/tomcat/apache-tomcat-8.5.5
Using CATALINA_HOME:   /home/tomcat/apache-tomcat-8.5.5
Using CATALINA_TMPDIR: /home/tomcat/apache-tomcat-8.5.5/temp
Using JRE_HOME:        /usr
Using CLASSPATH:       /home/tomcat/apache-tomcat-8.5.5/bin/bootstrap.jar:/home/tomcat/apache-tomcat-8.5.5/bin/tomcat-juli.jar
Tomcat started.
9. If you refer the logs you will be able to see that both webapps and webapps2 are deployed and the app is started up without any issue.
$ cd logs/
$ tail -25f catalina.out
29-Sep-2016 12:13:51.210 INFO [localhost-startStop-1] org.apache.catalina.startup.HostConfig.deployDirectory Deploying web application directory /home/tomcat/apache-tomcat-8.5.5/webapps/examples
29-Sep-2016 12:13:51.661 INFO [localhost-startStop-1] org.apache.catalina.startup.HostConfig.deployDirectory Deployment of web application directory /home/tomcat/apache-tomcat-8.5.5/webapps/examples has finished in 452 ms
29-Sep-2016 12:13:51.664 INFO [localhost-startStop-1] org.apache.catalina.startup.HostConfig.deployDirectory Deploying web application directory /home/tomcat/apache-tomcat-8.5.5/webapps/docs
29-Sep-2016 12:13:51.703 INFO [localhost-startStop-1] org.apache.catalina.startup.HostConfig.deployDirectory Deployment of web application directory /home/tomcat/apache-tomcat-8.5.5/webapps/docs has finished in 39 ms
29-Sep-2016 12:13:51.704 INFO [localhost-startStop-1] org.apache.catalina.startup.HostConfig.deployDirectory Deploying web application directory /home/tomcat/apache-tomcat-8.5.5/webapps/host-manager
29-Sep-2016 12:13:51.744 INFO [localhost-startStop-1] org.apache.catalina.startup.HostConfig.deployDirectory Deployment of web application directory /home/tomcat/apache-tomcat-8.5.5/webapps/host-manager has finished in 39 ms
29-Sep-2016 12:13:51.748 INFO [main] org.apache.coyote.AbstractProtocol.start Starting ProtocolHandler [http-nio-8080]
29-Sep-2016 12:13:51.767 INFO [main] org.apache.coyote.AbstractProtocol.start Starting ProtocolHandler [ajp-nio-8009]
29-Sep-2016 12:13:51.768 INFO [main] org.apache.catalina.core.StandardService.startInternal Starting service webapps2
29-Sep-2016 12:13:51.768 INFO [main] org.apache.catalina.core.StandardEngine.startInternal Starting Servlet Engine: Apache Tomcat/8.5.5
29-Sep-2016 12:13:51.777 INFO [localhost-startStop-1] org.apache.catalina.startup.HostConfig.deployDirectory Deploying web application directory /home/tomcat/apache-tomcat-8.5.5/webapps2/manager
29-Sep-2016 12:13:51.879 INFO [localhost-startStop-1] org.apache.catalina.startup.HostConfig.deployDirectory Deployment of web application directory /home/tomcat/apache-tomcat-8.5.5/webapps2/manager has finished in 102 ms
29-Sep-2016 12:13:51.879 INFO [localhost-startStop-1] org.apache.catalina.startup.HostConfig.deployDirectory Deploying web application directory /home/tomcat/apache-tomcat-8.5.5/webapps2/ROOT
29-Sep-2016 12:13:51.915 INFO [localhost-startStop-1] org.apache.catalina.startup.HostConfig.deployDirectory Deployment of web application directory /home/tomcat/apache-tomcat-8.5.5/webapps2/ROOT has finished in 35 ms
29-Sep-2016 12:13:51.927 INFO [localhost-startStop-1] org.apache.catalina.startup.HostConfig.deployDirectory Deploying web application directory /home/tomcat/apache-tomcat-8.5.5/webapps2/examples
29-Sep-2016 12:13:52.323 INFO [localhost-startStop-1] org.apache.catalina.core.ApplicationContext.log ContextListener: contextInitialized()
29-Sep-2016 12:13:52.337 INFO [localhost-startStop-1] org.apache.catalina.core.ApplicationContext.log SessionListener: contextInitialized()
29-Sep-2016 12:13:52.341 INFO [localhost-startStop-1] org.apache.catalina.startup.HostConfig.deployDirectory Deployment of web application directory /home/tomcat/apache-tomcat-8.5.5/webapps2/examples has finished in 414 ms
29-Sep-2016 12:13:52.341 INFO [localhost-startStop-1] org.apache.catalina.startup.HostConfig.deployDirectory Deploying web application directory /home/tomcat/apache-tomcat-8.5.5/webapps2/docs
29-Sep-2016 12:13:52.371 INFO [localhost-startStop-1] org.apache.catalina.startup.HostConfig.deployDirectory Deployment of web application directory /home/tomcat/apache-tomcat-8.5.5/webapps2/docs has finished in 29 ms
29-Sep-2016 12:13:52.371 INFO [localhost-startStop-1] org.apache.catalina.startup.HostConfig.deployDirectory Deploying web application directory /home/tomcat/apache-tomcat-8.5.5/webapps2/host-manager
29-Sep-2016 12:13:52.417 INFO [localhost-startStop-1] org.apache.catalina.startup.HostConfig.deployDirectory Deployment of web application directory /home/tomcat/apache-tomcat-8.5.5/webapps2/host-manager has finished in 46 ms
...
10. In this scenario, the IP of the server I used is 172.16.1.39 and you can see I could start two web servers up within a single tomcat container.
http://172.16.1.39:8080   [1st Web App]
http://172.16.1.39:7070   [2nd Web App]
Hope you all find this article useful and enjoyable. Keep in touch with TecMint and feel free to reach me out for any queries regarding this article.


I configure tomcat multi-domain in a single server but I want particular domain access on a particular port like
dev.local.com:7070andtest.local.com:9090I configured it but still, I can also accessdev.local.com:9090andtest.local.com:7070I want to restrict different port access. Please guide me for that.I learned a lot through this article and attempted to build a service based on the step but hit some errors when I restart tomcat.
14-Mar-2020 22:09:42.261 SEVERE [main] org.apache.catalina.core.StandardService.startInternal Failed to start connector [Connector[AJP/1.3-7072]]
org.apache.catalina.LifecycleException: Protocol handler start failed
at org.apache.catalina.connector.Connector.startInternal(Connector.java:1057)
at org.apache.catalina.util.LifecycleBase.start(LifecycleBase.java:183)
at org.apache.catalina.core.StandardService.startInternal(StandardService.java:440)
at org.apache.catalina.util.LifecycleBase.start(LifecycleBase.java:183)
at org.apache.catalina.core.StandardServer.startInternal(StandardServer.java:766)
at org.apache.catalina.util.LifecycleBase.start(LifecycleBase.java:183)
at org.apache.catalina.startup.Catalina.start(Catalina.java:688)
at sun.reflect.NativeMethodAccessorImpl.invoke0(Native Method)
at sun.reflect.NativeMethodAccessorImpl.invoke(NativeMethodAccessorImpl.java:62)
at sun.reflect.DelegatingMethodAccessorImpl.invoke(DelegatingMethodAccessorImpl.java:43)
at java.lang.reflect.Method.invoke(Method.java:498)
at org.apache.catalina.startup.Bootstrap.start(Bootstrap.java:343)
at org.apache.catalina.startup.Bootstrap.main(Bootstrap.java:474)
Caused by: java.lang.IllegalArgumentException: The AJP Connector is configured with secretRequired=”true” but the secret attribute is either null or “”. This combination is not valid.
at org.apache.coyote.ajp.AbstractAjpProtocol.start(AbstractAjpProtocol.java:274)
at org.apache.catalina.connector.Connector.startInternal(Connector.java:1055)
… 12 more
Please advise how can I resolve this issue. Thanks
I was created multiple instances outside web app directory like webapp1, webapp2, webapp3 in tomcat 8.5 and configure server.xml as:
but I want to start and stop individual application without stopping other using tomcat manager or other way:
directory structure--apache tomat8.5 |-bin |-conf |-webapp |-webapp1 |-webapp2Great article . How do you stop webapps2 only?
Hi,
Thank you for your explanation.
Can you put an article how to on:
Thank you
@Mela,
We’ve already published many articles on WordPress, you can find here: https://www.tecmint.com/category/wordpress/
Thank you for your feedback.
What i want to say is to install nagios ” i’ve already did it” but i need to install CENTREON in order to enhance to visual and manipulation for the users.
Do you have any topic around this?
Regards,
@Mela,
We don’t have any topic right now on CENTREON, but we will soon publish the article on same..
How can I point two different domains?
Like website one is running with 8080 and website two is running with 9090. I need to know
www.websiteone.comandwww.websitetwo.comalso domain only point with IP with 80 port.How can i forward request to specific port like if request is coming from
www.websiteone.comthat request have to forward to 8080 and request is coming fromwww.websiteone.comthat request have to forward to 9090.Thanks in Advance.
@Rohit,
You can do port forwarding via Firewall only..
Yes but I Know that request come which domain and then forward to internal port .
Hello team,
I am interested to know how can I deploy my JSP legacy application along with my Angular application within the same user context so that there is no need to implement handshaking using the token(JWT like) between these two separate applications as there is possible navigation from legacy to Angular and vice-versa.
Please note that JSP application is our parent application which has menu links to navigate to Angular application and Angular application has links to go back to JSP legacy application (**JSP application has many links for Angular pages and Angular application has many links for JSP legacy application**).
Thanks,
Samir Sinha
Hi Thilina great article thank you!
If you define multiple services for the server, can you restart/refresh only one of the individual services?
Hi,
You had given such a nice explanation!
I followed all above given steps as mentioned but not able to help me out! Actually i am running two application on single server and both application should talk to each other over web-socket connection. I am getting connection refused if i am deploying both application all together on single tomcat.
Can you please help me out for the same, how can we rid of this issue?
Wonderfull solution. Thank you!
Hi, for me its giving error below.
HTTP Status 500 – java.lang.ClassNotFoundException: org.apache.jsp.index_jsp
Thanks
Ajay Kumar
Thank you very much! This excellent article provided everything I needed to deploy multiple sites on Tomcat.