The /etc/resolv.conf is the main configuration file for the DNS name resolver library. The resolver is a set of functions in the C library that provide access to the Internet Domain Name System (DNS). The functions are configured to check entries in the /etc/hosts file, or several DNS name servers, or to use the host’s database of Network Information Service (NIS).
On modern Linux systems that use systemd (system and service manager), the DNS or name resolution services are provided to local applications via the systemd-resolved service. By default, this service has four different modes for handling the Domain name resolution and uses the systemd DNS stub file (/run/systemd/resolve/stub-resolv.conf) in the default mode of operation.
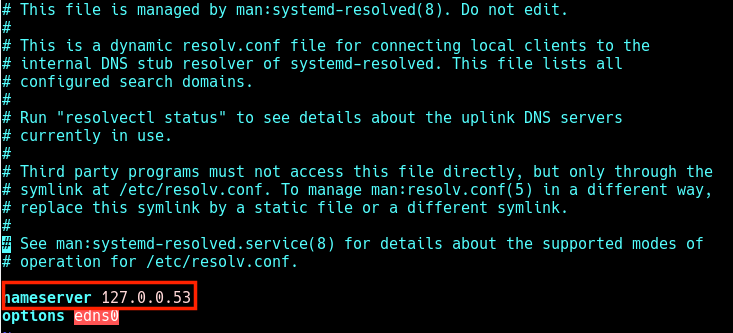
The DNS stub file contains the local stub 127.0.0.53 as the only DNS server, and it is redirected to the /etc/resolv.conf file which was used to add the name servers used by the system.
If you run the following ls command on the /etc/resolv.conf, you will see that this file is a symlink to the /run/systemd/resolve/stub-resolv.conf file.
$ ls -l /etc/resolv.conf

lrwxrwxrwx 1 root root 39 Feb 15  2019 /etc/resolv.conf -> ../run/systemd/resolve/stub-resolv.conf
Unfortunately, because the /etc/resolv.conf is indirectly managed by the systemd-resolved service, and in some cases by the network service (by using initscripts or NetworkManager), any changes made manually by a user can not be saved permanently or only last for a while.
In this article, we will show how to install and use the resolvconf program to set permanent DNS name servers in /etc/resolv.conf file under Debian and Ubuntu Linux distributions.
Why Would You Want to Edit /etc/resolv.conf File?
The main reason could be because the system’s DNS settings are misconfigured or you prefer to use specific name servers or your own. The following cat command shows the default name server in the /etc/resolv.conf file on my Ubuntu system.
$ cat /etc/resolv.conf
In this case, when local applications such as the APT package manager try to access FQDNs (Fully Qualified Domain Names) on the local network, the result is a “Temporary failure in name resolution” error as shown in the next screenshot.

The same happens when you run a ping command.
$ ping google.com

So when a user tries to manually set the name servers, the changes do not last for long or are revoked after a reboot. To resolve this, you can install and use the reolvconf utility to make the changes permanent.
To install the resolvconf package as shown in the next section, you need to first manually set the following name servers in the /etc/resolv.conf file, so that you access the FQDMs of Ubuntu repository servers on the internet.
nameserver 8.8.4.4
nameserver 8.8.8.8
Read Also: How to Setup Local DNS Using /etc/hosts File in Linux
Installing resolvconf in Ubuntu and Debian
First, update the system software packages and then install resolvconf from the official repositories by running the following commands.
$ sudo apt update
$ sudo apt install resolvconf
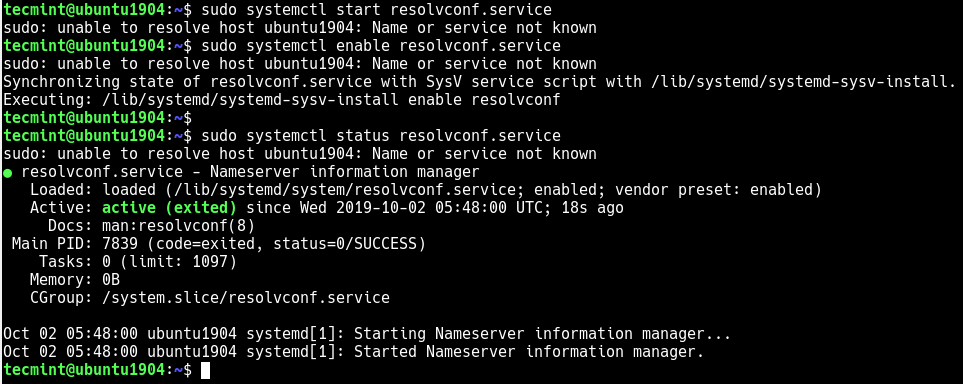
Once the resolvconf installation is complete, the systemd will trigger the resolvconf.service to be automatically started and enabled. To check if it is up and running issues the following command.
$ sudo systemctl status resolvconf.service
If the service is not started and enabled automatically for any reason, you can start and enable it as follows.
$ sudo systemctl start resolvconf.service
$ sudo systemctl enable resolvconf.service
$ sudo systemctl status resolvconf.service
Set Permanent DNS Nameservers in Ubuntu and Debian
Next, open the /etc/resolvconf/resolv.conf.d/head configuration file.
$ sudo nano /etc/resolvconf/resolv.conf.d/head
and add the following lines in it:
nameserver 8.8.8.8
nameserver 8.8.4.4

Save the changes and restart the resolvconf.service and systemd-resolved or reboot the system.
$ sudo systemctl restart resolvconf.service
$ sudo systemctl restart systemd-resolved.service
Now when you check the /etc/resolv.conf file, the name server entries should be stored there permanently. Henceforth, you will not face any issues concerning name resolution on your system.

I hope this quick article helped you in setting the permanent DNS nameservers in your Ubuntu and Debian systems. If you have any queries or suggestions, do share them with us in the comments section below.


root@dc1:/run/systemd/resolve# apt install resolvconf
Reading package lists… Done
Building dependency tree… Done
Reading state information… Done
Note, selecting ‘systemd-resolved’ instead of ‘resolvconf’
systemd-resolved is already the newest version (255.4-1ubuntu8.2).
0 upgraded, 0 newly installed, 0 to remove and 0 not upgraded.
Simply restarting resolvconf.service and systemd-resolved.service does not help in solving the problem until you restart the OS itself. Some other service needs to be restarted.
Thanks for the tutorial! I needed to run those two final commands to resolve it. Maybe it can be useful also to you, Dmitry:
@Aaron,
Thank you very much.
Very useful by me and my new owncloud server running bullseye.
I didn’t know how to solve this tough subject: forcing DNS while I activated WOL on my lan interface (not supported in network manager)
And it works fine right now
A lot of thanx again
Phil
This is the best tutorial I have come across after a lot of searching! It worked perfectly in one go!
@Daniel
We are glad that this tutorial worked for you. Many thanks for the useful feedback.
Hi, thanks for the detailed tutorial.
Unfortunately, I run into a problem that I don’t have permission to write to the files.
I run the commands as sudo but it makes no difference. I have tried to take ownership but nothing I do seems to work. Sudo
chmod + rwx resolv.confor sudo Chown doesn’t change anything.I hope I can find a solution because this nameserver issue I really annoying.
This solved the problem. Thanks
Hi,
on Debian 11 I followed straight ahead of your suggestions and steps about resolvconf (I did NOT add some own stuff). Systemctl (re)start resolvconf does NOT yield errors, everything seems to be fine.
I ended up with an EMPTY (no nameserver entries in it) /etc/resolvconf (which is linked to /root/run/resolvconf/resolv.conf. As a consequence “ping google.com” returns “ping: google.com: Name or service not known“.
The entries in /etc/resolvconf/resolv.conf.d/head still exists, but it seems that the resolvconf service does not see them.
Any ideas, please?
@DieterH,
Simply restart the systemd-resolved service will fix the problem…
I couldn’t save the Text File with this command:
it shows an error message..
thank you in any case…
Which error precisely? Can’t help without this info!
@Jeff: this is probably because /etc/resolvconf/resolv.conf.d/ does no exists.
This is what happened to me (ubuntu 21.10)
Make sure you leave out the
'$'in the command when you execute it,should be:
Is it possible to automate these entries into /etc/resolvconf/resolv.conf.d/head using Python or Ansible?
I’d like to try and create a button that automates and edits the conf file with 3 lines of code, but all I can find is how to do it manually and because it’s not a file that should be accessible by 3rd party software that easily, I haven’t gotten much luck finding this :/
I worked however I needed to reboot the server so just restarting the service might not be enough.
Thank you, it worked correctly.
Hi, there I was wondering whether these changes remain permanent no matter if /etc/interfaces are modified or not. Doesn’t Network Manager erase any modifications to resolv.conf on reboot?
Hi,
Thank you for this article. I tried to apply it but my problem is how I get resolvconf without DNS working. When manually I add 8.8.8.8 to the /etc/resolv.conf it doesn’t take effect I need to restart the network or reboot when I do so the file gets empty again.
If there is any solution to that thank you for sharing it.
Did you resolve the issue, if yes please post
Did you run
`sudo resolvconf -u`at the end?I think I messed something up. I added my nameservers, restarted the computer, but couldn’t access websites.
I am trying to use 1.1.1.1 as DNS
Maybe I am missing something. When you try to manually create it, you get the error messages below.
I don’t know why you didn’t mention how to do the manual change.
@Nick,
Use sudo while opening the file.
$ sudo vi /etc/resolv.conf
you need to edit with sudo
Works fine, I just had to run `sudo resolvconf -u` at the end
Thank you
I forgot to tell, my config: Debian 10 Buster.
More precisely Linux 4.19.0-11-amd64 #1 SMP Debian 4.19.146-1 (2020-09-17) x86_64 GNU/Linux
Thanks, @iaeiou — that did the trick to me as well. I was scratching my head to figure out what else I had to do to get the system to accept my configuration, and I knew it had to work somehow since I had changed everything to Google back in 2016… so there was no reason for things not to work in 2020 with Cloudflare’s servers (1.1.1.1 and 1.0.0.1)!
I guess that Aaron Kili has to update his original article to take the resolvconf -u into account.
Ubuntu girl here, using Ubuntu 20.04.1 LTS (focal) on a 5.4.0-52-generic kernel. So this seems to be consistent between Debian and Ubuntu (as it should!).
I downloaded resolvconf_1.82_all.deb and copied it to the broken system. Then installed with dpkg -i resolvconf_1.82_all.deb.
Nothing I do fixes my DNS issues.
# systemd-resolve --status Global LLMNR setting: no MulticastDNS setting: no DNSOverTLS setting: no DNSSEC setting: no DNSSEC supported: no Current DNS Server: 1.1.1.1 DNS Servers: 1.1.1.1 DNSSEC NTA: 10.in-addr.arpa 16.172.in-addr.arpa 168.192.in-addr.arpa 17.172.in-addr.arpa 18.172.in-addr.arpa 19.172.in-addr.arpa 20.172.in-addr.arpa 21.172.in-addr.arpa 22.172.in-addr.arpa 23.172.in-addr.arpa 24.172.in-addr.arpa 25.172.in-addr.arpa 26.172.in-addr.arpa 27.172.in-addr.arpa 28.172.in-addr.arpa 29.172.in-addr.arpa 30.172.in-addr.arpa 31.172.in-addr.arpa corp d.f.ip6.arpa home internal intranet lan local private test Link 2 (enp0s3) Current Scopes: DNS DefaultRoute setting: yes LLMNR setting: yes MulticastDNS setting: no DNSOverTLS setting: no DNSSEC setting: no DNSSEC supported: no Current DNS Server: 1.1.1.1 DNS Servers: 1.1.1.1 DNS Domain: ~.I can’t understand where that 10.0.0.1 is coming from??
You haven’t put the google DNS address in the config.
Did I miss something? How I can install resolvconf if I had no access to the network?
Check the part starting with “To install the resolvconf package as shown in the next section, you need to first of all manually set the following name servers in the /etc/resolv.conf file”
Was looking to use OpenDNS nameservers to prevent a multitude of Postfix dnsblog_query errors with Spamhaus, but couldn’t figure out how to make them stick. This article was from heaven.
Many, many, many thanks.
Editing with
sudo vi /etc/resolvconf/resolv.conf.d/headproduces:
This surely must be bad practice. What is the best practice?
@Andrew
Surely, this is not a good practice, we will find a better/accepted way to do it. Although it works for now, from a practical sense. Thanks for sharing your thoughts with us.
I think I was totally wrong on that one – the file can indeed be edited, its just that this text is meant to be carried along from this template file into the actual result file. Apologies!
There is a typo “Why Would You Want to Ddit”
should be changed to:
“Why Would You Want to Edit”
When the computer is not able to connect to the internet, how it will install an update which requires the internet?
This reminds me of what a wise man aside to me regarding systemd: A solution in search of a problem.
Nice article buddy, thank you!
I just want to know if after following these instructions I’ll be connected to the Cloudflare DNS (1.1.1.1 and 1.0.0.1.) automatically.
I’m also seeing another two lines on the /etc/resolv.conf file, one shows an IPv4 address, and the other one an IPv6. I guess I have to leave them as its. Right?
Regards!
@Mike
Yes, you should be connected to the Cloudflare DNS automatically, otherwise, give us feedback here and we will gladly help you. Thanks.
It seems like is working fine!
Is there any command I can use to see if I’m currently connected to that DNS?
@Mike
You use the nslookup tools (replace example.com with your domain):
I’m pretty new on Linux, but I’ve tried with “nslookup google.com” and “nslookup duckduckgo.com” and it gives me the server 1.1.1.1. That is the one that I put following your instructions on this post and belongs to Cloudflare. So I guess is working fine. Otherwise, let me know.
Thank you so much for your help. This blog is very nice by the way!
After updating the nameservers I keep on getting error messages.
See below(Ubuntu 19.04)
What am I missing.? Please advise
@welsh
Did you install resolvconf as described in the article? Try to follow the article to fix the issue.
Thank you, I love tecmint, it has solved my problems a lot.
@Aryan
Welcome, we love you too. Thanks for following us.
I think the right way is to modify “/etc/systemd/resolved.conf” and restart systemd-resolved to reload the configuration.
Yet another systemd epic fail. It now takes a running service, and a management tool, to accomplish what was and should be a simple file edit.
@Walter
Any changes made manually by a user in the
/etc/resolv.conffile are not saved permanently or only last for a while. That’s the reason why we use the resolvconf utility or the method @Carlos Sousa has shared, to make changes permanent.Correct. But before systemd started overwriting resolv.conf, i.e., in every version of Linux and Unix between 1983 and 2014 all the way back to the first BSD that introduced IPv4 support (BSD 4.2), you could change your resolvers just by editing resolv.conf.
No daemon or utility is necessary. Systemd adds unnecessary complexity to a process that worked just fine for thirty years, all so that some crazy German can say “now we do it the same way as Apple!”
As a wise person said to me once: a solution in search of a problem.
I always do:
@Carlos
True, this works as well but sets the file in an immutable state.
you could not do anything worse