In this 3-article series we will discuss how to set up a Postfix mail server with antivirus and spam protection in a CentOS 7 box. Please note these instructions also works on other distributions such as RHEL/Fedora and Debian/Ubuntu.
Our plan consists in storing email accounts and aliases in a MariaDB database which is for our convenience, will be managed through phpMyAdmin.
If you choose to not install phpMyAdmin, or are dealing with a CLI-only server, we will also provide the equivalent code to create the database tables that will be used throughout this series.
Since keeping a mail server up and running is one of the essentials tasks that are usually assigned to system administrators and engineers, we will also provide a few tips to efficiently run this critical service in a production environment.
Create A and MX Records for Domain in DNS
Before proceeding further, there are a few prerequisites that must be met:
1. You will need a valid domain registered through a domain registrar. In this series we will use www.linuxnewz.com, which was registered through GoDaddy.
2. Such domain must be pointed to the external IP of your VPS or cloud hosting provider. If you are self-hosting your mail server, you can use the service offered by FreeDNS (requires registration).
In any event, you have to set up A and MX records for your domain as well (you can learn more about MX records in this FAQ from Google).
Once added, you can look them up using an online tool such as MxToolbox or ViewDNS to ensure they are properly set up.
Important: Please note that it may take a while (1-2 days) until the DNS records are propagated and your domain is available. In the meanwhile, you can access your VPS through its IP address to perform the tasks indicated below.
3. Configure the FQDN (Fully Qualified Domain Name) of your VPS:
# hostnamectl set-hostname yourhostname
to set the system hostname, then edit /etc/hosts as follows (replace AAA.BBB.CCC.DDD, yourhostname, and yourdomain with the public IP of your server, your hostname, and your registered domain):
AAA.BBB.CCC.DDD yourhostname.yourdomain.com yourhostname
where yourhostname is the system hostname that was set previously using hostnamectl command.
Installing Required Software Packages
4. To install required software packages such as Apache, Postfix, Dovecot, MariaDB, PhpMyAdmin, SpamAssassin, ClamAV, etc, you need to enable the EPEL repository:
# yum install epel-release
5. Once you have followed the above steps, install the necessary packages:
In CentOS based Systems:
# yum update && yum install httpd httpd-devel postfix dovecot dovecot-mysql spamassassin clamav clamav-scanner clamav-scanner-systemd clamav-data clamav-update mariadb mariadb-server php phpMyAdmin
In Debian and derivatives:
# aptitude update && aptitude install apache2 postfix dovecot-core dovecot-imapd dovecot-pop3d dovecot-lmtpd dovecot-mysql spamassassin clamav clamav-daemon clamav-base mariadb-client mariadb-server php5 phpMyAdmin
6. Start and enable the web and database servers:
In CentOS based Systems:
# systemctl enable httpd mariadb
# systemctl start httpd mariadb
In Debian and derivatives:
# systemctl enable apache2 mariadb
# systemctl start apache2 mariadb
When the installation is complete and the above service are enabled and running, we will start off by setting up the database and tables to store information about Postfix mail accounts.
Creating Postfix Mail Accounts Database
For simplicity, we will use phpMyAdmin, a tool intended to handle the administration of MySQL / MariaDB databases through a web interface, to create and manage the email database.
However, in order to log on to and use this tool, we need to follow these steps:
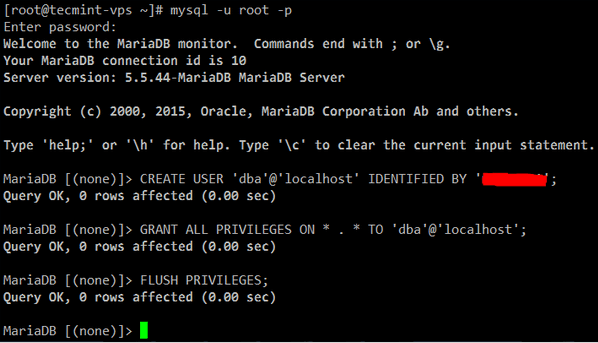
7. Enable the MariaDB account (you can do this by running the mysql_secure_installation utility from the command line, assigning a password for user root, and setting the default settings proposed by the tool EXCEPT “Disallow root login remotely?“:

or otherwise create a new database user:
MariaDB [(none)]> CREATE USER 'dba'@'localhost' IDENTIFIED BY 'YourPasswordHere';
MariaDB [(none)]> GRANT ALL PRIVILEGES ON * . * TO 'dba'@'localhost';
MariaDB [(none)]> FLUSH PRIVILEGES;
Secure Apache with a Certificate
8. Since we will be using a web application to manage the email server database, we need to take the necessary precautions to protect connections to the server. Otherwise, our phpMyAdmin credentials will travel in plain text over the wire.
To set up Transport Layer Security (TLS) in your server, follow the steps outlined in Part 8 of the RHCE series: Implementing HTTPS through TLS using Network Security Service (NSS) for Apache before proceeding further.
Note: if you do not have access to the server’s console you will need to find another way to generate the necessary entropy during the key creation. In that case, you may want to consider installing rng-tools and running rngd -r /dev/urandom.
Configure and Secure PhpMyAdmin
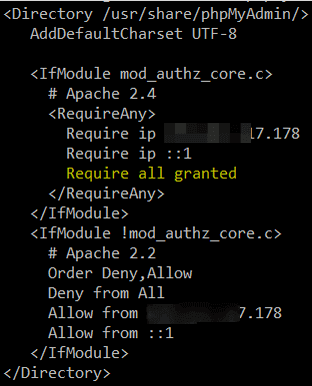
9. In /etc/httpd/conf.d/phpMyAdmin.conf (CentOS) or /etc/phpmyadmin/apache.conf (Debian and derivatives), locate all the occurrences of the following lines and make sure they point to the public IP of your server:
Require ip AAA.BBB.CCC.DDD
Allow from AAA.BBB.CCC.DDD
Additionally, disable the default aliases and create a new one to access your phpMyAdmin login page. This will help to secure the site against bots and external attackers who target www.yourdomain.com/phpmyadmin or www.yourdomain.com/phpMyAdmin.
#Alias /phpMyAdmin /usr/share/phpMyAdmin
#Alias /phpmyadmin /usr/share/phpMyAdmin
Alias /managedb /usr/share/phpMyAdmin
Also, add following line inside <IfModule mod_authz_core.c>:
Require all granted
Create Apache VirtualHost for Domain
10. Make sure your domain is added to the enabled sites. Create /etc/httpd/sites-available/linuxnewz.com.conf (CentOS) or /etc/apache2/sites-available/linuxnewz.com (Debian) with the following contents (make sure the DocumentRoot, sites-available, and sites-enabled directories exist):
<VirtualHost *:80>
    ServerName www.linuxnewz.com
    ServerAlias linuxnewz.com
    DocumentRoot /var/www/linuxnewz.com/public_html
    ErrorLog /var/www/linuxnewz.com/error.log
    CustomLog /var/www/linuxnewz.com/requests.log combined
    Options Indexes FollowSymLinks
</VirtualHost>
and the symbolic link:
On CentOS:
# ln -s /etc/httpd/sites-available/linuxnewz.com.conf /etc/httpd/sites-enabled/linuxnewz.com.conf
On Debian:
# a2ensite linuxnewz.com
and you’re done.
Setup Postfix Email Database
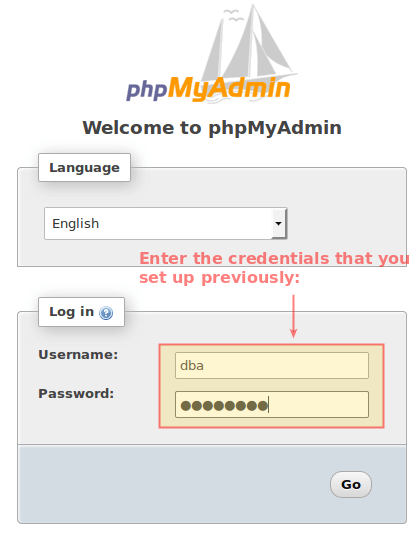
11. Now you can open your phpMyAdmin interface at https://www.yourdomain.com/managedb (note that managedb is the alias that we set up earlier for the phpMyAdmin data directory).
If that does not work (which can be caused by a delay in the propagation or lack of configuration of DNS records) for the time being you can try using your server’s public IP address instead of www.yourdomain.com:
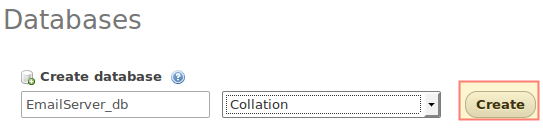
In any event, after you log on to phpMyAdmin you will see the following interface. Click New in the left section:

Enter a name for the database (EmailServer_db in this case, no need to select a Collation) and click Create:
12. On the next screen, choose a name for the first table (where we will store the domains this mail server will manage.
Please note that even when in this series we will only manage one domain, you can add more later) and the number of fields you want in it, then click Go. You will be prompted to name and configure those two fields, where you may safely proceed as indicated in the following images:
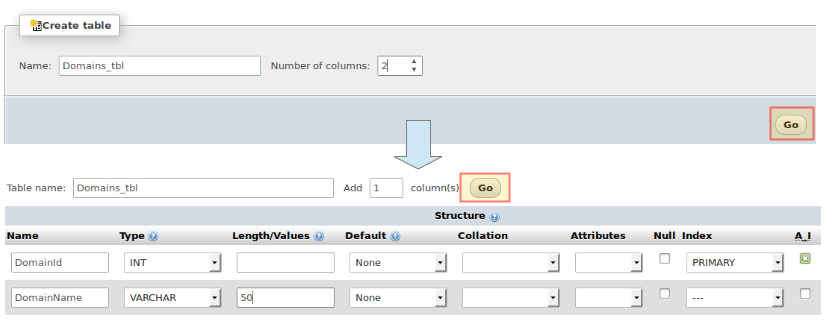
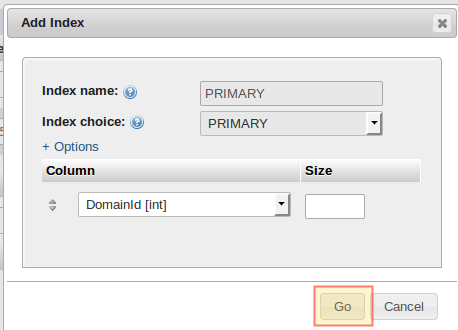
When you choose PRIMARY under Index for DomainId, accept the default values and click Go:
Alternatively, you can click Preview SQL to see the code under the hood:
CREATE TABLE `EmailServer_db`.`Domains_tbl` ( `DomainId` INT NOT NULL AUTO_INCREMENT , `DomainName` VARCHAR(50) NOT NULL , PRIMARY KEY (`DomainId`)) ENGINE = InnoDB;

When you’re ready, click Save to confirm changes. You will then be able to click New under EmailServer_db to continue creating tables:

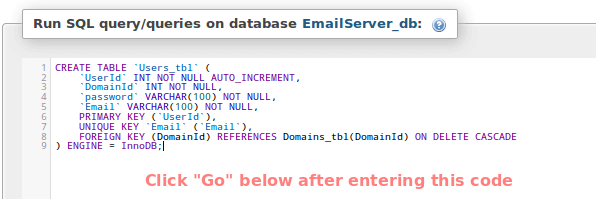
13. Now follow these steps to create the rest of the tables. Click on the SQL tab and enter the indicated code for each database object.
Note that in this case we chose to create the table using a SQL query because of the relationships that must be established between different tables:
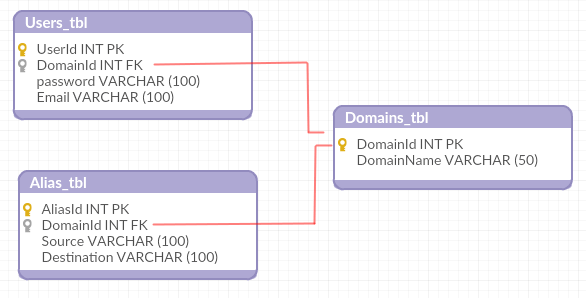
Users_tbl
CREATE TABLE `Users_tbl` (
    `UserId` INT NOT NULL AUTO_INCREMENT,
    `DomainId` INT NOT NULL,
    `password` VARCHAR(100) NOT NULL,
    `Email` VARCHAR(100) NOT NULL,
    PRIMARY KEY (`UserId`),
    UNIQUE KEY `Email` (`Email`),
    FOREIGN KEY (DomainId) REFERENCES Domains_tbl(DomainId) ON DELETE CASCADE
) ENGINE = InnoDB;
You should get a confirmation message (if not, phpMyAdmin will prompt for syntax errors):

Alias_tbl
CREATE TABLE `Alias_tbl` (
    `AliasId` INT NOT NULL AUTO_INCREMENT,
    `DomainId` INT NOT NULL,
    `Source` varchar(100) NOT NULL,
    `Destination` varchar(100) NOT NULL,
    PRIMARY KEY (`AliasId`),
    FOREIGN KEY (DomainId) REFERENCES Domains_tbl(DomainId) ON DELETE CASCADE
) ENGINE = InnoDB;
(Click Go at the bottom to proceed with the creation of the table).
Up to this point, you should have the following database structure:
Which means you’re ready to start adding some records in the next section.
Creating a Postfix Domain, Users and Aliases
14. We will now insert the following records into the three tables. The passwords for [email protected] and [email protected] will be encrypted and the INSERT INTO Users_tbl statement.
Also, please note that the emails sent to [email protected] will be redirected to [email protected]:
INSERT INTO Domains_tbl (DomainName) VALUES ('linuxnewz.com');
INSERT INTO Users_tbl (DomainId, password, Email) VALUES (1, ENCRYPT('PasswordForFirstEmailAccount', CONCAT('$6$', SUBSTRING(SHA(RAND()), -16))), '[email protected]');
INSERT INTO Users_tbl (DomainId, password, Email) VALUES (1, ENCRYPT('PasswordForSecondEmailAccount', CONCAT('$6$', SUBSTRING(SHA(RAND()), -16))), '[email protected]');
INSERT INTO Alias_tbl (DomainId, Source, Destination) VALUES (1, '[email protected]', '[email protected]');
Having added our domain, two user accounts, and an email alias we are ready to continue setting up our email server in the next article of this series, where we will configure Dovecot and Postfix.
Summary
In this article we have listed the packages required to install an Postfix email server in a CentOS 7 VPS, and explained how to manage the underlying database using phpMyAdmin.
In the next two articles we will review the configuration of the two programs that will take care of the email distribution for our domain (Part 2) and show you how to add protection against spam and viruses (Part 3) for your server.
Until then, feel free to contact us using the form below if you have any questions or comments.

Hi Guys,
Thank you for the great information.
I have a question, with this setup, how can I have a mailbox that receives a copy of the message and forwards a copy to an outside address like Gmail or yahoo.
How about an updated guide?
You’re referring to this guide from https://www.tecmint.com/install-wordpress-lamp-postfix-mail-notifications-vps-server/, but this is outdated, so creating the database in phpmyadmin isn’t working…
What if I have multiple domains on a single VPS? In such a case, how to assign FQDN?
[root@server ~]# telnet 202.51.74.100 110
Trying 202.51.74.100…
Connected to 202.51.74.100.
Escape character is ‘^]’.
+OK Dovecot ready.
user [email protected] 110
+OK
pass d@t@hub
-ERR [AUTH] Authentication failed.
After hours and hours just found the issue…
`password` VARCHAR(100) NOT NULL,
But the result of
ENCRYPT(‘PasswordForFirstEmailAccount’, CONCAT(‘$6$’, SUBSTRING(SHA(RAND()), -16)))
will always exceed 100 characters
Poor me, haven’t scrolled down to your comment. So I have spent another 30 hours with it and had found the issue 10 minutes before finding your comment.
I am just wondering if it is intentionally wrong, for a joke it is quite rough :-)
Me too :-( It would be nice to have that corrected in the article
I’d just like to point out that the function ENCRYPT is not available in MySQL 8 and that one has to use other stronger mean of encryption. I know here we are supposed to use MariaDB but I must use mysql. The function that worked for me up to this point is SHA2 and the syntax works like this:
INSERT INTO Users_tbl (DomainId, password, Email) VALUES (1, SHA2('mypassword', 256), '[email protected]');Albeit there are stronger algorithms, at least implementing this one was easy and fast. I found that Bcrypt is recommended by experts but I thing it might be more difficult to implement.
Hopefully someone else finds this useful.
Does this still work currently for new linux and other packages?
@Paul,
The instructions remain same for all Linux distributions, with slight changes in the commands.
Any plan to update this guide for latest systems and package versions?
@Armin,
Yes, there is plan to update this article to latest version in coming days, till then stay tuned to Tecmint.com
Hi Ravi, still hoping for guide update for Postfix 3.4.2 (current stable release)
The Part 2, Configuring Postfix Mail Server is the part of this series that doesn’t work with current Postfix configuration files, for instance, these shown variables:
(and others)
do not exists in the current main.cf file.
@Keith,
Give me sometime, I will update this guide.
Can you list step-by-step of configuration Mariadb store user mail account I young of knowledge of Mariadb I really need help
Thanks!
I have a Centos 7 mail and web server combo using the mariadb for email accounts. I would like to add wordpress db for multiple websites instead of the traditional web server.
Any insights on how to accomplish this? I tried to add the wordpress db and had issues and would like to have multiple instances of wordpress for multiple sites.
I appreciate any help you can give me.
Great article series. Quite detailed & extensive but I could not find any way to restrict the user mail accounts in size. I mean how can one restrict the mailboxes maximum size to some arbitrary amount to save the system from getting completely filled up by a runaway user.
Or maybe I overlooked some configuration detail.
Thanks…
Hi,
Replying to my own comment. Well, Isn’t there any configuration for mail quotas in the this setup ? I think that is the missing piece & will complete the scenario. Thanks.
Hello Everybody,
Is the comment section closed ? I was expecting some sort of a reply to my query on Quota Enforcement. Many Thanks…
If you have read through the setup you must have noticed the Directory /etc/dovecot/conf.d/ where all dovecot configuration files are stored.
Take a look at 90-quota.conf and adjust to your needs.
I was struggling for days to find out, why I always got password mismatches. After debugging dovecot auth-worker and creating the password
using:
doveadm pw -p myfirstpassword -s sha512
{SHA512}NiPagKRP+1ROZ29XI1unx+dqQ9PozCOZpk3AiAKE5vx/ZKCYbND++Jq84QbOM3LTxYIjDLgcn6NBF84rpg6pvg==
I found that $6$………………………. is no longer valid with dovecot version 2.2.13
When I took the complete string:
{SHA512}NiPagKRP+1ROZ29XI1unx+dqQ9PozCOZpk3AiAKE5vx/ZKCYbND++Jq84QbOM3LTxYIjDLgcn6NBF84rpg6pvg==
and put it into the password field of the SQL Database I could login with user and password.
I am using maria-db (mysql Ver 15.1 Distrib 10.0.30-MariaDB, for debian-linux-gnu (x86_64)) which is a opensource fork of mysql. I cannot imagine that this caused the problem. So please update Your great tutorial accordingly.
Thanks for your comments this solved my Authentication Failure with the clients.
Dist: Ubuntu 16.04
mysql Ver 15.1 Distrib 10.0.31-MariaDB, for debian-linux-gnu (x86_64) using readline 5.2
dovecot –version
2.2.22 (fe789d2)
Thanks for the wonderful tutorial, that’s a lot of work!
One problem, though in your “Users_tbl”, the password field needs to be longer, maybe “varchar(110)” rather than “varchar(100)”. The SHA512 hash is several characters too long, so gets automatically truncated. I spent quite a few hours on this before I could successfully log in!
I have confirmed the above comment, using varchar 100 caused password mismatch as the return hash value is 106, needs to be extended. Other than that a great guide.
I should have read that before, spent 30 minutes trying to figure that one out :)
Hello,
Thank you very much for these 5 articles, but I would like How to Setup Postfix Mail Server and Dovecot With the directory ldap of samba4 ?
Thank you for your responses.
Hello,
Thank you so much for this article, I am stuck in section 13 I got this error code #1005 – Can’t create table ‘ZeemailServer_db.Users_tbl’ (error: 150)
maybe I have done something wrong http://imgur.com/a/8kIr0
regards,
The actual MySQL error is #1005. Look it up in the MySQL / MariaDB documentation.
You should rewrite the guide to address this problem. Not everyone reading this has a background in MySQL.
@Ravi Saive, are all the suggestions made on previous comments implemented ? because I’m getting error while adding Database Index..
We’re working on it. Please check back in a few days.
Extremely complicated tutorial.
I am just wondering if you all think that if anyone wants to create a webmail server then it must be for sure for public .
What about creating something much more simpler without all that crap .
Is this email server for Google or for a common person that just wants to have his private email.
Instead following all these tutorials and get to the end and something is failin , it is much better to install citadel webcit that is more simple and will work at first time. And with citadel installed on a company server, your employees can talk with each others over citadel without having to pick the phone and stay there for hours.
Citadel also have an internal blog where Admin can post news, and users can have their own private room to put their data and share with they want. Citadel works as email server internally and externally, and you will have a web interface to check your email from home.
1 single install and everything works perfectly .
Next time create a tutorial more detailed, and without so many things installed and needed to be configured like MySQL, Postfix, Dovecot & Roundcube.
A more simple tutorial is here and user is not stuck in the middle because most of the options you say are not there because the time users are reading this tutorial, apps have new versions with removed options and new options added .
@sysadmin_linux,
You’re right in that this tutorial is complex (I would not say ‘complicated’) but you are missing the main point here. Nowadays, several business have moved their email services to a cloud provider such as Google Apps or Office365. So why bother to set up a mail server? It is one of the best learning exercises out there. Additionally, some people may actually need to set up one for private use.
On a side note, I have never heard about Citadel before, and will consider your suggestion for upcoming articles.
Hello
I am stack on section 12, when I run the sql i get error #1005 – Can’t create table ‘EmailServer_db.Alias_tbl’ (errno: 150) (Details…)
the details of the error is pasted here under
LATEST FOREIGN KEY ERROR
————————
170202 15:00:36 Error in foreign key constraint of table `EmailServer_db`.`Alias_tbl`:
Create table `EmailServer_db`.`Alias_tbl` with foreign key constraint failed. Referenced table `EmailServer_db`.`Domains_tbl` not found in the data dictionary near ‘FOREIGN KEY (DomainId) REFERENCES Domains_tbl(DomainId) ON DELETE CASCADE
) ENGINE = InnoDB’
My mistake, “_tb1 instead of _tbl
Good catch Chris!
Hi,
Can someone help me on this issue. I followed all steps carefully, i don’t know where i am doing a mistake. Below are errors.
A quick response will be highly appreciated.
There are substantial mistakes. I spent more time debugging your tutorial than implementing it. Oh my. First and foremost: You are limiting the password column in Users_tbl to varchar(100). This results in cut-off SHA512 pw hashes because they’re longer than 100 chars. This results in authentication failures in Dovecot and postfix, because the password can never get verified. Second, you should set inet_interfaces = all in /etc/postfix/main.cf. By default it is inet_interfaces = localhost (at least on CentOS 7) which results in users not being able to connect. Thanks.
Thank you for your comment and contribution. It is possible that some typos and errors such as these were later corrected in the implementation but failed to go into the writeup. It was my understanding that the issues you’re pointing out had been corrected already.
@Ravi,
Please make sure that Stefan’s observations are properly added to the article. Thanks!
@Stefan and @Gabriel,
Issues are fixed on time, once we came to know by our readers…So, I think all issues are already corrected in the writeup, if you still see, do let us know here, we will fix it asap..
I chose not to install the PhpMyAdmin package. Can’t see the need in one more potential security hole to maintain. So to make things easy when adding users or virtual domains, I added some procedures to MySQL.
Probably kinda messy and I didn’t bother with input validation, but it works. (Forgive me if the formatting looks bad here. No preview button to look at this post and tweak till it looks good.)
To create the procedure to add a virtual domain, type:
MariaDB [EmailServer_db]> delimiter //
MariaDB [EmailServer_db]> create procedure adddomain(IN domnm varchar(254))
    -> begin
    -> insert into Domains_tbl (DomainName) values (domnm);
    -> end //
[output shows here]

MariaDB [EmailServer_db]> delimiter ;
To add a new virtual domain, type:
[MariaDB [EmailServer_db]> call adddomain('domainname.tld');To create the procedure for adding users, type:
MariaDB [EmailServer_db]> delimiter //
MariaDB [EmailServer_db]> create procedure adduser(IN usrnm varchar(254), IN domnm varchar(254), IN psswd varchar(254))
    -> begin
    -> declare eml varchar(255) default '';
    -> declare pswd varchar(255) default'';
    -> declare domnum int default 0;
    -> select DomainID into domnum from Domains_tbl where DomainName = domnm;
    -> set pswd = ENCRYPT(psswd, CONCAT('$6$', SUBSTRING(SHA(RAND()), -16)));
    -> set eml = concat(usrnm,'@',domnm);
    -> insert into Users_tbl (DomainId, password, Email) values (domnum, pswd, eml);
    -> end //
[output shows here]

MariaDB [EmailServer_db]> delimiter ;
To add a user type:
MariaDB [EmailServer_db]> call adduser('username','domainname.tld','password');To create the procedure for creating a new alias mapping, type:
MariaDB [EmailServer_db]> delimiter //
MariaDB [EmailServer_db]> create procedure addalias (IN ail varchar(254), IN tu varchar(254), IN dom varchar(254))
    -> begin
    -> declare src, dst varchar(254) default '';
    -> declare domnum int default 0;
    -> select DomainID into domnum from Domains_tbl where DomainName = dom;
    -> set src = concat(ail,'@',dom);
    -> set dst = concat(tu,'@',dom);
    -> insert into Alias_tbl (DomainId, Source, Destination) values (domnum, src, dst);
    -> end //
[output shows here]

MariaDB [EmailServer_db]> delimiter ;
To add an alias, type:
MariaDB [EmailServer_db]> call addalias('aliasusername','username','domainname.tld');@Harmon20,
Big kudos to you for taking the time to share your feedback with us! Let me begin by saying that I don’t usually use PhpMyAdmin either, but I thought it would be a nice addition for this series as some users may find it easier to manage the database using a web interface than the command line.
As for the procedure, great job! And thanks again for sharing!
Great series on setting up virtual users and domains, just one major issue I will mention to save others some aggravation. The password column in the Users_tbl table needs to be more than 100 characters long or it truncates any SHA512-CRYPT password that was put in. This causes any authentication attempt via dovecot (when you get to part 2) to fail. I think at least varchar(200) should be plenty as it looks like the length of an encrypted password will generally be 106 characters.
@MJH,
Thank you for pointing this out. I believe someone else noticed it as well and it was my understanding we had corrected it in the writeup. @Ravi, please add a note next to the image MJH is referring to.
In Section 12: Is not the last Query, Alias Tbl deficient?
Where the last line should also stand: ENGINE = InnoDB;
??
@Stein,
Good catch! I’m asking @Ravi to correct this in the writeup. Thanks for your comment!
@Anders and @Gabriel,
Thanks for pointing out, yup corrected in the article as suggested..
Are you shore you shall run mysql_secure_installation on Debian installations? The Debian installation should make all that is done by mysql_secure_installation when the package are installed.
And never, ever clear user database in Debian installation, as there are a user there that is needed for Debian to be able to handle administration of all databases.
Read with zmore /usr/share/doc/apache2/README.Debian.gz
So no, you should NOT make links to start a virtual site in Apache2. Use the right tool instead, a2ensite linuxnew.com
See Debian Administrator’s Handbook.
@Anders,
Thank you for such an insightful comment. In my defense I’ll say I wrote this series using a CentOS 7 box and while I tried to keep it as compatible with Debian as possible, it’s likely that I could have missed some of the points you’re referring to.
On the other hand, I just installed mariadb-server and mariadb-client on a Debian Jessie box and the only part that the installation process and mysql_secure_installation have in common is the setting of a password for the root user. In addition, the only user that is removed during mysql_secure_installation is the anonymous user (which is not safe to be present in a production environment), not an administrative user.
Last, but not least, I agree with you on the fact that a2ensite should be used whenever available. I totally missed that while trying to make this tutorial Debian-compatible. @Ravi, please replace the symbolic link creation with ‘a2ensite linuxnewz.com’.
In Section 9 /etc/httpd/conf.d/phpMyAdmin.conf the IP is still visible at Apache 2.2 ;-)
@Tobi,
Thank you for pointing that out.
@Ravi,
Please hide the IP in that image.
@Tobi and @Gabriel,
Corrected the image..