Regardless of the many online communication methods that are available today, email remains a practical way to deliver messages from one end of the world to another, or to a person sitting in the office next to ours.
The following image illustrates the process of email transport starting with the sender until the message reaches the recipient’s inbox:

To make this possible, several things happen behind the scenes. In order for an email message to be delivered from a client application (such as Thunderbird, Outlook, or webmail services such as Gmail or Yahoo! Mail) to a mail server, and from there to the destination server and finally to its intended recipient, a SMTP (Simple Mail Transfer Protocol) service must be in place in each server.
That is the reason why in this article we will explain how to set up a SMTP server in RHEL 7 where emails sent by local users (even to other local users) are forwarded to a central mail server for easier access.
In the exam’s requirements this is called a null-client setup.
Our test environment will consist of an originating mail server and a central mail server or relayhost.
Original Mail Server: (hostname: box1.mydomain.com / IP: 192.168.0.18)
Central Mail Server: (hostname: mail.mydomain.com / IP: 192.168.0.20)
For name resolution we will use the well-known /etc/hosts file on both boxes:
192.168.0.18    box1.mydomain.com       box1
192.168.0.20    mail.mydomain.com       mail
Installing Postfix and Firewall / SELinux Considerations
To begin, we will need to (in both servers):
1. Install Postfix:
# yum update && yum install postfix
2. Start the service and enable it to run on future reboots:
# systemctl start postfix
# systemctl enable postfix
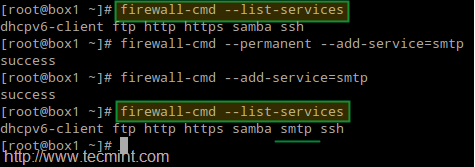
3. Allow mail traffic through the firewall:
# firewall-cmd --permanent --add-service=smtp
# firewall-cmd --add-service=smtp
4. Configure Postfix on box1.mydomain.com.
Postfix’s main configuration file is located in /etc/postfix/main.cf. This file itself is a great documentation source as the included comments explain the purpose of the program’s settings.
For brevity, let’s display only the lines that need to be edited (yes, you need to leave mydestination blank in the originating server; otherwise the emails will be stored locally as opposed to in a central mail server which is what we actually want):
myhostname = box1.mydomain.com
mydomain = mydomain.com
myorigin = $mydomain
inet_interfaces = loopback-only
mydestination =
relayhost = 192.168.0.20
5. Configure Postfix on mail.mydomain.com.
myhostname = mail.mydomain.com
mydomain = mydomain.com
myorigin = $mydomain
inet_interfaces = all
mydestination = $myhostname, localhost.$mydomain, localhost, $mydomain
mynetworks = 192.168.0.0/24, 127.0.0.0/8
And set the related SELinux boolean to true permanently if not already done:
# setsebool -P allow_postfix_local_write_mail_spool on

The above SELinux boolean will allow Postfix to write to the mail spool in the central server.
5. Restart the service on both servers for the changes to take effect:
# systemctl restart postfix
If Postfix does not start correctly, you can use following commands to troubleshoot.
# systemctl –l status postfix
# journalctl –xn
# postconf –n
Testing the Postfix Mail Servers
To test the mail servers, you can use any Mail User Agent (most commonly known as MUA for short) such as mail or mutt.
Since mutt is a personal favorite, I will use it in box1 to send an email to user tecmint using an existing file (mailbody.txt) as message body:
# mutt -s "Part 9-RHCE series" [email protected] < mailbody.txt

Now go to the central mail server (mail.mydomain.com), log on as user tecmint, and check whether the email was received:
# su – tecmint
# mail

If the email was not received, check root’s mail spool for a warning or error notification. You may also want to make sure that the SMTP service is running on both servers and that port 25 is open in the central mail server using nmap command:
# nmap -PN 192.168.0.20

Summary
Setting up a mail server and a relay host as shown in this article is an essential skill that every system administrator must have, and represents the foundation to understand and install a more complex scenario such as a mail server hosting a live domain for several (even hundreds or thousands) of email accounts.
(Please note that this kind of setup requires a DNS server, which is out of the scope of this guide), but you can use following article to setup DNS Server:
Finally, I highly recommend you become familiar with Postfix’s configuration file (main.cf) and the program’s man page. If in doubt, don’t hesitate to drop us a line using the form below or using our forum, Linuxsay.com, where you will get almost immediate help from Linux experts from all around the world.


Hi, Thanks for great useful post, I need one help, I am using five IP’s.
Where as when i sent mail from each ip but it shows originating IP : X.X.X.250 only, which means first ip. How to resolve this. where to do..
postfix null client
Just a small thing, you do not need to open the SMTP port on a Postfix null-client – a null-client cannot receive emails from outside, therefore opening the port isn’t required.
I was thinking the same