SSH (Secure Shell) is one of the most important tools for Linux system administrators and developers, as it allows you to securely log in to remote machines, run command-line programs, manage files, transfer data, forward ports, and even run GUI apps remotely.
But here’s the catch → using SSH with default settings isn’t always safe, because hackers constantly scan the internet for open SSH ports and weak logins. That’s why learning how to properly configure and secure SSH is a must.
In this guide, we’ll cover essential SSH configurations and security tips every Linux beginner should know to keep their servers secure, efficient, and running smoothly.
1. How to Change the Default SSH Port Number
By default, SSH listens on port 22, which makes it a common target for automated bot attacks. One simple way to reduce such attacks is by changing SSH to a non-standard port.
To do this, open the SSH configuration file with a text editor:
sudo nano /etc/ssh/sshd_config
Look for the line that says:
#Port 22
Uncomment it (remove the #) and change it to a custom port number, for example:
Port 2200
After saving the file, restart the SSH service to apply the changes:
sudo systemctl restart ssh     # Debian/Ubuntu
sudo systemctl restart sshd    # RHEL/CentOS
Important: On Debian/Ubuntu the SSH service is named ssh, and on RHEL/CentOS it is sshd. Always use the correct name when restarting or checking the service.
Next, update your firewall rules to allow traffic on the new port.
------------------ On FirewallD ------------------
sudo firewall-cmd --permanent --zone=public --add-port=2200/tcp
sudo firewall-cmd --reload

------------------ On UFW ------------------
sudo ufw allow 2200/tcp
In newer OpenSSH versions, changing the port in sshd_config may not work because SSH is managed via systemd sockets.
Create a systemd socket override (replace ListenStream with your desired port):
sudo mkdir -p /etc/systemd/system/ssh.socket.d
sudo bash -c 'cat > /etc/systemd/system/ssh.socket.d/listen.conf <<EOF
[Socket]
ListenStream=
ListenStream=2200
EOF'
Reload systemd and restart the SSH service:
sudo systemctl daemon-reload
sudo systemctl restart ssh     # Debian/Ubuntu
sudo systemctl restart sshd    # RHEL/CentOS
Update your firewall rules (same as above).
2. How to Disable Root SSH Login
Allowing direct root login over SSH is risky because it gives attackers a single target for brute-force attacks. A safer approach is to log in as a normal user and then use sudo for administrative tasks.
To disable root login, find the following line in your SSH configuration file.
PermitRootLogin yes
and change it to:
PermitRootLogin no
Save the file and restart the SSH service to apply the change:
sudo systemctl restart sshd
3. How to Log in to a Linux Server Without an SSH Password
Password-based SSH logins can be convenient but are less secure and can be cumbersome for repeated access.
A safer and more efficient approach is SSH key-based authentication, which allows you to log in without entering a password.
First, generate a pair of SSH keys on your local machine:
ssh-keygen -t rsa -b 4096
Next, copy your public key to the remote server:
ssh-copy-id user@remote-server
Once the key is installed, you can log in to the server without a password:
ssh user@remote-server
4. How to Allow Only Specific Users to SSH on Linux
To improve SSH security, you can restrict access so that only certain users or groups can log in, which is useful for preventing unauthorized accounts from attempting SSH connections.
To allow specific users, add the following line to your SSH configuration file.
AllowUsers alice bob
Or, to allow entire groups, use:
AllowGroups admins devops
After making these changes, restart the SSH service:
sudo systemctl restart sshd
From now on, only the specified users (alice and bob) or groups (admins and devops) will be able to log in via SSH, helping to tighten server security.
5. How to Show a Welcome or Warning Message on SSH Login
Displaying a message when users log in via SSH can be useful for welcoming users or showing legal/security warnings.
One simple option is to edit the Message of the Day (MOTD) file:
sudo nano /etc/motd
For a more formal or legal warning, you can create a banner in /etc/issue.net:
sudo nano /etc/issue.net
Then, tell SSH to display this banner by adding or editing the following line in the SSH configuration file:
Banner /etc/issue.net
Finally, restart the SSH service to apply the changes:
sudo systemctl restart sshd
Now, whenever someone logs in via SSH, they will see your custom welcome or warning message.
6. How to Trace Failed SSH Login Attempts
Monitoring failed SSH login attempts is essential for detecting unauthorized access attempts and improving server security.
On Debian-based distributions, you can check the logs with:
sudo grep "Failed password" /var/log/auth.log
On RHEL-based distributions, use:
sudo grep "Failed password" /var/log/secure
For real-time monitoring of SSH login activity, you can use the journalctl command:
sudo journalctl -u sshd -f
7. How to Restrict SSH Access by IP Address in Linux
Restricting SSH access to specific IP addresses adds an extra layer of security by allowing only trusted machines to connect.
You can configure this directly in the SSH configuration file by specifying a user and their allowed IP address:
AllowUsers [email protected]
Alternatively, you can enforce IP restrictions at the firewall level. For example, with UFW, allow access only from a specific IP address to port 22:
------------------ On FirewallD ------------------
sudo firewall-cmd --permanent --zone=public --add-rich-rule='rule family="ipv4" source address="192.168.1.100" port protocol="tcp" port="22" accept'
sudo firewall-cmd --reload

------------------ On UFW ------------------
sudo ufw allow from 192.168.1.100 to any port 22
8. How to Set Idle Timeout for SSH Sessions
Idle SSH sessions can pose a security risk if a user forgets to log out, leaving the connection open for potential misuse.
You can automatically disconnect inactive sessions by setting an idle timeout in the SSH configuration file.
ClientAliveInterval 300
ClientAliveCountMax 0
ClientAliveInterval 300→ Sends a “keep-alive” message every 300 seconds (5 minutes).ClientAliveCountMax 0→ Disconnects the session if no response is received.
With these settings, any idle SSH session will automatically terminate after 5 minutes, reducing the risk of unattended open sessions.
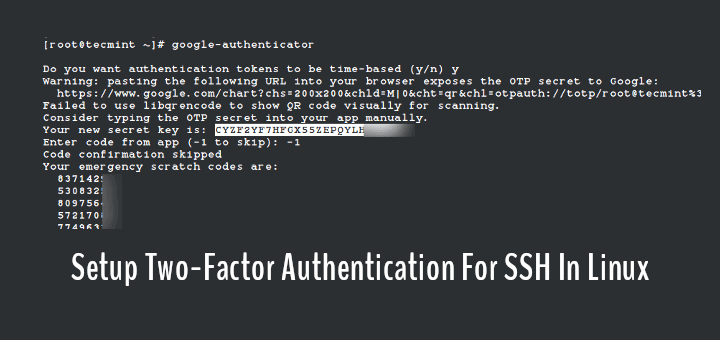
9. How to Enable Two-Factor Authentication (2FA) for SSH Login
Adding two-factor authentication (2FA) to SSH significantly increases security by requiring a second verification step in addition to your password.
On Debian/Ubuntu systems, you can use Google Authenticator.
sudo apt install libpam-google-authenticator
Then, set up 2FA for your user account by running:
google-authenticator
Next, enable the PAM module for SSH by editing:
sudo nano /etc/pam.d/sshd
Add the following line:
auth required pam_google_authenticator.so
Finally, allow challenge-response authentication in the SSH configuration file:
ChallengeResponseAuthentication yes
Restart the SSH service to apply the changes:
sudo systemctl restart sshd
Now, each SSH login will require both your password and a time-based verification code, greatly improving your server’s security.
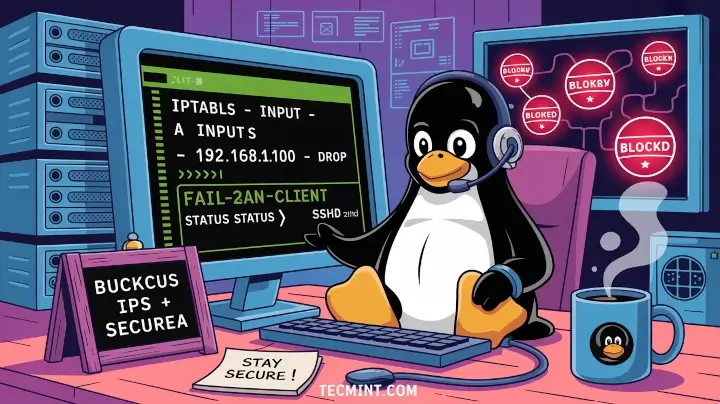
10. How to Limit SSH Connections with Fail2ban
Fail2ban is a powerful tool that helps protect your server from brute-force attacks by temporarily banning IP addresses that fail login attempts multiple times.
To set it up, first install Fail2ban on Debian/Ubuntu systems:
sudo apt install fail2ban
Next, enable the SSH jail by creating or editing the local configuration file:
sudo nano /etc/fail2ban/jail.local
Add the following lines to configure protection for SSH:
[sshd]
enabled = true
port = ssh
maxretry = 3
Finally, restart Fail2ban to apply the changes:
sudo systemctl restart fail2ban
With Fail2ban enabled, repeated failed login attempts will automatically trigger temporary bans, greatly reducing the risk of brute-force attacks.
11. How to Configure Key-Based SSH Authentication in Linux
Key-based authentication is a secure method to log in to SSH without using passwords. It relies on a cryptographic key pair, making brute-force attacks nearly impossible.
First, generate a key pair on your local machine using the modern and secure Ed25519 algorithm is recommended:
ssh-keygen -t ed25519
Next, copy your public key to the remote server:
ssh-copy-id user@server
Once key-based authentication is working, you can further improve security by disabling password logins in the SSH configuration file.
PasswordAuthentication no
Restart the SSH service to apply the change:
sudo systemctl restart sshd
After this, only users with the correct private key can log in, providing a strong layer of protection against unauthorized access.
12. How to Allow or Deny SSH Access Using hosts.allow and hosts.deny
Linux provides a simple way to control access to services using TCP wrappers, which rely on the /etc/hosts.allow and /etc/hosts.deny files.
First, allow trusted IPs in /etc/hosts.allow:
sshd: 192.168.1.100
Then, deny all other IPs by editing /etc/hosts.deny:
sshd: ALL
With this setup, only the IP address 192.168.1.100 can connect via SSH, while all other attempts are blocked.
13. How to Check and Monitor Active SSH Sessions on Linux
Monitoring active SSH sessions helps you keep track of who is logged in and detect any unauthorized access. To see a list of currently logged-in users, you can use simple commands like:
who
OR
w
If you need to terminate a specific user’s session, you can use pkill with their username:
sudo pkill -u username
Regularly checking active sessions ensures you have control over who is connected to your server and helps maintain security.
14. How to Set Up SSH Tunneling (Port Forwarding) on Linux
SSH tunneling, or port forwarding, allows you to securely route network traffic from your local machine to a remote server, which is useful for accessing services behind a firewall or encrypting otherwise insecure connections.
For local port forwarding, you can forward a port on your local machine to a port on the remote server.
ssh -L 8080:localhost:80 user@remote-server
8080→ The local port on your machine.localhost:80→ The destination on the remote server.user@remote-server→ Your SSH login credentials.
After running this command, any traffic sent to localhost:8080 on your local machine will be securely forwarded to port 80 on the remote server.
15. How to Enable Verbose Logging for SSH Troubleshooting
When troubleshooting SSH connection issues, detailed logs can help identify the root cause, such as authentication problems or network delays. SSH provides a built-in verbose mode that shows step-by-step information about the connection process.
To enable verbose logging, simply run:
ssh -vvv user@server
- The
-vvvflag increases the verbosity level, providing comprehensive details about each stage of the SSH connection. - You can also use fewer vs (
-vor-vv) for less detailed output.
Verbose mode is invaluable for diagnosing SSH problems, helping you quickly pinpoint configuration errors, network issues, or authentication failures.
16. How to Secure SSH with Strong Ciphers and Protocols
Securing SSH connections involves ensuring that only strong encryption algorithms and protocols are used. By default, SSH supports multiple protocols and ciphers, some of which are outdated and vulnerable.
You can harden your SSH server by explicitly specifying secure options in the configuration file:
Protocol 2
Ciphers aes256-ctr,aes192-ctr,aes128-ctr
MACs hmac-sha2-512,hmac-sha2-256
KexAlgorithms [email protected]
- Protocol 2 → Ensures only the secure SSHv2 protocol is used.
- Ciphers → Specifies strong encryption algorithms for data transfer.
- MACs → Sets secure message authentication codes to verify data integrity.
- KexAlgorithms → Chooses secure key exchange algorithms.
After making these changes, restart SSH to apply them:
sudo systemctl restart sshd
17. How to Limit SSH Access to a Specific Port Range
Restricting SSH access to a specific port range adds another layer of security by controlling which ports are allowed for connections, which can help reduce exposure to automated attacks on unused ports.
On systems using UFW (Uncomplicated Firewall), you can allow a range of ports with the following command:
sudo ufw allow 1024:1040/tcp
For FirewallD users, the equivalent would be:
sudo firewall-cmd --permanent --add-port=1024-1040/tcp
sudo firewall-cmd --reload
This configuration permits SSH connections only on ports 1024 to 1040, blocking access on all other ports.
18. How to Change SSH Connection Timeout in Linux
Limiting the time SSH waits for a user to log in helps prevent brute-force attacks and reduces the window for unauthorized access attempts, which can be configured using the LoginGraceTime setting in the SSH server configuration file.
Add or modify the following line, which will set the maximum time (in seconds) SSH will wait for a successful login before disconnecting.
LoginGraceTime 30
After saving the file, restart the SSH service to apply the change:
sudo systemctl restart sshd
19. How to Enable SSH Compression for Faster Connections
Enabling compression in SSH can improve connection speed, especially when transferring large amounts of data over slower networks. SSH can compress data before sending it, reducing the amount of traffic sent over the network.
To use compression on a per-connection basis, simply add the -C flag when connecting:
ssh -C user@server
For a permanent solution, you can enable compression in the SSH client configuration file.
Compression yes
Once enabled, SSH will automatically compress data for all connections, making transfers faster while still maintaining encryption and security.
20. How to Configure SSH Aliases for Easier Access
Managing multiple SSH connections can be cumbersome if you have to remember IP addresses, ports, and usernames for each server. Using SSH aliases simplifies this process by allowing you to create shortcuts for frequently accessed servers.
To set up an alias, edit your SSH client configuration file and add an entry like this:
Host myserver
  HostName 192.168.1.50
  User alice
  Port 2200
After saving the file, you can connect simply by running:
ssh myserver
21. How to Forward GUI Applications Over SSH (X11 Forwarding)
SSH can do more than just command-line access; it can also forward graphical applications from a remote server to your local machine using X11 forwarding, which allows you to run GUI apps on the server as if they were running locally.
To enable X11 forwarding, connect with the -X option:
ssh -X user@server
Once connected, you can launch GUI applications, such as:
gedit
The application’s window will appear on your local machine, while all processing happens on the remote server.
Tip: Ensure X11 forwarding is allowed in the SSH server configuration file.
X11Forwarding yes
Final Thoughts
SSH is an essential tool for anyone managing Linux servers, and using it correctly can make your work both easier and more secure.
By following the tips in this guide, you can protect your servers from unauthorized access, simplify your logins with key-based authentication and aliases, and monitor activity with tools like fail2ban and session timeouts.
Start with the basics, such as changing the default port, disabling root login, and setting up key-based login, and then gradually explore advanced features like two-factor authentication, SSH tunneling, and verbose logging.
Mastering these practices will help you manage servers efficiently, stay safe from attacks, and work like a confident Linux administrator.


There are several parts of this article with outdated information.
To change the port, in the latest versions of open-ssh server, it is done through socket configuration. No longer honoring the change of port in the standard sshd_config.
sudo bash -c ‘cat > /etc/systemd/system/ssh.socket.d/listen.conf <<EOF
[Socket]
ListenStream=
ListenStream=YOUR_NEW_PORT
EOF'
The service is under the name of ssh in Debian/Ubuntu based distros, sshd in RHEL/CentOs based distros.
Please update your article.
@John,
Thank you for your feedback! I’ve updated the article to include the latest method for changing the SSH port using systemd socket overrides for newer OpenSSH versions, while keeping the traditional
sshd_configmethod for older setups. I also added notes about the differences in service names between Debian/Ubuntu (ssh) and RHEL/CentOS (sshd).Your input helped make the guide more accurate and up-to-date—much appreciated!
Thanks for listening. I appreciate the update.
In Redhat OS, there are 2 files under /etc/ssh i.e sshd_config and ssh_config? What is the difference and what is the use of both files and for what purpose??
sshd_config is for daemon – ssh _server_ process working on host you connect to.
ssh_config is used to set up system-wide default settings for ssh command (ssh-client)
when given three departments how can write policy document for the security system for the bank that ensures integrity authentication in the bank.
Oh-oh-oh. There is no difference in config file names between RH, Debian, Gentoo and so on. I.e.
==================================================================
root@seafile:~# lsb_release -d
Description: Debian GNU/Linux 8.6 (jessie)
root@seafile:~# ls /etc/ssh/*_config
/etc/ssh/ssh_config /etc/ssh/sshd_config
root@seafile:~# head -n 3 /etc/ssh/ssh_config
# This is the ssh client system-wide configuration file. See
# ssh_config(5) for more information. This file provides defaults for
root@seafile:~# head -n 5 /etc/ssh/sshd_config
# Package generated configuration file
# See the sshd_config(5) manpage for details
# What ports, IPs and protocols we listen for
Port 22
==================================================================
[root@aloe ~]# cat /etc/redhat-release
CentOS release 4.9 (Final)
[root@aloe ~]# ls /etc/ssh/*_config
/etc/ssh/ssh_config /etc/ssh/sshd_config
[root@aloe ~]# head -n 3 /etc/ssh/ssh_config
# $OpenBSD: ssh_config,v 1.19 2003/08/13 08:46:31 markus Exp $
# This is the ssh client system-wide configuration file. See
[root@aloe ~]# head -n 5 /etc/ssh/sshd_config
# $OpenBSD: sshd_config,v 1.69 2004/05/23 23:59:53 dtucker Exp $
# This is the sshd server system-wide configuration file. See
# sshd_config(5) for more information.
==================================================================
isa ~ # cat /etc/gentoo-release
Gentoo Base System release 2.3
isa ~ # ls /etc/ssh/*_config
/etc/ssh/ssh_config /etc/ssh/sshd_config
isa ~ # head -n 3 /etc/ssh/ssh_config
# $OpenBSD: ssh_config,v 1.30 2016/02/20 23:06:23 sobrado Exp $
# This is the ssh client system-wide configuration file. See
isa ~ # head -n 5 /etc/ssh/sshd_config
# $OpenBSD: sshd_config,v 1.99 2016/07/11 03:19:44 tedu Exp $
# This is the sshd server system-wide configuration file. See
# sshd_config(5) for more information.
==================================================================
Ubuntu, Mint, Calculate all of them have two config files ssh_config for ssh client and sshd_config for daemon.
So seriously mistakes… :( Very bad!
Hi Ravi,
How does ssh work, mean to say what is the functionality of public and private key ,how the communication takes place b/w client and server.
It was asked to me in vmware interview.
Can you please help
Can SSH is used for making http requests to a web server, checking network path to a remote, and writing a web server, accessing a remote computer. please tell me the answer
@Deepa,
SSH is used to only connect remote Linux servers, and on the remote client SSH client must be installed to make a SSH connection…not for HTTP requests..
ok. thank u sir
which you provide information regarding ssh is nice, it ‘s very useful to sysadmins in linux.
Hello.
I hope you can help me.
What is the -f flag in scp?
Thank you
@Alan,
There isn’t any -f switch in scp man pages, yes there is capital -F option, which is used to specify per-user configuration file for ssh.
I found that is a undocumented option to, specified “from” (-f) and “to” (-t)
“In all cases aside from remote-to-remote scenario the scp command processes command line options and then starts an SSH connection to the remote host. Another scp command is run on the remote side through that connection in either source or sink mode. Source mode reads files and sends them over to the other side, sink mode accepts them. Source and sink modes are triggered using -f (from) and -t (to) options, respectively. These options are for internal usage only and aren’t documented. There is also the 3rd hidden option, -d, when the target is expected to be a directory.”
http://docstore.mik.ua/orelly/networking_2ndEd/ssh/ch03_08.htm
And this:
“So, how does the transfer protocol actually works? If you forget about ssh, sshd and the connection between them and concentrate only on interaction between scp in “normal” mode and scp in the sink mode, you can see the scenario like this (if you copied from remote to local the remote scp command would have been run with -f option instead of -t, denoting the source mode):”
https://blogs.oracle.com/janp/entry/how_the_scp_protocol_works
@Alan,
Thanks for the detailed information about background process of ssh and scp, very helpful, let me go through it and come back to you..
I face most of the problems in Linux Network commands. What are the main questions related to Networking in ssh ?
in #6. How to add welcome/warning message as soon as a user login to SSH Server?
the command nano/etc/issue is not working, any other solution for this…
but i am using /etc/motd for welcome/warning message
Seems you have not installed nano editor.
try
# vi /etc/issue
[Note there is gap between vi and /etc]
At Debian systems the SSH config could be found at “/etc/ssh/sshd_config” not “/etc/ssh/ssh_config” this is the SSH-Client config!
good one!
Thanks for the recognition.
keep Connected for more such posts.
On Debian and most Debian-based systems like, Ubuntu the ssh server configuration is in /etc/ssh/sshd_config
There are a lot of differences between Debian and Red Hat, but this is identical!
They always say something like “love to research nix” but they seem to never do that before posting articles.
Ref #6
I would also like a message when i login, but I only get a message, maybe my configuration is wrong ;-)
Ref #8
A better way is
grep “Failed password for” /var/log/secure
because pipe will fork another process.
On #1 and #2, as has been said by others, the /etc/ssh/ssh_config file is the client configuration while /etc/ssh/sshd_config is the server configuration file. All distributions should have both. Debian is not special here.
On #2 I prefer the without-password setting for PermitRootLogin. This disables password authentication for the root account but still allows root access via more secure authentication methods. Normally that means key authentication but it can also mean any other non-password authentication you have configured (such as the also previously mentioned Kerberos).
On #4 you would only need to specify a key file to ssh-copy-id if the file is not one of the standard file names and is not loaded into an agent. Otherwise ssh-copy-id will authorize every key it can find. You should also mention how to manually authorize a key since servers often have password authentication disabled (something that should be an additional question) and therefore ssh-copy-id can’t get in to authorize your key(s).
On #9 both sftp and rsync should also be mentioned. Both are actually superior to scp unless you need the rarely used scp -3 functionality.
Thank you Kumar, excellent article. One quick question, I was checking for the “/var/log/secure” file on my linux mint 17 Qiana and was not there. Is there a command or comment change I need to do to get SSH to start keeping logs about fail log in attempts.? Thank you in advance!
Actually, I found out that in Debian based systems the “/var/log/secure” file is in “/var/log/auth.log” ^.^ Thank you!
hye! I’m trying to change port number for ssh , but it refuse to work…
@halcyon,
How you changing? are you changing in sshd_config file? or any other way.. The proper way is to edit the sshd_config file and replace the port 22 with your choice of port…and restart ssh to work on new port..
/etc/ssh/ssh_config is on client side
Thanks good article regarding SSH questions.
Welcome @ raman
Thank you !!!!!!!!!!!!!!!!!!Nice topics and also comment of Roberto C. Sanchez is also very good .
thanks for sharing info.
Welcome @ venky
Nice article thanks for sharing :)
Welcome @ kiran
Nice and very valuable information
Thanks for the feedback @ Ravindra Reddy.
“ssd_config” to alter SSH SERVER configuration on Debian? Really? ?? I stopped reading here.
Thanks for Pointing the TYPO!
Requesting Admin to correct it.
Great Info…!
Thanks a lot Roberto for alternative methods and other useful features of SSH..!
Cheers..!
Welcome @ abilash.
Somebody forgot to proof read this article to the point that it’s factually incorrect.
Example:
“Protocol 1 is less secure than protocol 1 and should be disabled in the config file.”
Several notes about your article (I numbered them to correspond to your questions):
1. The /etc/ssh/ssh_config file is NOT the correct file. That file is for the system-wide ssh client configuration. The daemon is configured by /etc/ssh/sshd_config (as in other distros). Also, it is valid to specify the port directive with any sort of capitalization (e.g., “port” or “PORT” or even “pOrT”), so the grep command should be ‘grep -i port /etc/ssh/sshd_config’. Additionally, that command will only tell you what port has been configured, not what port the running daemon is actually listening on. That is, if the port specification in the configuration is changed but the daemon is not restarted, you will be misled. To see what port the daemon is currently listening on, you can run ‘netstat -nplt |grep sshd’. There is no ‘service’ command on Debian. You can restart ssh by running ‘/etc/init.d/ssh restart’.
2. Same as with #1, the file in Debian is /etc/ssh/sshd_config. Also, the command ‘nano Port /etc/ssh/ssh_config’ does not make sense.
3. In a Kerberos environment with a Kerberos-enabled telnet, it can use encryption. Of course, SSH can also take advantage of Kerberos authentication, so it is still likely a better choice these days than even encrypted telnet.
4. It is also possible to login via SSH without a password when using Kerberos for authentication.
6. /etc/issue is just the default, you can use any file with the directive ‘Banner /path/to/message’ in sshd_config. This can be used if you need to display different welcome messages to remote users than to local users.
8. First, it is pointless and unnecessary to ‘cat’ a file only to pipe it into ‘grep’. If the file is very large, it can be unnecessarily slow. You can achieve exactly the same by running ‘grep “Failed password for” /var/log/secure’. Also, there is no /var/log/secure on Debian systems. On a Debian system you would look in /var/log/auth.log. Also, the string “Failed password for” will only show you when someone tries to log in as an authorized user. If the user is not authorized (because you have used the AllowedUsers and/or AllowedGroups), then you should also look for “Invalid user”.
9. You make no mention of the sftp command.
10. You left out mention of some very useful features of ssh, including using the -f option to background ssh before executing a command on the remote host, as well as setting up secure tunnels with ssh.
You are doing the lord’s work, Roberto Sanchez. You covered everything I was going to gripe about and added in some nuggets I was unaware of. Bravo.