LVM Snapshots are space-efficient point-in-time copies of lvm volumes. It works only with lvm and consumes the space only when changes are made to the source logical volume to snapshot volume. If the source volume has huge changes made to the sum of 1GB the same changes will be made to the snapshot volume. It is best to always have a small size of changes for space efficiency. In case the snapshot runs out of storage, we can use lvextend to grow. And if we need to shrink the snapshot we can use lvreduce.

If we have accidentally deleted any file after creating a Snapshot we don’t have to worry because the snapshot has the original file which we have deleted. It is possible that the file was there when the snapshot was created. Don’t alter the snapshot volume, keep it as it is while the snapshot is used to do a fast recovery.
Snapshots can’t be used as a backup option. Backups are Primary Copies of some data, so we cant use snapshots as a backup option.
Requirements
My Server Setup
- Operating System – CentOS 6.5 with LVM Installation
- Server IP – 192.168.0.200
Step 1: Creating LVM Snapshot
First, check for free space in the volume group to create a new snapshot using the following ‘vgs‘ command.
# vgs
# lvs
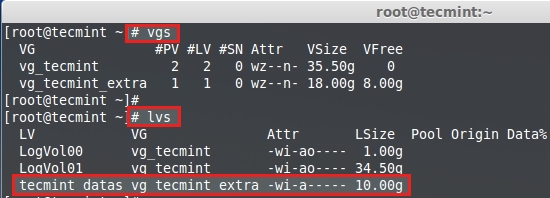
You see, there is 8GB of free space left in the above vgs output. So, let’s create a snapshot for one of my volume named tecmint_datas. For demonstration purposes, I am going to create only 1GB snapshot volume using the following commands.
# lvcreate -L 1GB -s -n tecmint_datas_snap /dev/vg_tecmint_extra/tecmint_datas

OR

# lvcreate --size 1G --snapshot --name tecmint_datas_snap /dev/vg_tecmint_extra/tecmint_datas
Both the above commands do the same thing:
- -s – Creates Snapshot
- -n – Name for snapshot

Here, is the explanation of each point highlighted above.
- Size of snapshot I am creating here.
- Creates snapshot.
- Creates name for the snapshot.
- New snapshots name.
- A volume of which we are going to create a snapshot.
If you want to remove a snapshot, you can use ‘lvremove‘ command.
# lvremove /dev/vg_tecmint_extra/tecmint_datas_snap

Now, list the newly created snapshot using the following command.
# lvs
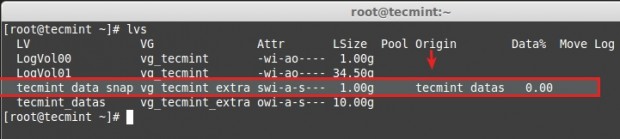
You see above, a snapshot was created successfully. I have marked with an arrow where snapshots originate from where its created, It’s tecmint_datas. Yes, because we have created a snapshot for tecmint_datas l-volume.
Let’s add some new files into tecmint_datas. Now volume has some data around 650MB and our snapshot size is 1GB. So there is enough space to back up our changes in snap volume. Here we can see, what is the status of our snapshot using the below command.
# lvs
You see, 51% of snapshot volume was used now, no issue for more modification in your files. For more detailed information use the command.
# lvdisplay vg_tecmint_extra/tecmint_data_snap
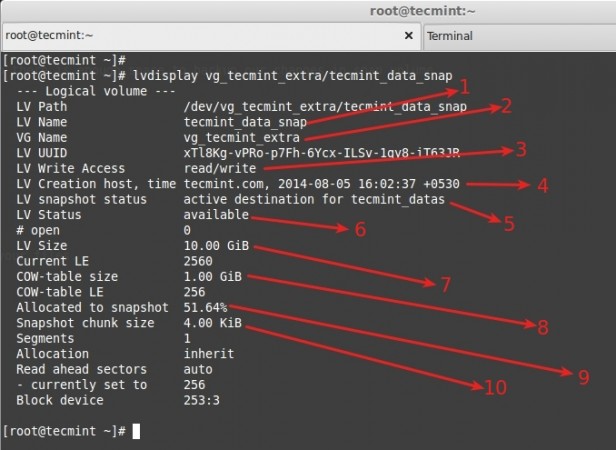
Again, here is a clear explanation of each point highlighted in the above picture.
- Name of Snapshot Logical Volume.
- Volume group name currently under use.
- Snapshot volume in read and write mode, we can even mount the volume and use it.
- A time when the snapshot was created. This is very important because a snapshot will look for every change after this time.
- This snapshot belongs to the tecmint_datas logical volume.
- A logical volume is online and available to use.
- Size of Source volume which we took a snapshot of.
- Cow-table size = copy on Write, which means whatever changes were made to the tecmint_data volume will be written to this snapshot.
- Currently, the snapshot size used, our tecmint_datas was 10G but our snapshot size was 1GB which means our file is around 650 MB. So what is now in 51% if the file grows to 2GB size in tecmint_datas size will increase more than the snapshot allocated size, sure we will be in trouble with a snapshot. That means we need to extend the size of the logical volume (snapshot volume).
- Gives the size of the chunk for a snapshot.
Now, let’s copy more than 1GB of files in tecmint_datas, let’s see what will happen. If you do, you will get an error message saying ‘Input/output error‘, which means out of space in the snapshot.

If the logical volume becomes full it will get dropped automatically and we can’t use it anymore, even if we extend the size of the snapshot volume. It is the best idea to have the same size as Source while creating a snapshot, tecmint_datas size was 10G, if I create a snapshot size of 10GB it will never overflow like above because it has enough space to take snaps of your volume.
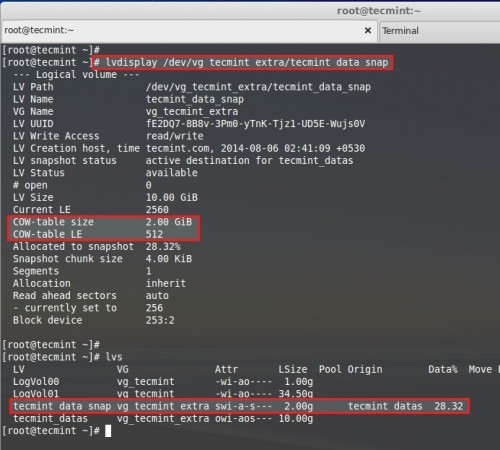
Step 2: Extend Snapshot in LVM
If we need to extend the snapshot size before overflow we can do it using.
# lvextend -L +1G /dev/vg_tecmint_extra/tecmint_data_snap
Now there was a total of 2GB size for a snapshot.

Next, verify the new size and COW table using the following command.
# lvdisplay /dev/vg_tecmint_extra/tecmint_data_snap
To know the size of the snap volume and usage %.
# lvs
But if you have a snapshot volume of the same size as the Source volume we don’t need to worry about these issues.
Step 3: Restoring Snapshot or Merging
To restore the snapshot, we need to un-mount the file system first.
# unmount /mnt/tecmint_datas/

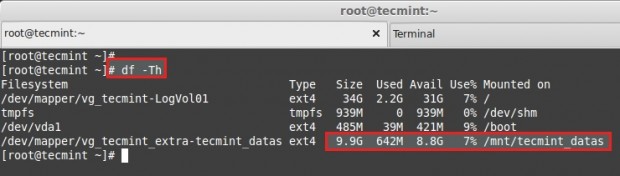
Just check for the mount point to whether it’s unmounted or not.
# df -h

Here are mount has been unmounted, so we can continue to restore the snapshot. To restore the snap using the command lvconvert.
# lvconvert --merge /dev/vg_tecmint_extra/tecmint_data_snap
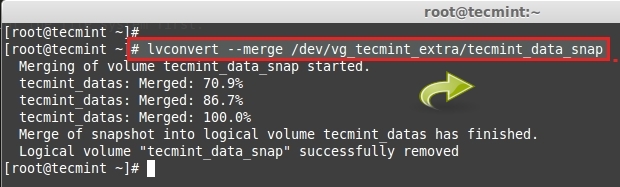
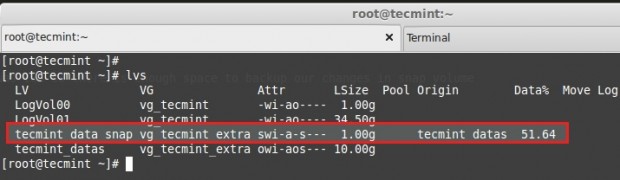
After the merge is completed, the snapshot volume will be removed automatically. Now we can see the space of our partition using the df command.
# df -Th

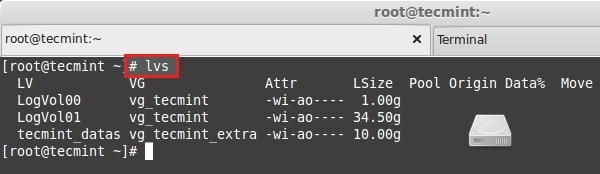
After the snapshot volume is removed automatically. You can see the size of the logical volume.
# lvs
Important: To Extend the Snapshots automatically, we can do it using some modifications in the conf file. For manual, we can extend using lvextend.
Open the lvm configuration file using your choice of editor.
# vim /etc/lvm/lvm.conf
Search for the word autoextend. By default, the value will be similar to below.
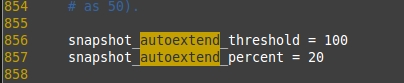
Change the 100 to 75 here, if so auto extend threshold is 75 and the auto-extend percent is 20, it will expand the size by 20 Percent
If the snapshot volume reaches 75% it will automatically expand the size of the snap volume by 20% more. Thus, we can expand automatically. Save and exit the file using wq!.
This will save snapshots from overflow drop. This will also help you to save more time. LVM is the only Partition method in which we can expand more and have many features such as thin Provisioning, Striping, Virtual volume, and more Using thin-pool, let us see them in the next topic.


Your first paragraph has a somewhat misleading statement, “If source volume has a huge changes made to sum of 1GB the same changes will be made to the snapshot volume,“ In fact, the same changes will NOT be made to the snapshot. What is written to the snapshot is the data of the original LV prior to update. That is how the snapshot is a ”point in time” copy of the original LV.
“It is the best idea to have the same size of Source while creating a snapshot, tecmint_datas size was 10G” Generally I think this is really bad advice, especially if you want to do a backup.
If you have, let’s say, 1TB of data that you want a snapshot of, and of which let’s say a maximum of 1% (10GB) is going to change during the copying of a snapshot, then you don’t want that snapshot to be no more than 10GB.
Saying it is ‘the best idea’ to allocate the whole size of the source is really not clever. That would mean you’d need to have yet another Terabyte in the volume group just for doing a backup, let alone space you take up with the backup itself.
After the step to create the snapshot via “lvcreate”, the next step says to “Let’s add some new files into tecmint_datas”, but you cannot copy anything to it because it has not been mounted yet.
I think you’re missing the step of mounting the snapshot.
The snapshot is not
tecmint_datas(buttecmint_datas_snap), and indeed the snapshot is not mounted at this point. But the volume that the snapshot was taken off (tecmint_datas) was and is still mounted, and the point is to move some files to the ‘original‘, which doesn’t affect the snapshot. But if the amount of changes is larger than the storage space allows, the snapshot is (silently) dropped.Of course I have limited experience and knowledge in system admin and LVM, but this is the kind of additional info that I would like to find about LVM snapshot concept in your page:
typical use
create the snapshot in few seconds without having to umount the volume that is snapshoted and backup immediately the system without having to stop access to system-users during the backup.
possible use (? because I have no experience) :
create the snapshot it in order to have the possibility to return back very quickly by mounting read-write the snapshot itself. I mean: to avoid merging.
create some kind of version control using snapshot like branches (of course several snapshots used simultaneously will increase dramatically IO traffic.
hope it will help.
Hi, I did not get the information like:
1)should i mount the snapshot?
2)how can i get the data from snapshot? where it will be?
Hi if we want to take whole server snap in that case what we have to do.? We need to unmount the root file system?
Hi Babin need to know one thing from you after running all the command successfully to create a snapshot when get into merging the snap vol it gives error UNABLE TO MERGE LV into its origin
You need umount both the original volume and snapshot volume
Hi Babin,
I have a query. Suppose I have three LV’s (LV1, LV2, LV3 ) and one LV snanshot (LV_snap) inside a VG (VG1)… in case if we lose the data from LV1, how can we merge the data from snapshot volume to specific LV1?
Thanks for your great article. This website is really helpful for beginners like us.
Regards,
Rajveer
// in case if we lose the data from LV1 //
That means only you lose some data so you can commit the snapshot to get back the files. Or even you can mount the snapshot volume and get the files.
Nice and very usefull !
One question, do you think It’s possible to use tmpfs as primary file system (for performances) and a SSD for snapshot by this way ?
Thanks
Why using tmpfs ? its a temporary volatile memory like mount.
Try testdisk
sudo dnf install testdisk
Thank you very much for the article. There is one thing I don’t yet fully undestand, thought.
If you merge the snapshot you are in fact making the changes you’ve made since its creation permanent, right?
Wouldn’t restoring as in goign back to the previous state before the snapshot mean you only need to delete the snapshot? Or am I missing something?
// If you merge the snapshot you are in fact making the changes you’ve made since its creation permanent, right?//
Yes
Merge will include the old and new changes, at the end of merge snapshot will be removed.
This can’t be right. What if you just remove the snapshot? The source volume should continue as is, with all the changes since the snapshot was made.
The merge of the snapshot means that you are “rolling back” to the snapshot, so you lose all the changes made since the snapshot. Please clarify!
This is very much useful article.
I’m good with this part. Great tutorial by the way. What I would like to do is create the snapshot, back it up to another location, get rid of the snapshot and then if something I do FUBARS my lvm, restore from the backup. Is this possible?
Thanks!
No it’not possible in snapshot, COW = Copy of Write in this rules only snapshot work’s. That mean what ever the changes made after snapshot creation it will make a copy.
thanks a lot for examples :)
Hi babin,
I have one query related to LVM snapshot .In the example you mention above, you have create a snapshot name “tecmint_datas_snap” of the volume “tecmint_datas”.For this snapshot .do we required to mount the directory name “”tecmint_datas_snap”” to take snapshot ? .One more question what is snapshot size ,i mean if my volume size is 10 GB then the sanpshot size will be 10GB or less or more? .
Thanks for your help in advance.
@Anil,
No we don’t required any directory in the name of snapshot.
We just need to use only the name for snapshot.
If disk size is 10 GB use 10 GB for snapshot, Sure it will not grow more than 10 GB, If you use less disk size it may get full according to your usage.