Partx is a simple yet useful command line utility oriented towards maintenance of your Linux system. It is used to tell the kernel about the presence and numbering of partitions on a disk.
In this short article, we will explain useful Partx command usage with examples in Linux. Note that you need to run partx with root privileges, otherwise use the sudo command to gain root privileges.
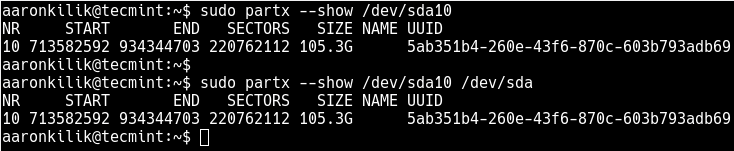
1. To list the partition table of disk, you can run any of the following commands. Note that, in this case, partx will see sda10 as a whole-disk rather than as a partition (replace /dev/sda10 with the appropriate device node you want to deal with on your system):
# partx --show /dev/sda10
OR
# partx --show /dev/sda10 /dev/sda
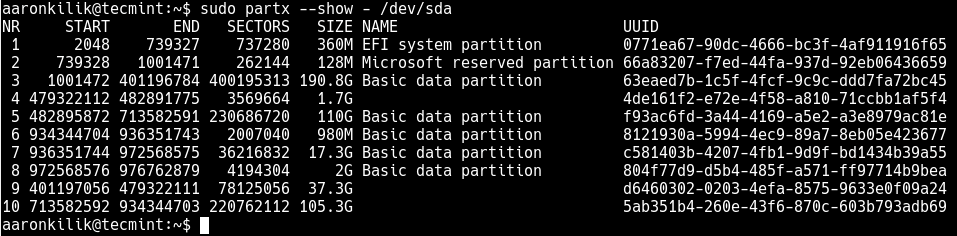
2. To lists all sub-partitions on /dev/sda (note that the device is used as a whole-disk), run:
# partx --show /dev/sda
3. You can also specify the range of partitions to show using the --nr option. Use the -o option to define the output columns. It can be used for the --show or other related options.
For example to print the start and end sectors of partition 10 on /dev/sda, run:
# partx -o START, END --nr 10 /dev/sda

4. To read the disk and try to add all partitions to the system, use the -a and -v (verbose mode) option as follows.
# partx -v -a /dev/sdb
5. To lists the length in sectors and human-readable size of partition 3 on /dev/sdb, run the following command.
# partx -o SECTORS,SIZE /dev/sdb3 /dev/sdb
6. To add the specified partitions, 3 to 5 (inclusive) on /dev/sdb, use the following command.
# partx -a --nr 3:5 /dev/sdb
7. You can also remove partitions using -d flag. For example, to remove the last partition on /dev/sdb, use the following command. In this example, the --nr -1:-1 means the last partition on the disk.
# partx -d --nr -1:-1 /dev/sdb
8. To specify the partition table type, use the -t flag and to disable the headers, use the -g flag.
# partx -o START -g --nr 5 /dev/sdb
You might also like to read these following related articles:
- 8 Linux ‘Parted’ Commands to Create, Resize and Rescue Disk Partitions
- How to Create a New Ext4 File System (Partition) in Linux
- How to Clone a Partition or Hard drive in Linux
- Top 6 Partition Managers (CLI + GUI) for Linux
- 9 Tools to Monitor Linux Disk Partitions and Usage in Linux
For more information, read the partx manual entry page (by running man partx). You can ask questions or share your thoughts with us via the feedback form below.


“It is used to tell the kernel about the presence and numbering of partitions on a disk.”
Why should the kernel be told about the presence and numbering of partitions? Isn’t the kernel already aware of all disks and partitions on the system because of the hardware identification modules that run during bootup?
When you use the
'-d'option, are you actually deleting the partition, or are just telling the kernel not to “see” the partition?