The Linux filesystem is a hierarchical file structure that defines how files are stored and accessed on a Linux operating system. It’s a logical structure built into the system that handles file management that includes the systematic storage, access, and modification of files across directories and sub-directories.
The file system manages attributes such as the file name, size, inodes, user and group ownership, creation date, etc. The systematic storage of data allows for easier and faster file access resulting in smooth workflows.
Before we demonstrate how to create and convert filesystems, let’s explore the major file systems in use on Linux systems today.
Ext2 – Second Extended File System
Also known as the second extended file system, the ext2 filesystem was introduced in the early Linux releases back in 1993. It took over from the Extended File System (Ext FS), the first filesystem designed for the Linux kernel. Due to performance issues and other drawbacks, the EXt Filesystem was replaced by Ext2 which was more robust and offered improved performance.
The Ext2 filesystem is portable and lacks the journaling feature which is associated with resource overhead from additional data processing, memory consumption, and disk access. As such, the Ext2 file system is ideal for flash-based storage devices including pen drives, memory sticks, and SD cards.
Ext3 – Third Extended File System
The Ext3 filesystem also known as Third Extended File System, was released in November 2001 for the Linux kernel version 2.4.15. The Ext3 filesystem is a significant improvement to Ext2 and is still used in some Linux distributions.
Just like Ext2, the Ext3 filesystem supports a maximum file size of 2TB and caps the length of the file name to 255 bytes. Unlike its predecessor, the Ext3 filesystem supports journaling, which is the greatest improvement.
Journaling brings on board significant improvements such as:
- Reduces the likelihood of data loss or corruption through power failure or system crash.
- Keeps track of changes made and logs them in files.
- Revives the filesystem after a system crash.
Ext4 – Fourth Extended File System
The ext4 filesystem is yet another journaling filesystem that is the successor to the ext3 filesystem, which was released on December 2008 and currently remains the widely used filesystem, especially in Debian / Ubuntu systems.
It supports files and filesystems of up to 16TB in size and caps the maximum filename length to 255 bytes.
Key highlights of Ext4 include:
- Allocation Improvements – The Ext4 filesystem improves reads and write performance through efficient allocation of storage blocks before writing them to disk.
- Timestamp Improvements – The Ext4 filesystem extends the date up to May 10, 2446, by adding an additional 408 years to the timestamp.
- Faster File System Checks – In the Ext4 filesystem, inodes, and unallocated block groups are pre-marked. As such, the time needed to run e2fsck and fsck commands is greatly reduced leading to faster filesystem checks.
- Online Defragmentation – One of the drawbacks of Ext2 and Ext3 file systems is disk defragmentation which inevitably impacts disk performance. The ext4 file system provides the e4defrag tool which is a command-line tool used for defragmenting Ext4 filesystems and by so doing, optimizes performance.
- Journal Checksums – We have already seen the advantages of journaling which include enabling recovery in case of hardware failure which leads to corruption of files. The journal checksum option boosts performance since it shortens the time taken for journaling to happen.
How to Determine File System Type?
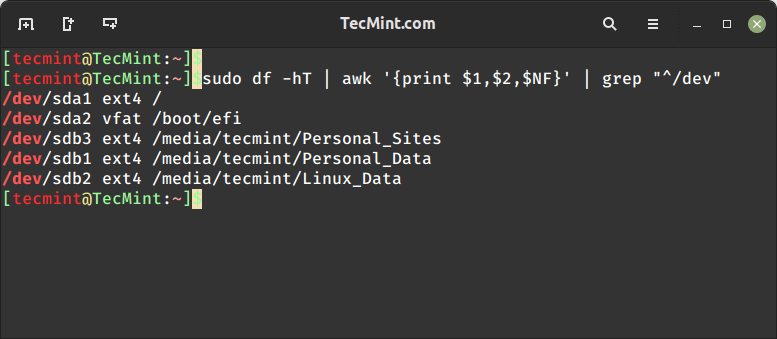
To determine your Linux file system type, run the following command in the terminal as a root user.
# df -hT | awk '{print $1,$2,$NF}' | grep "^/dev"

/dev/sda1 ext4 /
/dev/sda2 vfat /boot/efi
/dev/sdb3 ext4 /media/tecmint/Personal_Sites
/dev/sdb1 ext4 /media/tecmint/Personal_Data
/dev/sdb2 ext4 /media/tecmint/Linux_Data
Creating an Ext2, or Ext3, or Ext4 File Systems
Once you create a file system using the fdisk or parted command, use the mke2fs command to create either of the file systems and make sure you replace sdXX with your device name.
Creating an Ext2 File System
To convert the file system to an Ext2 file system, run the following command as root.
# mke2fs /dev/sdX
Creating an Ext3 File System
To create an EXt3 filesystem, run the command:
# mkfs.ext3 /dev/sdX
OR
# mke2fs –j /dev/sdX
In the above command, the -j option is used for journaling.
Creating the Ext4 File System
To create an Ext4 filesystem, format the filesystem block as shown.
# mkfs.ext4 /dev/sdX
OR
# mke2fs -t ext4 /dev/sdX
In the above command, the -t option is used to specify the file system type.
Converting an Ext2, or Ext3, or Ext4 File Systems
Conversion from one file system to another is quite an easy task. Suppose you have an Ext2 partition block labeled /dev/sdb1 mounted on /data mount point.
You can find it in the /etc/fstab file entries labeled as shown.
/dev/sdb1 /data ext2 defaults 0 0
To proceed, unmount the partition first.
# umount /dev/sdb1
Convert Ext2 to Ext3
To convert it to Ext3, use the tune2fs command and pass the -j option to enable journaling.
# tune2fs /dev/sdb1
Next, edit the /etc/fstab file and change the file system type to ext3. So the entry should look like this.
/dev/sdb1 /data extd3 defaults 0 0
Then mount the partition using the mount command.
# mount /dev/sdb1 /data
Finally, reboot the system
# reboot
Convert Ext2 to Ext4
As before, unmount the block volume.
# umount /dev/sdb1
Next, use the tune2fs command together with the “-O extents,uninit_bg,dir_index” option to enable the journaling.
# tune2fs -O extents,uninit_bg,dir_index /dev/sdb1
As before, mount the filesystem and reboot the system.
# mount /dev/sdb1 /data
Finally, reboot the system.
# reboot
Convert Ext3 to Ext4
The procedure of converting from Ext3 to Ext4 is similar to that of converting Ext2 to Ext4.
So, first, unmount the block volume.
# umount /dev/sdb1
Next, use the tune2fs command together with the “-O extents,uninit_bg,dir_index” option to enable the journaling.
# tune2fs -O extents,uninit_bg,dir_index /dev/sdb1
Now run the fsck command to fix up some on-disk structures that have been modified.
# fsck -pf /dev/sdb1
# e2fsck -f /dev/sdb1
Finally, mount the filesystem and reboot the system.
# mount /dev/sdb1 /data
# reboot
Conclusion
We hope that this guide provided you with insights into the major filesystem types on Linux and how you can convert from one filesystem type to another. Your feedback on this guide is much welcome.


Please suggest is it possible to convert ext3 to xfs filesystem on RedHat 7?
@Gayathri,
Check this article for a solution – https://access.redhat.com/solutions/30063
Hello Ravi,
I bought the RHCSA V8 book a couple of weeks ago. The book is missing RHCSA V8 topics such as Virtual data Optimizer(VDO) and tuned.
Can they be added, please? I need them to prepare for the RHCSA exam.
@Tam,
Thanks for updating us, yes in next update I will add this topic, hopefully, will re-distribute updated copies by next week.
Please suggest is it possible to convert ext4 to xfs filesystem on redhat 7?
Please ignore my previous comment, I was using small o instead capital. I got it later.
I hit these both commands and it says invalid mount options set.
I think it should be “Partitions instead of File Systems” in this line “Once you create file system using fdisk or parted command, use mke2fs command to create either of file system and make sure you replace hdXX with your device name.”
@Hemant,
You can call it filesystem or partition, nothing makes sense, becasue everything is a file in Linux.
how to change the filesystem path in linux /dev/db1 to /prod/db1
@Abdul,
I think you mean to say how to change Linux partition Label names, if yes so, you can read this article that explains how to change or modify partition label names on Linux filesystem.
https://www.tecmint.com/change-modify-linux-disk-partition-label-names/
I found useful
A nice way is to manage LVM through ssm. Only one step-we can create a logical volume and volume group, choose file system type.
ex: sudo ssm create -s 200GB -n disk0 –fstype ext4 -p my_volume /dev/sda /mount
So we create a volume group named “my_volume”, create a 200GB LVM volume named disk0, after that format the volume ext4 file system, and mount it under “/mount” mounting point.
@Dragos,
I agree SSM is the nice nifty tool to manage LVM’s, here is the complete guide that shows how to manage LVM’s using SSM.
https://www.tecmint.com/rhcsa-exam-create-format-resize-delete-and-encrypt-partitions-in-linux/