In this article of the RHCSA Series, we will discuss how to set up and configure local system storage in Red Hat Enterprise Linux 9 using classic tools and introduce the System Storage Manager (also known as SSM) and the parted command, which greatly simplifies this task.
Creating and Modifying Partitions in RHEL 9
In RHEL 9, parted is the default utility to work with partitions, and will allow you to:
- Display the current partition table.
- Manipulate (increase or decrease the size of) existing partitions.
- Create partitions using free space or additional physical storage devices.
It is recommended that before attempting the creation of a new partition or the modification of an existing one, you should ensure that none of the partitions on the device are in use, and if you’re using part of the device as a swap you need to disable it during the process.
umount /dev/partition
swapoff -v /dev/partition
Replace /dev/partition with the actual partition device you want to work with.
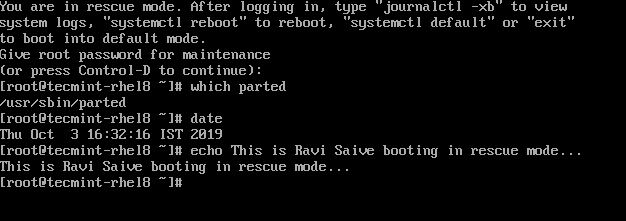
The easiest way to do this is to boot RHEL in rescue mode using the following command.
systemctl rescue
You will then be presented with a shell prompt.
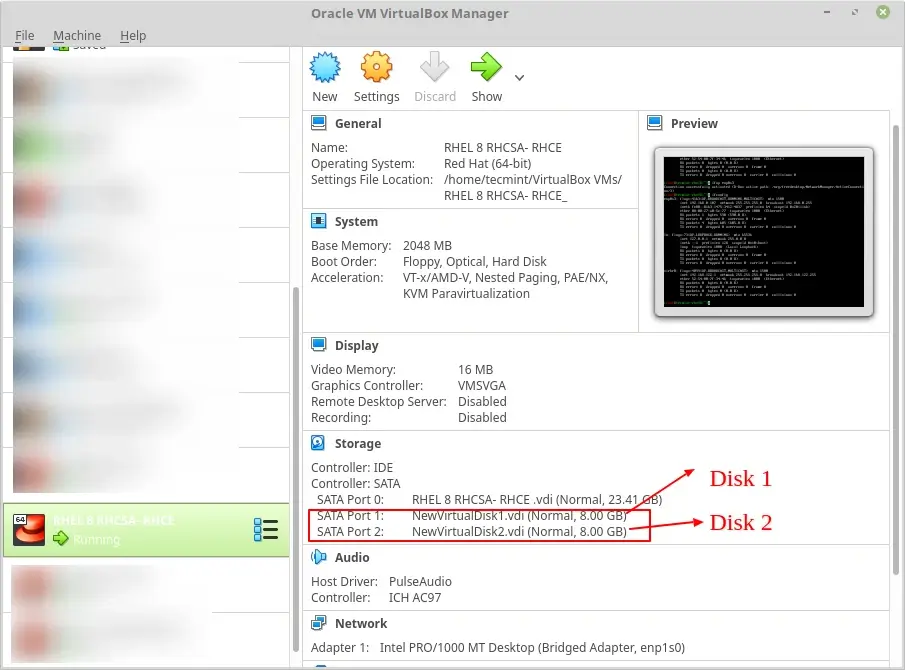
To create a new partition, you must attach a new disk. For demonstration purposes, I have created 2 new virtual hard disks of 8GB each in my VM (Virtual Machine) using Virtualbox.
To start parted, simply type.
parted /dev/sdb
Where /dev/sdb is the device where you will create the new partition; next, type print to display the current drive’s partition table:
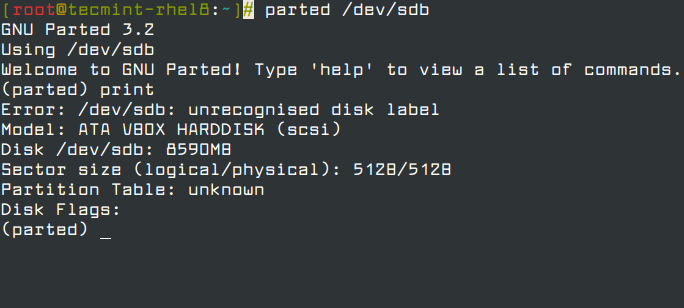
As you can see, in this example we are using a virtual drive of 8 GB. We will now proceed to create a 7 GB primary partition and then format it with the xfs filesystem, which is the default in RHEL.
You can choose from a variety of file systems. You will need to manually create the partition with mkpart and then format it with mkfs.fstype as usual because mkpart does not support many modern filesystems out of the box.
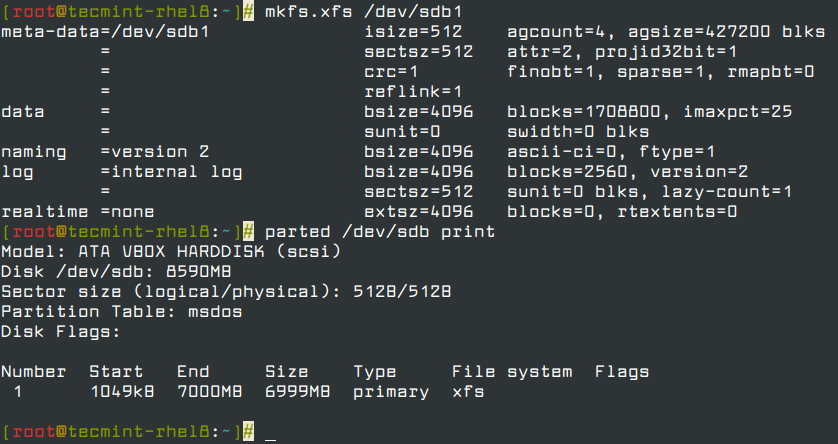
In the following example, we will set a label for the device and then create a primary partition (p) on /dev/sdb, which starts at the 0% percentage of the device and ends at 7000 MB (7 GB):
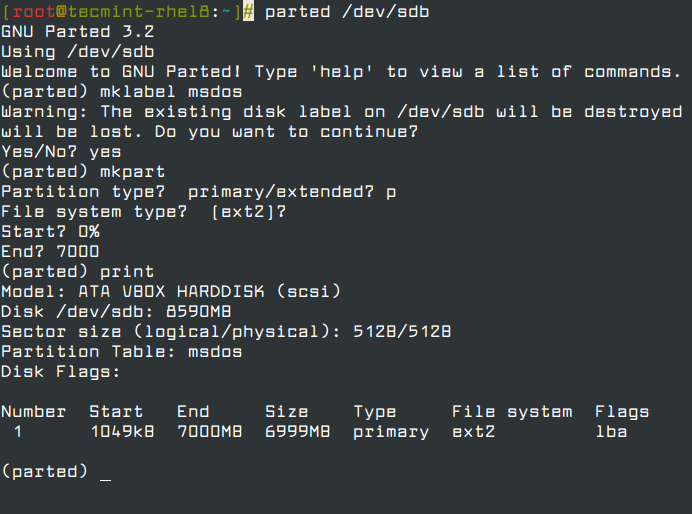
Next, we will format the partition as xfs and print the partition table again to verify that changes were applied:
mkfs.xfs /dev/sdb1
parted /dev/sdb print
For older filesystems, you could use the resize command in parted to resize a partition. Unfortunately, this only applies to ext2, fat16, fat32, hfs, linux-swap, and reiserfs (if libreiserfs is installed).
Thus, the only way to resize a partition is by deleting it and creating it again (so make sure you have a good backup of your data!). No wonder the default partitioning scheme in RHEL is based on LVM.
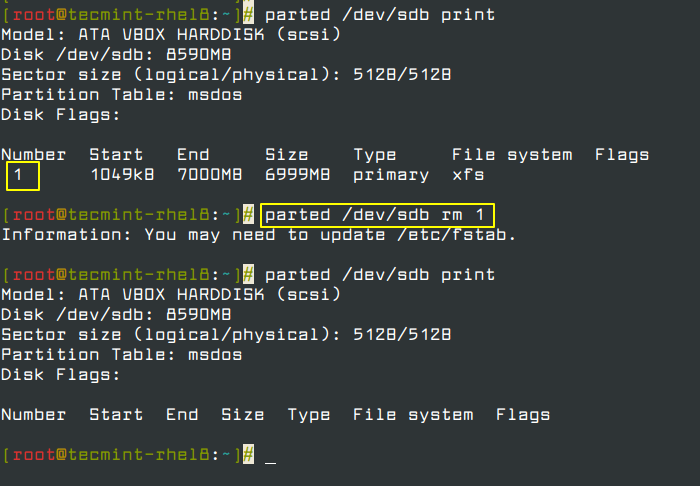
To remove a partition with parted:
parted /dev/sdb print
parted /dev/sdb rm 1
The Logical Volume Manager (LVM)
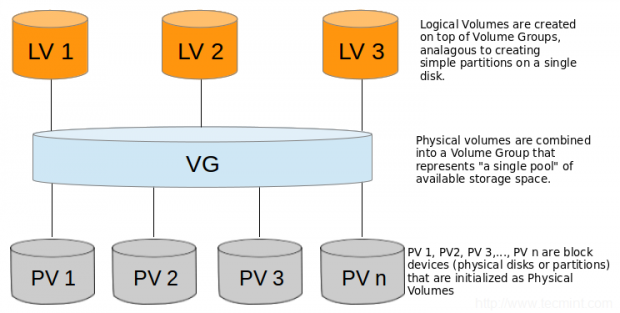
Once a disk has been partitioned, it can be difficult or risky to change the partition sizes. For that reason, if we plan on resizing the partitions on our system, we should consider the possibility of using LVM instead of the classic partitioning system, where several physical devices can form a volume group that will host a defined number of logical volumes, which can be expanded or reduced without any hassle.
In simple terms, you may find the following diagram useful to remember the basic architecture of LVM.
Follow these steps in order to set up LVM using classic volume management tools. Since you can expand this topic by reading the LVM series on Tecmint.com, I will only outline the basic steps to set up LVM, and then compare them to implementing the same functionality with SSM.
Note that we will use the whole disks /dev/sdb and /dev/sdc as PVs but it’s entirely up to you if you want to do the same.
Setting Up Logical Volume Manager
To set up LVM on two disks, first, you need to create partitions using the parted command as explained above.
Creating Partitions for LVM Setup
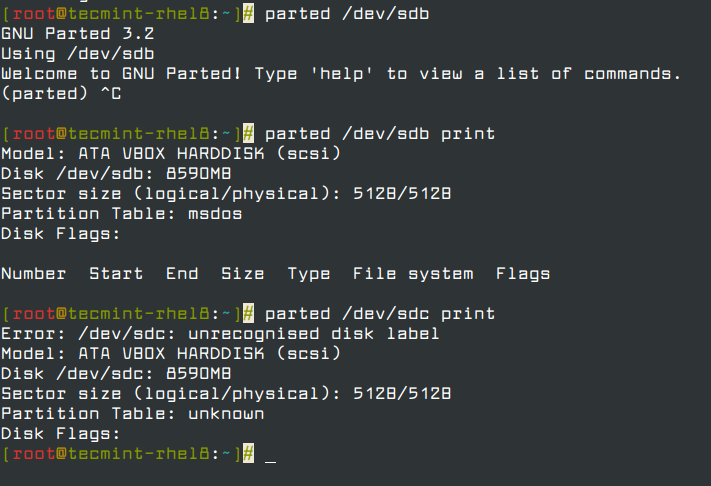
1. Create partitions /dev/sdb1 and /dev/sdc1 using 100% of the available disk space in /dev/sdb and /dev/sdc:
parted /dev/sdb print
parted /dev/sdc print
Creating Physical Volumes
2. Create 2 physical volumes on top of /dev/sdb1 and /dev/sdc1, respectively.
pvcreate /dev/sdb1
pvcreate /dev/sdc1

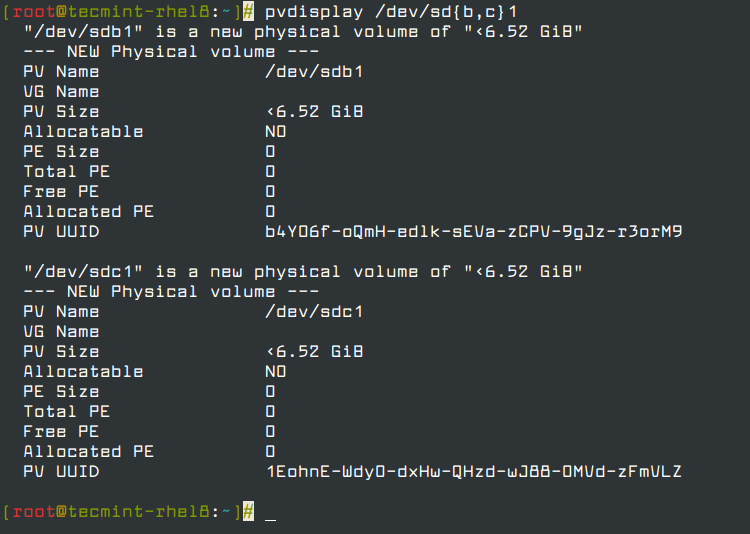
Remember that you can use the following command to show information about the newly created Pvs.
pvdisplay /dev/sd{b,c}1
Creating Volume Group
3. Create a VG on top of the PV that you created in the previous step:
vgcreate tecmint_vg /dev/sd{b,c}1

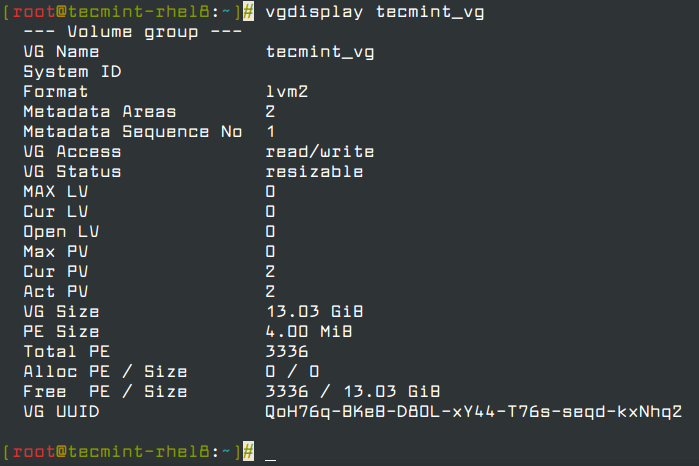
Remember that you can use the following command to show information about the newly created VG.
vgdisplay tecmint_vg
Creating Logical Volumes
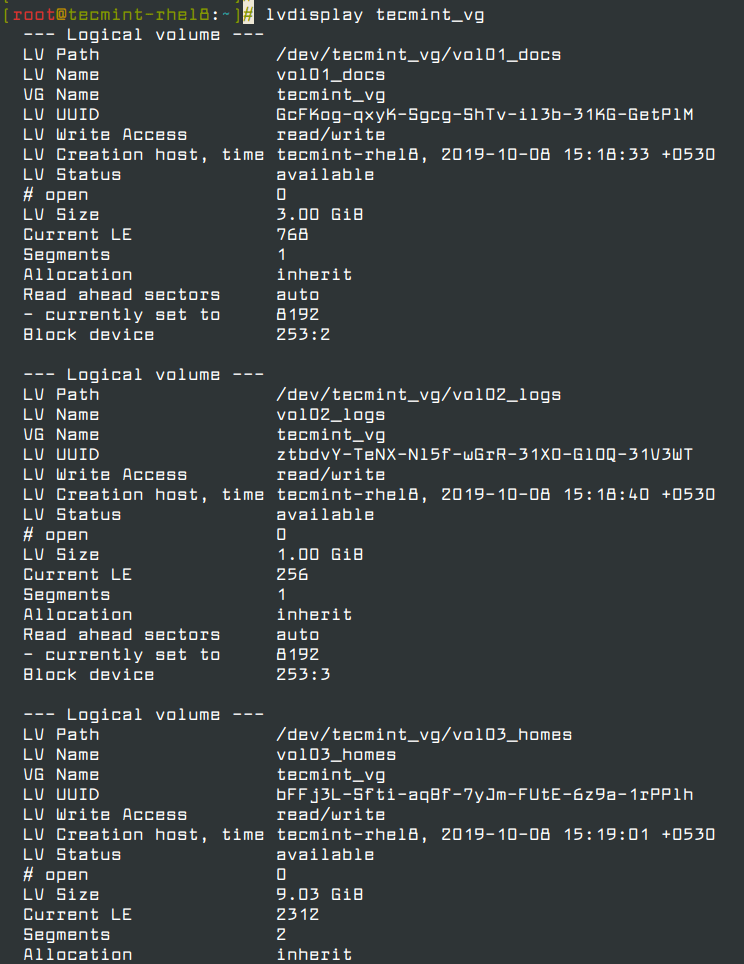
4. Create three logical volumes on top of VG tecmint_vg, as follows:
lvcreate -L 3G -n vol01_docs tecmint_vg		[vol01_docs → 3 GB]
lvcreate -L 1G -n vol02_logs tecmint_vg		[vol02_logs → 1 GB]
lvcreate -l 100%FREE -n vol03_homes tecmint_vg	[vol03_homes → 9 GB]

Remember that you can use the following command to show information about the newly created LVs on top of VG tecmint_vg.
lvdisplay tecmint_vg
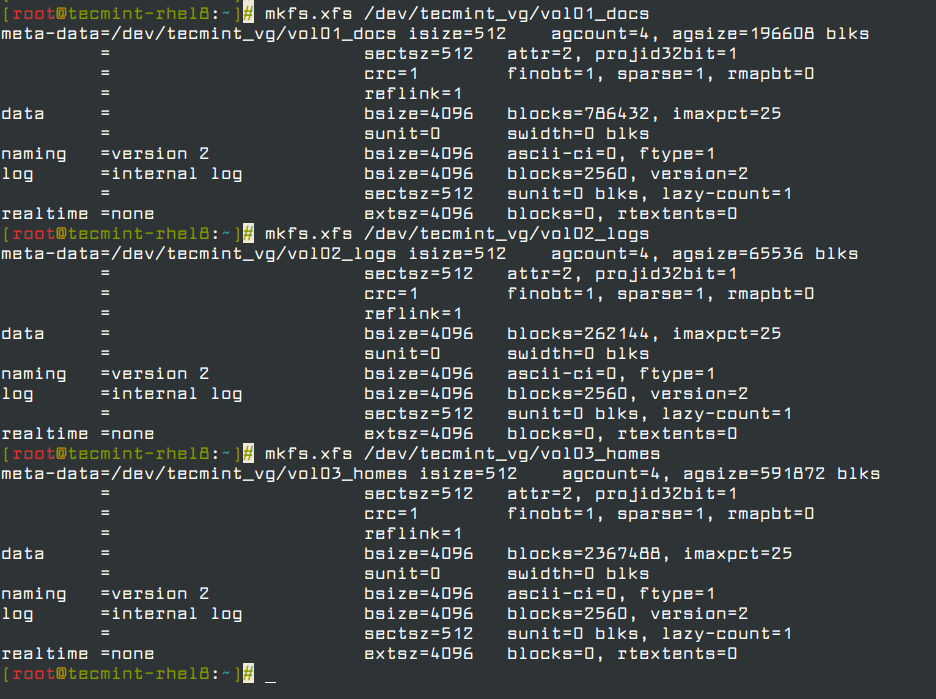
Formatting Logical Volumes
5. Format each of the logical volumes with xfs (do NOT use xfs if you’re planning on shrinking volumes later!):
mkfs.xfs /dev/tecmint_vg/vol01_docs
mkfs.xfs /dev/tecmint_vg/vol02_logs
mkfs.xfs /dev/tecmint_vg/vol03_homes
Mounting Logical Volumes
6. Finally, mount them:
mount /dev/tecmint_vg/vol01_docs /mnt/docs
mount /dev/tecmint_vg/vol02_logs /mnt/logs
mount /dev/tecmint_vg/vol03_homes /mnt/homes

Removing Logical Volumes, Volume Group,s and Physical Volumes
7. Now we will reverse the LVM implementation and remove the LVs, the VG, and the PVs:
lvremove /dev/tecmint_vg/vol01_docs
lvremove /dev/tecmint_vg/vol02_logs
lvremove /dev/tecmint_vg/vol03_homes
vgremove /dev/tecmint_vg
pvremove /dev/sd{b,c}1

Install System Storage Manager (SSM)
8. Now let’s install SSM and we will see how to perform the above in ONLY 1 STEP!
dnf update && dnf install system-storage-manager
We will use the same names and sizes as before:
# ssm create -s 3G -n vol01_docs -p tecmint_vg --fstype ext4 /mnt/docs /dev/sd{b,c}1
# ssm create -s 1G -n vol02_logs -p tecmint_vg --fstype ext4 /mnt/logs /dev/sd{b,c}1
# ssm create -n vol03_homes -p tecmint_vg --fstype ext4 /mnt/homes /dev/sd{b,c}1
Yes! SSM will let you:
- initialize block devices as physical volumes
- create a volume group
- create logical volumes
- format LVs, and
- mount them using only one command
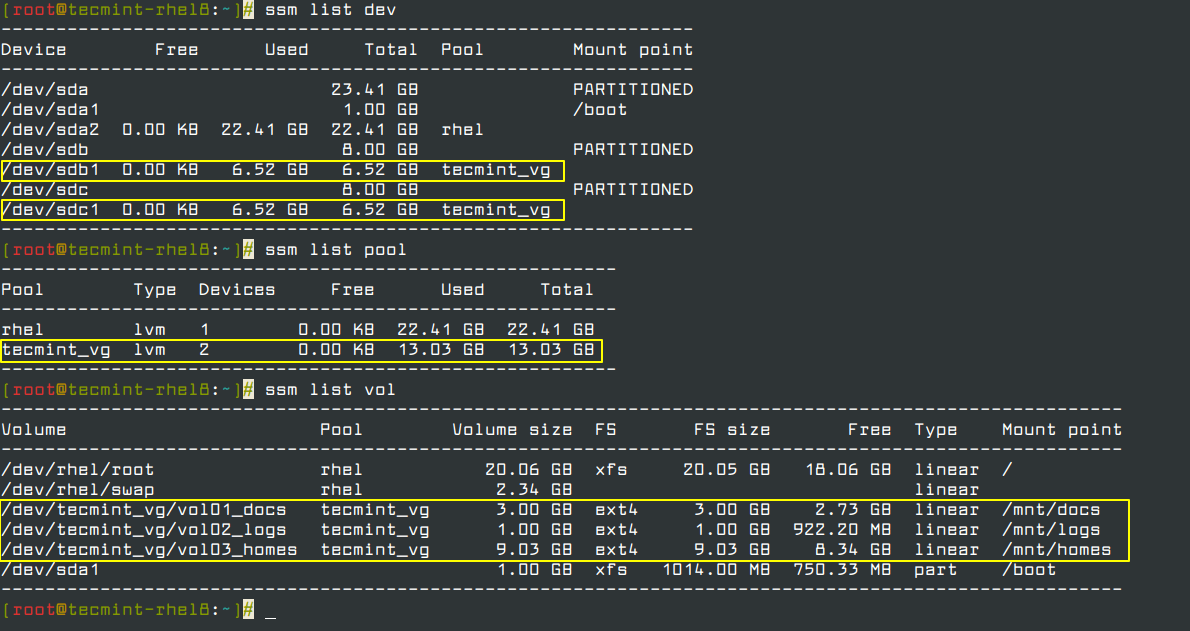
9. We can now display the information about PVs, VGs, or LVs, respectively, as follows:
ssm list dev
ssm list pool
ssm list vol
10. As we already know, one of the distinguishing features of LVM is the possibility to resize (expand or decrease) logical volumes without downtime.
Resizing Logical Volumes
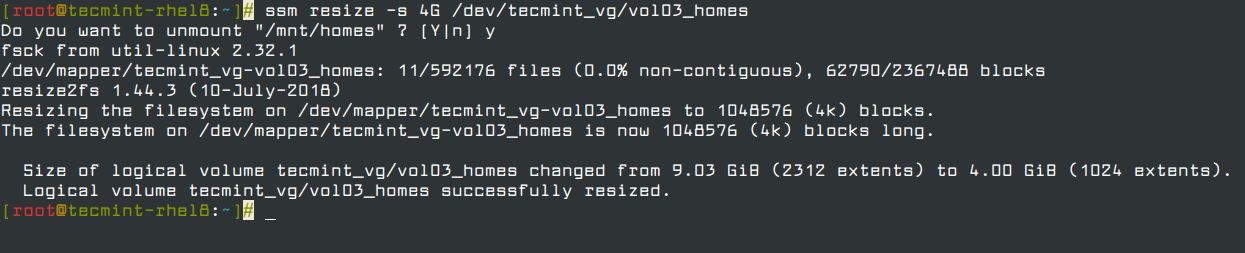
Say we are running out of space in vol02_logs but have plenty of space in vol03_homes. We will resize vol03_homes to 4 GB and expand vol02_logs to use the remaining space:
ssm resize -s 4G /dev/tecmint_vg/vol03_homes
Run the ssm list pool again and take note of the free space in tecmint_vg:
ssm list

Then do:
ssm resize -s+1.99 /dev/tecmint_vg/vol02_logs

Note: that the plus sign after the -s flag indicates that the specified value should be added to the present value.
Removing Logical Volumes and Volume Groups
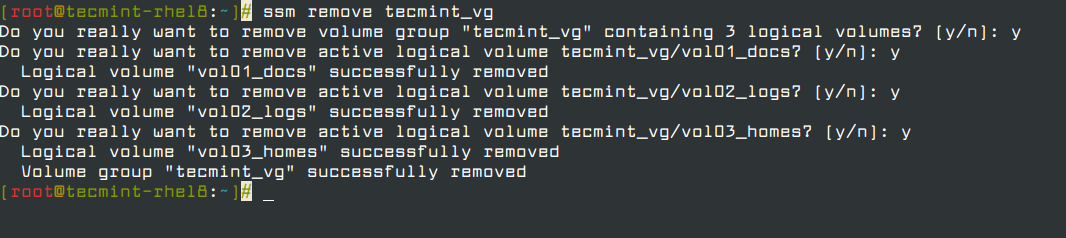
11. Removing logical volumes and volume groups is much easier with ssm as well. A simple,
ssm remove tecmint_vg
will return a prompt asking you to confirm the deletion of the VG and the LVs it contains:
Managing Encrypted Volumes
SSM also provides system administrators with the capability of managing encryption for new or existing volumes. You will need the cryptsetup package installed first:
dnf update && dnf install cryptsetup
Then issue the following command to create an encrypted volume. You will be prompted to enter a passphrase to maximize security:
ssm create -s 3G -n vol01_docs -p tecmint_vg --fstype ext4 --encrypt luks /mnt/docs /dev/sd{b,c}1
ssm create -s 1G -n vol02_logs -p tecmint_vg --fstype ext4 --encrypt luks /mnt/logs /dev/sd{b,c}1
ssm create -n vol03_homes -p tecmint_vg --fstype ext4 --encrypt luks /mnt/homes /dev/sd{b,c}1
Our next task consists of adding the corresponding entries in /etc/fstab in order for those logical volumes to be available on boot.
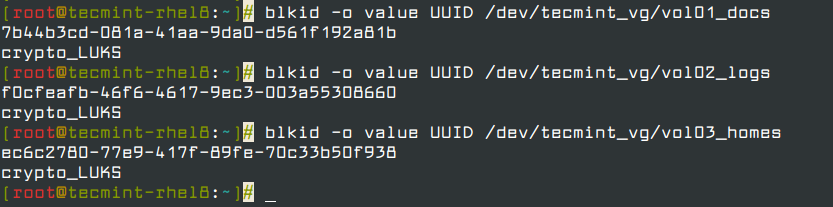
Rather than using the device identifier (/dev/something). We will use each LV’s UUID (so that our devices will still be uniquely identified should we add other logical volumes or devices), which we can find out with the blkid utility:
blkid -o value UUID /dev/tecmint_vg/vol01_docs
blkid -o value UUID /dev/tecmint_vg/vol02_logs
blkid -o value UUID /dev/tecmint_vg/vol03_homes
In our case:
Next, create the /etc/crypttab file with the following contents (change the UUIDs for the ones that apply to your setup):
docs UUID=ba77d113-f849-4ddf-8048-13860399fca8 none
logs UUID=58f89c5a-f694-4443-83d6-2e83878e30e4 none
homes UUID=92245af6-3f38-4e07-8dd8-787f4690d7ac none
Insert the following entries in /etc/fstab. Note that device_name (/dev/mapper/device_name) is the mapper identifier that appears in the first column of /etc/crypttab.
# Logical volume vol01_docs:
/dev/mapper/docs    	/mnt/docs   	ext4	defaults    	0   	2
# Logical volume vol02_logs
/dev/mapper/logs    	/mnt/logs   	ext4	defaults    	0   	2
# Logical volume vol03_homes
/dev/mapper/homes    	/mnt/homes   	ext4	defaults    	0   	2
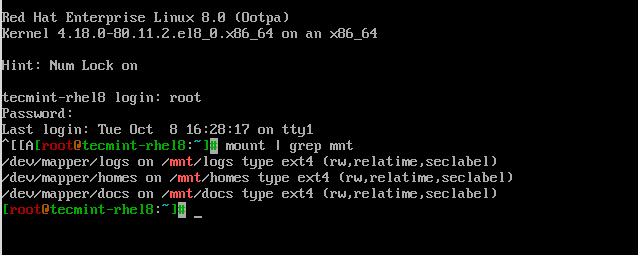
Now reboot (systemctl reboot) and you will be prompted to enter the passphrase for each LV. Afterwards, you can confirm that the mount operation was successful by checking the corresponding mount points:
Conclusion
In this tutorial, we have started to explore how to set up and configure system storage using classic volume management tools and SSM, which also integrates filesystem and encryption capabilities in one package. This makes SSM an invaluable tool for any sysadmin.
Let us know if you have any questions or comments – feel free to use the form below to get in touch with us!


Wow thanks a lot for making this tutorial, it is very help.
I have created encrypted LVM using ssm
ssm create -s 3G -n vol01_docs -p tecmint_vg –encrypt luks –fstype ext4 /mnt/docs /dev/sdb
updated /etc/crypttab file with UUID and after that made entry in fstab. When i reboot its not booting up going to maintenance mode
give root password for maintenance
type Control-D to continue).
fstab entry:
/dev/mapper/vol01_docs /mnt/docs ext4 defaults 0 2
Could you please let share you thoughts on the same issue. thanks in advance :)
@suresh,
Try using the UUID or device LABEL instead of the path to the logical volume. Do that in a regular mount command, and if it works change that in your /etc/fstab.
@Gabriel Cánepa
Thanks for your update, I used UUID and LABEL too but getting same problem ext4 file system is not found and went to maintenance mode..
why we don’t use fdisk or gdisk? why should use parted? is it because the curriculum of the exam?
@Rizal,
Feel free to use whatever tool you like :). I used parted because it seems to be the default tool suggested in the RHEL 7 documentation.
@Humayun,
Thank you for your kind words about this series! I am the author, and apologize for the delay in publishing the next article. But it should be online in a day or two. Please stay tuned and make sure you subscribe to Tecmint and you’ll receive a notice each time a new guide is published :).
I am following your tutorial and it is very helpful. I can see only until part-6 and it was on 7th April. Am I missing something (some form of subscription) or the next parts are delayed?