In this article we will review how to install, update, and remove packages in Red Hat Enterprise Linux 7. We will also cover how to automate tasks using cron, and will finish this guide explaining how to locate and interpret system logs files with the focus of teaching you why all of these are essential skills for every system administrator.

Managing Packages Via Yum
To install a package along with all its dependencies that are not already installed, you will use:
# yum -y install package_name(s)
Where package_name(s) represent at least one real package name.
For example, to install httpd and mlocate (in that order), type.
# yum -y install httpd mlocate
Note: That the letter y in the example above bypasses the confirmation prompts that yum presents before performing the actual download and installation of the requested programs. You can leave it out if you want.
By default, yum will install the package with the architecture that matches the OS architecture, unless overridden by appending the package architecture to its name.
For example, on a 64 bit system, yum install package will install the x86_64 version of package, whereas yum install package.x86 (if available) will install the 32-bit one.
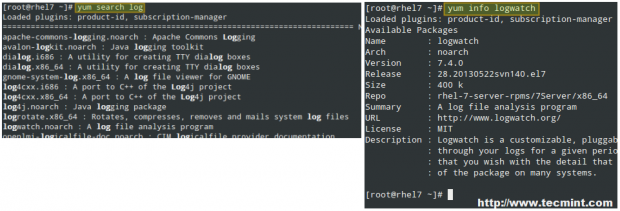
There will be times when you want to install a package but don’t know its exact name. The search all or search options can search the currently enabled repositories for a certain keyword in the package name and/or in its description as well, respectively.
For example,
# yum search log
will search the installed repositories for packages with the word log in their names and summaries, whereas
# yum search all log
will look for the same keyword in the package description and url fields as well.
Once the search returns a package listing, you may want to display further information about some of them before installing. That is when the info option will come in handy:
# yum info logwatch
You can regularly check for updates with the following command:
# yum check-update
The above command will return all the installed packages for which an update is available. In the example shown in the image below, only rhel-7-server-rpms has an update available:

You can then update that package alone with,
# yum update rhel-7-server-rpms
If there are several packages that can be updated, yum update will update all of them at once.
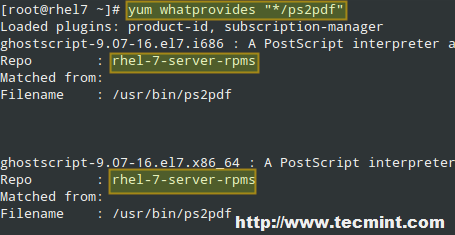
Now what happens when you know the name of an executable, such as ps2pdf, but don’t know which package provides it? You can find out with yum whatprovides “*/[executable]”:
# yum whatprovides “*/ps2pdf”
Now, when it comes to removing a package, you can do so with yum remove package. Easy, huh? This goes to show that yum is a complete and powerful package manager.
# yum remove httpd
Read Also: 20 Yum Commands to Manage RHEL 7 Package Management
Good Old Plain RPM
RPM (aka RPM Package Manager, or originally RedHat Package Manager) can also be used to install or update packages when they come in form of standalone .rpm packages.
It is often utilized with the -Uvh flags to indicate that it should install the package if it’s not already present or attempt to update it if it’s installed (-U), producing a verbose output (-v) and a progress bar with hash marks (-h) while the operation is being performed. For example,
# rpm -Uvh package.rpm
Another typical use of rpm is to produce a list of currently installed packages with code>rpm -qa (short for query all):
# rpm -qa

Read Also: 20 RPM Commands to Install Packages in RHEL 7
Scheduling Tasks using Cron
Linux and other Unix-like operating systems include a tool called cron that allows you to schedule tasks (i.e. commands or shell scripts) to run on a periodic basis. Cron checks every minute the /var/spool/cron directory for files which are named after accounts in /etc/passwd.
When executing commands, any output is mailed to the owner of the crontab (or to the user specified in the MAILTO environment variable in the /etc/crontab, if it exists).
Crontab files (which are created by typing crontab -e and pressing Enter) have the following format:
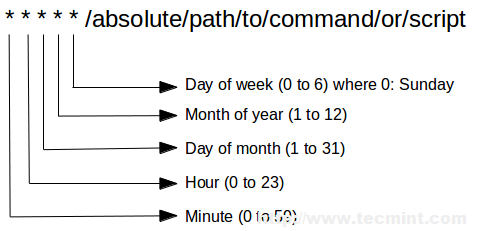
Thus, if we want to update the local file database (which is used by locate to find files by name or pattern) every second day of the month at 2:15 am, we need to add the following crontab entry:
15 02 2 * * /bin/updatedb
The above crontab entry reads, “Run /bin/updatedb on the second day of the month, every month of the year, regardless of the day of the week, at 2:15 am”. As I’m sure you already guessed, the star symbol is used as a wildcard character.
After adding a cron job, you can see that a file named root was added inside /var/spool/cron, as we mentioned earlier. That file lists all the tasks that the crond daemon should run:
# ls -l /var/spool/cron

In the above image, the current user’s crontab can be displayed either using cat /var/spool/cron/root or,
# crontab -l
If you need to run a task on a more fine-grained basis (for example, twice a day or three times each month), cron can also help you to do that.
For example, to run /my/script on the 1st and 15th of each month and send any output to /dev/null, you can add two crontab entries as follows:
01 00 1 * * /myscript > /dev/null 2>&1
01 00 15 * * /my/script > /dev/null 2>&1
But in order for the task to be easier to maintain, you can combine both entries into one:
01 00 1,15 * * /my/script > /dev/null 2>&1
Following the previous example, we can run /my/other/script at 1:30 am on the first day of the month every three months:
30 01 1 1,4,7,10 * /my/other/script > /dev/null 2>&1
But when you have to repeat a certain task every “x” minutes, hours, days, or months, you can divide the right position by the desired frequency. The following crontab entry has the exact same meaning as the previous one:
30 01 1 */3 * /my/other/script > /dev/null 2>&1
Or perhaps you need to run a certain job on a fixed frequency or after the system boots, for example. You can use one of the following string instead of the five fields to indicate the exact time when you want your job to run:
@reboot    	Run when the system boots.
@yearly    	Run once a year, same as 00 00 1 1 *.
@monthly   	Run once a month, same as 00 00 1 * *.
@weekly    	Run once a week, same as 00 00 * * 0.
@daily     	Run once a day, same as 00 00 * * *.
@hourly    	Run once an hour, same as 00 * * * *.
Read Also: 11 Commands to Schedule Cron Jobs in RHEL 7
Locating and Checking Logs
System logs are located (and rotated) inside the /var/log directory. According to the Linux Filesystem Hierarchy Standard, this directory contains miscellaneous log files, which are written to it or an appropriate subdirectory (such as audit, httpd, or samba in the image below) by the corresponding daemons during system operation:
# ls /var/log

Other interesting logs are dmesg (contains all messages from kernel ring buffer), secure (logs connection attempts that require user authentication), messages (system-wide messages) and wtmp (records of all user logins and logouts).
Logs are very important in that they allow you to have a glimpse of what is going on at all times in your system, and what has happened in the past. They represent a priceless tool to troubleshoot and monitor a Linux server, and thus are often used with the tail -f command to display events, in real time, as they happen and are recorded in a log.
For example, if you want to display kernel-related events, type the following command:
# tail -f /var/log/dmesg
Same if you want to view access to your web server:
# tail -f /var/log/httpd/access.log
Summary
If you know how to efficiently manage packages, schedule tasks, and where to look for information about the current and past operation of your system you can rest assure that you will not run into surprises very often. I hope this article has helped you learn or refresh your knowledge about these basic skills.
Don’t hesitate to drop us a line using the contact form below if you have any questions or comments.


Does anyone whether “–help” option is allowed in the actual rhcsa exam environment?
Why wouldn’t it be allowed?