Previously we have seen how to create a flexible disk storage using LVM. Here, we are going to see how to extend volume group, extend and reduce a logical volume. Here we can reduce or extend the partitions in Logical volume management (LVM) also called as flexible volume file-system.

Requirements
When do we need to reduce volume?
May be we need to create a separate partition for any other use or we need to expand the size of any low space partition, if so we can reduce the large size partition and we can expand the low space partition very easily by the following simple easy steps.
My Server Setup – Requirements
- Operating System – CentOS 6.5 with LVM Installation
- Server IP – 192.168.0.200
How to Extend Volume Group and Reduce Logical Volume
Logical Volume Extending
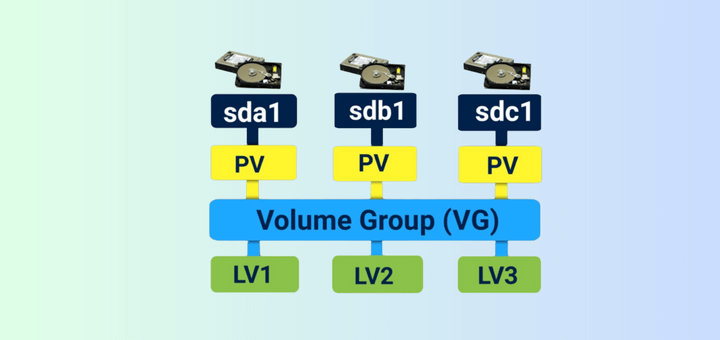
Currently, we have One PV, VG and 2 LV. Let’s list them one by one using following commands.
# pvs
# vgs
# lvs

There are no free space available in Physical Volume and Volume group. So, now we can’t extend the lvm size, for extending we need to add one physical volume (PV), and then we have to extend the volume group by extending the vg. We will get enough space to extend the Logical volume size. So first we are going to add one physical volume.
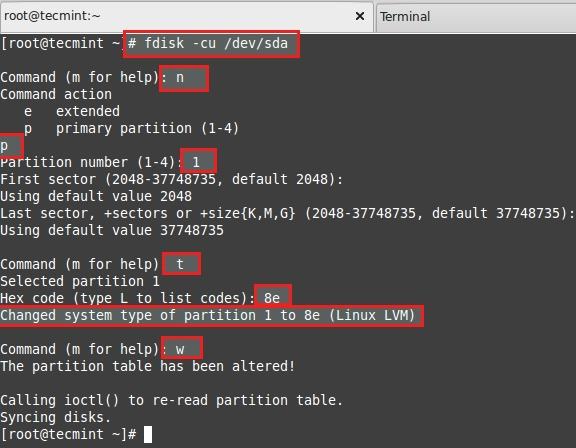
For adding a new PV we have to use fdisk to create the LVM partition.
# fdisk -cu /dev/sda
- To Create new partition Press n.
- Choose primary partition use p.
- Choose which number of partition to be selected to create the primary partition.
- Press 1 if any other disk available.
- Change the type using t.
- Type 8e to change the partition type to Linux LVM.
- Use p to print the create partition ( here we have not used the option).
- Press w to write the changes.
Restart the system once completed.
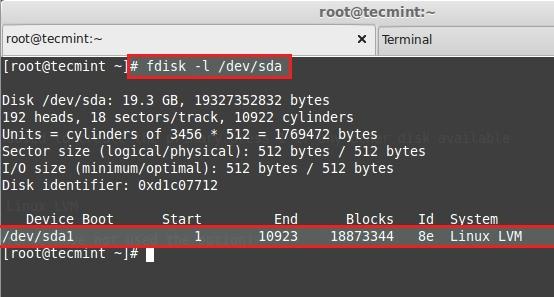
List and check the partition we have created using fdisk.
# fdisk -l /dev/sda
Next, create new PV (Physical Volume) using following command.
# pvcreate /dev/sda1
Verify the pv using below command.
# pvs

Extending Volume Group
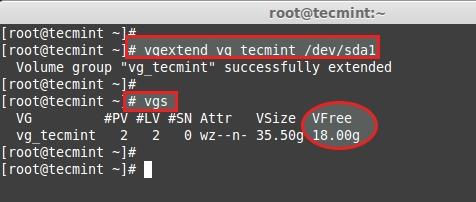
Add this pv to vg_tecmint vg to extend the size of a volume group to get more space for expanding lv.
# vgextend vg_tecmint /dev/sda1
Let us check the size of a Volume Group now using.
# vgs
We can even see which PV are used to create particular Volume group using.
# pvscan

Here, we can see which Volume groups are under Which Physical Volumes. We have just added one pv and its totally free. Let us see the size of each logical volume we have currently before expanding it.
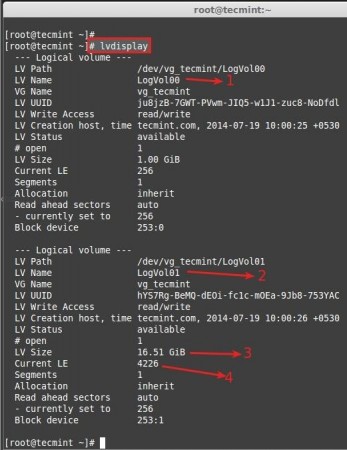
- LogVol00 defined for Swap.
- LogVol01 defined for /.
- Now we have 16.50 GB size for / (root).
- Currently there are 4226 Physical Extend (PE) available.
Now we are going to expand the / partition LogVol01. After expanding we can list out the size as above for confirmation. We can extend using GB or PE as I have explained it in LVM PART-I, here I’m using PE to extend.
For getting the available Physical Extend size run.
# vgdisplay
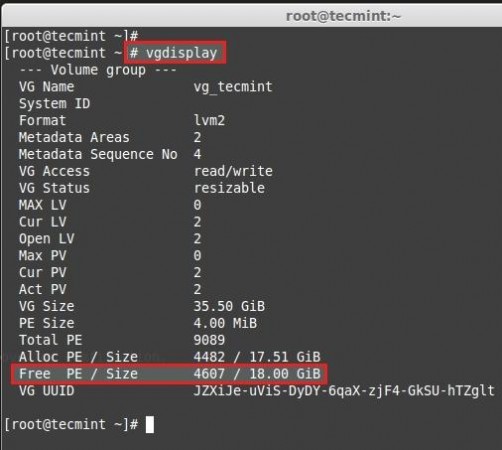
There are 4607 free PE available = 18GB Free space available. So we can expand our logical volume up-to 18GB more. Let us use the PE size to extend.
# lvextend -l +4607 /dev/vg_tecmint/LogVol01
Use + to add the more space. After Extending, we need to re-size the file-system using.
# resize2fs /dev/vg_tecmint/LogVol01
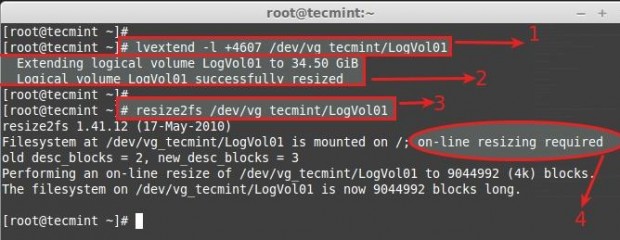
- Command used to extend the logical volume using Physical extends.
- Here we can see it is extended to 34GB from 16.51GB.
- Re-size the file system, If the file-system is mounted and currently under use.
- For extending Logical volumes we don’t need to unmount the file-system.
Now let’s see the size of re-sized logical volume using.
# lvdisplay
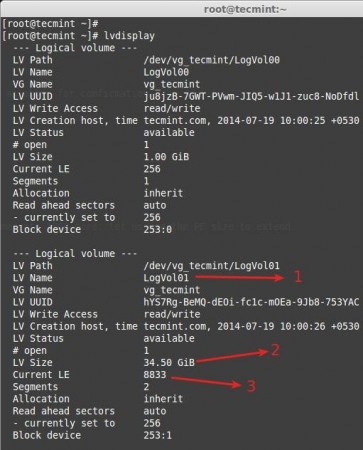
- LogVol01 defined for / extended volume.
- After extending there is 34.50GB from 16.50GB.
- Current extends, Before extending there was 4226, we have added 4607 extends to expand so totally there are 8833.
Now if we check the vg available Free PE it will be 0.
# vgdisplay
See the result of extending.
# pvs
# vgs
# lvs
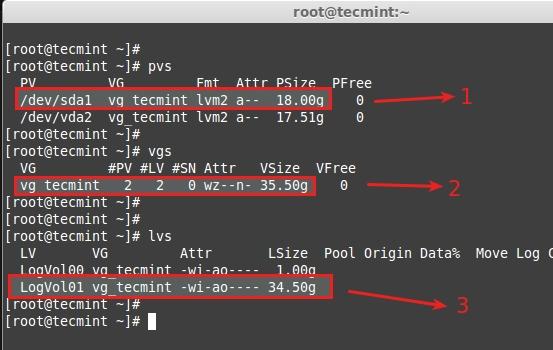
- New Physical Volume added.
- Volume group vg_tecmint extended from 17.51GB to 35.50GB.
- Logical volume LogVol01 extended from 16.51GB to 34.50GB.
Here we have completed the process of extending volume group and logical volumes. Let us move towards some interesting part in Logical volume management.
Reducing Logical Volume (LVM)
Here we are going to see how to reduce the Logical Volumes. Everyone say its critical and may end up with disaster while we reduce the lvm. Reducing lvm is really interesting than any other part in Logical volume management.
- Before starting, it is always good to backup the data, so that it will not be a headache if something goes wrong.
- To Reduce a logical volume there are 5 steps needed to be done very carefully.
- While extending a volume we can extend it while the volume under mount status (online), but for reduce we must need to unmount the file system before reducing.
Let’s wee what are the 5 steps below.
- unmount the file system for reducing.
- Check the file system after unmount.
- Reduce the file system.
- Reduce the Logical Volume size than Current size.
- Recheck the file system for error.
- Remount the file-system back to stage.
For demonstration, I have created separate volume group and logical volume. Here, I’m going to reduce the logical volume tecmint_reduce_test. Now its 18GB in size. We need to reduce it to 10GB without data-loss. That means we need to reduce 8GB out of 18GB. Already there is 4GB data in the volume.
18GB ---> 10GB
While reducing size, we need to reduce only 8GB so it will roundup to 10GB after the reduce.
# lvs

Here we can see the file-system information.
# df -h
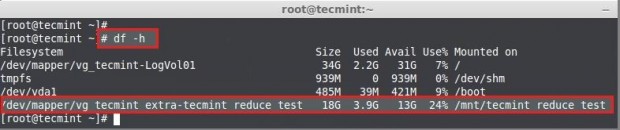
- The size of the Volume is 18GB.
- Already it used upto 3.9GB.
- Available Space is 13GB.
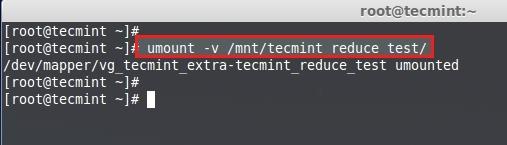
First unmount the mount point.
# umount -v /mnt/tecmint_reduce_test/
Then check for the file-system error using following command.
# e2fsck -ff /dev/vg_tecmint_extra/tecmint_reduce_test
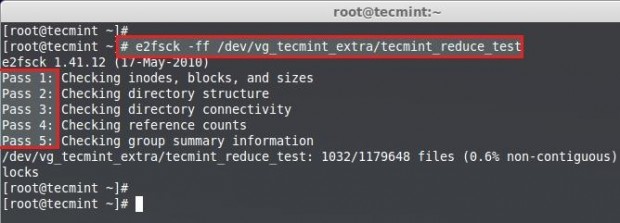
Note: Must pass in every 5 steps of file-system check if not there might be some issue with your file-system.
Next, reduce the file-system.
# resize2fs /dev/vg_tecmint_extra/tecmint_reduce_test 10G

Reduce the Logical volume using GB size.
# lvreduce -L -8G /dev/vg_tecmint_extra/tecmint_reduce_test

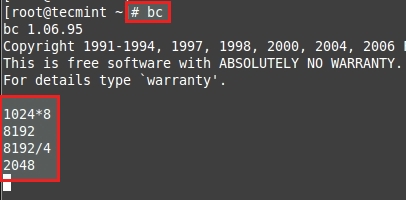
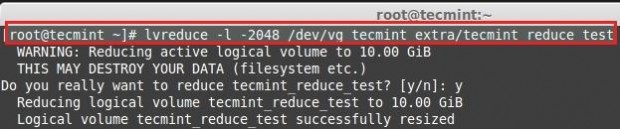
To Reduce Logical volume using PE Size we need to Know the size of default PE size and total PE size of a Volume Group to put a small calculation for accurate Reduce size.
# lvdisplay vg_tecmint_extra
Here we need to do a little calculation to get the PE size of 10GB using bc command.
1024MB x 10GB = 10240MB or 10GB

10240MB / 4PE = 2048PE
Press CRTL+D to exit from BC.
Reduce the size using PE.
# lvreduce -l -2048 /dev/vg_tecmint_extra/tecmint_reduce_test
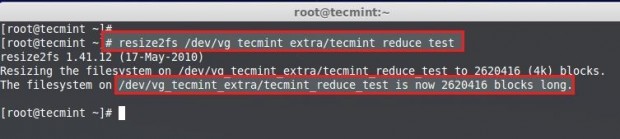
Re-size the file-system back, In this step if there is any error that means we have messed-up our file-system.
# resize2fs /dev/vg_tecmint_extra/tecmint_reduce_test
Mount the file-system back to same point.
# mount /dev/vg_tecmint_extra/tecmint_reduce_test /mnt/tecmint_reduce_test/
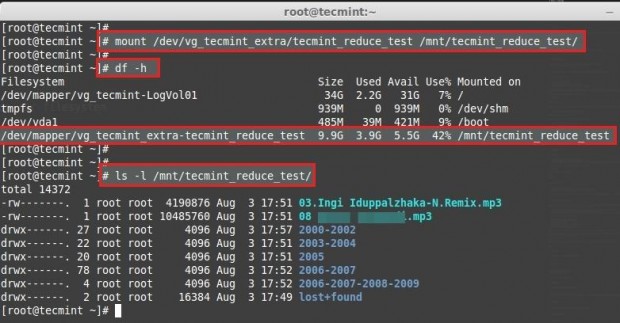
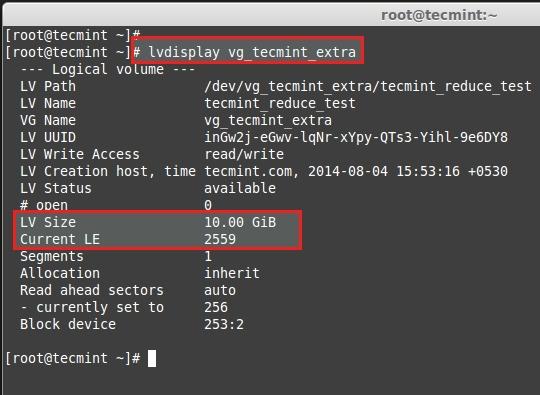
Check the size of partition and files.
# lvdisplay vg_tecmint_extra
Here we can see the final result as the logical volume was reduced to 10GB size.
In this article, we have seen how to extend the volume group, logical volume and reduce the logical volume. In the next part (Part III), we will see how to take a Snapshot of logical volume and restore it to earlier stage.


I have what I consider a big problem. I installed Ubuntu 22.04 and LVM during installation. I have 3 HDs before installing I moved all data to the 3rd drive, sdc.
Now after installing it, I do not see the sdc. With gparted I can see the sdc and it is called sdc. It shows an area with data. MY DATA but I cannot see it in Nautilus.
How to see it and move my data back to the /home/user/? The data was created on Ubuntu 23.04. I went down because of too many problems on 23.04. What can I do?
There is a typo:
should be:
@Xabispacebiker,
Thanks for your input, corrected the command in the article…
Nice post.
I have a question related to that article above. can I reduce my multiple HDD were use by home partition? we have five HDD @2TB extend with lvm with xfs format in centos 7.
So we need to resize the partition home from 10TB to 5TB. I need to remove two HDDs and make sure all data cant corrupt.
can you advise me step by step. thanks
How to extend the partition without using lvextend command?
The actual command you can see 10G is used in the terminal screenshot.
The author/editor needs to update in display information which may be due to a typing mistakes.
Hi,
my activemq is running on
/data. Can I extend lvm online without stopping process of activemq?I have already expanded the
/homeby following the instructions above.However when I use the df command to verify the
/homesize, its size is still 953M.Hope you can help me.
” resize2fs /dev/vg_tecmint_extra/tecmint_reduce_test 10GB ”
Your command line is wrong. resize2fs takes size with a single character. It should be 10G and not 10GB.
Thank you! This took forever to figure out what I wanted to do. Super clear instructions, much better than ubuntu forums or StackOverflow LOL
You have to unmount /home first. This might not be possible if you are logged in. You can try to go to the console with
CTRL-ALT-F1, log in as root. Stop the GUI. Depending on what Desktop you are running you have to google how to do that. After the GUI is stopped you should be able to unmount /home. Root does not use /home.How to reduce lvm mapped to /home? When I use e2fsck, it returns the device is busy.
You cannot resize a volume you have mounted, and that you are also currently in.
Thanks, this was a very helpful write up!
I am getting following errors.
Free-flowing explanation from start to finish. Many thanks.
This was very helpful!! Thanks Babin!
In summary, to reduce ext filesystem:
1 thru 5 are taken care by single command:
lvreduce -L (size) -r /dev/mapper/vg-lvAs seen here: https://access.redhat.com/documentation/en-us/red_hat_enterprise_linux/6/html/logical_volume_manager_administration/lv_reduce
The command performs each of the steps (even unmounts and mounts back)
Thanks, this was a very helpful write up!
Hi,
I have created one hard disk (sdc) and want to add in (sdb) hard disk how to add in command line in LVM please let me know.
@Mihir,
Still, XFS did not provide an option to reduce, but you can grow the size on the fly.
How to reduce xfs file system?
It is worth mentioning if your partition is xfs then you will need to use ‘xfs_growfs‘.
xfs seems popular for later releases of Centos.
All was going well until I ran Couldn’t find valid
Couldn't find valid filesystem superblock.
Hi Guys,
I need to increase disk space on a centos 7 but when I do
fdisk -cu /dev/sdaI get the menu with options. If I do onlyfdisk /dev/sdaI get a warning that fdisk GPT support is current new.Already added a new disk from the hypervisor to the virtual machine.
Used the same method as described in the article but for Ubuntu.
Any thoughts?
Thank You, worked Perfectly on Red Hat Enterprise Linux Server release 6.3
resizefs give error about bad superblock.
I had to use xfs_growfs instead of resizefs.
@6ril,
Yes, resize2fs for ext file systems. We need to use xfs_growfs for xfs file systems.
Hi,
I have 2 questions any one please give me a answer:
1. what is the difference between L and l (small) ?
2. what is the difference between LVresize and LV extend ?
@Krishna,
1. what is the difference between L and l (small)?
L = Can be used while MB, GB or TB in size
l = Can be used while resizing or reducing with Physical extent in size (PE), (The default extent size of a single PE is 4 MB).
2. what is the difference between LVresize and LV extent?
lvresize = Take an example resizing from 10 GB to 20 GB using existing PEs from the Volume group.
lvextend = Only used while adding a new device (/dev/sdc or /dev/sdd or whatever ) to existing volume group.
Thanks & Regards,
Bobin Lonston
I tried reducing the LV on a test system. Worked like breeze. To calculate the PE’s to remove I converted everything to real bytes. That is, PE size of 4MiB = 4 * 1024 * 1024. And the number of GB to remove was 1Gib = 1024 * 1024 * 2014 bytes.
After resizefs, the space needed by the file system is specified in 4kiB blocks, so 4096 bytes each. If you want to calculate accurately without losing a GB here and there AND you want to be sure not to reduce the LV beyond the size of the file system, I’d recommend this.
I think the command `resize2fs /dev/vg_tecmint_extra/tecmint_reduce_test 10GB` should be `resize2fs /dev/vg_tecmint_extra/tecmint_reduce_test 10G` –> 10GB produces: invalid new size.
That is correct. I had the same problem
We can use lvextend and resize2fs same time with lvextend -r command.
From the man page:
-r|–resizefs – Resize underlying filesystem together with the LV using fsadm(8).
Thanks for sharing the article…Really helpful.
Awesome article! Straight to the point.
Hello Ravi,
but on the actual screen you showing:
Still the article is live and you have not corrected. Please make the correction as its been followed by many techs.
Regards
Ramesh Das
@Ramesh,
We extremely sorry for trouble, we’ve corrected the command as suggested, if you still seeing same, clear your browser cache..
Thanks a lot ! This is the best tutorial I have ever seen !
Great article.
Just a little mistake you made. In reducing LVM you saying:
# resize2fs /dev/vg_tecmint_extra/tecmint_reduce_test 8GB
…but on the actual screen you showing:
# resize2fs /dev/vg_tecmint_extra/tecmint_reduce_test 10G
@Rob,
Thanks for pointing out, we’ve corrected in the article..
Excellent detailed article!
Great article – so helpful! I was able to use this to extend my media server library filesystem in CentOS 6.8 with no issue whatsoever (after I spent 6 hours rebuilding my RAID array that is)
Thanks for the help!
Excellent! This is exactly what I needed to resize my LV’s on my OpenMediaVault server. Made a how-to with reference to this page on the OMV forum. I hope it gets approved ;)
Is it possible to extend the space on a disk without adding another disk and no downtime?
@Michael,
Yes, it’s possible to extend the size without adding new disks, but we should have enough space in VG.
To extend the space for any logical volumes we don’t require any downtime, only we need downtime in the case of reducing disk space by unmounting.
Thanks & Regards,
Babin Lonston
I know that you need space on VG. But what if I don’t have and I add space to the disk from vSphere or whatever virtualization product? Then it involves downtime to increase the disk space, right?
Nope – it’s perfectly possible to increase available disk space on any file system without downtime.
We did a CentOS and an RHEL box last week – one was
/, and the other was a/srv– both without downtime.Great article. Can’t do this with built in GUI tools so this article was dead on for what to do.
Thanks.
@Mark,
In real world production environment, only DB servers are installed with GUI more over LVM GUI will not be configured.
It’s good to practice in CLI to keep hands on any platform.
Thanks & Regards,
Babin Lonston
Great article,
Thanks for the explanation I modified my partitions without any problem
This article was great! I found it very helpful so I could accomplish what I needed to do. Thanks for this!
I have two hard drives, SATA 1 (/ dev / sdb1) 80 GB and SATA 2 (dev / sdc1) 40 GB. Problem: the 40 GB hard drive is damaged and I will replace it with a new 40GB hard drive as well. How can I reduce the disk (/ dev / sdc1) without losing my data?
Thanks it worked well.
Hi,
it is possible to reduce filesystem mounted on “/” which can’t be umounted? I got “device is busy” error.
Thanks in advance!
awesome……………i got good information.thanks
very nice information……your post is very helpful to understand how lvm reduce
help me
i dont know. i got /dev/mapper/centos-home can’t read superblock
quick question
in your article you have mentioned ” resize2fs /dev/vg_tecmint_extra/tecmint_reduce_test 8GB”
should it be : resize2fs /dev/vg_tecmint_extra/tecmint_reduce_test 10GB” instead?
I guess you have not understood what I am trying to say. I understand that there are 2 ways of reducing lvm size. One is with size name and other is using extent. The problem I see here is that you have reduced lvm size by 8 GB using when reducing with name size. Now, when you reduce lvm size with physical extent you have reduced it by 2048 PE which is equal to 10GB. Our target was to reduce the lvm size to 10GB and not to 8GB which is the case that was carried out while reducing lvm size using name size. Don’t you think both the conversions contradict with each other? I hope you have got the point here.
@Minthang Sitlhou,
It’s a conversion for knowing the exact PE size for specific amount of GB.
hi, can you please clarify the below statement and rectify if incorrect:
“For demonstration, I have created separate volume group and logical volume. Here, I’m going to reduce the logical volume tecmint_reduce_test. Now its 18GB in size. We need to reduce it to 10GB without data-loss. That means we need to reduce 8GB out of 18GB. Already there is 4GB data in the volume.”
While reducing the LVM using size you have used 8G in the example but when you reduce the LVM using physical extend you have used 10240MB / 4PE = 2048PE.
Is this a typo or it is a convention? Would be great if you could at least clarify it.
Thanks,
Thanks, Nice to read the article
@Muthu
Happy to hear from you, Thanks for your feedback.
Hi,
if you are in rescue mode and you want to extend a partition, you have to remount / in read-write mode before lvextend and resize2fs :
> mount -o remount, rw /
AM
@Arnaud Mounier,
Thanks for the information however this scenario is very rare in production environment. Even a partition get fills we can get some free space by find and removing super blocks, Then we can extend the volume without having any downtime.
Very helpful, thanks
This is a very good resource. This helped me resized lvm based partitions on my test systems painlessly. Thank you.
Thanks for your valuable feedback hope you have find some useful information from us.
nice article, thanks.
Need some help on this one,
[root@directadmin04 ~]# pvs
PV VG Fmt Attr PSize PFree
/dev/sda2 vg_directadmin04 lvm2 a– 99.51g 0
[root@directadmin04 ~]# vgs
VG #PV #LV #SN Attr VSize VFree
vg_directadmin04 1 3 0 wz–n- 99.51g 0
[root@directadmin04 ~]# lvs
LV VG Attr LSize Pool Origin Data% Meta% Move Log Cpy%Sync Convert
lv_home vg_directadmin04 -wi-ao—- 41.68g
lv_root vg_directadmin04 -wi-ao—- 50.00g
lv_swap vg_directadmin04 -wi-ao—- 7.83g
[root@directadmin04 ~]#
is there a way to down size the lv_root so that lv_home will become bigger, without losing information
yes you can, But can’t perform from live want downtime for host and enter into maintenance mode to follow the resize steps.
Thanks, very helpful
Thank you for the post . you have one error .
resize2fs /dev/vg_tecmint_extra/tecmint_reduce_test 8GB
it should be :
resize2fs /dev/vg_tecmint_extra/tecmint_reduce_test 10GB
I was helpful. Thanks!!
I believe the line that says:
# resize2fs /dev/vg_tecmint_extra/tecmint_reduce_test 8GB
should read:
# resize2fs /dev/vg_tecmint_extra/tecmint_reduce_test 10G
Just after “Next, reduce the file-system”
i would like to note that for newer distributions (where XFS might be used by default) you need to use xfs_growfs instead (install xfsprogs.)
Thanks, helped me a lot!!!
This article is really helpful. I looked forward to finding some information to extend my logical volume with a new hard disk. Thanks!!
Thank you for the awsome guide! It saved me a lot of trouble!
Very nice document and well explained. I found some discrepancies between the screen-shots and command. for example you can see that you fired the command to reduce the FS size 8GB…
# resize2fs /dev/vg_tecmint_extra/tecmint_reduce_test 8GB
@Babin Lonston can you give me steps how to create new partion to install Ubuntu from existing LVM. I follwed your steps but it added that space to “Free PE /Size”can you tell me how to take that space out for installing ubuntu in that place.
Current my machine is running fedora.
@ Egi Adithia Pradana, Yes its Possible to reduce the logical volume size and extend other logical volume in the same volume group. Even you can create a new logical volume if you have enough space in Volume group.
@Babin Lonston can you give me steps how to create new partion to install Ubuntu from existing LVM. I follwed your steps but it added that space to “Free PE /Size”can you tell me how to take that space out for installing ubuntu in that place.
Current my machine is running fedora.
hi
it possible if i want to reduce some LVM partition and use the empty space after reducing to extending another LVM partition such root?
Nice document!
we can recover from metadata, Yes we can use LVM in raid. Going to write those articles soon. :) After thin-volumes.
nice work!
What if a disk start to fail? How can I substitute it? Can I use LVM with a raid?
Great Explanation!!!!
@ Ashok P Gowda, Thanks dear
Hello, Pls i am trying to Reduce a LVM to 150MB and i follow the below step but at the end of my step, iam not able to mount the Filesystem back as the systems tells me that i user do fuser .
2500
my steps:
umount /home
e2fsck /dev/mapper/vg_nw
resize2fs /dev/mapper/vg_new 150M
lvcreduce -L 150M /dev/mapper/vg_new
mount -a ………..This where the problems comes in, as i am not able to remount /home
df -h . pls advice , is it only possible to reduce to GB not MB? pls help me on this ASAP. my email is [email protected]
@OLUYOMI
We can reduce lvm to any size. May i know the size of your LVM ?
I’am assuming that you have a 500MB LVM with the name of lv_oluyomi and now you need to reduce it to 150MB ok.
I’am assuming that your volume group is vg_oluyomi and your logical volume mounted under /mnt/oluyomi.
1. First step you have to unmount the file system to reduce.
# umount /mnt/oluyomi
2. Check for the filesystem error before proceding to other steps.
# e2fsck -ff /dev/vg_oluyomi/lv_oluyomi
Check for any error, sure you have to pass in all 5 tests.
3. Then resize. If you need to resize from 500MB to 150MB
# resize2fs /dev/vg_oluyomi/lv_oluyomi 350M
4. Then reduce the lvm
# lvreduce -L -350M /dev/vg_oluyomi/lv_oluyomi
5. Then resize the filesystem.
# resize2fs /dev/vg_oluyomi/lv_oluyomi
6. Then mount
# mount /dev/vg_oluyomi/lv_oluyomi /mnt/oluyomi
7. Check the mount point size now
# df -h
or check the lvm size now
# lvdisplay /dev/vg_oluyomi/lv_oluyomi
Hope you problem solved, let me know if there still you face the issue.
{ user do fuser } This means you currently using the file system. if you use lazy umount you can umount it even the filesystem under use. Just use -l option with umount.
example: # umount -l /mnt/oluyomi
you are not specify the reducing symbol
ex:- extend means add + symbol
lvextend -L +150M /dev/mapper/vg_new
reduce means add – symbol
umount /home
e2fsck /dev/mapper/vg_nw
resize2fs /dev/mapper/vg_new 150M
lvcreduce -L -150M /dev/mapper/vg_new