Formerly phpMinAdmin, Adminer is a front-end database management tool written in PHP. Unlike phpMyAdmin, it only comprises a single PHP file that can be downloaded on the target server on which Adminer is to be installed.
Adminer provides a stripped-down and leaner UI compared to phpMyAdmin. It works with popular SQL database management systems such as MariaDB, PostgreSQL, MySQL, Oracle, SQLite, MS SQL as well as Elasticsearch search engine.
In this guide, we will walk you through the installation of Adminer on RHEL-based distributions.
Step 1: Install LAMP Stack in RHEL
Since Adminer is accessed from the front-end and powered by PHP, we need to install the LAMP stack. We already have a comprehensive guide on how to install the LAMP stack on RHEL-based Distributions.
With the LAMP stack in place, proceed and install additional PHP extensions which are required to work with Adminer.
$ sudo dnf install php php-curl php-zip php-json php-mysqli php-gd
Step 2: Create a Database for Adminer
The next step is to create a database for Adminer. So, log into the database server.
$ sudo mysql -u root -p
Create a database and database user.
CREATE DATABASE adminer_db;
CREATE USER 'adminer_user'@'localhost' IDENTIFIED BY 'P@ssword321';
Then grant all privileges to the database user on the Adminer database.
GRANT ALL ON adminer_db.* TO 'adminer_user'@'localhost';
Apply the changes and exit the database server.
FLUSH PRIVILEGES;
EXIT;
Step 3: Download and Configure Adminer
With the Adminer database in place, the next step is to download the Adminer installation file. But first, you need to create a directory for Adminer in the Document Root as follows.
$ sudo mkdir -p /var/www/html/adminer
Next, navigate to the Adminer directory.
$ cd /var/www/html/adminer
Then download the latest version of the Adminer PHP file using the wget command and save it as index.php.
$ wget -O index.php https://github.com/vrana/adminer/releases/download/v4.8.1/adminer-4.8.1.php
Once the download is complete, set the following directory ownership and permissions.
$ sudo chown -R apache:apache /var/www/html/adminer/
$ sudo chmod -R 775 /var/www/html/adminer/
Step 4: Configure Apache for Adminer
Moving on, you need to configure an Apache virtual host file for Adminer. So, create a virtual host file in the /etc/httpd/conf.d/ directory.
$ sudo vim /etc/httpd/conf.d/adminer.conf
Paste the following lines into the file ensuring that you replace the mydomain.com value in the ServerName directive with your server’s registered domain or Public IP.
<VirtualHost *:80>
     ServerName mydomain.com
     DocumentRoot /var/www/html/adminer/
     ServerAdmin [email protected]
     DirectoryIndex index.php
     ErrorLog /var/log/httpd/adminer-error.log
     CustomLog /var/log/httpd/adminer-access.log combined
</VirtualHost>
Save and exit the configuration file.
Next restart Apache to apply the changes made.
$ sudo systemctl restart httpd
It’s also prudent to ensure that Apache is running:
$ sudo systemctl status httpd
In addition, ensure that the configuration is free of any errors.
$ sudo apachectl configtest

Step 5: Access Adminer from Web Browser
Finally, launch your web browser and browse your server’s IP using the following URL.
http://server-ip or domain_name
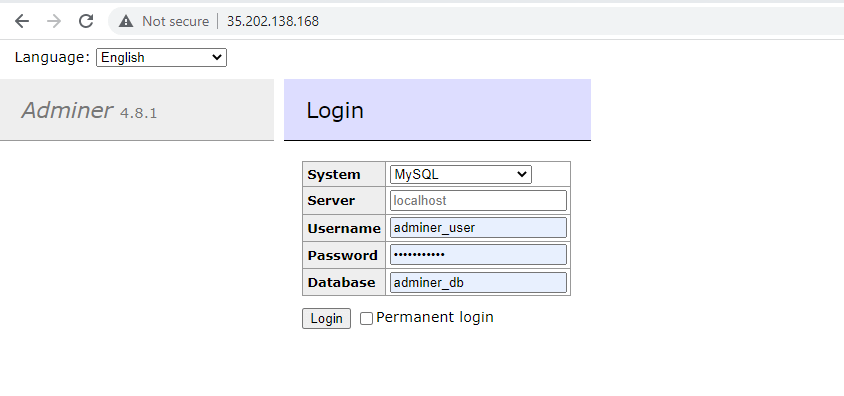
You will get the following web page. Provide the MariaDB database credentials – MariaDB user, password to the user, and the name of the database and click ‘Login’.
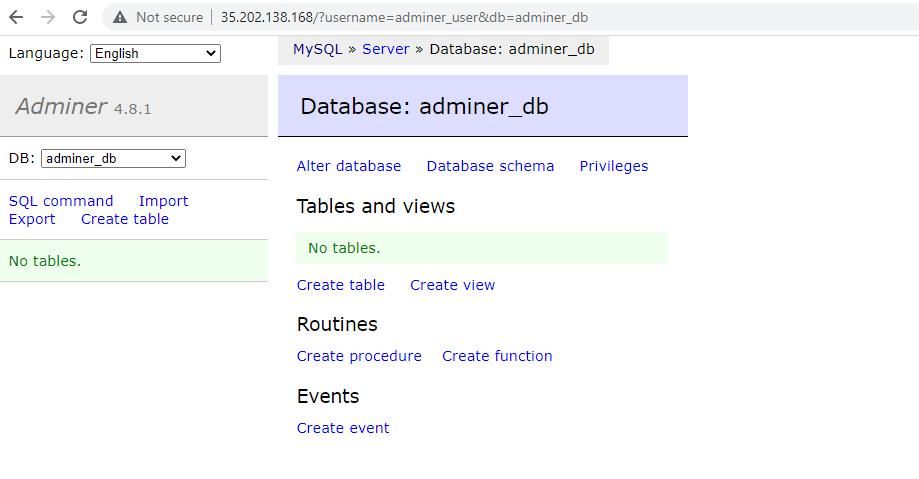
Once logged in, the following display will come into view. From here, you can carry out various database operations such as creating databases, and tables and executing SQL queries to mention a few.
This draws this guide to a close. We have successfully installed and configured Adminer on RHEL-based distributions.

Being software developer and daily user of Adminer, I wanted to add a new feature via Pull Request. But I quickly noticed it was going to be difficult since the project is discontinued for some time already.
Because I really like Adminer and don’t want to see it dying, I tried to get in touch with the original developer to propose my help on continuing.
Since I got no answer, the only option I had was to continue on my own through a fork that I called AdminerEvo (https://github.com/adminerevo/adminerevo).
There is a lot of work : support, new features, documentation, translations,…
Anyone is welcome to help, post comments, report problems or simply do testing.
Please, don’t be afraid, join the community and contribute in whatever way suits you. There are only well-intentioned people who follow the same goal: to move the project forward.
Regards,
L.
FLUSH PRIVILEGES is only necessary if you update the privileges tables directly. When working with the GRANT syntax implicit flush happens.
It was formerly known as phpMinAdmin not phpMyAdmin (https://en.wikipedia.org/wiki/Adminer). Boy did that cause some confusion!
@Andrew,
Thanks, corrected the article…
Very Good document.
I am working as a System Admin & use mysql dump to take backup of my databases. Use scp to copy data from remote server to local server. Entire process is done by the help of shell Script.
Did any have idea of Web based Mysql database backup application(Remote & Local Server), if it support Scheduling then it will be more help full for me.
A very valuable info!!
Thanks
Javier Q
@jjqc
Nice article.