SSL (Secure Socket Layer), and its improved version, TLS (Transport Socket Layer), are security protocols that are used to secure web traffic sent from a client’s web browser to a web server.
An SSL certificate is a digital certificate that creates a secure channel between a client’s browser and a web server. In so doing, sensitive and confidential data such as credit card data, login credentials, and other highly private information is encrypted, preventing hackers from eavesdropping and stealing your information.
What is a Self-Signed SSL Certificate?
A self-signed SSL certificate, unlike other SSL certificates which are signed and trusted by a Certificate Authority (CA), is a certificate signed by an individual who owns it.
It is totally free to create one and is a cheap way of encrypting your locally hosted web server. However, the use of a self-signed SSL certificate is highly discouraged in production environments for the following reasons:
- Since it’s not signed by a Certificate Authority, a self-signed SSL certificate generates alerts on web browsers warning users of potential risk ahead should they decide to proceed. These alerts are undesired and will dissuade users from visiting your website, potentially leading to a decline in web traffic. As a workaround to these alerts, organizations usually encourage their employees to simply ignore the alerts and proceed ahead. This may spawn a dangerous habit among users who may decide to continue ignoring these alerts on other online sites, potentially falling victim to phishing sites.
- Self-signed certificates have a low-security level since they implement low-level cipher technologies and hashes. Thus the security level may not be at par with standard security policies.
- Additionally, there’s no support for Public Key Infrastructure (PKI) functions.
That said, the use of a self-signed SSL certificate is not a bad idea for testing services and applications on a local machine that requires TLS / SSL encryption.
In this guide, you will learn how to install a local self-signed SSL certificate on the Apache localhost web server on a CentOS 8 server system.
Prerequisites:
Before getting started, ensure that you have the following basic requirements:
- An instance of the CentOS 8 server.
- Apache webserver installed on the server
- A hostname already configured and defined in the /etc/hosts file. For this guide, we are going to use
tecmint.locala hostname for our server.
Step 1: Installing Mod_SSL on CentOS
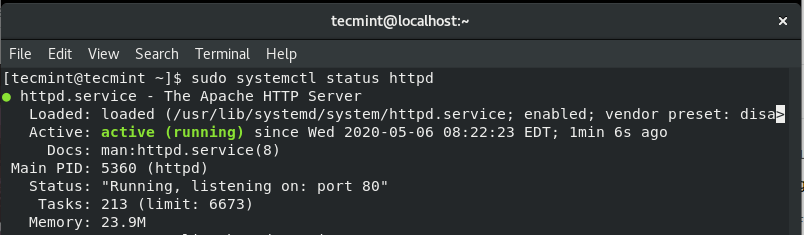
1. To start off, you need to verify that the Apache web server is installed and running.
$ sudo systemctl status httpd
Here’s the expected output.
If the webserver is not running, you can start and enable it upon booting using the command.
$ sudo systemctl start httpd
$ sudo systemctl enable httpd
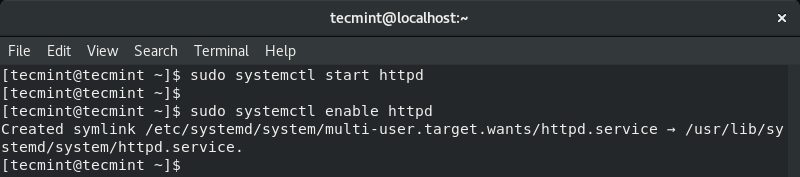
You can thereafter confirm if Apache is up and running.
2. To enable the installation and setup of the local self-signed SSL certificate, the mod_ssl package is required.
$ sudo dnf install mod_ssl
Once installed, you can verify its installation by running.
$ sudo rpm -q mod_ssl

Also, ensure that the OpenSSL package is installed (OpenSSL comes installed by default in CentOS 8).
$ sudo rpm -q openssl

Step 2: Create a Local Self-Signed SSL Certificate for Apache
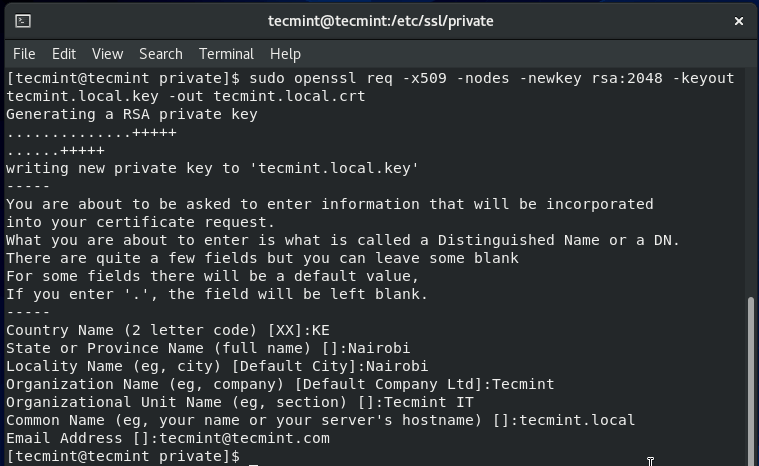
3. With the Apache web server and all the prerequisites in check, you need to create a directory within which the cryptographic keys will be stored.
In this example, we have created a directory at /etc/ssl/private.
$ sudo mkdir -p /etc/ssl/private
Now create the local SSL certificate key and file using the command:
$ sudo openssl req -x509 -nodes -newkey rsa:2048 -keyout tecmint.local.key -out tecmint.local.crt
Let’s have a look at what some of the options in the command actually stand for:
- req -x509 – This indicates that we are using the x509 Certificate Signing Request (CSR).
- -nodes – This option instructs OpenSSL to skip encrypting the SSL certificate using a passphrase. The idea here is to allow Apache to be able to read the file without any kind of user intervention which would not be possible if a passphrase is provided.
- -newkey rsa:2048 – This indicates that we want to simultaneously create a new key and a new certificate. The rsa:2048 portion implies that we want to create a 2048-bit RSA key.
- -keyout – This option specifies where to store the generated private key file upon creation.
- -out – The option specifies where to place the created SSL certificate.
Step 3: Install Local Self-Signed SSL Certificate on Apache
4. Having generated the SSL certificate file, It’s now time to install the certificate using Apache web server’s settings. Open and edit the /etc/httpd/conf.d/ssl.conf configuration file.
$ sudo vi /etc/httpd/conf.d/ssl.conf
Ensure that you have the following lines between the virtual host tags.
<VirtualHost *:443>
    ServerAdmin [email protected]
    ServerName www.tecmint.local
    ServerAlias tecmint.local

    DocumentRoot /var/www/html

    SSLEngine on
    SSLCertificateFile /etc/ssl/private/tecmint.local.crt
    SSLCertificateKeyFile /etc/ssl/private/tecmint.local.key
</VirtualHost>
Save and exit the file. For the changes to be effected, restart Apache using the command:
$ sudo systemctl restart httpd
5. For external users to access your server, you need to open port 443 through the firewall as shown.
$ sudo firewall-cmd --add-port=443 --zone=public --permanent
$ sudo firewall-cmd --reload
Step 3:Testing Local Self-Signed SSL Certificate on Apache
With all the configurations in place, fire up your browser and browse your server’s address using the server’s IP address or domain name using the https protocol.
To streamline the testing, you may consider redirecting the HTTP protocol to HTTPS on the Apache webserver. This is so that whenever you browse the domain in plain HTTP, it will automatically be redirected to HTTPS protocol.
So browse your server’s domain or IP
https://domain_name/
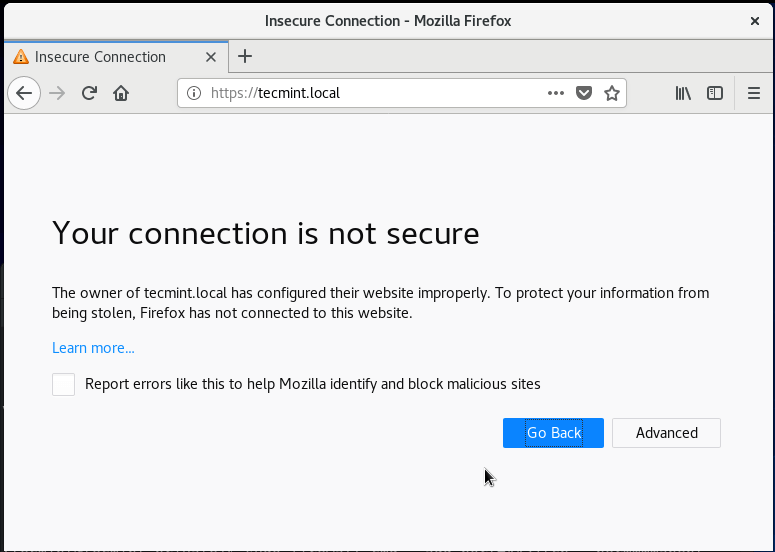
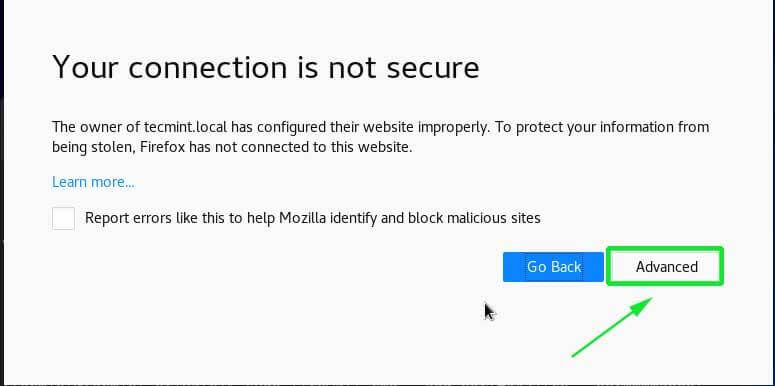
You will get an alert informing you that the connection is not secure as shown. This will vary from one browser to another. As you might guess, the alert is due to the fact that the SSL certificate is not signed by the Certificate Authority and the browser registers that and reports that the certificate cannot be trusted.
To proceed to your website, click on the ‘Advanced’ tab as shown above:
Next, add the exception to the browser.
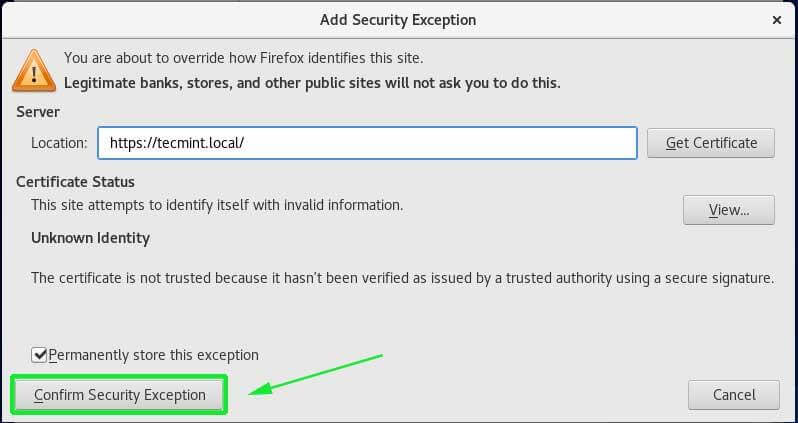
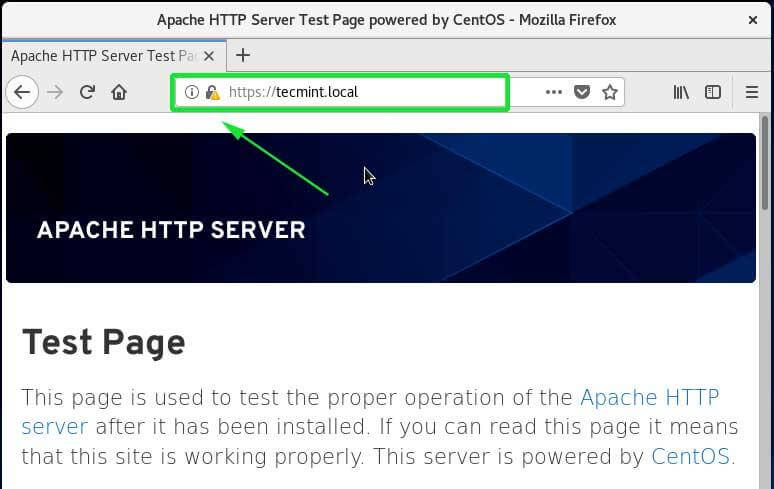
Finally, reload your browser and observe that you can now access the server, albeit, there will be a warning on the URL bar that the site is not fully secure for the same reason that the SSL certificate is self-signed and not signed by the Certificate Authority.
It’s our hope that you can now proceed and create and install a self-signed SSL certificate on Apache localhost web server on CentOS 8.


There are still 2 glaring issues with this article, and why many users get so frustrated when learning Linux admin:
Thanks
Pallsopp,
Sorry for the trouble, updated the article with the corrections pointed by you…
Thank you for this article/guide it helped me, I just wanted to add that the user/reader needs to ‘cd‘ to /etc/ssl/private after creating it, also to open the port through the firewall –add-port=443 does not work, it throws an error “Error: INVALID_PORT: bad port (most likely missing protocol), correct syntax is portid[-portid]/protocol”, the correct option with value is –add-port=443/tcp.
using centos 7.5
As mentioned this is a really nice article guide and I am very grateful for your effort, solved my problem, cheers.
Thank you
Paul
Thank you so much Paul for your feedback. We’re glad that you found the guide beneficial. Keep it Tecmint.