Network bonding combines multiple LAN or Ethernet interfaces into a single logical interface known as a network bond.
The goal of network bonding is to provide fault tolerance and network redundancy. It also enhances capacity and improves network throughput depending on the type of bond created.
On the other hand, Network Bridging involves the creation of a logical interface known as a bridge between two interfaces. This allows traffic to pass through them and is especially helpful in sharing an internet connection between your system and others.
In this lesson, we will first look at Network Bonding and how you can configure a network bond. Later, we will shift our attention to Network Bridging.
What is Network Bonding?
Also referred to as link aggregation, Network Interface Card (NIC) bonding, or simply network bonding, is the joining together of two physical network interfaces into a single logical interface.
This is done for redundancy and failover. In case one interface develops a problem or goes down, the remaining interface will still provide the connection required.
Types of Network Bonds
There are 7 types of network bonds, each denoted using a mode number, i.e. mode=0, mode=1 all the way to mode=7.
- mode=0 (Round Robin Policy) – This is the default mode and is based on the Round-robin policy. Data packets are transmitted in sequential order from the first available slave interface to the last. This mode provides load balancing and fault tolerance.
- mode=1 (Active-backup) – This is based on the Active-backup policy. As the name infers, only one slave is active. The other one is activated when the current slave fails. The mode provides fault tolerance and redundancy.
- mode=2 (Balance-XOR) – The mode sets an Exclusive OR (XOR) of the source address with the destination MAC address.
- mode=3 (Broadcast) – In this policy, all packets are transmitted on all slave interfaces.
- mode=4 (802.3ad) – This is also referred to as the Dynamic Link Aggregation mode. It creates aggregation groups with the same speed. Works on network switches that support the IEEE 802.3ad dynamic link standard.
- mode=5 (Balance-tlb) – This is also known as Adaptive Transmit Load Balancing. Here, outgoing traffic is transmitted based on the current load on each slave interface, while incoming traffic is received by the current active slave.
- mode=6 (Balance-alb) – This is also known as Adaptive Load Balancing. Load balancing is done using ARP (Address Resolution Protocol) negotiation.
Having looked at the network bond types, let’s now switch gears and explore how to configure a network bond on Ubuntu 20.04.
Step 1: Enable Bonding in Ubuntu
Before anything else, the first step is to ensure that the ‘bonding’ module is installed and loaded.
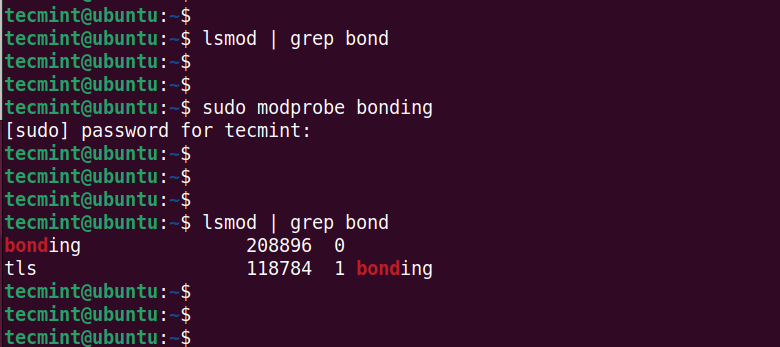
In most cases, the module comes pre-installed in modern Linux distributions, but not loaded. To check if the module is loaded, use the lsmod command:
$ lsmod | grep bond
If the module is not loaded, the output will be blank. To load the module, run the modprobe command shown.
$ sudo modprobe bonding
Once again, confirm that the module is loaded as follows.
$ lsmod | grep bond
This time, some output will be printed on your terminal confirming that the module has been loaded.
If the module is not installed, install it using the command:
$ sudo apt install ifenslave -y
Step 2: Configure a Temporary Network Bonding in Ubuntu
The next step is to configure a network bond. Remember that this will only be a temporary bond and will not persist in a reboot.
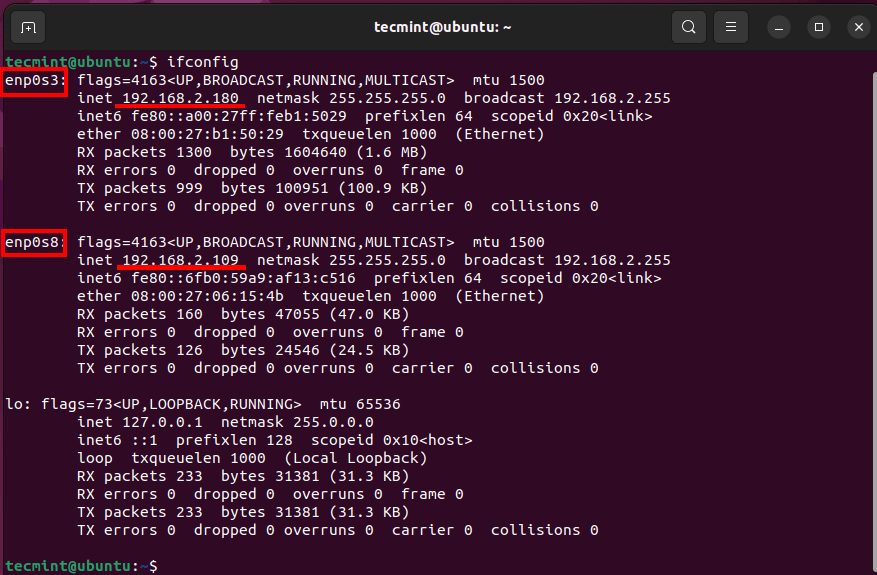
First, Let’s check the network interfaces in the system by running the ip command as shown.
$ ip a
From the output, we have two active interfaces: enp0s3 and enp0s8.

You can also use the ifconfig command.
If you run into an error when running the command, install the net-tools package which provides the ifconfig utility.
$ sudo apt install net-tools
Moving on, we need to disable the two network interfaces.
$ sudo ifconfig enp0s3 down
$ sudo ifconfig enp0s8 down
Next, create a network bond of type 802.3ad.
$ sudo ip link add bond0 type bond mode 802.3ad
Then add each of the network interfaces to the network bond.
$ sudo ip link set enp0s3 master bond0
$ sudo ip link set enp0s8 master bond0
Next, activate your network bond.
$ sudo ifconfig bond0 up
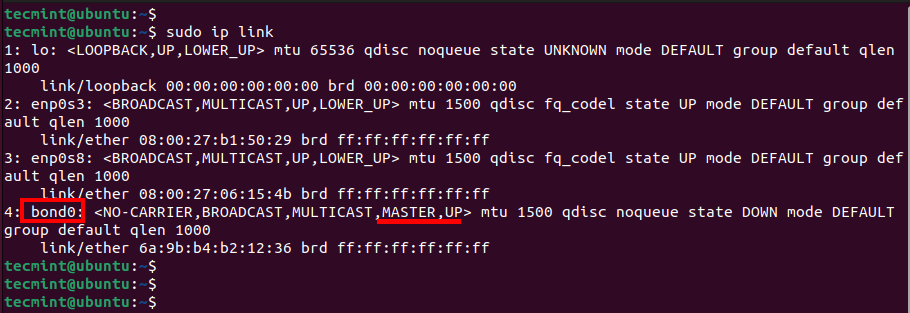
To verify that the bond has been created, run the command:
$ sudo ip link
Step 3: Configure a Permanent Network Bonding in Ubuntu
As earlier mentioned, the bond created is only temporary and will cease to exist upon system poweroff or reboot. To make the changes permanent, we will edit the Netplan YAML file using the nano editor as shown.
$ sudo nano /etc/netplan/01-network-manager-all.yaml
Once you have opened the file add the following lines to specify the network bond, network interfaces, bond mode, and nameservers.
network:
  version: 2
  renderer: NetworkManager

  ethernets:
    enp0s3:
      dhcp4: no
    enp0s8:
      dhcp4: no

  bonds:
      bond0:
       interfaces: [enp0s3, enp0s8]
       addresses: [192.168.2.150/24]
       routes:
            - to: default
              via: 192.168.2.1
       parameters:
            mode: active-backup
            transmit-hash-policy: layer3+4
            mii-monitor-interval: 1

       nameservers:
           addresses:
                - "8.8.8.8"
                - "192.168.2.1"
Here, we have selected the bond type to be active-backup, which provides backup such that in case one interface goes down, the other takes over as the primary link.
Save the changes made and exit the configuration file.
Next, bring down the interfaces.
$ sudo ifconfig enp0s3 down
$ sudo ifconfig enp0s8 down
Next, apply the settings made.
$ sudo netplan apply
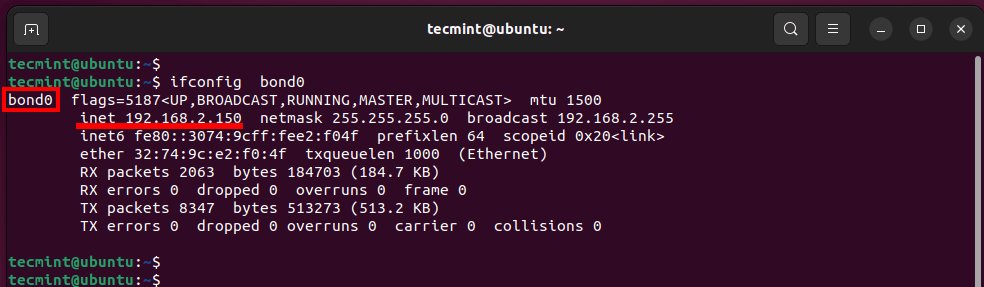
Be sure to enable the bond and verify the bond interface.
$ sudo ifconfig bond0 up
$ ifconfig bond0
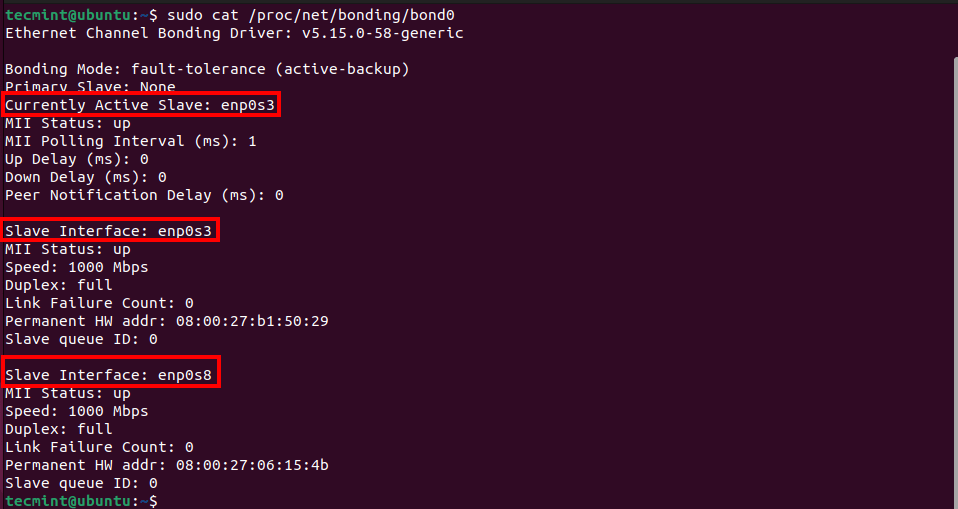
In addition, you can check detailed info about the network bond.
$ sudo cat /proc/net/bonding/bond0
This displays the slave interfaces and currently active slave interfaces alongside their statistics. In this setup, the current slave interface is enps0s3.
Step 4: Testing Network Bonding in Ubuntu
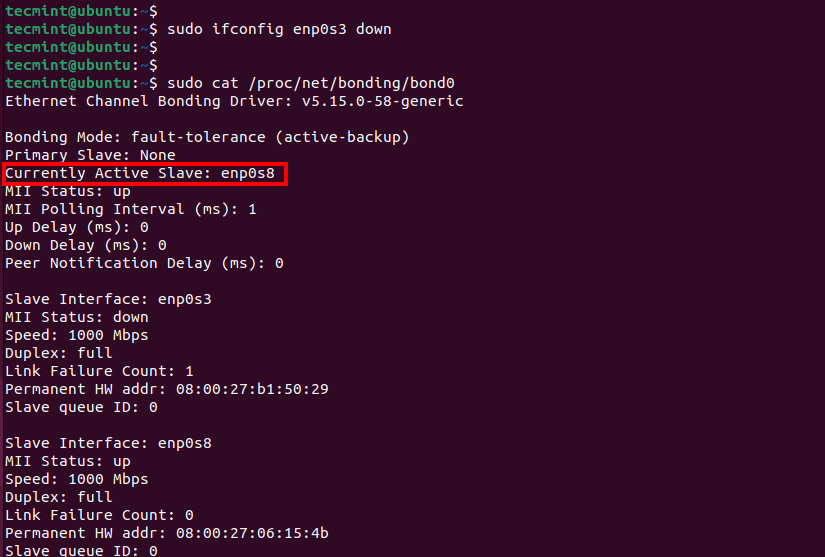
We have set our network bond to the ‘active-backup’ policy. This is where only one interface is active. In case of failure, the other interface takes over as the active interface.
To put this to the test, we will disable the enps0s3 interface and check if the other interface will kick in.
$ sudo ifconfig enps0s3 down
When we check the bond statistics, we see that the enps0s8 interface is now the active slave interface.
$ sudo cat /proc/net/bonding/bond0
What is Network Bridging?
In networking, a network bridge is a device that connects two LAN networks and controls the flow of data packets between them. It functions more like a network switch and forwards traffic between networks based on host MAC addresses.
It builds a MAC addresses table by listening to network traffic from hosts in each network. It is considered a Layer 2 device since it operates on Layer 2 of the OSI model.
You can create a software bridge on your Linux device to emulate a hardware bridge. In Network bridging, a bridge is created between one or more network interfaces in order to let traffic flow between them. This allows you to share the internet connection of your host with others.
The bridge acquires an IP address dynamically (Using DHCP) or can be manually configured to have a static IP address.
In this section, we will demonstrate how to create and configure a network bridge on Ubuntu 20.04.
Step 1: Install Bridge Utils in Ubuntu
The first step is to install the bridge-utils package which provides all the tools needed to create and manage a bridge network.
$ sudo apt install bridge-utils
Step 2: Create a Network Bridge in Ubuntu
Just like in networking bonding, you can also create a bridge using the netplan utility. You can go about it two ways – you can create a bridge using either DHCP or Static IPv4 addressing.
Let’s have a look at how you can accomplish this using both ways.
Create a Network Bridge Using DHCP Addressing
This is the most straightforward way of creating a Network bridge since the bridge interface will acquire an IP dynamically from the DHCP server.
Before anything else, let’s list the active interfaces.
$ ip a
From the output, we have only one active network interface – enp0s3 which has been configured using a static IP.

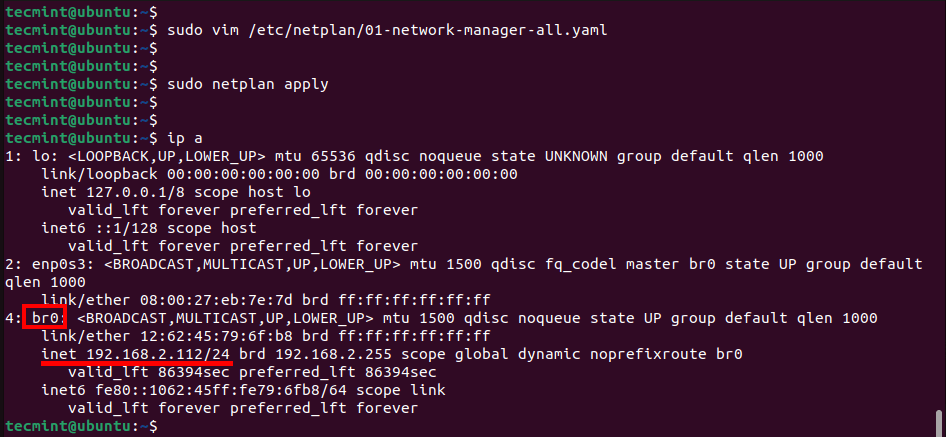
Moving on, we will modify the Netplan YAML file.
$ sudo nano /etc/netplan/01-network-manager-all.yaml
Paste the following configuration. The enp0s3 interface is now a part of the bridge interface.
ethernets:
    enp0s3:
      dhcp4: no

  bridges:
    br0:
      dhcp4: yes
      interfaces:
        - enp0s3
Save the changes and exit the file. Then apply the configuration made.
$ sudo netplan apply
After about 30 seconds, the bridge interface will come up and automatically receive an IP address via the DHCP protocol.
$ ip a
You can use the nmcli utility to verify active connections.
$ sudo nmcli con show --active

Create a Network Bridge Using Static IP Addressing
Alternatively, you can configure static IP addressing for your bridge interface and explicitly specify the IP address, default gateway as well as DNS servers.
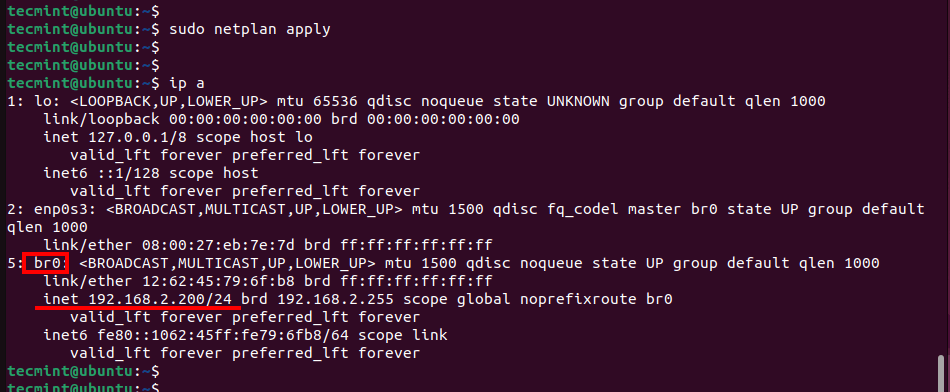
So once again, access the YAML file.
$ sudo nano /etc/netplan/01-network-manager-all.yaml
Modify the configuration as follows.
ethernets:
    enp0s3:
      dhcp4: true

  bridges:
    br0:
      addresses: [ 192.168.2.200/24 ]
      routes:
        - to: default
          via: 192.168.2.1
      mtu: 1500
      nameservers:
          addresses: [8.8.8.8]
      interfaces:
        - enp0s3
In this configuration, 192.168.2.200 is the IP of the bridge interface while /24 specifies the subnet mask (255.255.255.0). The gateway IP is 192.168.2.1 and 8.8.8.8 is the DNS address.
Save the changes and exit the YAML file. Then apply the configuration.
$ sudo netplan apply
Next, very that the bridge interface has been created and bears the static IP addressing assigned to it
$ ip a
From the output, you can see that the bridge interface has been created with the static IP assigned to it.
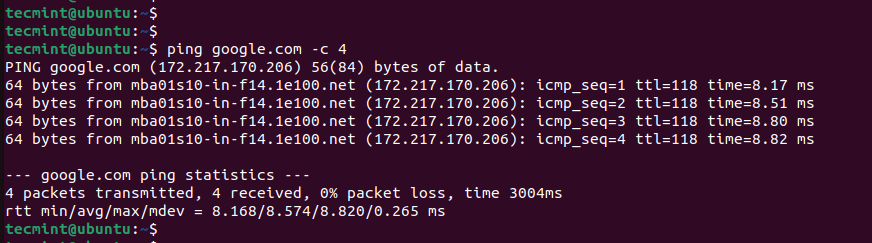
Also, be sure to verify that you also have internet access from your Linux system using the ping command.
$ ping google.com -c 4
Conclusion
In this lesson, we have covered the fundamentals of networking bridging and bonding, and how you can configure bridge and bonding interfaces on a Ubuntu system.


What a helpful article to combine multiple network interfaces into a single logical interface to enhance network performance in Ubuntu…
Very clear explanation with easy-to-follow instructions for setting up network bonding and bridging in the Ubuntu system…
I will try in my company, if any issues will share them here…
Thanks again…