In the previous two articles of this series, we explained how to set up Netbeans in a Linux desktop distribution as an IDE to develop web applications. We then proceeded to add two core components, jQuery and Bootstrap, in order to make your pages mobile-friendly and responsive.
- How to Create a Basic HTML5 Project in Ubuntu Using Netbeans – Part 1
- How to Write a Mobile-Friendly App Using JQuery & Bootstrap – Part 2
As you will seldom deal with static content as a developer, we will now add dynamic functionality to the basic page that we set up in Part 2. To begin, let us list the prerequisites and address them before moving forward.
Prerequisites
In order to test a dynamic application in our development machine before deploying it to a LAMP server, we will need to install some packages.
Since we are using a Ubuntu desktop to write this series, we assume that your user account has already been added to the sudoers file and granted the necessary permissions.
Installing Packages and Configuring Access to the DB Server
Please note that during the installation you may be prompted to enter a password for the MySQL root user. Make sure you choose a strong password and then continue.
Ubuntu and derivatives (also for other Debian-based distributions):
$ sudo apt update && sudo apt install apache2 php php-common php-mysql mysql-server filezilla
Fedora / CentOS / RHEL and also for other RHEL-based distributions):
$ sudo yum update && sudo yum install httpd php php-common php-mysql mysql-server filezilla
When the installation is complete, it is strongly recommended that you run mysql_secure_installation command to secure your database server.
$ sudo mysql_secure_installation
You will be prompted for the following information:
- Change the root password? [Y/n]. If you already set a password for the MySQL root user, you can skip this step.
- Remove anonymous users? [Y/n] y.
- Disallow root login remotely? [Y/n] y (Since this is your local development environment, you will not need to connect to your DB server remotely).
- Remove test database and access to it? [Y/n] y
- Reload privilege tables now? [Y/n] y.
Creating a sample Database and Loading test Data
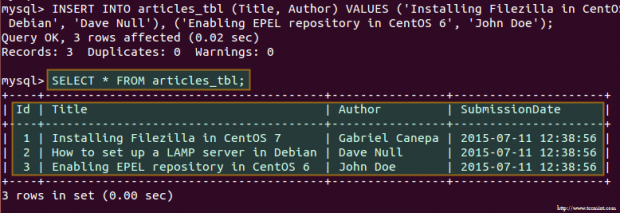
To create a sample database and load some test data, log on to your DB server:
$ sudo mysql -u root -p
You will be prompted to enter the password for the MySQL root user.
At the MySQL prompt, type
CREATE DATABASE tecmint_db;
and press Enter:

Now let’s create a table:
USE tecmint_db;
CREATE TABLE articles_tbl(
   Id INT NOT NULL AUTO_INCREMENT,
   Title VARCHAR(100) NOT NULL,
   Author VARCHAR(40) NOT NULL,
   SubmissionDate TIMESTAMP DEFAULT CURRENT_TIMESTAMP,
   PRIMARY KEY ( Id )
);

and populate it with sample data:
INSERT INTO articles_tbl (Title, Author) VALUES ('Installing Filezilla in CentOS 7', 'Gabriel Canepa'), ('How to set up a LAMP server in Debian', 'Dave Null'), ('Enabling EPEL repository in CentOS 6', 'John Doe');
Adding symbolic links in the Web Server directory
Since Netbeans, by default, stores projects in the current user’s home directory, you will need to add symbolic links that point to that location. For example,
$ sudo ln -s /home/ubuntu/NetBeansProjects/TecmintTest/public_html /var/www/html/TecmintTest
will add a soft link called TecmintTest that points to /home/gabriel/NetBeansProjects/TecmintTest/public_html.
For that reason, when you point your browser to http://localhost/TecmintTest/, you will actually see the application that we set up in Part 2:

Setting Up a Remote FTP and Webserver
Since you can easily set up an FTP and Web server with the instructions provided in Part 9 – Install and Configure Secure FTP and Web Server of the RHCSA series in Tecmint, we will not repeat them here. Please refer to that guide before proceeding further.
Turning our application into a Dynamic One
You will probably think that we can’t do much with the sample data that we added to our database earlier, and you are right, but it will be enough to learn the basics of embedding PHP code and the results of queries to a MySQL DB in your HTML5 pages.
First off, we will need to change the extension of the main document of our application to .php instead of html:
# mv /var/www/html/TecmintTest/index.html /var/www/html/TecmintTest/index.php
Then let’s open the project in Netbeans and start doing some modifications.
1. Add a folder to the project named includes where we will store backend php applications.
2. Create a file named dbconnection.php inside includes and insert with the following code:
<?php
    $host = "localhost";
    $username = "root";
    $password = "MyFancyP4ssw0rd";
    $database = "tecmint_db";

    //Establish a connection with MySQL server
    $mysqli = new mysqli($host, $username, $password,$database);

    /* Check connection status. Exit in case of errors. */
    if (mysqli_connect_errno()) {
        printf("Connect failed: %s\n", mysqli_connect_error());
        exit();
    }
    $mysqli -> query("SET character_set_results = 'utf8', character_set_client = 'utf8', character_set_connection = 'utf8', character_set_database = 'utf8', character_set_server = 'utf8'");

    $records = array();
    $query = "SELECT Title, Author, SubmissionDate FROM articles_tbl;";
    $result = $mysqli->query($query) or die($mysqli->error);
    $data = array();

    while ( $row = $result->fetch_assoc() ){
        $data[] = json_encode($row);
    }
    echo json_encode( $data );
?>
as indicated in the following image:
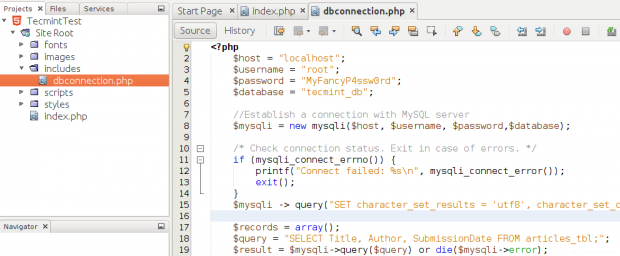
This file will be used to connect to the database server, to query it, and to return the results of that query in a JSON-like string to be consumed by the frontend application with a slight modification.
Note that typically you would use separate files to perform each of these operations, but we chose to include all of that functionality in one file for sake of simplicity.
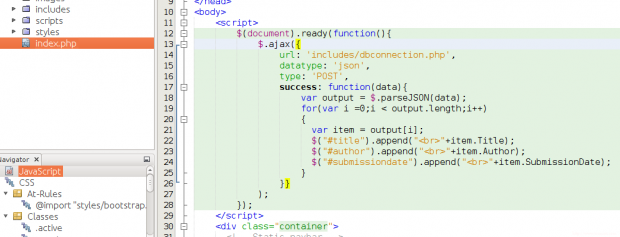
3. In index.php, add the following snippet just beneath the opening body tag. That is the jQuery way of calling an external PHP app when the web document is ready, or in other words, each time it loads:
<script>
    $(document).ready(function(){
        $.ajax({
            url: 'includes/dbconnection.php',
            datatype: 'json',
            type: 'POST',
            success: function(data){
                var output = $.parseJSON(data);
                for(var i =0;i < output.length;i++)
                {
                  var item = output[i];
                  $("#title").append("<br>"+item.Title);
                  $("#author").append("<br>"+item.Author);
                  $("#submissiondate").append("<br>"+item.SubmissionDate);
                }
            }}
        );
    });
</script>
4. Now, add a unique id (same as inside the for loop above) to each line in the div with a class row at the bottom of index.php:
<div class="row">
    <div class="col-md-4" id="title" style="text-align: center"><strong>Titles</strong></div>
    <div class="col-md-4" id="author" style="text-align: center"><strong>Authors</strong></div>
    <div class="col-md-4" id="submissiondate" style="text-align: center"><strong>Published on:</strong></div>
</div>
If you now click Run Project, you should see this:
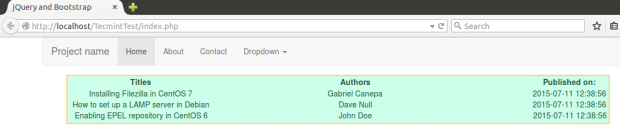
This is essentially the same as the information returned when we ran the query from our MySQL client prompt earlier.
Deploying to a LAMP server using Filezilla
Launch Filezilla from the Dash menu and enter the IP of the remote FTP server and your credentials. Then click Quickconnect to connect to the FTP server:
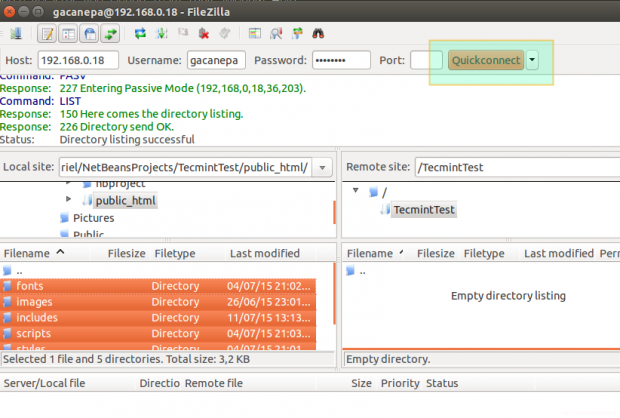
Navigate to /home/gabriel/NetBeansProjects/TecmintTest/public_html/, select its contents, right click on them and select Upload.
This, of course, assumes that the remote user indicated in Username has to write permissions on the remote directory. When the upload is complete, point your browser to the desired location and you should see the same page as before (please note that we have not set up the local MySQL database to the remote host, but you can easily do so following the steps from the beginning of this tutorial).

Summary
In this article, we have added dynamic functionality to our web application using jQuery and a little JavaScript. You can refer to the official jQuery docs for more information, which will be very helpful if you decide to write more complex applications. Wrapping up, we have also deployed our application to a remote LAMP server using an FTP client.
We are excited to hear your opinion about this article – feel free to contact us using the form below.


Not sure how popular is an HTML5 site and how does this help the crowd? I think more than this a php stack would be convenient.
Instead of using the line “var item = output[i];” in the for loop for Step 3, I had to use “var item = $.parseJSON(output[i]);”. Otherwise, I was getting “undefined” returned because I believe it was treating each item as a String value, instead of a JSONObject.